SEARCH FINESCALE.COM

Enter keywords or a search phrase below:

Revell 1/72nd S-100 Schnellboot Completed Page 4

8159 views
132 replies
1 rating 2 rating 3 rating 4 rating 5 rating
  • Member since
    July 2010
  • From: Tempe AZ
Posted by docidle on Monday, February 24, 2020 10:58 PM

Bish,

Welcome to the wet side of things. I’m pulling up my desk chair for this one! I have the Flak kit that I’ve been adding PE and 3D goodies to. I have the same PE set and reference materials so I’ll be following closely.

Steve


  • Member since
    November 2008
  • From: Central Florida
Posted by plasticjunkie on Monday, February 24, 2020 11:21 PM

Hi Bish. I have this  one and the old Airfix high bridge boat. Will be watching your build.Yes 

 GIFMaker.org_jy_Ayj_O


Too many models to build, not enough time in a lifetime!!

  • Member since
    December 2002
  • From: Bury St Edmunds, Suffolk, England
Posted by Bish on Tuesday, February 25, 2020 3:35 AM

Thanks guys.

I am a Norfolk man and i glory in being so


On the bench: Airfix 1/72nd Harrier GR.3/Fujimi 1/72nd Ju 87D-3

  • Member since
    July 2012
  • From: Douglas AZ
Posted by littletimmy on Wednesday, February 26, 2020 7:52 PM

I built one of these a few year's ago. But I did it without any after market stuff.

It build's up nice straight out of the box. but you will have a real "show winner" when you finish !  I seem to recall that the kit supplyed propellers are wrong.

( Mine currently lives in a box.... broken into several piece's. ......)


 Dont worry about the thumbprint, paint it Rust , and call it "Battle Damage"

  • Member since
    December 2002
  • From: Bury St Edmunds, Suffolk, England
Posted by Bish on Thursday, February 27, 2020 2:56 AM

Thanks timmey. Ye, i have read that about the props, but i can't find out what the issue is. Going to have to find some pics and try and see if it can be fixed.

I am a Norfolk man and i glory in being so


On the bench: Airfix 1/72nd Harrier GR.3/Fujimi 1/72nd Ju 87D-3

  • Member since
    December 2015
  • From: providence ,r.i.
Posted by templar1099 on Thursday, February 27, 2020 5:49 AM

Off the beaten path here Bish,looking foward to it.

"le plaisir delicieux et toujours nouveau d'une occupation inutile"

  • Member since
    November 2008
  • From: Central Florida
Posted by plasticjunkie on Thursday, February 27, 2020 6:35 AM

Bish

Thanks timmey. Ye, i have read that about the props, but i can't find out what the issue is. Going to have to find some pics and try and see if it can be fixed.


I've read a couple of reviews and all they say is that the props are wrong but doesn't explain what or how to correct. I have looked for pictures too but nothing, even in my In Action book. Please let us know what you find out. 

 GIFMaker.org_jy_Ayj_O


Too many models to build, not enough time in a lifetime!!

  • Member since
    December 2002
  • From: Bury St Edmunds, Suffolk, England
Posted by Bish on Thursday, February 27, 2020 6:37 AM

Thanks templar. Ye it is a bit, but gets worse later in the year when i am starting a 72nd U-Boat.

I am a Norfolk man and i glory in being so


On the bench: Airfix 1/72nd Harrier GR.3/Fujimi 1/72nd Ju 87D-3

  • Member since
    July 2010
  • From: Tempe AZ
Posted by docidle on Thursday, February 27, 2020 8:52 PM

Bish,

How is the Griffon PE? I have this set for my kit and was wondering what you thought? Also, are you going to replace the barrels on the weapons?

If you’re talking about the Revell 1/72 U-Boat, I think you’ll like it. It was the first “modern” ship I did when I got back into modeling in 2010. It was actually a great kit with few problems that were more than likely user error! I also used the Eduard PE set.

Steve


  • Member since
    December 2002
  • From: Bury St Edmunds, Suffolk, England
Posted by Bish on Friday, February 28, 2020 1:58 AM

Steve, the PE set seems ok so far, nothing to complicated, its certainly easier to use than the Voyager sets. I am just in the process of doing the centre section of the deck and the instructions are slightly muisleading, i'll expand on that in an update at the weekend. I think it will be useful for those who have the set. And as it seems several people do have this set, i will try and give as much detail as i can. And ye, i will be useing the barrels that come in the Griffon set.

Ye, its the Revell Type VIIc, i am really looking forward to that. I have the Eduard set and a few other things to go with it. Hopfeullu starting that in August or Sept.

I am a Norfolk man and i glory in being so


On the bench: Airfix 1/72nd Harrier GR.3/Fujimi 1/72nd Ju 87D-3

  • Member since
    December 2015
  • From: providence ,r.i.
Posted by templar1099 on Friday, February 28, 2020 5:57 AM

Bish
Ye, its the Revell Type VIIc, i am really looking forward to that


Funny, I just pulled the Revell type ix off the shelf having finished the BMP-1. Perused the instructions but decided to start the Olympia. Maybe have an August U boat build?

"le plaisir delicieux et toujours nouveau d'une occupation inutile"

  • Member since
    December 2002
  • From: Bury St Edmunds, Suffolk, England
Posted by Bish on Friday, February 28, 2020 1:05 PM

plasticjunkie


Bish

Thanks timmey. Ye, i have read that about the props, but i can't find out what the issue is. Going to have to find some pics and try and see if it can be fixed.


I've read a couple of reviews and all they say is that the props are wrong but doesn't explain what or how to correct. I have looked for pictures too but nothing, even in my In Action book. Please let us know what you find out. 


Will do. I know i have seen a pic some where. The kagero book is not to helpful on that area.

I am a Norfolk man and i glory in being so


On the bench: Airfix 1/72nd Harrier GR.3/Fujimi 1/72nd Ju 87D-3

  • Member since
    December 2002
  • From: Bury St Edmunds, Suffolk, England
Posted by Bish on Friday, February 28, 2020 1:06 PM

templar1099


Bish
Ye, its the Revell Type VIIc, i am really looking forward to that


Funny, I just pulled the Revell type ix off the shelf having finished the BMP-1. Perused the instructions but decided to start the Olympia. Maybe have an August U boat build?


Modelcrazy will be starting the German ships GB in August. I am keeping the Type VII for that.

I am a Norfolk man and i glory in being so


On the bench: Airfix 1/72nd Harrier GR.3/Fujimi 1/72nd Ju 87D-3

  • Member since
    July 2010
  • From: Tempe AZ
Posted by docidle on Sunday, March 1, 2020 10:42 PM

Bish


plasticjunkie


Bish

Thanks timmey. Ye, i have read that about the props, but i can't find out what the issue is. Going to have to find some pics and try and see if it can be fixed.


I've read a couple of reviews and all they say is that the props are wrong but doesn't explain what or how to correct. I have looked for pictures too but nothing, even in my In Action book. Please let us know what you find out. 


Will do. I know i have seen a pic some where. The kagero book is not to helpful on that area.


Bish,

I forgot to post this link to Shapeways that have the correct props. This is one of the upgrades I plan on making on mine. Hope this helps.

Steve

https://www.shapeways.com/product/FGYP79TKM/1-72-german-schnellboot-propellers-kit?optionId=62908397&li=marketplace


  • Member since
    December 2002
  • From: Bury St Edmunds, Suffolk, England
Posted by Bish on Monday, March 2, 2020 4:08 AM

Thanks Steve, i will look intio that. I am at work at the moment, but looking at them i think the curve in the blades is completly different. Only issue i can see is that i an sure on the kit one of the props attaches to the rudder. Will have to check that.

Thanks.

I am a Norfolk man and i glory in being so


On the bench: Airfix 1/72nd Harrier GR.3/Fujimi 1/72nd Ju 87D-3

  • Member since
    November 2008
  • From: Central Florida
Posted by plasticjunkie on Monday, March 2, 2020 7:44 PM

I looked at the kit props and compared them to the Shapeways ones. They look the same to me except for the blade pitch being reversed. Is this the issue? I can’t justify spending about what the kit cost me initially for 3 props.

 GIFMaker.org_jy_Ayj_O


Too many models to build, not enough time in a lifetime!!

  • Member since
    April 2015
Posted by Mopar Madness on Monday, March 2, 2020 9:40 PM

Well I can't believe I missed this one! I've got this one in the stash and look forward to seeing what you make of it. Beer

Chad

God, Family, Models...

At the plate: 1/48 Airfix Bf109 & 1/35 Tamiya Famo

On deck: Who knows!

  • Member since
    July 2010
  • From: Tempe AZ
Posted by docidle on Monday, March 2, 2020 10:20 PM


plasticjunkie

I looked at the kit props and compared them to the Shapeways ones. They look the same to me except for the blade pitch being reversed. Is this the issue? I can’t justify spending about what the kit cost me initially for 3 props.


I agree with you PJ. Here are links that show the correct props. Looking at these, the Shapeways props are correct. Notice the different pitch on the port prop. The second link has a write up of the correct style of props. The metal props are no longer avaible but I will be picking up the Shapeways ones, heck I’ve already spent way more on the kit with the PE and the 3D extras I have now! Hope this will help.

Steve

http://www.modelwarships.com/reviews/misc/cw/s-100-props/props.html


http://www.modelwarships.com/reviews/misc/cw/s-100-props/s100-02.jpg


  • Member since
    December 2002
  • From: Bury St Edmunds, Suffolk, England
Posted by Bish on Tuesday, March 3, 2020 2:24 AM

plasticjunkie

I looked at the kit props and compared them to the Shapeways ones. They look the same to me except for the blade pitch being reversed. Is this the issue? I can’t justify spending about what the kit cost me initially for 3 props.


Ye, from what i could tell looking at them last night, i think this is the main issue. Also the centre prop which connects directly to the rudder. I am sure thats not right either.

Like Steve, i have already spent a bicket load on AM on this kit, so i might as well get those and after looking through it, they also have the 37mm gun shield i need for my boat that the kit and PE set don't supply. Thats going to save some scratch building.

I am a Norfolk man and i glory in being so


On the bench: Airfix 1/72nd Harrier GR.3/Fujimi 1/72nd Ju 87D-3

  • Member since
    December 2002
  • From: Bury St Edmunds, Suffolk, England
Posted by Bish on Tuesday, March 3, 2020 2:29 AM

Mopar Madness

Well I can't believe I missed this one! I've got this one in the stash and look forward to seeing what you make of it. Beer


Well, glad to have you on board.

I skipped an update this weekend as there was not that much done. But for those who have this PE set, there are a few issues i have picked up, mainly with the instructions. I will highlight those at the next update and hopefully save people a bit of head scratching.

I am a Norfolk man and i glory in being so


On the bench: Airfix 1/72nd Harrier GR.3/Fujimi 1/72nd Ju 87D-3

  • Member since
    November 2008
  • From: Central Florida
Posted by plasticjunkie on Tuesday, March 3, 2020 6:59 AM

Thanks Steve for the links. I will try to reverse the pitch on the kit blades using Tenax to melt the corrected plastic blades in place. If that fails then I may go with replacement props. I have the 05051 Revell kit with the single 40mm and have the Griffon N72001 PE set for it. 

I also have the old Airfix high bridge E Boat in the stash and have been waiting for someone to come out with a pe set for it. It's a lovely kit but it will benefit a lot more with some PE upgrades.

 GIFMaker.org_jy_Ayj_O


Too many models to build, not enough time in a lifetime!!

  • Member since
    December 2002
  • From: Bury St Edmunds, Suffolk, England
Posted by Bish on Tuesday, March 3, 2020 9:13 AM

Well, i took the plunge and ordered the props and gun shield. never used 3D printed stuff before, so keen to see what iots like. Won't be here until the end of the month, but thats no problem.

I am a Norfolk man and i glory in being so


On the bench: Airfix 1/72nd Harrier GR.3/Fujimi 1/72nd Ju 87D-3

  • Member since
    November 2008
  • From: Central Florida
Posted by plasticjunkie on Tuesday, March 3, 2020 9:17 AM

Bish the detail is excellent. I bought a 3d printed 1/144 3" deck gun and the level of detail is incredible. Use water based acrylic paint on that plastic as per the instructions. It mentioned something about solvents possibly damaging the plastic.

This is my 1/144 Gato's 3d printed 3" deck gun. The picture doesn't do it justice. One can see each traversing wheel, gears, levers, bolts etc. Even the barrel is drilled out.


 GIFMaker.org_jy_Ayj_O


Too many models to build, not enough time in a lifetime!!

  • Member since
    December 2002
  • From: Bury St Edmunds, Suffolk, England
Posted by Bish on Tuesday, March 3, 2020 9:24 AM

Thanks PJ, thats good to know. I use Alclad primer and enamel paint. Not sure if there is an acrylic version of S-Boot white so maybe seal with Tamiya first. Is there any excess to be removed that could be used to test it on?

I am a Norfolk man and i glory in being so


On the bench: Airfix 1/72nd Harrier GR.3/Fujimi 1/72nd Ju 87D-3

  • Member since
    March 2018
  • From: Chicago suburbs
Posted by Luvspinball on Tuesday, March 3, 2020 9:46 AM

Bish

 Is there any excess to be removed that could be used to test it on?


Depends on the particular process used.  Some do, some don't.  Be sure to follow any directions they send with on washing/cleaning the parts prior to painting.  Purchased quite a few things over the years, and always been quite pleased with the level of detail.

Bob


Bob Frysztak

Luvspinball

Current builds:  Revell 1/96 USS Constitution with extensive scratch building

  • Member since
    December 2002
  • From: Bury St Edmunds, Suffolk, England
Posted by Bish on Tuesday, March 3, 2020 9:59 AM

Thanks Bob. I will be sure to read anything they send me. And i know where to come if i have any questions.

I am a Norfolk man and i glory in being so


On the bench: Airfix 1/72nd Harrier GR.3/Fujimi 1/72nd Ju 87D-3

  • Member since
    November 2008
  • From: Central Florida
Posted by plasticjunkie on Tuesday, March 3, 2020 10:16 AM

Bish

Thanks PJ, thats good to know. I use Alclad primer and enamel paint. Not sure if there is an acrylic version of S-Boot white so maybe seal with Tamiya first. Is there any excess to be removed that could be used to test it on?


No, don't use those. Use like MM acryl or Vallejo paint. Remember that tamiya is an acrylic lacquer and not a true acrylic. It may look ok at first but you may get a reaction days or weeks later. My buddy used MM enamel on it and it looked fine for about a month then he noticed what looked to be like grit on the surface. You will more than likely get the same reaction from a solvent type acrylic lacquer. He carefully brushed it off and used Vallejo paint and had no reaction from that. I used Vallejo black  on my 3" deck gun and it's been fine.

 GIFMaker.org_jy_Ayj_O


Too many models to build, not enough time in a lifetime!!

  • Member since
    July 2010
  • From: Tempe AZ
Posted by docidle on Wednesday, March 4, 2020 10:51 PM

Bish

Thanks PJ, thats good to know. I use Alclad primer and enamel paint. Not sure if there is an acrylic version of S-Boot white so maybe seal with Tamiya first. Is there any excess to be removed that could be used to test it on?


Bish,

I have been using ColourCoat paint a great deal lately so I understand the trepidation on using them on 3D parts... especially with the price! I’m going to try and use an acrylic clear flat coat after the primer (Tamiya) on some of the spare sprue and see what happens. Since I’m not really going to start this kit yet.... that said, I had started it a couple of years ago before my hands started going wonky on me. 

The acrylic ”equivalent“ to Scnellboot Wheis (sorry my iPad doesn’t have the correct German B sort of thing for the S), is Vallejo Model Color 70.993 White Grey.

Something else I did when I started this kit was to drill out the different underwater holes for induction and ejection. I then added Evergreen tubing on the interior to give them depth and painted them and the interior Black. Here are a couple of picks to show what I mean. Just some of my AMS (Advanced Modeler Disease) showing through!

Another area of discussion from another thread was the question of the German Anti Fouling paint colors. From what I could find in regards to S-Boots, the earlier boats such s PJ’s Airfix High Bridge E Boot S-1 through S-7 as well as the early S-38 series vs. the later S-38 to S-100 series discussed in another thread, was that the earlier boats used Schiffsbodenfarbe III Grau (Anti Fouling Grey) and the later boats sported Scheffbodenfarbe Rot III (Anti Fouling Red) which is actually on the Brownish side of Red.

Anyway, I hope this helps a bit,

Steve


  • Member since
    December 2002
  • From: Bury St Edmunds, Suffolk, England
Posted by Bish on Thursday, March 5, 2020 4:17 AM

Thanks Steve. I have the colourcoats paint including the white and red. I had noticed that about the hull colour as well, and from what i can tell there is no black water line.

Damn, i wasn't sure what to do with those underwater parts so i left them and now i have the deck on. I wounder if i can insert them from the outside. What size tube did you use?

I really should have thought of that.

I am a Norfolk man and i glory in being so


On the bench: Airfix 1/72nd Harrier GR.3/Fujimi 1/72nd Ju 87D-3

  • Member since
    November 2008
  • From: Central Florida
Posted by plasticjunkie on Thursday, March 5, 2020 7:39 AM

I think if you use an acrylic primer like Future then the enamel top coat will not attack the brittle 3D plastic.

 GIFMaker.org_jy_Ayj_O


Too many models to build, not enough time in a lifetime!!

  • Member since
    December 2002
  • From: Bury St Edmunds, Suffolk, England
Posted by Bish on Thursday, March 5, 2020 8:39 AM

Thanks PJ, i will try that. Its not so much the props, its more the shield i am worried about. Is the 3D plastic more brittle than normal resin?

I am a Norfolk man and i glory in being so


On the bench: Airfix 1/72nd Harrier GR.3/Fujimi 1/72nd Ju 87D-3

  • Member since
    July 2010
  • From: Tempe AZ
Posted by docidle on Thursday, March 5, 2020 10:57 AM

Bish

Thanks Steve. I have the colourcoats paint including the white and red. I had noticed that about the hull colour as well, and from what i can tell there is no black water line.

Damn, i wasn't sure what to do with those underwater parts so i left them and now i have the deck on. I wounder if i can insert them from the outside. What size tube did you use?

I really should have thought of that.


Bish,

Sorry for adding the drillling out the holes a bit too late. I'm not sure if you could insert tubing now but I will never say never, you could always muscle them in I guess! If not then paint the retracted parts Black and call it a day. When you weather the hull, it will look cool.

I used Evergreen Tube #225 - 5/32 (4.0 mm) for the smaller holes and #227 - 7/32 (5.5mm) for the larger. The tiny holes were drilled but no tubing behind them. In the Kagero book on page 7 and on the drawings, there are two smaller holes just under the waterline forward on both sides. They look like they would use the #225 tubing.

You are correct about the lack of a Black Boot Top. If there is any discolourization at the waterline, it will be from the gas, oil and the normal scum floating in the harbor water.

Steve


  • Member since
    July 2010
  • From: Tempe AZ
Posted by docidle on Thursday, March 5, 2020 11:00 AM

plasticjunkie

I think if you use an acrylic primer like Future then the enamel top coat will not attack the brittle 3D plastic.


I think you're right PJ. I remember our conversation regarding a Future coat on my PT Boat I'm getting ready to weather since I used ColourCoat paints and I love to weather with Artist Oils. It should protect them fairly well.

Thanks again,

Steve


  • Member since
    November 2008
  • From: Central Florida
Posted by plasticjunkie on Thursday, March 5, 2020 11:12 AM

docidle


plasticjunkie

I think if you use an acrylic primer like Future then the enamel top coat will not attack the brittle 3D plastic.


I think you're right PJ. I remember our conversation regarding a Future coat on my PT Boat I'm getting ready to weather since I used ColourCoat paints and I love to weather with Artist Oils. It should protect them fairly well.

Thanks again,

Steve


Yes


 GIFMaker.org_jy_Ayj_O


Too many models to build, not enough time in a lifetime!!

  • Member since
    November 2008
  • From: Central Florida
Posted by plasticjunkie on Thursday, March 5, 2020 11:14 AM

Bish

Thanks PJ, i will try that. Its not so much the props, its more the shield i am worried about. Is the 3D plastic more brittle than normal resin?


Very delicate so be careful cutting anything. I used a very thin razor saw to separate parts.


 GIFMaker.org_jy_Ayj_O


Too many models to build, not enough time in a lifetime!!

  • Member since
    December 2002
  • From: Bury St Edmunds, Suffolk, England
Posted by Bish on Friday, March 6, 2020 1:55 AM

Thanks PJ.

And last night i found a couple of pics in one of those books i have of the props on an S-38 class boat. I'll get a pic taken and post it with my next update.

I am a Norfolk man and i glory in being so


On the bench: Airfix 1/72nd Harrier GR.3/Fujimi 1/72nd Ju 87D-3

  • Member since
    December 2002
  • From: Bury St Edmunds, Suffolk, England
Posted by Bish on Friday, March 6, 2020 2:01 AM

Thanks Steve, and no problem. I will look into it, but if i think its to tricky i will just do as you suggest. I noticed those smaller wholes as well

I had seen the term Boot Top in a couple of books and was not sure if thats what it applied to, i just thought it was the waterline. Thanks for clearing that up.

I am a Norfolk man and i glory in being so


On the bench: Airfix 1/72nd Harrier GR.3/Fujimi 1/72nd Ju 87D-3

  • Member since
    December 2002
  • From: Bury St Edmunds, Suffolk, England
Posted by Bish on Sunday, March 8, 2020 2:53 PM

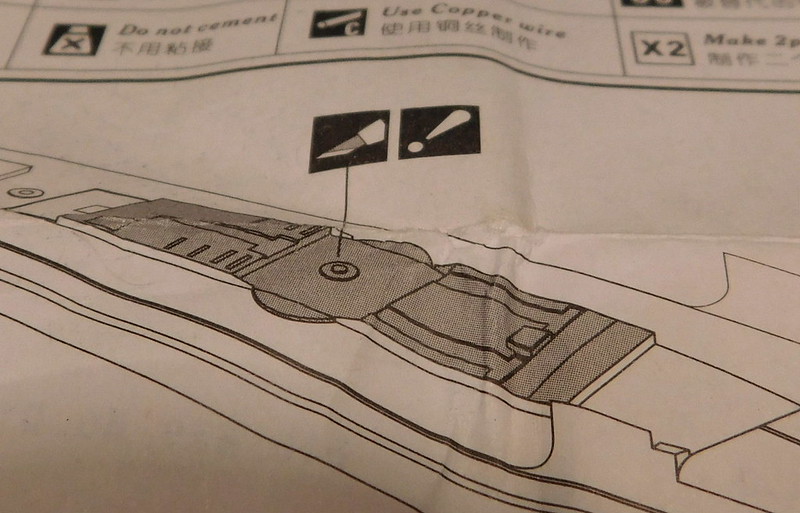
Its been a couple of weeks, so time for an update. A few people have said they have the same Griffon set, so i am going to start with a few issues i have found with it, mainly down to the instructions.

First one is on the main deck. You have to remove the raised area, greyed out in the instructions. And it clearly shows that the vertical sides are to be left.
Which leaves you with this.
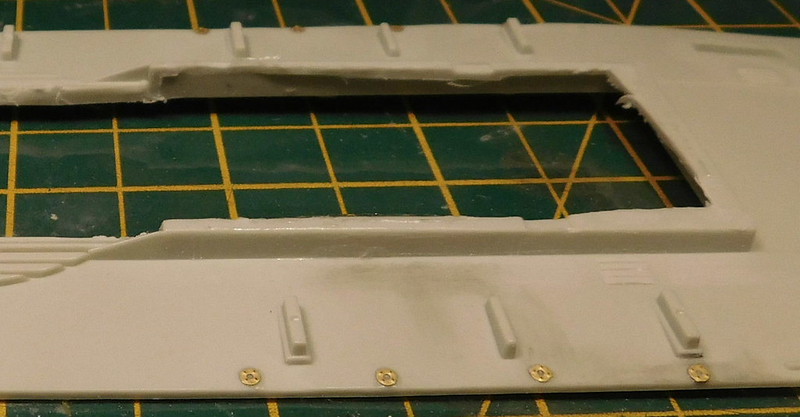
But the 2 peices that go over the hole look like this underneath.

Clearly the cross piece with not allow it to fit with the sides of the kit in place. So, the sides had to be removed, here the rear has been done but not the front.

Next issue is the rear section of the torpedo tubes. Before adding AM, they should fit like this.

There is a PE piece for each side which going off the instructions fit like this.

Clearly thats not right, in the instructions, the top of the PE run along the plastic piece. Whjat they miss out is the the sides of the vertical plastic bulkhead have to be taken back.
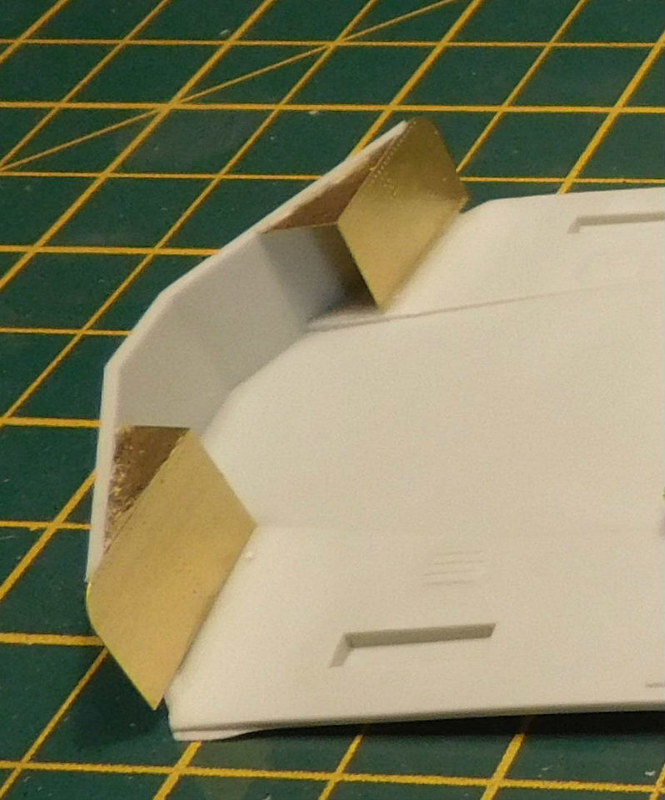
This also means that the torpedo tubes won't fit and have to be cut back, again this is not mentioned.

Those isues caused me some head scratching, though really it should have been clear what to do. I only realised when i look at the Griffon models website and the page on this AM set had a lot of images which included this area without the bridge fitted.

Unfortunatly, the link to different products does not seem to be working at the moment, at least on my computer. The product is a little way down on the right side, BPN 72001.

http://www.griffonmodel.com/

So once those issues where dealt with, this is how the rear deck looked.

I waisted a couple of evenings trying to sort that out, but it got there. So i was able to fit the deck and put the hull together.

I then did some work on the raised front deck including around the forward gun mount and the hatch, this was then fitted. Towards the rear, there are 2 raised circles just behind the small raised deck section. There were 4 of these, the other 2 being on the outside edge. These are the bases for the smoke generators. The instructions tell you to remove the inner ones. But the pics of my boat clearly show the generators on these inner positions, so i removed the other ones.

The prop shafts were also fitted, i left out the rudders.

And i got one of the rear sections of the torpedo tubes donw. Lots of tricky PE on there. You can see the front has been cut back. I did a bit to much so had to add some styrene strip.

And finally, those props we were speaking about. In the ship craft book there are a couple of pics of an S-38 prop which show them well. They also show that the centre prop attaches to the main rudder. The kit has this right, but i thought it must have been wrong when i saw the instructions, but what do i know about ships.

When i checked the Shapways site, it did not show one of the propeller like this, so will have to see when they get here. And thats going to be sooner than i expected. They are due to arrive tomorrow, i was not expecing them until the end of the month.

More soon.


I am a Norfolk man and i glory in being so


On the bench: Airfix 1/72nd Harrier GR.3/Fujimi 1/72nd Ju 87D-3

  • Member since
    April 2003
  • From: USA
Posted by keavdog on Sunday, March 8, 2020 4:22 PM

Quite the project you've got going there Bish.  Looking good.

Thanks,

John

  • Member since
    October 2019
  • From: New Braunfels, Texas
Posted by Tanker-Builder on Sunday, March 8, 2020 5:31 PM

Hi Bish!

 Although you chose the Armored Cupola Model, this is awesome. I am partial to the older version. Now that said, keep it up, beautiful work so far!

  • Member since
    April 2015
Posted by Mopar Madness on Sunday, March 8, 2020 10:50 PM

Bish, this looks like quite an ambitious project but I know you'll make it look smashing! I've been on the fence when it comes to PE for mine. 

Chad

God, Family, Models...

At the plate: 1/48 Airfix Bf109 & 1/35 Tamiya Famo

On deck: Who knows!

  • Member since
    December 2002
  • From: Bury St Edmunds, Suffolk, England
Posted by Bish on Monday, March 9, 2020 4:04 AM

Thanks guys. Yes, it is a bit daunting, without doubt this is the most PE i have used on a build, and being a ship not somthing i have experiance with. But its leading me to bigger things. I have the 72nd U-Boat this year and then hopefully in a few years a 350 Bismarck.

Chad, while the kit is very nice, the PE does greatly improve the detail as well as correct a few things. Though i think Eduard does a set which would be less daunting. I have not even touched the sets for the guns and torpedos and i am not yet a 1/3rd of the way through the main set.

TB, am i correct in think the old Airfix kit has the older style bridge. I would not mind doing an earlier boat at some point.

I am a Norfolk man and i glory in being so


On the bench: Airfix 1/72nd Harrier GR.3/Fujimi 1/72nd Ju 87D-3

  • Member since
    November 2008
  • From: Central Florida
Posted by plasticjunkie on Monday, March 9, 2020 11:21 AM

That certainly looks like a PE overdose attack lol but looking very nice Bish. The level of details are greatly enhanced with the upgrades.

Like I mentioned before, the old Airfix E Boat does in fact have the high bridge being an early S7 Class and the Revell being a later S100 Class boat so you get quite a different contrast between the two pieces when shown side by side.

I would love for someone to come out with a pe detail set for the older Airfix boat or have Revell put out the S-7 or S-38 Class as new moldings.

 GIFMaker.org_jy_Ayj_O


Too many models to build, not enough time in a lifetime!!

  • Member since
    October 2019
  • From: New Braunfels, Texas
Posted by Tanker-Builder on Monday, March 9, 2020 11:47 AM

Hi ;

  Yes, you are correct! The Airfix model is the older one. Now that said. I have recently acquired three more Hulls of that boat. Parts were toast. Too much time up in someone's attic. When the Airfix boat is left like that in a high heat environment this is what happens. The Plastic gets brittle and turns from a nice light grey to a nasty puke Brown grey! Or Green grey

 The boat can still be built.They don't seem to warp much, surprisingly! But, care must be taken. It's like building with parts made of eggshells! As you already know I am always going on about Yachts. These make beautiful yacht hulls as well as the Lindberg " Cape Class" U.S.C.G. Cutter. Many " Mega" yachts back in the day were built along those lines.

 Some after the war were modified with the "Spoon" stern to look more "Ocean Liner Regal". This operation was actually not that bad structurally. Just frippery as far as the men in my family saw them. They felt that Yachts that go to sea should mimic "Tuna Clippers. Enough streamlining to take the seas, but, enough brute strength to handle the seas that destroy many that size.

 I have always liked the older boats like Airfixe's Torpedo boats like the Fairmiles and others. Nice lines and good equipment. The Vospers were also something to behold in the Eighties! You know, It's a shame. If you had stayed with the plastic you could have installed the engines! Imagine Lift off hardware showing a depth of that boat, old or new, that no one ever sees!

  • Member since
    November 2008
  • From: Central Florida
Posted by plasticjunkie on Monday, March 9, 2020 12:30 PM

TB, since you mentioned them modified after the war a thought came back. As a child in the early 60s  I remember one of these boats tied up near Downtown Miami on the Miami River. It was a total mess with lots of junk on it. My older brother recalls seeing some type of large eagle painted on the sides And was referred by the locals as "Hitler's Yacth". It went away in the early to mid 70s hopefully rescued and not scrapped.

 GIFMaker.org_jy_Ayj_O


Too many models to build, not enough time in a lifetime!!

  • Member since
    December 2002
  • From: Bury St Edmunds, Suffolk, England
Posted by Bish on Monday, March 9, 2020 3:31 PM

Thanks PJ. The PE set does include parts for the light raft that was fitted to the S-38 but not to the S-100, so not sure if they expected Revell to do the other boat. Would be nice to see new moldings of the older boats.

got the 3D parts today, they lok superb, the props look like the pitch is spot on when i compared them to the pics. I will post some pics later in the week.

I am a Norfolk man and i glory in being so


On the bench: Airfix 1/72nd Harrier GR.3/Fujimi 1/72nd Ju 87D-3

  • Member since
    December 2002
  • From: Bury St Edmunds, Suffolk, England
Posted by Bish on Monday, March 9, 2020 3:33 PM

Thanks TB. Sound slike you have a challenge on your hands.

I am a Norfolk man and i glory in being so


On the bench: Airfix 1/72nd Harrier GR.3/Fujimi 1/72nd Ju 87D-3

  • Member since
    March 2009
  • From: brisbane australia
Posted by surfsup on Friday, March 13, 2020 11:18 PM

I have built this Kit with the Griffon P/E before and really enjoyed it so will be watching your build with Interest. I found the same thing with your Build about the centre Deck Section. When dry fitting the built up P/E Deck, I found no obstructions to it sitting down onto the Deck.....Cheers mark

If i was your wife, i'd poison your tea! If Iwas your husband, I would drink it! WINSTON CHURCHILL

  • Member since
    December 2002
  • From: Bury St Edmunds, Suffolk, England
Posted by Bish on Saturday, March 14, 2020 9:16 AM

Thanks Mark, glad i am not the only one. Any other issues i should be aware of.

Been slow going this past week, but i am hoping to get some good build time in tonight and tomorrow and catch up a bit.

I am a Norfolk man and i glory in being so


On the bench: Airfix 1/72nd Harrier GR.3/Fujimi 1/72nd Ju 87D-3

  • Member since
    December 2002
  • From: Bury St Edmunds, Suffolk, England
Posted by Bish on Monday, April 6, 2020 2:56 PM

Well, its taken quite a bit longer than i expected, but i am finally able to get some paint on the S-Boat. But before i post some pics of the boat, i wanted to show the 3D parts i ordered from Shapeways.

This is a love;lt piece. The device on the side is a rocket launcher. I had not come across this until i saw the part and so i did a little digging and indeed found it was fitted to the boat i am doing.

But there was a sligth problem. The boat i am doing, S 205, was one of 2 which sailed into Felixstowe in May 45, the other being S 204. The launcher is right for 204, but 205 had it on the other side. So i carefully cut it off and removed the launcer from the mount so it could face the right way.

I left the launcher off to fit after painting.

And these are the props, again really nice.

A big thank you to those who suggested checking out shapeways and for the advice on working with these.

And now the boat. there is not lt more here than in the last update, just the last few bits of PE.

And the bridge, with the inside painted, i finished off the rest and masked off with some tissue.

And then some primer and paint. I am useing colour coats German naval colours. I painted the lower hull red and then did the dck dark grey.

I will leave this another day or two before masking off and painting the white, along with the bridge.


I am a Norfolk man and i glory in being so


On the bench: Airfix 1/72nd Harrier GR.3/Fujimi 1/72nd Ju 87D-3

  • Member since
    July 2014
Posted by modelcrazy on Monday, April 6, 2020 3:04 PM

That is some amazing work mate.

Steve

Building a kit from your stash is like cutting a head off a Hydra, two more take it's place.


http://www.spamodeler.com/forum/

  • Member since
    December 2002
  • From: Bury St Edmunds, Suffolk, England
Posted by Bish on Monday, April 6, 2020 3:11 PM

Thanks Steve. I am really pleased with how its coming along and am glad i have taken my time on it.

I am a Norfolk man and i glory in being so


On the bench: Airfix 1/72nd Harrier GR.3/Fujimi 1/72nd Ju 87D-3

  • Member since
    November 2008
  • From: Central Florida
Posted by plasticjunkie on Monday, April 6, 2020 3:31 PM

Looking great!Beer 

 GIFMaker.org_jy_Ayj_O


Too many models to build, not enough time in a lifetime!!

  • Member since
    December 2002
  • From: Bury St Edmunds, Suffolk, England
Posted by Bish on Monday, April 6, 2020 4:50 PM

Thanks PJ.

I am a Norfolk man and i glory in being so


On the bench: Airfix 1/72nd Harrier GR.3/Fujimi 1/72nd Ju 87D-3

  • Member since
    November 2010
  • From: Florida-West Central
Posted by Eagle90 on Monday, April 6, 2020 5:51 PM

Wow Bish!  That is coming along great!!!  A lot of PE but you are mastering it!  Great work!


  • Member since
    December 2002
  • From: Bury St Edmunds, Suffolk, England
Posted by Bish on Monday, April 6, 2020 6:12 PM

Cheers Boddy, and thanks again for the kit.

I am a Norfolk man and i glory in being so


On the bench: Airfix 1/72nd Harrier GR.3/Fujimi 1/72nd Ju 87D-3

  • Member since
    November 2010
  • From: Florida-West Central
Posted by Eagle90 on Tuesday, April 7, 2020 5:18 AM

Bish

Cheers Boddy, and thanks again for the kit.


You're very welcome.....you know, you do such great work, I should you more kits to do!   LOL!


  • Member since
    December 2002
  • From: Bury St Edmunds, Suffolk, England
Posted by Bish on Tuesday, April 7, 2020 10:08 AM

Eagle90


Bish

Cheers Boddy, and thanks again for the kit.


You're very welcome.....you know, you do such great work, I should you more kits to do!   LOL!


Don't you bloddy dear, i have enough on my plate lol.

I am a Norfolk man and i glory in being so


On the bench: Airfix 1/72nd Harrier GR.3/Fujimi 1/72nd Ju 87D-3

  • Member since
    December 2015
  • From: providence ,r.i.
Posted by templar1099 on Friday, April 10, 2020 5:43 AM

Just caught up to this Bish nice work all around so far. Yea, boats are a different animal but you have seem to have adapted way beyond the learning curve. The PE can kill ya.

"le plaisir delicieux et toujours nouveau d'une occupation inutile"

  • Member since
    May 2013
  • From: Indiana, USA
Posted by Greg on Friday, April 10, 2020 7:19 AM

Late to the party but here now.

Cool WIP. You have lots going on with all the AM. Much of the PE is some very intricate detail. Don't cha just love the way PE pops after finally shooting it with some grey primer?

All the info on 3d printed stuff, especially the bit about no oil-based paint is news to me, good info. PJ, the detail in your deck gun is really something, and you said the pic doesn't even do it justice. I'm sort of fired up to try some 3d printed AM now.

I haven't built a ship since the late 60's probably. You are tempting me here, Bish.


  • Member since
    October 2019
  • From: New Braunfels, Texas
Posted by Tanker-Builder on Friday, April 10, 2020 10:45 AM

Hi Bish:

      Yeah, the Airfix Boat is the older Standard Wheelhouse version. I have two in regular KreigsMarine fit and at least six more. Old storage damaged and glue Bombs for conversions to Yachts.

 The Hull caught my eye years ago. Shortened, it looks just like an older Matthews or Hunter hull, as well as a Grand Banks type hull. Great for conversion of the time because of the rounded bilge. 

      You are doing great on the P.E. That is certainly a learning curve isn't it? I did the LINDBERG Bismark with a Trumpeter set of P.E. . Talk about turning a "Sows Ear" into a Silk Purse!! Keep going, Oh, the Port prop spins to the right. The other two to the left.

      The layout is odd, But at the speed they traveled the last thing they wanted to worry about was "Prop Walk". If all three props spun the same way she would be a bear to handle at low speed because of the tendency of a boat to spin to the direction of the props. So any multi prop vessel ( Two and above ) have counter rotating props!

       As far as the center prop was concerned that is a design fluke . The Rounded bilge added other problems and the prop linked by ball and socket to the center rudder actually was a feature to stabilize the prop action and lessen wake! If you notice in the picture the center rudder is bigger and NOT streamlined either! Also that explains the step for causing the boat to rise up on plane faster. It created a " Hook " in the hull profile. Much like an upside down spoiler!

  • Member since
    December 2002
  • From: Bury St Edmunds, Suffolk, England
Posted by Bish on Friday, April 10, 2020 12:59 PM

Thanks templar, it is a learning curve indeed. And the PE is more than i have ever used in one build. But i am taking this in stages taking breaks to bild other things.

I am a Norfolk man and i glory in being so


On the bench: Airfix 1/72nd Harrier GR.3/Fujimi 1/72nd Ju 87D-3

  • Member since
    December 2002
  • From: Bury St Edmunds, Suffolk, England
Posted by Bish on Friday, April 10, 2020 1:03 PM

Thanks Greg. The PE really does make a huge differance once the paint is on.

I am really impressed with the 3D parts, i'll deffinetly be checking them out more often.

I've only done smaller scale less detailed ships before, the most intricate being the Airfix Belfast last year. I have a U-boat line dup for later this year which i don't think will be as challenging as this despite the bigger size. But i do have a 350 Bismarck in the stash with a similar PE set and that will be fun Bang Head

I am a Norfolk man and i glory in being so


On the bench: Airfix 1/72nd Harrier GR.3/Fujimi 1/72nd Ju 87D-3

  • Member since
    December 2002
  • From: Bury St Edmunds, Suffolk, England
Posted by Bish on Friday, April 10, 2020 1:09 PM

Thanks TB and thanks very much for that info. I was not even sure if that centre rudder was actually a rudder largely because its not streamlined. I am glad to could put me straight on that. And i never thought about the props neededing to rotate in different directions.

I know how armour works and i am pretty clued up on aircraft, but ships are a whole other matter. Thank you.

I am a Norfolk man and i glory in being so


On the bench: Airfix 1/72nd Harrier GR.3/Fujimi 1/72nd Ju 87D-3

  • Member since
    November 2008
  • From: Central Florida
Posted by plasticjunkie on Friday, April 10, 2020 1:16 PM

Greg you can't go wrong with the 3D parts. The detail is incredible.

 GIFMaker.org_jy_Ayj_O


Too many models to build, not enough time in a lifetime!!

  • Member since
    July 2010
  • From: Tempe AZ
Posted by docidle on Tuesday, April 14, 2020 11:36 PM

Your Boat is looking pretty sweet there Bish. You have got to be happy with the way it’s turning out.

Steve


  • Member since
    December 2002
  • From: Bury St Edmunds, Suffolk, England
Posted by Bish on Wednesday, April 15, 2020 4:19 AM

Thanks Steve and yes i am. Got the white paint done on Monday, just leaving it another day or so before i handle it.

I am a Norfolk man and i glory in being so


On the bench: Airfix 1/72nd Harrier GR.3/Fujimi 1/72nd Ju 87D-3

  • Member since
    March 2009
  • From: brisbane australia
Posted by surfsup on Saturday, April 18, 2020 1:56 AM

Bish

Thanks Mark, glad i am not the only one. Any other issues i should be aware of.

Been slow going this past week, but i am hoping to get some good build time in tonight and tomorrow and catch up a bit.


Thanks Mate. The only other major improvement was to the Hull. I drilled out the Exhaust Ducts and backed them with Plasticard to give them some Depth. They just looked strange as they were on the Hull....Cheers mark

If i was your wife, i'd poison your tea! If Iwas your husband, I would drink it! WINSTON CHURCHILL

  • Member since
    December 2002
  • From: Bury St Edmunds, Suffolk, England
Posted by Bish on Sunday, May 3, 2020 2:05 PM

Its been a while but i've been plugging away and the S-Boat is geting some where. While i was in the process of paiting the hull, i got the 3 guns put together, other than the torpedo's and racks, these were the last bits to assemble. These are the forward and centre 20mm guns, mainly kit parts with some PE additions. The centre gun, the one on the right, has a PE shieled and they all have metal barrels to replace the kit parts.

And this is the rear 37mm gun.Except for the round base, the kit gun is completly replaced though i did use the pastic hand wheels as the PE ones were just not right. There is a PE shield for this but i will be adding the 3D one. This alone took 3 nights to build.

And after a week or so of painting, waiting and masking, the hull was painted, all with colourcoats. This was followed by a couple of coats of future.

On the deck i used oils to lighten it in patches.

I started off weathering with the underside of the bridge and the torpedo tubes. Pics show these boats quite clean, so i just went with some light streaking and some scuffing and chipping.

The bridge was then fitted. This was a very tight fit, i had to do some clamping, which meant the ladders had to be removed.

And then this weekend, i finally got the decals on. I had bought 2 sets of Peddinghaus decals as one set had the individual boat marking and the otehr the Panther. But the panther they used was way to small, so that was a set i didn't need. So i used the Revell one, which has no detail on it, and painted that in with white and red Tamiya. Quite pleased with how they turned out. Today, it got 2 more coats of future to seal in the decals.

And on for some weathering and to get the deck fitted out.

I am a Norfolk man and i glory in being so


On the bench: Airfix 1/72nd Harrier GR.3/Fujimi 1/72nd Ju 87D-3

  • Member since
    November 2008
  • From: Central Florida
Posted by plasticjunkie on Sunday, May 3, 2020 3:15 PM

Danmed that looks bad ass to the bone. Fantastic results Bish! I have my work cut out for me when I do mine, simply outstanding work Bish. Beer

It has taken me close to 10 minutes to post this thanks to the ever snail slow web site.Snail

 GIFMaker.org_jy_Ayj_O


Too many models to build, not enough time in a lifetime!!

  • Member since
    July 2010
  • From: Tempe AZ
Posted by docidle on Sunday, May 3, 2020 11:15 PM

plasticjunkie

Danmed that looks bad ass to the bone. Fantastic results Bish! I have my work cut out for me when I do mine, simply outstanding work Bish. Beer

It has taken me close to 10 minutes to post this thanks to the ever snail slow web site.Snail


I have to agree wholeheartedly with PJ. That is sweet looking! I love the lightening you did on the deck. Most excellent. Did you use a White with a tad of Payne’s Grey added? 

I’m asking so that when I get my clear coat issue fixed, I was thinking of doing the exact thing on my PT.

Also, do you airbrush your Future or use a Sable brush? I think you told me me but I’m drawing a blank right now. 

Steve


  • Member since
    April 2020
  • From: Mountains of Western MD
Posted by BBorBust on Monday, May 4, 2020 12:25 AM

Beautifully done. Looks amazing!

  • Member since
    December 2002
  • From: Bury St Edmunds, Suffolk, England
Posted by Bish on Monday, May 4, 2020 2:59 AM

Thanks guys. Some of the pics i looked at, there seemed to be some fadeing on the deck. And i checked a couple of builds where they had done it as results of the salf spray, so that made sense.

Steve, i use the base paint, which is enamel, and mix with a drop of white oil paint, the 2 mix really well. That way you start with the right base but still get the advantage of oil paint. I did this in 3 stages going slightly lighter each time, trying to focus in areas of heavier footfall and well as were the salt spray might be more prominant.

I air brush it. I have not been useing future on my builds for a while, useing Alclad aqua instead. But i decided to use the future on this one.

I am a Norfolk man and i glory in being so


On the bench: Airfix 1/72nd Harrier GR.3/Fujimi 1/72nd Ju 87D-3

  • Member since
    July 2014
Posted by modelcrazy on Monday, May 4, 2020 8:02 AM

That looks sick Bish. Too cool. Now you went and made me want one.

Steve

Building a kit from your stash is like cutting a head off a Hydra, two more take it's place.


http://www.spamodeler.com/forum/

  • Member since
    December 2002
  • From: Bury St Edmunds, Suffolk, England
Posted by Bish on Monday, May 4, 2020 9:09 AM

Thanks Stevem, and glad i could be of assistance Big Smile

I am a Norfolk man and i glory in being so


On the bench: Airfix 1/72nd Harrier GR.3/Fujimi 1/72nd Ju 87D-3

  • Member since
    October 2019
  • From: New Braunfels, Texas
Posted by Tanker-Builder on Monday, May 4, 2020 9:31 AM

Hey Bish!

 Runnin a little late here. You are doing awesome on the guns. Even in plastic the kit guns are( after clean-up ) kits, in and of themselves. I had a friend that had a Vosper Built Air/Sea Rescue Boat. He chose to run without the center prop or engine. Lightened her up and maintenance was much simpler.

  • Member since
    December 2002
  • From: Bury St Edmunds, Suffolk, England
Posted by Bish on Monday, May 4, 2020 3:49 PM

Thanks TB.

I am a Norfolk man and i glory in being so


On the bench: Airfix 1/72nd Harrier GR.3/Fujimi 1/72nd Ju 87D-3

  • Member since
    January 2015
Posted by TheMongoose on Monday, May 4, 2020 4:22 PM

Absolutely superb! The fading on the deck in spots looks just like it follows water washing over the deck and off again. You really made this look excellent.

In the pattern: Scale Shipyard's 1/48 Balao Class Sub! leaning out the list...NOT! Ha, added to it again - Viper MkVii, 1/32 THUD & F-15J plus a weekend madness build!

  • Member since
    December 2002
  • From: Bury St Edmunds, Suffolk, England
Posted by Bish on Tuesday, May 5, 2020 2:54 PM

Thanks Mongoose. That is what i was trying to achieve but never haveing weathered a ship before, was not sure if i was doing the right think. I guess i was lucky it paid off.

I am a Norfolk man and i glory in being so


On the bench: Airfix 1/72nd Harrier GR.3/Fujimi 1/72nd Ju 87D-3

fox
  • Member since
    January 2007
  • From: Narvon, Pa.
Posted by fox on Tuesday, May 5, 2020 5:13 PM

Just got caught up. Fantastic work Bish! Toast

Jim  Captain

Stay Safe.

PS - Just heard a voice behind me that said "You want to build one of those". Uh Oh.

 Main WIP: 

   On the Bench: Artesania Latina  (aka) Artists in the Latrine 1/75 Bluenose II

I keep hitting "escape", but I'm still here.

  • Member since
    July 2010
  • From: Tempe AZ
Posted by docidle on Tuesday, May 5, 2020 10:01 PM

Bish

Thanks guys. Some of the pics i looked at, there seemed to be some fadeing on the deck. And i checked a couple of builds where they had done it as results of the salf spray, so that made sense.

Steve, i use the base paint, which is enamel, and mix with a drop of white oil paint, the 2 mix really well. That way you start with the right base but still get the advantage of oil paint. I did this in 3 stages going slightly lighter each time, trying to focus in areas of heavier footfall and well as were the salt spray might be more prominant.

I air brush it. I have not been useing future on my builds for a while, useing Alclad aqua instead. But i decided to use the future on this one.


Thanks for the technique Bish. I’m definitely going to try it out.

If I may ask you a couple more questions? Did you use any thinner for the mixing of the Colourcoats and oils or just used them straight out? Also, did you shoot the Future straight or thin that also? 

Steve


  • Member since
    April 2003
  • From: USA
Posted by keavdog on Tuesday, May 5, 2020 11:19 PM

Amazing detail.  Those gun positions could be a model all themselves.  Are you using a PE bending tool?  Just bought one myself.  This one is going to be a beauty.

Thanks,

John

  • Member since
    December 2002
  • From: Bury St Edmunds, Suffolk, England
Posted by Bish on Wednesday, May 6, 2020 6:10 AM

docidle


Bish

Thanks guys. Some of the pics i looked at, there seemed to be some fadeing on the deck. And i checked a couple of builds where they had done it as results of the salf spray, so that made sense.

Steve, i use the base paint, which is enamel, and mix with a drop of white oil paint, the 2 mix really well. That way you start with the right base but still get the advantage of oil paint. I did this in 3 stages going slightly lighter each time, trying to focus in areas of heavier footfall and well as were the salt spray might be more prominant.

I air brush it. I have not been useing future on my builds for a while, useing Alclad aqua instead. But i decided to use the future on this one.


Thanks for the technique Bish. I’m definitely going to try it out.

If I may ask you a couple more questions? Did you use any thinner for the mixing of the Colourcoats and oils or just used them straight out? Also, did you shoot the Future straight or thin that also? 

Steve


Usually i don't add any thinners when dry brushing. But in this case i used a small drop of Humbrol enamel thinners. The future i shoot straight, i am not actually sure what you would thin that with.

I am a Norfolk man and i glory in being so


On the bench: Airfix 1/72nd Harrier GR.3/Fujimi 1/72nd Ju 87D-3

  • Member since
    December 2002
  • From: Bury St Edmunds, Suffolk, England
Posted by Bish on Wednesday, May 6, 2020 6:12 AM

keavdog

Amazing detail.  Those gun positions could be a model all themselves.  Are you using a PE bending tool?  Just bought one myself.  This one is going to be a beauty.


Thanks John. I do have a bending tool, but in the few years i have had it, i have hardly used it. On this build i have not, i have a pair of smooth flat nosed pliers which i find much more useful for anything exceopt really large pieces.

I am a Norfolk man and i glory in being so


On the bench: Airfix 1/72nd Harrier GR.3/Fujimi 1/72nd Ju 87D-3

  • Member since
    December 2002
  • From: Bury St Edmunds, Suffolk, England
Posted by Bish on Wednesday, May 6, 2020 6:12 AM

fox

Just got caught up. Fantastic work Bish! Toast

Jim  Captain

Stay Safe.

PS - Just heard a voice behind me that said "You want to build one of those". Uh Oh.


Thanks Jim. have to be careful of those voices, they can get you in all sorts of trouble. Wink

I am a Norfolk man and i glory in being so


On the bench: Airfix 1/72nd Harrier GR.3/Fujimi 1/72nd Ju 87D-3

fox
  • Member since
    January 2007
  • From: Narvon, Pa.
Posted by fox on Wednesday, May 6, 2020 12:57 PM

You got that right. 

Jim  Captain

Stay Safe.

 Main WIP: 

   On the Bench: Artesania Latina  (aka) Artists in the Latrine 1/75 Bluenose II

I keep hitting "escape", but I'm still here.

  • Member since
    April 2015
Posted by Mopar Madness on Wednesday, May 6, 2020 6:43 PM

Bish, I gotta say that I'm loving this S-Boat!

Chad

God, Family, Models...

At the plate: 1/48 Airfix Bf109 & 1/35 Tamiya Famo

On deck: Who knows!

  • Member since
    December 2002
  • From: Bury St Edmunds, Suffolk, England
Posted by Bish on Monday, May 11, 2020 6:44 AM

Thanks Chad. With the hull weathered and the deck being fitted out, its really looking the part now.

I am a Norfolk man and i glory in being so


On the bench: Airfix 1/72nd Harrier GR.3/Fujimi 1/72nd Ju 87D-3

  • Member since
    December 2002
  • From: Bury St Edmunds, Suffolk, England
Posted by Bish on Sunday, May 17, 2020 11:49 AM

Quick update, this should be the last one before i wrap this up. I got the sides weathered with a very light oil wash and then sealed with a flat coat. I forgot to take a proper pic of the side but its very subtle. I then started fitting it out with the wood deck, railings and a few other bits.

And this is whats left to be added. Every thing has been painted, weathered and mat coated before fitting.

And the last bits to be put together were the torpedo's, quite a bit of work on these. the propellers on each one had 8 small PE blades.

And the CMK mines.

Just got to get those painted up and primed and make up the dodgers for the side rails.

I am a Norfolk man and i glory in being so


On the bench: Airfix 1/72nd Harrier GR.3/Fujimi 1/72nd Ju 87D-3

fox
  • Member since
    January 2007
  • From: Narvon, Pa.
Posted by fox on Sunday, May 17, 2020 2:19 PM

W - O - W!!!!!!!!!Bow Down

Jim  Captain

Stay Safe.

 Main WIP: 

   On the Bench: Artesania Latina  (aka) Artists in the Latrine 1/75 Bluenose II

I keep hitting "escape", but I'm still here.

  • Member since
    December 2002
  • From: Bury St Edmunds, Suffolk, England
Posted by Bish on Monday, May 18, 2020 6:48 AM

Thanks Jim.

I am a Norfolk man and i glory in being so


On the bench: Airfix 1/72nd Harrier GR.3/Fujimi 1/72nd Ju 87D-3

  • Member since
    March 2003
  • From: Western North Carolina
Posted by Tojo72 on Monday, May 18, 2020 7:49 AM
Wow,glad I took a look,that brass looks real good,looking forward to this one progressing.

  • Member since
    December 2002
  • From: Bury St Edmunds, Suffolk, England
Posted by Bish on Monday, May 18, 2020 9:18 AM

Thanks Tony, it was a pain but i am really glad i used it.

I am a Norfolk man and i glory in being so


On the bench: Airfix 1/72nd Harrier GR.3/Fujimi 1/72nd Ju 87D-3

  • Member since
    November 2008
  • From: Central Florida
Posted by plasticjunkie on Saturday, May 23, 2020 8:52 AM

Badass!! Love it. Will you have it mounted dry or as part of a sea diorama?

 GIFMaker.org_jy_Ayj_O


Too many models to build, not enough time in a lifetime!!

  • Member since
    December 2002
  • From: Bury St Edmunds, Suffolk, England
Posted by Bish on Saturday, May 23, 2020 11:57 AM

Thanks PJ. It will be dry, i have made my own base up for it.

I am a Norfolk man and i glory in being so


On the bench: Airfix 1/72nd Harrier GR.3/Fujimi 1/72nd Ju 87D-3

  • Member since
    November 2008
  • From: Central Florida
Posted by plasticjunkie on Saturday, May 23, 2020 3:05 PM

Bish

Thanks PJ. It will be dry, i have made my own base up for it.


Yes


 GIFMaker.org_jy_Ayj_O


Too many models to build, not enough time in a lifetime!!

  • Member since
    April 2015
Posted by Mopar Madness on Saturday, May 23, 2020 5:24 PM

Those torpedos!! Bow Down

Chad

God, Family, Models...

At the plate: 1/48 Airfix Bf109 & 1/35 Tamiya Famo

On deck: Who knows!

  • Member since
    December 2002
  • From: Bury St Edmunds, Suffolk, England
Posted by Bish on Saturday, May 30, 2020 11:10 AM

Got the S-Boat wrapped up last weekend and got the pics sorted today. At just over 3 months this is one of the longest builds i have done and was worth every minute. To finish it off i got the rest of the deck pieces fitted as well as the completed torpedo's and mines. The latter were a bit awkward as the trolleys were to wide for the raisl. I had to trim those down quite a bit but as the mines are on top of them you can't see the trolleys anyway.

I also added a rubber dinghy. This is not included in this kit but does come with the Flak 38 version. But the pics of this boat clearly show one. Fortunalty i have a set of Revell German assault engineer figures which come with a similar boat. So i dressed that up with some PE and fitted that.

I felt that the wood decks looked to clean. So after testing on some of the off cut wood, i used a light oil wash of raw umber and yellow orche mixed. Rather pleased with that. I added dodgers (i thinks thats the right term) with tissue soaked with white glue, and tied on with rigging thread. The final additions were the radio aerial cables, a fabric ensign from AMP and a ships bell. At 4mm its the smallest i could find, i think it rounds it off nicely.

I know there are some accuracy issues when compared to the real S-205. The torpedo rails were a simply wooded type, ammo lockers for the centre gun were bigger and some other differances but i can live with those. I do wish i had drilled out the underwater openings but it was to late by the time i realised. For my first 72nd boat, i am really chuffed with this. Now i am keen to start a 72nd U-Boat which i will be getting to later this year or early next. But for now i am looking forward to some aircraft and some heavy armour.

Now for the pics.

Thanks all for following along. And a big thank you to the guys who answered my question about painting the props, some great advice there. I opted for the method suggested by Don and am really pleased with how they turn out.

And a really big thank you to Bobby who sent me this kit back in 2013. I hope i did it justice.

I am a Norfolk man and i glory in being so


On the bench: Airfix 1/72nd Harrier GR.3/Fujimi 1/72nd Ju 87D-3

  • Member since
    November 2008
  • From: Central Florida
Posted by plasticjunkie on Saturday, May 30, 2020 12:25 PM

Awesome finish Toast

 GIFMaker.org_jy_Ayj_O


Too many models to build, not enough time in a lifetime!!

  • Member since
    December 2002
  • From: Bury St Edmunds, Suffolk, England
Posted by Bish on Saturday, May 30, 2020 4:42 PM

Thanks PJ.

I am a Norfolk man and i glory in being so


On the bench: Airfix 1/72nd Harrier GR.3/Fujimi 1/72nd Ju 87D-3

  • Member since
    July 2008
Posted by Est.1961 on Saturday, May 30, 2020 6:42 PM

Nice one Bish Beer

  • Member since
    December 2002
  • From: Bury St Edmunds, Suffolk, England
Posted by Bish on Sunday, May 31, 2020 2:24 AM

Cheers mate.

I am a Norfolk man and i glory in being so


On the bench: Airfix 1/72nd Harrier GR.3/Fujimi 1/72nd Ju 87D-3

  • Member since
    May 2020
  • From: North East of England
Posted by Hutch6390 on Sunday, May 31, 2020 5:34 AM

That's fantastic, Bish - beautiful job!

     Hutch.

Vell, Zaphod's just zis guy, you know?


TakkaTakkaTakkaTakkaTakkaTakka


  • Member since
    December 2015
  • From: providence ,r.i.
Posted by templar1099 on Sunday, May 31, 2020 6:06 AM

Turned out beautiful Bish.

"le plaisir delicieux et toujours nouveau d'une occupation inutile"

  • Member since
    November 2008
  • From: Central Florida
Posted by plasticjunkie on Sunday, May 31, 2020 8:33 AM

How did you do the base Bish? I like the mounting style you used.

 GIFMaker.org_jy_Ayj_O


Too many models to build, not enough time in a lifetime!!

  • Member since
    December 2002
  • From: Bury St Edmunds, Suffolk, England
Posted by Bish on Sunday, May 31, 2020 8:43 AM

Thanks guys. I really did enjoy this. Ships ain't quick bt i think they are going to be fun.

PJ, the bottom is just a piece of pine shelf board cut to size and routed around the edge. I then used some wood strip, this was 1/4 x 1/4 spruce (i have several sizes for different sized ships) cut to length and nail to the base. I had to file a grove down the middle of these because of the shape of the hull (don't know if its called a keel or not) and then stained it. I ran some wood glue down the middle to keep the boat in place.

I saw these sort of base a few years back some where on line and though it would be better than a pedastal and drilling a hole into the hull. I've tested it on a couple of smaller kits (1/600 belfast, 125 U-Boat) and decided i like the look so will stick with it. When i do my U-Boat it will take a slightly different approach, but i will try and remember to do a how to when the time comes.

I am a Norfolk man and i glory in being so


On the bench: Airfix 1/72nd Harrier GR.3/Fujimi 1/72nd Ju 87D-3

  • Member since
    April 2015
Posted by Mopar Madness on Sunday, May 31, 2020 11:35 AM

I like that base too. You've given the viewer so many extras to look at.  Your hard work is evident in this one! 

Chad

God, Family, Models...

At the plate: 1/48 Airfix Bf109 & 1/35 Tamiya Famo

On deck: Who knows!

  • Member since
    December 2002
  • From: Bury St Edmunds, Suffolk, England
Posted by Bish on Sunday, May 31, 2020 11:42 AM

Thanks Chad. I normally only do half a dozen pics of the completed kit, but there is so much in this when compared to aircraft or armour, i knew i had to get in extra images.

I am a Norfolk man and i glory in being so


On the bench: Airfix 1/72nd Harrier GR.3/Fujimi 1/72nd Ju 87D-3

  • Member since
    November 2008
  • From: Central Florida
Posted by plasticjunkie on Sunday, May 31, 2020 12:06 PM

Bish

Thanks guys. I really did enjoy this. Ships ain't quick bt i think they are going to be fun.

PJ, the bottom is just a piece of pine shelf board cut to size and routed around the edge. I then used some wood strip, this was 1/4 x 1/4 spruce (i have several sizes for different sized ships) cut to length and nail to the base. I had to file a grove down the middle of these because of the shape of the hull (don't know if its called a keel or not) and then stained it. I ran some wood glue down the middle to keep the boat in place.

I saw these sort of base a few years back some where on line and though it would be better than a pedastal and drilling a hole into the hull. I've tested it on a couple of smaller kits (1/600 belfast, 125 U-Boat) and decided i like the look so will stick with it. When i do my U-Boat it will take a slightly different approach, but i will try and remember to do a how to when the time comes.


I will try your method  next time. Thanks for sharing!

 GIFMaker.org_jy_Ayj_O


Too many models to build, not enough time in a lifetime!!

  • Member since
    December 2005
Posted by PTConsultingNHR on Sunday, May 31, 2020 12:21 PM
Very nice model.
fox
  • Member since
    January 2007
  • From: Narvon, Pa.
Posted by fox on Sunday, May 31, 2020 12:23 PM

Outstanding! Toast Toast Toast

I want one of those. This time I'm going to listen to the voices.Wink

Jim  Captain

Stay Safe.

 Main WIP: 

   On the Bench: Artesania Latina  (aka) Artists in the Latrine 1/75 Bluenose II

I keep hitting "escape", but I'm still here.

  • Member since
    April 2003
  • From: USA
Posted by keavdog on Sunday, May 31, 2020 1:06 PM

That turned out great!  You time and work definitely shows.  Fantastic detail Bish.   Really like this one.  Well done.

Thanks,

John

  • Member since
    December 2002
  • From: Bury St Edmunds, Suffolk, England
Posted by Bish on Sunday, May 31, 2020 1:16 PM

Thanks guys.

Jim, i usually do, no matter how hard i try.

I am a Norfolk man and i glory in being so


On the bench: Airfix 1/72nd Harrier GR.3/Fujimi 1/72nd Ju 87D-3

  • Member since
    July 2010
  • From: Tempe AZ
Posted by docidle on Monday, June 1, 2020 12:23 AM

Well done Bish! She looks fantastic. I love the whole thing and it shows the and energy you put into her.

Steve

You’re making it hard to ignore the voices telling me to jump the queue with my Flak Boat! 


  • Member since
    April 2006
  • From: ON, Canada
Posted by jgeratic on Monday, June 1, 2020 1:13 AM

Hi Bish, nice one! Yes

I really like the sublte staining/weathering on the deck.


regards,

Jack

  • Member since
    December 2002
  • From: Bury St Edmunds, Suffolk, England
Posted by Bish on Monday, June 1, 2020 6:33 AM

Thanks guys.

Steve, i'll keep an eye out for that build.

jack, i was pleased with how that turned out.

I am a Norfolk man and i glory in being so


On the bench: Airfix 1/72nd Harrier GR.3/Fujimi 1/72nd Ju 87D-3

  • Member since
    October 2019
  • From: New Braunfels, Texas
Posted by Tanker-Builder on Monday, June 1, 2020 7:37 AM

UhOh!

    I have to go and get new Glasses! Mine shattered from the beauty they Beheld!. LOL.LOL. That is an awesome Job, Bish! Now when you Gonna do a real working Boat-Like say a Tuna Clipper?

     It's that attention to detail I think. I don't think you were cut out to build warships. You make them look so good, some folks would think they were yachts. You have added unique touches and yes, The canvas on the rails are called Dodgers.

  • Member since
    March 2003
  • From: Western North Carolina
Posted by Tojo72 on Monday, June 1, 2020 8:20 AM
that looks real good,nice job.

  • Member since
    December 2002
  • From: Bury St Edmunds, Suffolk, England
Posted by Bish on Monday, June 1, 2020 9:37 AM

Thanks guys, that means a lot.

TB, i could have spent another month adding detail and correcting things and it would still not have been 100%, i had to call a halt some where. It really is different from what i am used to. And you never know, one day i just might.

I am a Norfolk man and i glory in being so


On the bench: Airfix 1/72nd Harrier GR.3/Fujimi 1/72nd Ju 87D-3

  • Member since
    April 2020
  • From: Mountains of Western MD
Posted by BBorBust on Monday, June 1, 2020 8:15 PM

YesBish, truly incredible and awe inspiring.

  • Member since
    June 2017
Posted by Chemteacher on Monday, June 1, 2020 9:22 PM
Wow! Super job. Congrats.

On the bench: Revell-USS Arizona; Airfix P-51D in 1/72

  • Member since
    December 2002
  • From: Bury St Edmunds, Suffolk, England
Posted by Bish on Tuesday, June 2, 2020 4:06 AM

Thanks guys.

I am a Norfolk man and i glory in being so


On the bench: Airfix 1/72nd Harrier GR.3/Fujimi 1/72nd Ju 87D-3

  • Member since
    March 2009
  • From: brisbane australia
Posted by surfsup on Sunday, June 14, 2020 4:59 AM

You have done her justice my Friend. Really super finish.....Cheers Mark

If i was your wife, i'd poison your tea! If Iwas your husband, I would drink it! WINSTON CHURCHILL

  • Member since
    December 2002
  • From: Bury St Edmunds, Suffolk, England
Posted by Bish on Sunday, June 14, 2020 5:14 AM

Thanks Mark, much appreciated.

I am a Norfolk man and i glory in being so


On the bench: Airfix 1/72nd Harrier GR.3/Fujimi 1/72nd Ju 87D-3

  • Member since
    July 2010
  • From: Tempe AZ
Posted by docidle on Wednesday, June 24, 2020 11:21 PM

Bish,

Did you remove the hump around the forward gun position? If so, how did you do it?

Steve


  • Member since
    December 2002
  • From: Bury St Edmunds, Suffolk, England
Posted by Bish on Thursday, June 25, 2020 2:30 AM

Steve, i did yes. I just sanded it down with a sanding stick. I didn't want to risk my mini power tool.

I am a Norfolk man and i glory in being so


On the bench: Airfix 1/72nd Harrier GR.3/Fujimi 1/72nd Ju 87D-3

  • Member since
    July 2010
  • From: Tempe AZ
Posted by docidle on Thursday, June 25, 2020 9:58 PM

Thanks Bish.  That must have used a few sticks! I’ll have to look at the deck surface again to see if there is a non skid feature on it.

I also asked a question on the German Flag thread about if you used metal barrels on your guns. I’m going to go through this thread with a fine tooth comb for techniques.

I appreciate you helping me out with all my questions.

Steve


  • Member since
    December 2002
  • From: Bury St Edmunds, Suffolk, England
Posted by Bish on Friday, June 26, 2020 2:13 AM

No worries Steve. If i didn't answer that, then yes, the Griffon set included metal barrels for all of the guns.

The Griffon set i got comprised 4 different sets that they sell seperatly. There is a similar set for your kit, i think the only differeance is the set for the guns as you have the quad.

I am a Norfolk man and i glory in being so


On the bench: Airfix 1/72nd Harrier GR.3/Fujimi 1/72nd Ju 87D-3

  • Member since
    July 2014
Posted by modelcrazy on Friday, June 26, 2020 8:37 AM

Can't believe I haven't commented yet.

Das Schneelboot sieht fantastisch aus herr Bish!

Steve

Building a kit from your stash is like cutting a head off a Hydra, two more take it's place.


http://www.spamodeler.com/forum/

  • Member since
    May 2013
  • From: Indiana, USA
Posted by Greg on Friday, June 26, 2020 8:52 AM

Holy .....cow. But I didn't really want to say cow.

I guess I don't pay enough attention to ship models. This thing is absolutely mind-blowing, Bish. What a fascinating model to look at. You really did a great job.

YesYesYesYes

  • Member since
    December 2002
  • From: Bury St Edmunds, Suffolk, England
Posted by Bish on Friday, June 26, 2020 2:32 PM

modelcrazy

Can't believe I haven't commented yet.

Das Schneelboot sieht fantastisch aus herr Bish!


Danke, though i am not to sure it would go very far on snow Wink

I am a Norfolk man and i glory in being so


On the bench: Airfix 1/72nd Harrier GR.3/Fujimi 1/72nd Ju 87D-3

  • Member since
    December 2002
  • From: Bury St Edmunds, Suffolk, England
Posted by Bish on Friday, June 26, 2020 2:32 PM

Thanks Greg. You and me both, and there is some really stunning work pulled up by the ship guys. I need to pop in more often.

I am a Norfolk man and i glory in being so


On the bench: Airfix 1/72nd Harrier GR.3/Fujimi 1/72nd Ju 87D-3

JOIN OUR COMMUNITY!

Our community is FREE to join. To participate you must either login or register for an account.

SEARCH FORUMS
FREE NEWSLETTER
By signing up you may also receive reader surveys and occasional special offers. We do not sell, rent or trade our email lists. View our Privacy Policy.