SEARCH FINESCALE.COM

Enter keywords or a search phrase below:

Revell 1/72nd Type VIIc U-Boat U-552 WiP

3631 views
25 replies
1 rating 2 rating 3 rating 4 rating 5 rating
  • Member since
    February 2003
  • From: Lacombe, LA.
Posted by Big Jake on Wednesday, March 31, 2021 8:23 AM

Nah, I may never get around to building it....... too good to pass on though... ;)


  • Member since
    December 2002
  • From: Bury St Edmunds, Suffolk, England
Posted by Bish on Tuesday, March 30, 2021 4:08 AM

Cheers TB.

I am a Norfolk man and i glory in being so


On the bench: Airfix 1/72nd Harrier GR.3/Fujimi 1/72nd Ju 87D-3

  • Member since
    October 2019
  • From: New Braunfels, Texas
Posted by Tanker-Builder on Monday, March 29, 2021 11:00 AM

Aha!

 You are doing a fantastic job on this so far. As my friend would say-" Das is Goot"! and he served in the modern LufftWaffe!

  • Member since
    December 2002
  • From: Bury St Edmunds, Suffolk, England
Posted by Bish on Monday, March 29, 2021 9:47 AM

Thanks Jake. I think thats about what i paid for it make in 2011. But i think you got lucky, i've these on e-bay for well over £100.

But if you do decide to go the full AM route, be ready to open your wallet.

I am a Norfolk man and i glory in being so


On the bench: Airfix 1/72nd Harrier GR.3/Fujimi 1/72nd Ju 87D-3

  • Member since
    February 2003
  • From: Lacombe, LA.
Posted by Big Jake on Monday, March 29, 2021 9:03 AM
I just scored this kit for $75.00 and am following your build.


  • Member since
    December 2002
  • From: Bury St Edmunds, Suffolk, England
Posted by Bish on Monday, March 29, 2021 8:07 AM

So, about 11 days ago i said i would be starting on the oil canning that weekend. Didn't quite work out like that. I spent the best part of a week, starting at the front and going along one side and then repeating on the other, blending in the edges of the PE and cleaning up where i had filled flood holes and other bits. Going the check pieces was tricky as it mean filling PE and trying not to lose rivet detail. But it feels and loks like it has paid off and i think its created an oil canning effect at the same time.

Still need to fix the 2 drain holes at the front.

The PE sections above the saddle tanks were removed and re-fitted. These stuck out to much so i cleaned and filed down the plastic creating a shelfe for the PE to sit into making it flush. I also removed all of the rib detail and replaced it with thicker sheet styrene. I had used the thinnest one i had, but this was just not strong enough and kept coming away. So i recut and replaced all of the ribs and its holding fine now.

And then on Wed i finally got to the oil canning. Its taking longer then i thought, the pic below is after 3 nights. I am doing one section atb a time, running the curved blade down it and then useing small round sanding sticks to clean it up and get a nice curve. At first i could not see the effect, and you can't really see it in the pic, but when i turne my bench light off, the shadow create by the room light showed off the curves and i think its working out well.

I have managed to get these done with 1 blade but its starting to dull now so will have to replace it.

As well as the drain holes at the front, i also need to fix these at the bow underneath. These are both on the starboard side, the port side is fine.

And i also have the inside of the tower painted. My referance said the inside of the 552's tower was either black or dark grey. There is one pic were you can see the inside of the tower as well as the railing around the rear and the wave deflector part way up the tower. We know the deflector is black on top, and to my eye this looke to be the same as the tower and railings, so i opted for black. I have also given it a gloss coat prior to some light weathering.

My main focus with this now is to finish the oil canning. But i do need to get on with my 262 as well as a Stuka for the CAS GB. So i plan on working on those 2 and spend about 30mins per evening doing the oil canning. Hopefully by the time the aircraft are down, the hull should be ready for the final touches.

I am a Norfolk man and i glory in being so


On the bench: Airfix 1/72nd Harrier GR.3/Fujimi 1/72nd Ju 87D-3

  • Member since
    December 2002
  • From: Bury St Edmunds, Suffolk, England
Posted by Bish on Monday, March 15, 2021 6:58 AM

I have edited my first post and attached the link to AMP for those who may want to download the very useful U-Boat articles.

I am a Norfolk man and i glory in being so


On the bench: Airfix 1/72nd Harrier GR.3/Fujimi 1/72nd Ju 87D-3

  • Member since
    December 2002
  • From: Bury St Edmunds, Suffolk, England
Posted by Bish on Sunday, March 14, 2021 2:16 PM

Thanks John. Ye, it is, i had underestimated just how much was involve. But hopefully once the PE areas are sorted and the oil canning done,. the rest should not be so bad. I think it wil all be worth it if i don't bugger it up.

I am a Norfolk man and i glory in being so


On the bench: Airfix 1/72nd Harrier GR.3/Fujimi 1/72nd Ju 87D-3

  • Member since
    April 2003
  • From: USA
Posted by keavdog on Sunday, March 14, 2021 2:09 PM

Wow, enormous amount of work Bish. Looking good.  

Thanks,

John

  • Member since
    December 2002
  • From: Bury St Edmunds, Suffolk, England
Posted by Bish on Sunday, March 14, 2021 1:53 PM

Been working on the hull the last couple of weeks and got the starboard side cheek piece in place. Theres a lot of work to get these fitted. Also added the torpedo doors.

The doors are actually a fraction smaller than the opening, so they need somthing to old them in place. I use some styrene strip. Also aded the front of the torpeo tubes. These won't be seen byt they do with with strengtheing the hull.

I also added styrene inside the hull to replicate the saddle tanks. I removethe one i did on the port side and re-did it as it was to wide.

I then spraye black primer on the inside where it migt be seen through the many openings.

And primed over the PE areas so i can see what more work needs to be done to blend them in.

There is still some work to do there, but i will do that after finally getting the hull together. This should make it easier to handle without damaging the rib's i added. And putting the hull together is what i did next. 3 months work, but finally got to this stage.

So thats where i am at. Goung to finish of those PE areas and tidy up the other areas. Also going to mask the rivets prior to oil canning. I have been trying to get some X-Acto No 12 blades for a couple of months but no one seems to have them. Finally found a UK based e-bay seller with them, though i am dubious as he h=is sellign 2 packs of 5 for the same price that one pack usually sells for. They are meant to be here Thurs, so will see what i get. But hopefully i can finish off all that and get to ad the rest of the hull parts.

I am a Norfolk man and i glory in being so


On the bench: Airfix 1/72nd Harrier GR.3/Fujimi 1/72nd Ju 87D-3

  • Member since
    December 2002
  • From: Bury St Edmunds, Suffolk, England
Posted by Bish on Tuesday, February 23, 2021 6:10 AM

Thanks capn. We will see how well its blended in once i get some primer on.The check pieces around the torpedo doors and the strip above the tanks will be the real test, if they are not right it will really stand out.

I am a Norfolk man and i glory in being so


On the bench: Airfix 1/72nd Harrier GR.3/Fujimi 1/72nd Ju 87D-3

  • Member since
    November 2005
  • From: Formerly Bryan, now Arlington, Texas
Posted by CapnMac82 on Monday, February 22, 2021 6:09 PM

For being in a tiny (armor) scale which is also a near-huge (ship) scale, this is an outstanding build. 

Getting all the aftermarket to blend in what looks so effortlessly is a marvel.

  • Member since
    December 2002
  • From: Bury St Edmunds, Suffolk, England
Posted by Bish on Sunday, February 21, 2021 12:40 PM

Thanks TB, its plenty big enough for me.

I am a Norfolk man and i glory in being so


On the bench: Airfix 1/72nd Harrier GR.3/Fujimi 1/72nd Ju 87D-3

  • Member since
    October 2019
  • From: New Braunfels, Texas
Posted by Tanker-Builder on Sunday, February 21, 2021 8:27 AM

Ah!

      Das is Middle sized U-Boot,Ya? I vill be vatching closely.

  • Member since
    December 2002
  • From: Bury St Edmunds, Suffolk, England
Posted by Bish on Sunday, February 21, 2021 5:37 AM

I got back to the u-boat a week or so ago, focusing on the conning tower. On the top piece i have sanded away the molded on wood sides, added the loops where the crew can hook on their saftey harness by drilling out a small indentation and useing some fine wire. Also used some styrene for the 5 braces around the front of the tower.

The same for the other side. The 4 small white buts of styrene are the hinges for folding seats. From what i have read these were in different locations depening on the boat, on the 552 they were on the port side. There are no clear images of these seats or a clear description of them. I am guessing they are wood rather than metal or fabric, so i have cut them out from some spare pieces on the nautilus deck kit.

I have also decided to replace the kit periscope bases with some 3D printed ones. Unfortunatly they are not sold seperatly, they only comes with some snorkel parts, which i won't need, and a UZO which i already have. But i can use my other UZO for my Type IX. I am going to order that next month.

The bottom of the tower has been finished, no scratching needed here, just PE and kit parts.

I will have to scratch some tubes which carry the radio wires and are at the back of this piece but not included in the kit.

The Eduard deck gun is complete, all resin and PE. Rather intricate but a nice looking piece.

And finally the railing around the back of the tower. These are 2 thick and its recomended to make a new one out of wire or live with the thick parts. I took a 3rd option and simply sanded down the whole thing to make the railings thinner. I am happy with that.

I have since primed all this and painted the inside of the tower, its now in the shed drying. I have just started on the hull to get that finished off and hopefully get both parts together soon.

I am a Norfolk man and i glory in being so


On the bench: Airfix 1/72nd Harrier GR.3/Fujimi 1/72nd Ju 87D-3

  • Member since
    December 2002
  • From: Bury St Edmunds, Suffolk, England
Posted by Bish on Sunday, September 27, 2020 3:35 AM

Been a few weeks but finally got an update. In my last one i said that i was almost ready to primer the tower. I then made the mistake of checking my referances again and realised it needed some fixing.

Unfortunatly photo's of the inside of towers are tricky to find. It seems that Revell mat have based theirs on U-995 which is on display at ladoe. But this is a late style tower. At the top front of the tower was a shelf which went full width and stuck out to far. This was chopped in half and sanded back. The Eduard PE set has a compass face which goes on this shelf, but that should be on a frame which i will have to build. At the bottom of the tower was another shelf which went right round the sides. Oddly this is where Revell place the voice pipe and compass repeater, almost at floor level. I trimmed this leaveing just a step on either side and built up the front and then put the voice pipe onto the higher shelf. I still have a bit of work to do, including the fitting for the crew to attach their saftey harness to.

I then spent over 2 weeks working on the starboard side of the hull.

I sanded through to far at the rear, so i need to repair that area.

The centre is done.

At the front i still need to fit the new parts around the torpedo doors.

So, after 7 weeks, i'm going to put this to one side to build a couple of aircraft and an armour kit before the year is out. Will be back to this soon.

I am a Norfolk man and i glory in being so


On the bench: Airfix 1/72nd Harrier GR.3/Fujimi 1/72nd Ju 87D-3

  • Member since
    December 2002
  • From: Bury St Edmunds, Suffolk, England
Posted by Bish on Monday, August 31, 2020 2:37 AM

Finally time for an update on the U-Boat. I spent the first 2 weeks just working on the port side hull. It was just all drilling and sanding and filling. I am useing the Wolf Pack article by Dougie Martindale and Wink Grise that i downloaded from AMP a few years ago. These guys develope the U-Bras set now sold by WEM that corrects many of the errors on the Revell kit. The artcile also gives good detail on the flood holes on the U-552 along with other Tupe VII's.

So, starting the the front, i cut out the cheack piece and replaced that with the U-Brass part. Also the row of small round holes along the top of the hull were filled and re-drilled. The Revell ones are to big and to far forward. Also filled the 3 holes at the front of the hull as these are to bag and the pattern is wrong. But i have just noticed i still need to finish re-drilling these.

Then the forward portion of the free flooding vents. Over the whole boat, i need to fill 7 holes, drill 11 new ones and alter 2. Also filled and re-drilled the curved line of vents which drain water away from the deck gun.
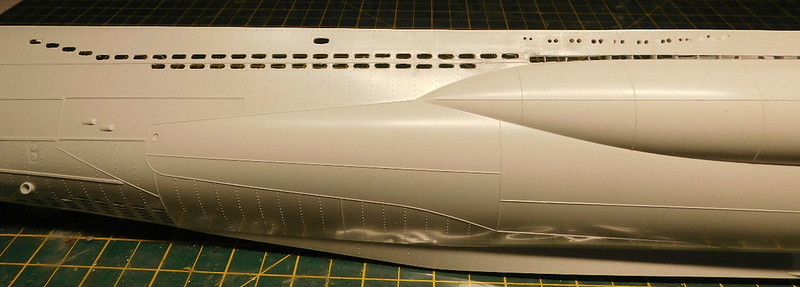
In the middle, the central drainage area, the recess running along the top of the saddle tanks, was cut out and ribs added. The brass part above can either be used as a template or replace the kit area, again, some holes needed filling.

And the rear free flooing vents alng with the 3 vents above the saddle tank. These had to be done twice as i messed up first time. I have left the exhaust as i am not sure if i should drill that or just paint it in. If its drilled, it will need somthing behind it so you can't see straight through.

The holes on the underside can be corrected with a set from Model Brass. But this is pricey and i would not need the vast majority of it. So i just drilled them out and re-shapped with a round needle file. You can see where i over did the sanding and went right through. But fortunatly that will be covered by base of the propeller shaft.

And the ones at the front.
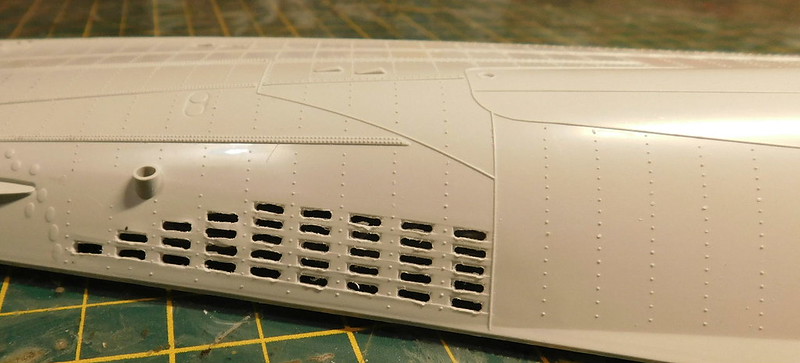
And the whole part.

One thing i learnt is that was easier to thin the plastic before drilling out the vents. I still need to do a little clean up on some of the holes. On the inside, i addd some styrene sheet to replicate the saddle tank extending into the hull. Once the hull halves are together and the ''pressure hull'' fitted, i will tidy that up.

Now i just have to repeat the whole process on the starboard side.

After 2 weeks of that, i decided i need a break so moved onto the tower. The top and bottom halves are together with the external PE added from the Eduard set. I plan to prime and paint the inside befor ethen fitting this out and getting it all together.

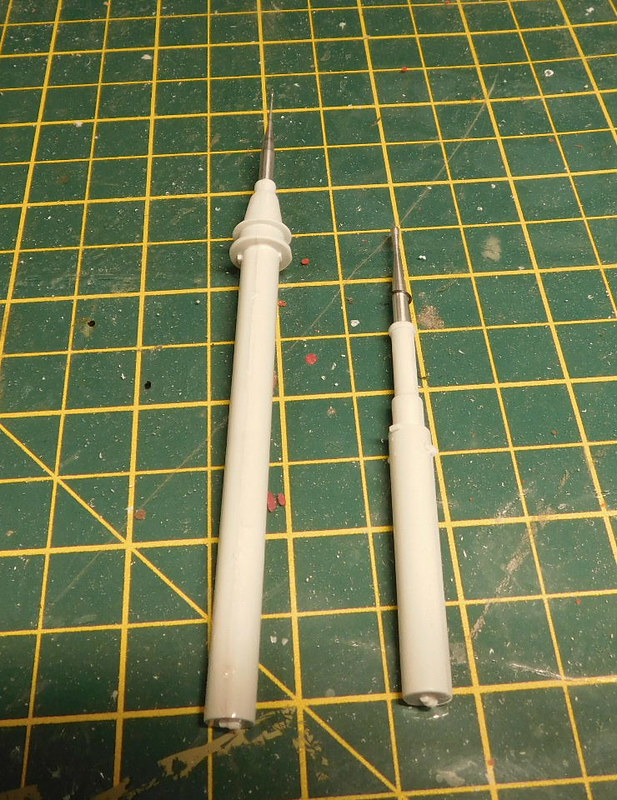
The 2 periscopes were put together including the metal parts.
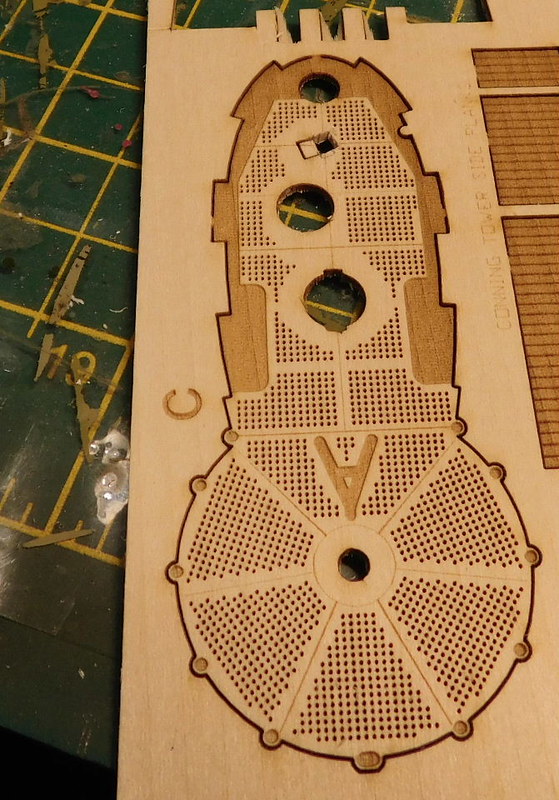
The Nautilus wood deck is based exactly on the Revell one, including errors. This includes the hole for the UZO sight. This should be in the middle, but Revell places it over the the left side.So on my piece i cut out the correct area, fortunatly the base of the UZO covers most of the area where the incorrect hole is.
And 4 more bit of AM arrived, 3D printed parts from Shapeways. Left to right, turnbuckles which i ahve kept in their little box, insulators for the antenna wire's, UZO base and sight and anchor.

Thats all for now. I plan on spending this week finishing off the tower and working on the deck gun. Then at the wekend i will start on the starboard side of the hull.

And seeing how this is going, and given i will need to take a couple of breaks to do some otehr bilds befor ethe year is out, i will deffinetly still be doing this next year. But i will certainly not be rushing this build given how long i have been waiting to build it and how much research i have put in to it.

Thanks for looking, all comments very welcome.

I am a Norfolk man and i glory in being so


On the bench: Airfix 1/72nd Harrier GR.3/Fujimi 1/72nd Ju 87D-3

  • Member since
    August 2014
  • From: Willamette Valley, Oregon
Posted by goldhammer on Sunday, August 9, 2020 1:31 PM

If you dive as deep as MC did, good possibility....

Knowing your build quality, going to be a beauty.

  • Member since
    December 2002
  • From: Bury St Edmunds, Suffolk, England
Posted by Bish on Sunday, August 9, 2020 6:44 AM

Thanks for looking in guys. Not sure when i will have my first update. But i certainly hope i am not still building this next year.

I am a Norfolk man and i glory in being so


On the bench: Airfix 1/72nd Harrier GR.3/Fujimi 1/72nd Ju 87D-3

  • Member since
    March 2003
  • From: Western North Carolina
Posted by Tojo72 on Sunday, August 9, 2020 6:00 AM
Wow, this should be good

  • Member since
    July 2003
  • From: On my kitchen counter top somewhere in central North Carolina.
Posted by disastermaster on Saturday, August 8, 2020 10:57 PM

Super!

 See 'ya next year when you "surface".

 https://i.imgur.com/LjRRaV1.png


  • Member since
    July 2010
  • From: Tempe AZ
Posted by docidle on Saturday, August 8, 2020 10:22 PM

Pulling up a seat for this one bud! 

Steve


  • Member since
    July 2013
Posted by steve5 on Saturday, August 8, 2020 10:11 PM

this should be fun to watch , a metre long wow .


  • Member since
    December 2002
  • From: Bury St Edmunds, Suffolk, England
Posted by Bish on Saturday, August 8, 2020 6:30 PM

Thanks Mac. A 48th kit is a bit much for me. I wanted this kit since it was first released in 2003 and finally picked in up in 2011 when it was re-released with the figures. This one is just short of a meter as it is.

I am a Norfolk man and i glory in being so


On the bench: Airfix 1/72nd Harrier GR.3/Fujimi 1/72nd Ju 87D-3

  • Member since
    November 2005
  • From: Formerly Bryan, now Arlington, Texas
Posted by CapnMac82 on Saturday, August 8, 2020 6:24 PM

That looks far more approachable that Trumpy's monster that's  liek a meter and the third long and costs about as much as a small developing nation, especially after adding all the a/m stuff.

Can't wait to see more.

  • Member since
    December 2002
  • From: Bury St Edmunds, Suffolk, England
Revell 1/72nd Type VIIc U-Boat U-552 WiP
Posted by Bish on Saturday, August 8, 2020 6:14 PM

I am about to start my 2nd 72nd boat this year, in fact my second ever. I'll be building U-552 in its early fit.

And for extras, i have a couple of sets from eduard. A PE set and resin 88mm deck gun.

A White Ensign set includes some PE parts and a template to correct some of the flood drain holes. And from Schatton-Modellbau a radio antenn and metal barrel for the 2cm Flak.

G-Factor propellers and another Schatton set, metal periscopes.

And finally, a wooden deck from Nautilus Models which includes resin hatches.

I also have some waterline decals and a fabric flag from AMP.


Edit: below is a link to the AMP site where a number of U-Boat articles can be downloaded. I only used the first one, which compiles a number of the articles further down the page. The Wolf Pack II collection is a more recent addition and i have not yet looked at that, but i will down load it now i have seen it for the Type XI info.

https://amp.rokket.biz/lib_uboats.shtml


I am a Norfolk man and i glory in being so


On the bench: Airfix 1/72nd Harrier GR.3/Fujimi 1/72nd Ju 87D-3

JOIN OUR COMMUNITY!

Our community is FREE to join. To participate you must either login or register for an account.

SEARCH FORUMS
FREE NEWSLETTER
By signing up you may also receive reader surveys and occasional special offers. We do not sell, rent or trade our email lists. View our Privacy Policy.