SEARCH FINESCALE.COM

Enter keywords or a search phrase below:

Modeling jargon

3897 views
26 replies
1 rating 2 rating 3 rating 4 rating 5 rating
  • Member since
    October 2016
Modeling jargon
Posted by Davecus on Saturday, October 22, 2016 6:13 PM

At the risk of testing the age-old axiom that there are no stupid questions , I may have two :

1. Washes seem to be complex and finicky- do they make that much difference? 

2. What in the world is a panel line? 

Thanks for bearing with me !


Tags: Confused
  • Member since
    January 2014
  • From: Nampa, Idaho
Posted by jelliott523 on Monday, October 24, 2016 1:15 PM

Dave,

Really surprised nobody has responded to this thread. I have a personal philosophy that there are no such things as stupid questions. So, in my best attempt, I'll try to give you my answers to your questions.

1. Washes come in several different forms and people use them in many different ways. They can be acrylic, oil, enamels, etc. Do some searching here on the site and watch some videos on Youtube, and I'm sure you'll see all kinds of techniques for washes. They do help add some realism; however, in my opinion, sometimes they can be way overdone.

2. Panel lines are the molded into the plastic on kits to show doors, hatches, wing panels, access "panels" and other surface detail found on all types of kits from aircraft to boats. Some may be "raised" or molded so that the line sticks up from the surface of the kit, others are recessed into the surface. Typically, when speaking of aircraft, you find raised panel lines on older kits. Raised panel lines often get wiped out when sanding, even with the utmost care, I often obliterate raised panel lines, they are my personal nemesis!

Hopefully you find this helpful.

On the Bench:  Lots of unfinished projects!  Smile

  • Member since
    November 2009
  • From: Twin Cities of Minnesota
Posted by Don Stauffer on Wednesday, October 26, 2016 9:00 AM

There are two types of panel lines.  First, sheets of aircraft grade aluminum came in limited sizes, plus it was easier to skin the surface of an aircraft with smaller sheets.  The seam between these panels always laid over a former or a stringer, and the gap between sheets was miniscule.  The other type was the inspection or access panel, which had a larger seam.  This later type was much more visible.  In fact, on painted aircraft, the seams between the skin panels, the former type, were almost invisible at normal viewing distances.  In addition to more dirt and grime collecting in access panel lines because of their bigger gaps, the frequent removal and replacing of access and inspection panels on painted aircraft caused chipping of the paint around edges of the panel.

Don Stauffer in Minnesota

  • Member since
    July 2014
Posted by modelcrazy on Wednesday, October 26, 2016 9:26 AM
Hi Dave,
Will…there can be stupid questions but these defiantly are not.
Both Jeremy and Don nailed it with the description, but back to your first question. Yes, highlighting panel lines do make a difference and like Jeremy said it can be overdone. Some people think they are completely unnecessary as you really don’t see them on actual aircraft while others believe it removes the toy like appearance of the subject. I am in the middle. If you look at some builds on the internet you will see subjects which look way overdone and others which look like they are missing something. These are the panel lines.
There are several methods to accomplish this, some are easy and others are involved, but like most things in the world you get what you pay for.
One method is pre shading which “The Doog”, a member here, has put up a nice little vid on You Tube sponsored by Testers explaining this method.
Other methods are post shading which are really used with recessed panel lines. First can be a wash (the easiest) where you go over the entire subject with a darker color and then wipe it off. The paint will get into the panel lines and stay after it is cleaned off, similar to Scrimshaw if you have seen any of that. Another is a pin wash, where you place a tiny drop of very thinned dark paint into the recessed panel line and let it flow down the line using capillary action. This requires a very small brush and patience, but the results can be very nice.
I’m sure others will chime in here with other methods and variations on what I have said. There are many methods which vary with the builder. You will have to find the method that suits you.
Steve

Steve

Building a kit from your stash is like cutting a head off a Hydra, two more take it's place.


http://www.spamodeler.com/forum/

  • Member since
    January 2014
Posted by Silver on Thursday, October 27, 2016 10:06 AM

On actual aircraft the panel lines were not highlighted or the even looking preshaded Look-Camo or metal finish.Your best bet is to use "Pastels" To crest a realistic  worn or used oxidation look.Washes only works on internal areas such as wheel wells and cockpits.I flew fighters and aircraft of many types .camo and nmf.

  • Member since
    September 2006
  • From: Bethlehem PA
Posted by the Baron on Friday, October 28, 2016 12:08 PM

And "pastels" are colored chalks. Apologies if anyone thinks I'm being a smart-aleck; I was just anticipating a followup question.

I got a set of earth colors at an art supply store years ago, for less than ten bucks.  The set comprises a dozen sticks, about four inches long, maybe a quarter-inch in thickness.  They will last me till I die. 

The colors range from a pale yellow over various shades of brown, including a reddish or rusty brown, and also a stick of black.

I just use a sharp knife blade to scrape along the edge of a stick, to get a powder in that color.  I can mix the colors, too.  I apply the chalk to the model with an old brush, get it into the recesses (for panel lines), or rub it onto the surface (for things like exhaust staining or blast stains).  I've even mixed the powder with a drop or two of water and a drop or two of dishwashing liquid, to make a mud paste for vehicles.  I can apply it to the road wheels of a tank, for example, and when it dries, it looks like mud and dirt caked on.  Who needs AK Interactive?

The bigger the government, the smaller the citizen.


  • Member since
    October 2016
Posted by Davecus on Friday, October 28, 2016 12:14 PM

Thanks Baron. No apology necessary to me- I know you folks are serious about our hobby and just trying to help. I appreciate all the advice you want to give. Thanks! This was a good one!

  • Member since
    July 2014
Posted by modelcrazy on Friday, October 28, 2016 12:57 PM

Yes the pastel method works very well. I think I have the same pack Baron. I will usually use all the methods to produce nice results, including the wetted pastels.

This is what can be done with chipping, oils and pastels on a U-boat I'm currently working on. I blew myself away with the results I was able to achieve.


Steve

Building a kit from your stash is like cutting a head off a Hydra, two more take it's place.


http://www.spamodeler.com/forum/

  • Member since
    October 2016
Posted by Davecus on Friday, October 28, 2016 1:32 PM

Nice job model crazy. That looks good. I have a U- boat in my stash and I will use yours as my example. 

PS What is chipping?


  • Member since
    July 2014
Posted by modelcrazy on Friday, October 28, 2016 2:46 PM
Sorry, chipping is exactly what it sounds like. The top coat is either actually chipped off exposing the paint underneath or painted to look like chipped paint. In the case of the U-boat, I painted a coat of enamel rust colored paint and applied a product called AK Interactives "Weathering Effects" to areas using a brush. The product prevents acrylic paint from adhering well so it can be chipped off using an xacto blade or washed off using a water dampened brush. You can also use hairspray in the same way, oddly called the "hairspray method". This will only work with acrylic paint. For rusted areas I added burnt umber oils and let that "drip" to look like older rust followed by burnt sienna which looks like newer rust. You want to be careful with any weathering. If you think the subject needs just a little more....you probably have gone far enough.

Steve

Building a kit from your stash is like cutting a head off a Hydra, two more take it's place.


http://www.spamodeler.com/forum/

  • Member since
    July 2013
Posted by steve5 on Friday, October 28, 2016 3:48 PM

this is an excellent tutorial on how to use your chalk wash , he calls it a sludge washhttps://www.youtube.com/watch?v=QrCueONhuko


  • Member since
    November 2009
  • From: Twin Cities of Minnesota
Posted by Don Stauffer on Saturday, October 29, 2016 10:16 AM

Testors makes a flat aluminum in their Model Master line, which gives a good chipped paint effect.  I apply it with the tip of a toothpick.  When paint is chipped from Aluminum, the aluminum surface dulls rapidly to a matt finish.


Don Stauffer in Minnesota

  • Member since
    July 2004
  • From: Sonora Desert
Posted by stikpusher on Saturday, October 29, 2016 7:20 PM

One other type of aircraft panel is overlapping. It is an older method used before butt joined panels. It is more commonly seen on older aircraft such as the C-47, B-17, SBD, etc. But is is often still seen on modern helicopters. It is the construction technique where the edge of one panel of skin overlaps the next, and the panels are connected at that point, usually by rivets.


F is for FIRE, That burns down the whole town!

U is for URANIUM... BOMBS!

N is for NO SURVIVORS...

       - Plankton

LSM


  • Member since
    September 2006
  • From: Bethlehem PA
Posted by the Baron on Monday, October 31, 2016 12:00 PM

For chipping, depending on the subject, there are different techniques you can use.

For aircraft, where chipped paint reveals shiny metal underneath, you could use a silver pencil, such as a Prismacolor pencil (see Michael's, AC Moore, HobbyLobby or art supply stores) and apply the shiny color over your finish colors.  That works really well for areas of fine wear, like the seams or rivets around an access panel, that get chipped as someone opens them, reaches in and out, etc.  For larger areas, like on Japanese aircraft with the lousy paints that were applied, or Allied aircraft operating on Pacific islands with sun, salt water and coral or volcanic dust blowing all around, you could apply the metal color as an undercoat, then apply a mask in patches, then apply your finish colors, and remove the mask.  Many modelers like to use salt with a little water, or hairspray as the masking material.  They're easily removed, once the finish coat is dried, and they let you do large areas realistically.

For other vehices, made of other metals than aluminum, I'll use similar methods-applying chipping and wear on top of a finish color, using a fine brush, or, I'll use a dark undercoat, apply the finish color, and then use a green scouring pad (like a 3M pad) to scuff away the finish color and reveal the undercoat.  I look at objects around me to get ideas, like looking at a dump truck stopped next to me at a traffic light, a worn metal railing on a set of steps outside, and so on.

Here's a photo to illustrate my scuffing technique.  This is Wave's Grosser Hund AI combat robot, from the Maschinen Krieger series:

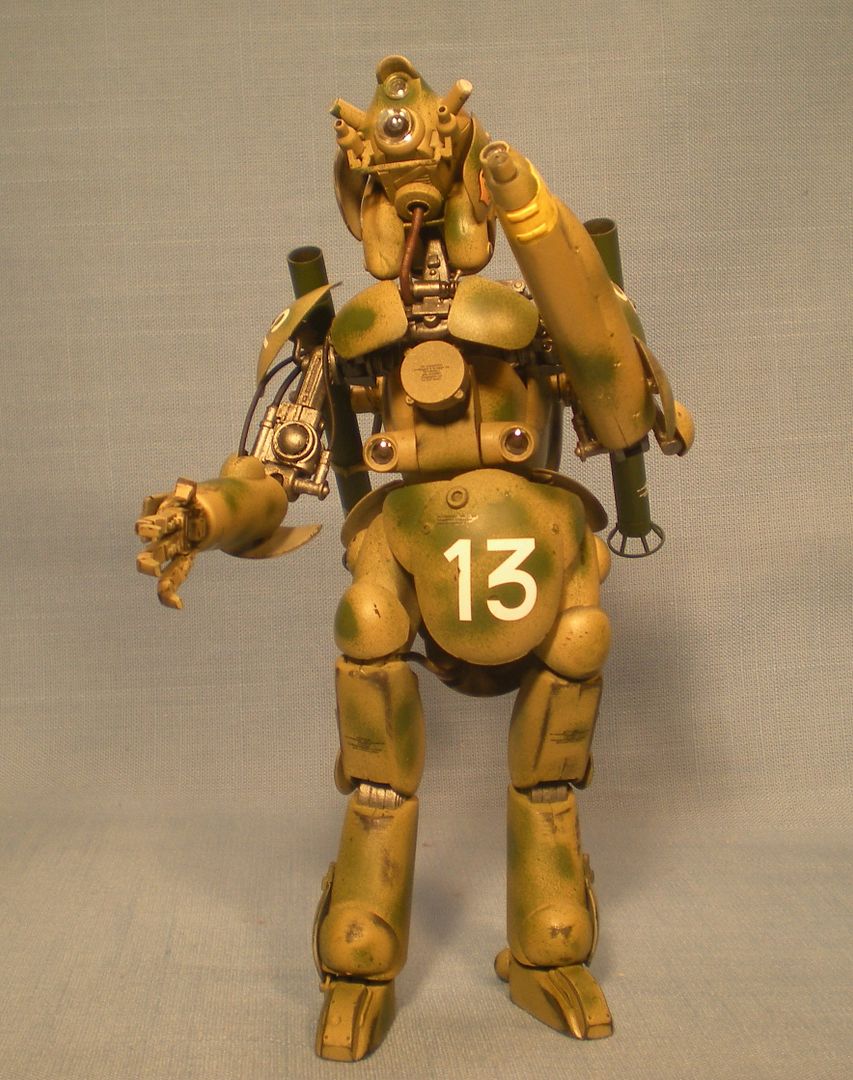
I primed this with Army Painter matte black, an enamel.  It dries rock-hard and absolutely matte.  My finish colors are Tamiya acrylics, Dark Yellow and Green, applied with the airbrush.  When the paint was cured, I used the scouring pad to hit highlights like edges and seams, fastener heads, and so on.  And some marks, I applied using Vallejo flat black, applied with a very fine brush, in places where I couldn't really get the scouring pad in.  I hope that helps illustrate what I mean.

The bigger the government, the smaller the citizen.


  • Member since
    September 2006
  • From: Bethlehem PA
Posted by the Baron on Monday, October 31, 2016 12:01 PM

stikpusher

One other type of aircraft panel is overlapping. It is an older method used before butt joined panels. It is more commonly seen on older aircraft such as the C-47, B-17, SBD, etc. But is is often still seen on modern helicopters. It is the construction technique where the edge of one panel of skin overlaps the next, and the panels are connected at that point, usually by rivets.


Thanks for sharing that photo, Stik!  That's cool nose art and it would be fun to try to reproduce it.

The bigger the government, the smaller the citizen.


  • Member since
    January 2009
  • From: hamburg michigan
Posted by fermis on Tuesday, November 1, 2016 6:25 AM

In addition...or suggestion..to the Barons explanation on pastels...

Rather than scraping the chalk...I have a piece of heavy grit sandpaper (roughly 3x4") that I use as a "palette", just grind the chalk on it, in a circular motion. Just touch your brush to it, and brush it on where you want it.

I use two brushes, specifically for pastels. First is a wide, cut off, stubby brush...I use this one to kinda "poke" at the model. This is good for heavy traffic areas...tops of wings/fuselage, areas that get foot traffic during maintenance. The other brush is a little longer and soft...this one is good for making steaks...like on the sub posted earlier.

  • Member since
    October 2016
Posted by Davecus on Tuesday, November 1, 2016 8:05 AM

Thanks Fermis Love this idea!

  • Member since
    August 2005
  • From: Sydney, Australia
Posted by Phil_H on Tuesday, November 1, 2016 8:49 AM

the Baron
And "pastels" are colored chalks. Apologies if anyone thinks I'm being a smart-aleck; I was just anticipating a followup question.

To add, there are two types of artists pastels. "Soft" pastels and "oil" pastels. Soft pastels are the aforementioned sticks of chalk-like material. Oil pastels are similar to crayons and have a waxy consistency. 

For weathering/dusting purposes, you want soft pastels. Oil pastels have few, if any applications for modelling.

  • Member since
    October 2016
Posted by Culhwch on Wednesday, November 2, 2016 10:33 PM

On the topic of powdered pastels - how do you seal them once applied? I assume that you need to 'fix' them siomehow, or else they're just going to eventually come off. 

  • Member since
    July 2014
Posted by modelcrazy on Wednesday, November 2, 2016 11:36 PM

They won't come off as easily as you may think, but yes, handling them mill wipe them off. I always use a clear coat to protect the entire build after completion.

Steve

Building a kit from your stash is like cutting a head off a Hydra, two more take it's place.


http://www.spamodeler.com/forum/

  • Member since
    July 2013
Posted by steve5 on Thursday, November 3, 2016 1:52 AM

I saw a tutorial where the guy applied them with decalfix


  • Member since
    June 2014
  • From: New Braunfels , Texas
Posted by Tanker - Builder on Thursday, November 3, 2016 7:06 AM

Hi Davecus !

   All the advice you got was spot on . I just ask you to remember something . A few modelers of small Craft ( P.T. boats etc.) seem to think that P.T.Boats rust ! P.T. Boats , Lcvps and and some others like the W.W.-1 Subchaser by Pyro are made of wood , then later Fibreglas !

   This stuff gets dirt and rust on it only where metal objects are attached . Not overall , Please don't make that mistake . They do have rust stains running off the deck , say next to a cleat or gun base and it can follow the water drain off pattern . But that is rare . Now L.C.Ms are steel , have a ball .

 Any metal ship , especially ocean going will have rust after the first year . It's the nature of the beast . Pristine carriers etc. , look wrong to me .The Hornet , prior to becoming a Museum , looked derelict because of rust and corrosion in the salt laden air .

 Most Naval ships used to get the " Hong Kong Mary " cosmetic paint job when there . Why ? Because they looked extremely rough . Salt water is corrosive , Just like sandpaper .The Atlantic and Pacific have varying degrees of the stuff . So age accordingly.

 Also remember Aluminum doesn't rust . It gets a coat of a whitish dust and that too , is corrosion in a different metal . It will be a light or dark chalky effect .  T.B. 


  • Member since
    January 2009
  • From: hamburg michigan
Posted by fermis on Thursday, November 3, 2016 7:53 AM

Culhwch

On the topic of powdered pastels - how do you seal them once applied? I assume that you need to 'fix' them siomehow, or else they're just going to eventually come off. 


In my experience, black seems to get amplified by a clear coat, while all other colors seem to completely disappear under a clear coat. I am using a cheap set of chalk though, too. I have not tried out any of the model specific stuff, like Tamiya has.

I do pastels as the last step. So far, I haven't had any problems with them not being sealed in.

  • Member since
    November 2009
  • From: Twin Cities of Minnesota
Posted by Don Stauffer on Thursday, November 3, 2016 9:26 AM

fermis
...

I do pastels as the last step. So far, I haven't had any problems with them not being sealed in.


The finer the powder is ground, the more tenaciously it will stick to most materials.  I have not had any problems with adhesion as long as I used good stuff.  Some coloring pigments are ground unbelievably fine.


Don Stauffer in Minnesota

  • Member since
    September 2006
  • From: Bethlehem PA
Posted by the Baron on Thursday, November 3, 2016 3:24 PM

I use DullCote, and that seals in the chalks.  However, the clear lacquer does knock the intensity of the color back a bit, as others have mentioned.  You can deal with that by overdoing the color a little, before sealing, to counter that effect; do several applications of your pastels, and sealing them; or you can apply them over the lacquer coat and just forgo sealing the chalks.  Unless you're going to pick the model up, you could apply the chalks and not seal them.

The bigger the government, the smaller the citizen.


  • Member since
    April 2016
  • From: N. Burbs of ChiKawgo
Posted by GlennH on Friday, November 4, 2016 8:22 AM

modelcrazy

Yes the pastel method works very well. I think I have the same pack Baron. I will usually use all the methods to produce nice results, including the wetted pastels.

This is what can be done with chipping, oils and pastels on a U-boat I'm currently working on. I blew myself away with the results I was able to achieve.


Outstanding. Was hoping that photo opened large.

A number Army Viet Nam scans from hundreds yet to be done:

https://www.flickr.com/photos/southwestdreams/albums/72157621855914355

Have had the great fortune to be on every side of the howitzers.

  • Member since
    July 2014
Posted by modelcrazy on Friday, November 4, 2016 9:23 AM

Here you go Glenn.

Steve

Building a kit from your stash is like cutting a head off a Hydra, two more take it's place.


http://www.spamodeler.com/forum/

JOIN OUR COMMUNITY!

Our community is FREE to join. To participate you must either login or register for an account.

SEARCH FORUMS
FREE NEWSLETTER
By signing up you may also receive reader surveys and occasional special offers. We do not sell, rent or trade our email lists. View our Privacy Policy.