SEARCH FINESCALE.COM

Enter keywords or a search phrase below:

How do I do soft-edged camo schemes?

779 views
9 replies
1 rating 2 rating 3 rating 4 rating 5 rating
  • Member since
    May 2004
  • From: Indianapolis
How do I do soft-edged camo schemes?
Posted by chester111472 on Wednesday, October 12, 2005 10:08 AM
Hello all,
I am new to modeling and am doing German armor. How do I do the soft-edged camo. scheme that was prevalent on German armor in World War II. I have an Iwata airbrush, but not sure on the technique required.
Thanks,
ChadBig Smile [:D]
  • Member since
    May 2005
  • From: Left forever
Posted by Bgrigg on Wednesday, October 12, 2005 12:45 PM
Pickup the October issue of FSM, Matthew Usher has a very good article on this very subject!

Basically it consists of cutting shapes in a card material and holding it just above the area to be sprayed.

So long folks!

  • Member since
    November 2005
Posted by Anonymous on Wednesday, October 12, 2005 12:52 PM
Hey Chad,
There are lots of answers to this question. German camo is pretty easy because really nothing is wrong. Early war is very easy because everything was gray Big Smile [:D]

For later war WWII patterns, the colors are important. Dunkelgelb, Rotbrown, and Green??. The schemes are mostly random (except when they are ordered by the commander to adhere to some kind of division pattern) and are usually some form of the ambush scheme and can be with or w/out the "leaves". It's really easiest to go by a picture and try to keep it close to that.

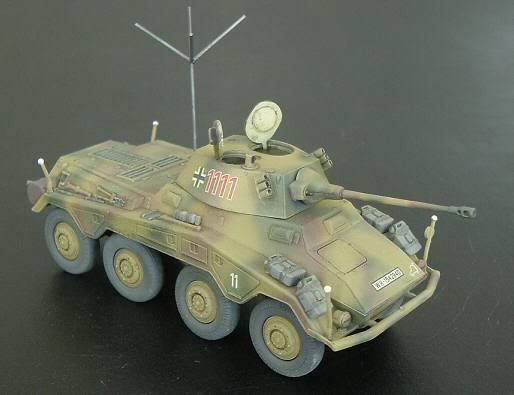
For painting itself, here is my order. Primer, preshading, dunkelgelb base coat, draw the pattern lightly with a pencil, then the red and green, then blend with extra thinned dunkelgelb again to clean up overspray.

Alot of people just spray away without drawing the pattern and get excellent results.

Here is my finished Puma with the technique I just described. I didn't use a reference picture. It's just random.
  • Member since
    December 2002
  • From: Massachusetts
Posted by ajlafleche on Wednesday, October 12, 2005 3:31 PM
Low air pressure, get the airbrush up close and personal with the model and paint. Angle into the color to reduce excess over spray. Unles syou hav a documented vehicle you're replicating, there's no need to draw the pattern or cut out patterns, etc.

Remember, if the women don't find you handsome, they should at least find you handy.

  • Member since
    January 2005
Posted by jcheung5150 on Thursday, October 13, 2005 12:47 AM
for soft edge camo I do it free hand. to reduce overspray I hold the AB at or close to a 90 degree angle to the model surface and apply light coats.

Jimmy Photobucket

  • Member since
    November 2005
Posted by Anonymous on Thursday, October 13, 2005 1:11 AM
I use the technique first sugested(cut outs held just above the surface) and then go back "freehand to extend the design. I also suggest you weather and matte seal between color coats. This will give a "deeper" feel. Take your time! Let things dry between application or you'll end up with a sticky mess!!! The colors and designs changed quite a bit through out the war, so make sure to start with the right scheme for the time and place that you are reproducing. Reference!Reference!Reference! and don't forget that different materials "age" and weather at different rates; ie.metal cables,rubber,etc. dirty it up for the real deal!!!
and finally remember the little stuff counts! You're gonna spend the time so don't let a little thing throw it all off. The first thing your fellow hobbist look at is the little stuff.

Good Luck and have fun!
  • Member since
    January 2004
  • From: Philomath, OR, USA
Posted by knight667 on Thursday, October 13, 2005 4:29 PM
QUOTE: Originally posted by Bgrigg

Pickup the October issue of FSM, Matthew Usher has a very good article on this very subject!

Basically it consists of cutting shapes in a card material and holding it just above the area to be sprayed.


Sign - Ditto [#ditto] That's what I do for all my camouflaging now (I'm not very good at freehand) and it works quite well, as long as your pressure's down. Does NOT work with rattlecans...too much paint in too small of a space.
John "The only easy day was yesterday." - US Navy SEALs "Improvise. Adapt. Overcome." - US Marine Corp. "I live each day/Like it's my last/...I never look back" - from "I'm A Rocker" by Judas Priest
  • Member since
    May 2004
  • From: Indianapolis
Posted by chester111472 on Friday, October 14, 2005 9:57 AM
Thanks for the input....what PSI do I need to use?
Chad
  • Member since
    January 2004
  • From: Philomath, OR, USA
Posted by knight667 on Friday, October 14, 2005 9:58 AM
QUOTE: Originally posted by chester111472

Thanks for the input....what PSI do I need to use?
Chad


I shoot at around 15-20, but other people may shoot differently. That has worked for me, though. Also, if you use masks, shoot at a 90 degree angle to the mask, or you'll get overspray under the mask. :)
John "The only easy day was yesterday." - US Navy SEALs "Improvise. Adapt. Overcome." - US Marine Corp. "I live each day/Like it's my last/...I never look back" - from "I'm A Rocker" by Judas Priest
  • Member since
    November 2003
  • From: maine
Posted by ilikespagetti on Saturday, October 15, 2005 8:48 PM
I've gone as far as base coating my model in the secondary color and rolling sone "non-hardening" modeling clay into snakes about 3/16" in diameter and placing them as I thought looked good then sprayed my main color over that. That way you don't need to free hand and you get more of an idea of what it will look like.
I am a man, But I can change. If I have to....I guess...
JOIN OUR COMMUNITY!

Our community is FREE to join. To participate you must either login or register for an account.

SEARCH FORUMS
FREE NEWSLETTER
By signing up you may also receive reader surveys and occasional special offers. We do not sell, rent or trade our email lists. View our Privacy Policy.