SEARCH FINESCALE.COM

Enter keywords or a search phrase below:

Good hobby desk?

23487 views
33 replies
1 rating 2 rating 3 rating 4 rating 5 rating
  • Member since
    January 2016
  • From: A Galaxy Far, Far Away
Posted by Hunter on Sunday, February 7, 2016 9:16 AM

Hello Matt - Mine cost about a $110.00 for the workbench and paint shelves. It took me about 2 hours to put together. I'm sure by now you have built or selected a workbench. 

Hunter 


  • Member since
    September 2006
  • From: Bethlehem PA
Posted by the Baron on Tuesday, January 26, 2016 12:12 PM

I've added one of those little Sterlite/Rubbermaid/etc shelf units, too.  I put all my paints in it.  They used to be spread out between space on top of my bench and some old cookie tins.  Now,  I have all of the jars of Tamiya, Model Master, Polly-S, etc, in similar size jars, in the top drawer, with labels on the lids with the brand and color marked, all of the acrylic eye-dropper bottles and craft store paints in the middle, and tools like my punch and die sets, a box with my Dremel bits in it, my drill bits, and various sculpting putties, in the bottom drawer.  And I can pick up the shelf unit and take it along to a friend's house when we get together for a build day.

The bigger the government, the smaller the citizen.


  • Member since
    January 2003
  • From: Chantilly, Virginia
Posted by CNicoll on Sunday, January 24, 2016 3:06 PM

I have used an old corner computer table from Office Depot for many many years now and it works great for me.  Bonus is I keep a monitor where i can plug in my laptop for reference photo's or especially enlarging the Eduard instruction sheets.

Hobby deskThere are lots of nooks and places for all of my supplies and what doesn't fit into the desk or supplies I don't use often, go into the plastic rollaway drawer set that has two small drawers on top, the other two are full width.  Plus I always keep the model box open on top of the drawers, with unused sprues there.

I use a number of things I ordered from MicroMark : the 2 round organizers on the right and the two brown paint brush organizers.  Helps a lot.  On the left is the vented paint booth (also MicroMark but about 10 years old at this point) that can quickly be taken down and put away.  Works so well that even lacquers can be safely painted.


On the bench:  Academy 1/72 B-17G 'Blue Hen Chick';  1/48 Tamiya Mustang III; Kitty Hawk 1/32 P-39. 

Completed:  1/48 Tamiya P-51D Mustang - 'Show Bird', 1/32 Dragon P-51D  Flying Tigers 'What if'; 1/32 Tamiya P-51D Big Beautiful Doll

Group build:1/48 Tamiya Mustang III; 1/48 Tamiya P-51D Show Bird

  • Member since
    January 2009
  • From: hamburg michigan
Posted by fermis on Sunday, January 24, 2016 1:06 AM

I did a "built in" bench, back in 03...although, I didn't "move in" until 09, after a 3 year hiatus.

My main work surface is a piece of 1/4" (24" x 14") glass...HIGHLY recommended!

Paint booth is on the other side of the basement, (vented outside).

Having been at this bench, since Jan of 09...I'm still happy with it!

  • Member since
    February 2009
Posted by maxdtex on Saturday, January 23, 2016 9:58 PM

http://www.amazon.com/gp/product/B00AY94YAY?psc=1&redirect=true&ref_=oh_aui_detailpage_o06_s00http://www.amazon.com/gp/product/B00AY94YAY?psc=1&redirect=true&ref_=oh_aui_detailpage_o06_s00

  • Member since
    June 2010
Posted by 5-high on Saturday, January 23, 2016 9:48 PM

tempestjhonny

sorry for the late reply,,its out of a old duracraft moisture console humidifier that i found at valuevillage up here in prince goerge bc canada. i guted it for the 10 inch 5 blade fan . it came all ready with a 12inch long tube what mounted the motor----fan assambly in the center. all i had to do is cut a hole in back of my booth , and hook up the 5inch vent pipe . i had to build a costom vent hood in the back cuss of the space restriction i have. i was going to use a indoor to outside fan that hangs in a window or hole in the wall . A nother way i was thinking of useing and elec auto mobile cooling fan ..u know the ones that hotrodders use . all you need toget is a step down tranformer 120v to 12 v . thay come with a fan shroud 

pete


  • Member since
    October 2013
Posted by infofrog on Saturday, January 23, 2016 4:44 PM

i did  this new set up about 2 weeks ago .

Rick

before

new table set up


  • Member since
    November 2003
  • From: Naples, FL
Posted by tempestjohnny on Saturday, January 23, 2016 4:37 PM

5-high

heres my hobby bench ..built this 10 years ago ..im still adding stuff as i need it . had a tamiya spraybooth but that wasnt powerfull enough so i built a new one from heating ducket and 10 inch fan.

pete


Hey Pete. What kind of fan did you use for your booth. That might be just what I need


  • Member since
    June 2010
Posted by 5-high on Saturday, January 23, 2016 3:46 PM

heres my hobby bench ..built this 10 years ago ..im still adding stuff as i need it . had a tamiya spraybooth but that wasnt powerfull enough so i built a new one from heating ducket and 10 inch fan.

pete

  • Member since
    May 2003
  • From: Central USA
Posted by qmiester on Saturday, January 23, 2016 9:46 AM

I got my current modeling desk from Harbor Freight. It's an all hardwood desk about 60"x24", w/4 drawers.  I removed the carpenters vise and added a top made from a piece of 3/4" CD plywood about 2" wider than the top.  It comes in light hardwood or dark hardwood.  Depending upon what is on sale or what certificates are available, one can cost from 119.95 to 249.95 dollars.

The also have an all metal unit which seems to be a little bit smaller than the wooden version. It seems to be a little smaller than the wooden versions but has wat appears to be a 4'x4' piece of pegboard mounted at the back of the bench top with a flourescent light mounted at the top.  The current price is $99.95.  Check them out on the web.

-----------------------------------------------------------------------------------------------

Dialog between lady and Winston Churchill at a party in the late 1930's

Lady "Winston, you're drunk!"  Churchill " Yes'm, and you're ugly, but tommorrow, I will be sober and you will still be ugly!"

Quincy
  • Member since
    April 2008
  • From: Fox Lake, Il., USA
Posted by spiralcity on Wednesday, January 20, 2016 8:24 PM

I had a nice setup before we sold our house and purchased a townhome. Now I use a 5 foot folding table. The table is sturdy and I actually like it.

This was my old setup. I had so much light I thought I would go blind. Stick out tongue


Note: I can not work in a cluttered work space. I just cant do it. I need a tidy space, with everything in it's place, and a place for everything.


fox
  • Member since
    January 2007
  • From: Narvon, Pa.
Posted by fox on Thursday, December 17, 2015 6:11 PM

I have 2 metal shelf sets, one on each side for storage with an old hollow door sitting between them bolted to the edge of the shelves. Been thinking of re-doing the room and getting a couple of used metal office desks to make the work area larger, plus more storage in the drawers of each desk.

Jim  Captain

 Main WIP: 

   On the Bench: Artesania Latina  (aka) Artists in the Latrine 1/75 Bluenose II

I keep hitting "escape", but I'm still here.

  • Member since
    November 2009
  • From: Twin Cities of Minnesota
Posted by Don Stauffer on Thursday, December 17, 2015 8:49 AM

Personally I have been narrowing my benches through the years.  I find 24 inches about the deepest I find readily accessible.  I find if I make it deeper junk just accumulates at the back. I always build a tool rack at the back, and find it easier to grab the tools if it is shallower.  I have built several that were 20 inches, and find that works well, though with 24 I do not need to trim the sheets of 2 x 4 I usually use.  I have built at least a dozen benches over the years, and keep revising them, and planning my next one, with the lessons I have learned on the latest.  Some of my friends say my hobby is really building work benches :-)

Don Stauffer in Minnesota

  • Member since
    December 2015
Posted by Dash8 on Wednesday, December 16, 2015 1:21 PM

I use 2x5 metal bench stands, the ones you add your own plywood top.

In my case I use 3x6 plywood  for the top, tons of room. They are outstanding

and the legs can be adjusted to desk or stand level. I like desk level. Looks like

they don't sell them at any of the local stores around here. I think I paid $49

each I bought two of them one for home shop and one for the model shop.


On the bench: Revell Euro Fighter 1/32

Ontario, CANADA


  • Member since
    July 2014
Posted by modelcrazy on Tuesday, December 15, 2015 2:53 PM
Here's mine. Just a 4X8 plywood sheet cut to 3X8 and lament glued on the top. Underneath is strengthened with 2x4 and the legs are the foldable kind that I bought separately. Works well for me.

Steve

Building a kit from your stash is like cutting a head off a Hydra, two more take it's place.


http://www.spamodeler.com/forum/

  • Member since
    August 2014
  • From: Willamette Valley, Oregon
Posted by goldhammer on Tuesday, December 15, 2015 2:36 PM

Living in a 12 wide old mobile home, no dedicated area, so I have a piece of 1/2 inch ply I glued a piece of laminate on that was used by the wife as a lap desk/writing table  Has a cutout to fit around the stomach.  Looks somewhat like a kidney shaped swimming pool.

Otherwise do some over at work in the body shop.

  • Member since
    May 2008
  • From: Wyoming Michigan
Posted by ejhammer on Tuesday, December 15, 2015 10:29 AM

bluewavecaptain
 
ejhammer

My room in the basement. About 8' X 10', plus space under the stairs for storage. Spray booth I built, vented to the outside. Cool in summer and warm in the Michigan winters.

The following pics show what I've done, maybe give some ideas to others. Kinda hard to get the whole layout in a small room. I'm very comfy in there.

EJ


and I thought I had a lot of modeling stuff.....


My problem is, I am easily distracted to something else. Plastic ships, wood boats and ships, RC, whatever, so the collection just kept growing over the last 15 years. That's why I finally moved the stuff to a dedicated room (originally organized fairly well) from the top of my drafting table in the office. I'm finally to the point - I think - that the exponential growth of "stuff" has slowed consideably, much to the relief of SWMBO.


EJ

Completed - 1/525 Round Two Lindberg repop of T2A tanker done as USS MATTAPONI, USS ESSEX 1/700 Hasegawa Dec 1942, USS Yorktown 1/700 Trumpeter 1943. In The Yards - USS ESSEX 1/700 Hasegawa 1945, USS ESSEX 1/700 Dragon 1944, USS ESSEX 1/700 Trumpeter 1945, USS ESSEX 1/540 Revell (vintage) 1962, USS ESSEX 1/350 Trumpeter 1942, USS ESSEX LHD-2 as commissioned, converted from USS Wasp kit Gallery Models. Plus 35 other plastic and wood ship kits.

  • Member since
    May 2013
  • From: From the Mit, but live in Mason, O high ho
Posted by hogfanfs on Tuesday, December 15, 2015 10:03 AM

I have three 2 X 6 folding tables from Sam's. I am using them for now, since we have been in the house since the end of September. But, I plan to make a modular set of desks for my modeling. And the adjustment is to have the desk height at least 42", which keeps my back from getting sore.

 Bruce


 On the bench:  1/48 Eduard MiG-21MF

                        1/35 Takom Merkava Mk.I


  • Member since
    May 2013
  • From: Indiana, USA
Posted by Greg on Tuesday, December 15, 2015 9:08 AM

Whatever you end up doing, were I you I'd consider a worktop deeper than 24" if at all possible. I notice a couple of folks above have same.

My bench is two 24" x 5' garage bench units from a big box store. A nice 10' long setup, but I think 24" is too shallow for a good bench. Even for a general workbench, which is what mine really is. An extra 6" like Chris K and 5 High above mentioned would make a big difference.

Just my two cents.

  • Member since
    February 2003
  • From: Cameron, Texas
Posted by Texgunner on Tuesday, December 15, 2015 8:34 AM

I work at an old painted drop-leaf table in my study.  My magnifier light is positioned over it in this pic:

Here's the corner where the work gets done:


Of course, it rarely looks that "clean". Big Smile

Some reference:


"All you mugs need to get busy building, and post pics!"

  • Member since
    April 2004
Posted by Jon_a_its on Tuesday, December 15, 2015 3:03 AM

I LIKE RECYCLING! (read cheap, & PRESERVES Modelling & Beer tokens)

As above, kitchen worktops, old office desks file drawer units, lots of shelving, & 4 glass fronted book-cases for the essential reference materiel & 'ahem' finished models, (whatever they are.... )

Essential are the LOCKABLE desk pedestals & Filing cabsinets, for all the SHARPs, PAINTS, THINNERS & stuff small fingers & paws shouldn't find....


East Mids Model Club 32nd Annual Show 2nd April 2023

 http://www.eastmidsmodelclub.co.uk/

Don't feed the CM!


  • Member since
    June 2010
Posted by 5-high on Tuesday, December 15, 2015 1:55 AM

My room is about 10x10 ..have alot of paint shelving that I crafted my self ..as soon as I get my new laptop. ..I'll try to post pictures. ..my bench I made is 53inx32 in with an 18inch extension for those big projects like rc plains . And it holds my dremel jigsaw.. pictures comeing soon Big Smile

  • Member since
    February 2014
Posted by bluewavecaptain on Monday, December 14, 2015 3:27 PM

ejhammer

My room in the basement. About 8' X 10', plus space under the stairs for storage. Spray booth I built, vented to the outside. Cool in summer and warm in the Michigan winters.

The following pics show what I've done, maybe give some ideas to others. Kinda hard to get the whole layout in a small room. I'm very comfy in there.

EJ


and I thought I had a lot of modeling stuff.....

Shipyard - Revell 1/570 Titanic

Next Scheduled Build - Lindberg North Atlantic Fishing Trawler

"Take her to sea, Mr. Murdoch. Let's stretch her legs." - Titanic (1997)

Captain Charles Nelson

  • Member since
    August 2011
  • From: Earth, for now
Posted by BashMonkey on Monday, August 24, 2015 10:40 PM

I can't recommend my work desk. It's also hand made from Ikea shelf components, but in use its way too narrow with only about 12" effective depth, it needs at least another 6 to 8" in depth to really work, I am constantly dealing with things falling over the edge. I would suggest going to a thrift store and find a basic computer desk. I have seen decent ones for as low as $15-25.

 ALL OF YOUR BASE ARE BELONG TO US!

  • Member since
    August 2015
  • From: North Central Texas
Posted by Limacharlie48 on Monday, August 24, 2015 9:39 PM

Great looking benches! Felines and youngsters mean I need to be fairly compact and have the ability to batten down - large computer style rolltop from Craigslist fit the bill perfectly, one switch lights her up and fires the compressor. I use the keyboard tray as a slide out mount for dremel with cable drive, the printer drawer holds two small shelving units and an adjustable drawer organizer keeps tools organized and at hand. Paints in the second lockable drawer. Great for my needs, and when closed down it keeps the peace in the house!

  • Member since
    June 2014
Posted by USAFASME7 on Wednesday, August 19, 2015 9:47 AM

Here's my new model work bench. I love it!

I started with two 18" wide lower kitchen cabinets (Oak), that I got from a local builder's supply surplus store for $79.00 each. Each has a pull out drawer in the top and an a hinged cabinet door at the bottom. I spread them 8' apart in an alcove of my man cave room.

Next, I bought two boards to make the apron; a 1x6x8 in Oak, and another in pine to connect the two cabinets together under the counter top. The Oak board for the front was finished to match the cabinets (Clear Satin Polyurethane) and the rear apron board (pine) was left natural, as it can't be seen. I secured the apron boards to the cabinets with screws and four 90-degree L-brackets used to build outdoor decks.

Next, I bought an 8' section of Formica Laminate kitchen countertop (with the integral back splash) from the same store for $90. I used Liquid Nails construction adhesive, L-brackets and screws to attach it to the top of the cabinets and apron.

The left cabinet holds my computer tower, network and WiFi boxes, while the right side houses my Bose subwoofer and my airbrush compressor. I drilled about a dozen 2" diameter holes in the backs of the cabinets for airflow for the computer and compressor. The drawers are organized with bins for Q-Tips, sandpaper, clothes pins, putty, extra paints, etc.

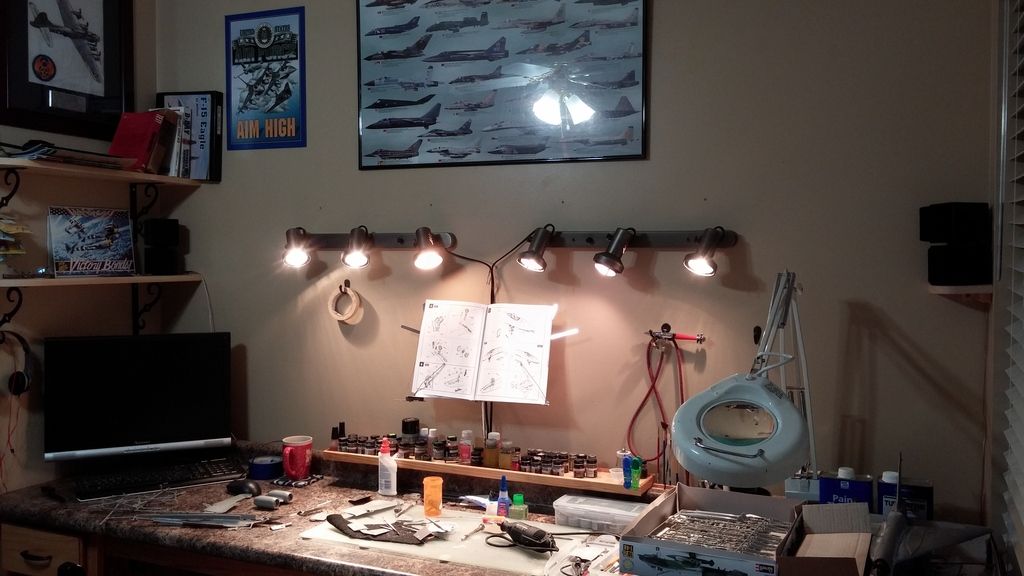
I used scrap wood from another project to build a 12" deep X 4' long shelf to hold my paints, glues, thinners, etc. A musician's old sheet music stand that I found in my attic is attached to the back of the shelf serves to hold my instructions or reference books.

I also added a 12" long magnetic block (not shown) to the wall (the same kind Chefs use to hold kitchen knives) and it works well to keep needle files, sprue cutters, pin vises and other steel tools within easy reach.

Two wall-mounted (plug-in type) dimmable track lights hold a total of 6 LED flood light bulbs, for PLENTY of light.

This bench is even big enough to hold my airbrush spray booth on the right side (not shown) that is vented out the window. I recently mounted my computer monitor on an articulating wall-mount arm, so reference pictures are always easy to see.

My airbrush, magnifying visor, dremel tool and other necessities are hanging on hooks within easy reach. I recently added some spruce shelves to the left side wall to hold reference books, in-work projects, etc.

I have a pretty sweet work space, and I'm pretty proud of it! Cool The cabinets, countertop, wood and hardware to make the bench cost me $300 and the lighting was $75, plus an additional $90 for LED bulbs.


--Rob

Glue Sniffer since 1977

  • Member since
    November 2009
  • From: Twin Cities of Minnesota
Posted by Don Stauffer on Tuesday, August 18, 2015 9:12 AM

My desk is homemade, and I really like it.  It consists of two of those plastic drawer units sold at office supply stores.  The top is to pieces of half inch particle board, 2 x 4 foot pieces, as a sandwich with ribs and longerons of 1 x 2 inch pine stock between.  I wanted the top to be a couple inches higher than it would be just putting that top on the drawer units, so I made a couple of squares out of 1 x 2, and mounted those on top of drawer units under the top.  A bonus is those drawer units come with castors.  Those drawer units are frequently sold for about 15- 20 bucks a piece on sale.  Cost for everything was a little over fifty bucks.  I use white contact paper to make a nice bright surface on top- easily replaced when full of glue and paint spills.


I used a couple more pieces of 1 x 2 as uprights screwed to back of top, and mounted pegboard to them for tool rack.


Don Stauffer in Minnesota

  • Member since
    May 2008
  • From: Wyoming Michigan
Posted by ejhammer on Monday, August 17, 2015 7:47 PM

My room in the basement. About 8' X 10', plus space under the stairs for storage. Spray booth I built, vented to the outside. Cool in summer and warm in the Michigan winters.

The following pics show what I've done, maybe give some ideas to others. Kinda hard to get the whole layout in a small room. I'm very comfy in there.

EJ

Completed - 1/525 Round Two Lindberg repop of T2A tanker done as USS MATTAPONI, USS ESSEX 1/700 Hasegawa Dec 1942, USS Yorktown 1/700 Trumpeter 1943. In The Yards - USS ESSEX 1/700 Hasegawa 1945, USS ESSEX 1/700 Dragon 1944, USS ESSEX 1/700 Trumpeter 1945, USS ESSEX 1/540 Revell (vintage) 1962, USS ESSEX 1/350 Trumpeter 1942, USS ESSEX LHD-2 as commissioned, converted from USS Wasp kit Gallery Models. Plus 35 other plastic and wood ship kits.

JOIN OUR COMMUNITY!

Our community is FREE to join. To participate you must either login or register for an account.

SEARCH FORUMS
FREE NEWSLETTER
By signing up you may also receive reader surveys and occasional special offers. We do not sell, rent or trade our email lists. View our Privacy Policy.