SEARCH FINESCALE.COM

Enter keywords or a search phrase below:

Rapid prototyping Machines

7011 views
64 replies
1 rating 2 rating 3 rating 4 rating 5 rating
  • Member since
    November 2005
Posted by Anonymous on Sunday, August 13, 2006 9:55 PM

Here is my idea on how to Sprue the Weapons.  The Sprue should be no more than half of the dia of the weapon.  The dimension boxes are supposed to read 1/3 each

IF IT WOULD WORK BETTER, when you create the object for support, you can come straight down with the Sprues to the StereoLith table and I'll connect them when I put them on the base.

  • Member since
    November 2005
Posted by Anonymous on Sunday, August 13, 2006 6:00 PM

Here is the desired sprue for the Medallion

ANYTHING YOU DO IS OK.  If I don’t like it, it’s easy to remove.
--  The Sprue thickness or diameter should be 3/4 the thickness of the object
--  If the Sprue is not round, the width should be no more than twice the thickness
--  The Sprue should be flush with the back of the Medallion
--  The Sprue can be any shape as long as there are no sharp transitions that create turbulence during the pour
--  I create the Sprue in 3 parts, but StereoLith will not be three parts assembled
-- On the medallion there should be three entry points into the medallion. 
        >>  It doesn’t matter where on the edge the first entry point is at as long as it is not an object where there is detail on both sides
        >>  The other two entry points should be on the edge also at about 90 deg from the first.
       >>   I had a fourth that came up from the junction and went to the center of the back
 
ONLY BECAUSE IT WAS SO LARGE.  It WILL NOT be necessary on a smaller medallion
  • Member since
    November 2005
Posted by Anonymous on Sunday, August 13, 2006 1:04 PM
       Right-on. I will re-cad them tonight and make em tomorrow morning. I will thicken the fins and If you tell me where the sprues need to be located and the size I will build them in. On the medallion I will resize it and fix the star problem thats easy I have the center done and will ship a combined example also so you can take a look. If you can tell me where you want the sprues on the medallion I can build them also.

I love a challenge.

Cheers,

e-
  • Member since
    November 2005
Posted by Anonymous on Sunday, August 13, 2006 12:23 PM

 DK666 wrote:
Can Casting. Wow. I take it the models burned out ok. Looking good.

Here is the objects after they spent the night in the "Pickle Jar" actually a mild acid called "Sparx"

GENERAL OBSERVATIONS AND CHANGES THAT NEED TO BE MADE

The MAJOR problem in the casting was my own fault. The investment is a critical step and I could not perform it totally because of the HUGE amount of investment that was required.

The objects burned out very well. No indications that there was any ash that remained after the vacuum with the sprue hold toward the vac plate. The investment is porus enough to pull air through the investment and pull the ash out. Then the canister is turned over on the vac plate and a vacuum is pulled while the molten metal is poured in.

MEDALLIONS

The Medallion canister required a HUGE amount of investment and I couldn't do a proper vacuum. The fix is for me to reshape the container to require less volume of investment.

The Medallion is too large. The fix is to see if we can reduce the size without losing the detail.

The Medallion surfaces are not all equal. The flags seem to be lower than the circle surfaces. Hopefully the depth of detail on the flags can be increased

The stars in the American Flag need to be more pronounced. Just dots would be ok as long as they are deeper

The Medallion mass is 114 g 4.1 oz avdp. Hopefully we can get the size down to get the mass down to about 31g or 1 oz troy

The 10 stars around the perimeter are outstanding in detail showing that I can cast the detail.

The maple leaf is also very very good.

It would help if the sprues could be directly built on the Medallion but it is far less critical on the Medallion when compared to the Weapons

WEAPONS

The Weapons are outstanding in terms of castability

The fins on the tails turned out exactly as the models

The fins on the models did not reproduce very well on the Stereo Lith OR they were damaged in transit. The fix is to make the fins somewhat thicker

The Weapons at this size need to be ONLY the actual shape. It is a waste of time to try to make them flat on the back

The best way to cast the Weapons is to sprue them about mid way on the length with a sprue that is about 30% of the diameter. OR two sprues that are about 25% of the diameter and at about the 1/3 points on the Weapon and coming to a single sprue sort of like a Y shape. The BEST fix is to have the sprues done while the StereoLith is being formed. Perhaps the sprue would be the support during the laser process and allow the fins to develop more securely.

Questions Welcome, they will make me think through the process being used.

----- Caster (RLW) -----

  • Member since
    November 2005
Posted by Anonymous on Sunday, August 13, 2006 10:25 AM

Can Casting. Wow.


I take it the models burned out ok.

Looking good.


e-

  • Member since
    November 2005
Posted by Anonymous on Saturday, August 12, 2006 10:31 PM
 DK666 wrote:
Did you get it yet ?

Yup Got em.  Wanted to surprise everyone.

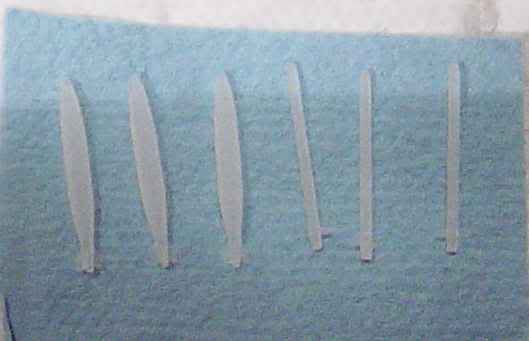
Here are the Weapons that I choose to Cast, 6 out of the 10

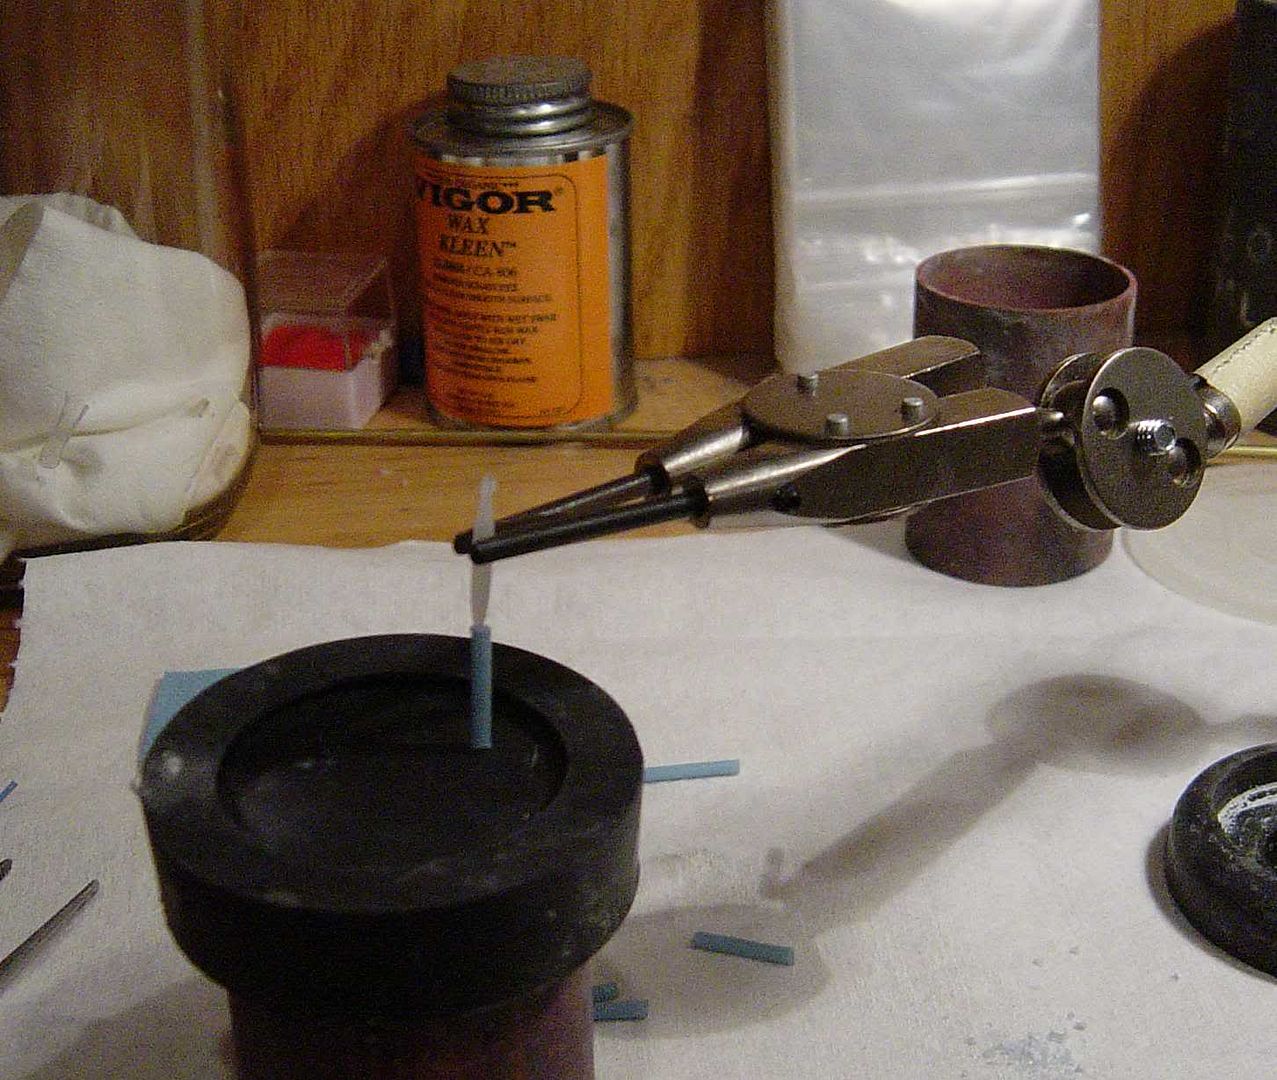
Putting the Sprue on the first of 6

Here are all 6 Sprued and Waxed to the Investment base

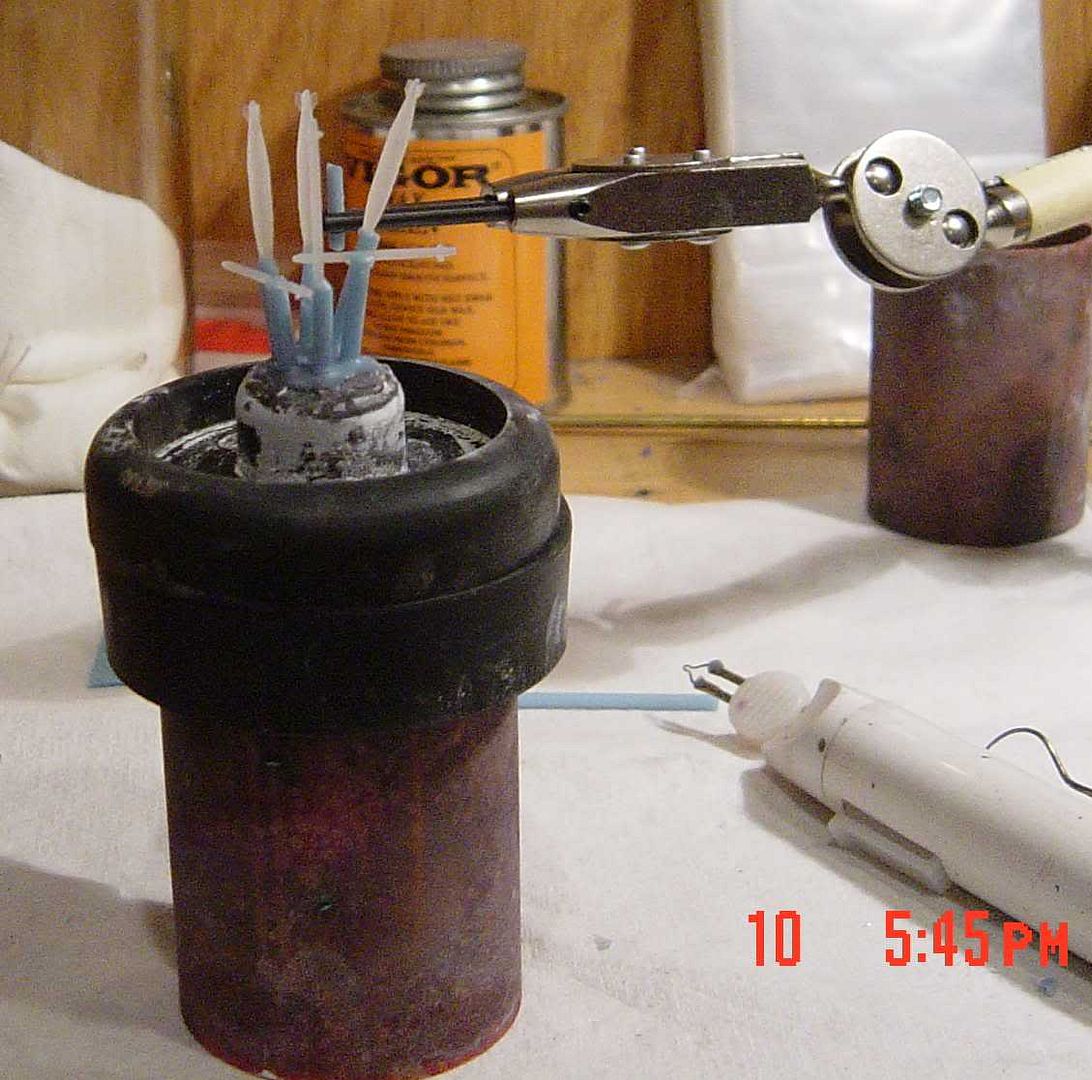
Now they have been sprayed with a liquid to decrease surface tension prior to pouring the investment.  And, the canister has been mounted on the base almost ready to pour and vac

Here is the medallion with 4 sprues attached.  one on the edge center, two on each edge side at about 90 deg and one up the back into dead center of the back

Now it has been sprayed, and mounted on the base ready for the investment.

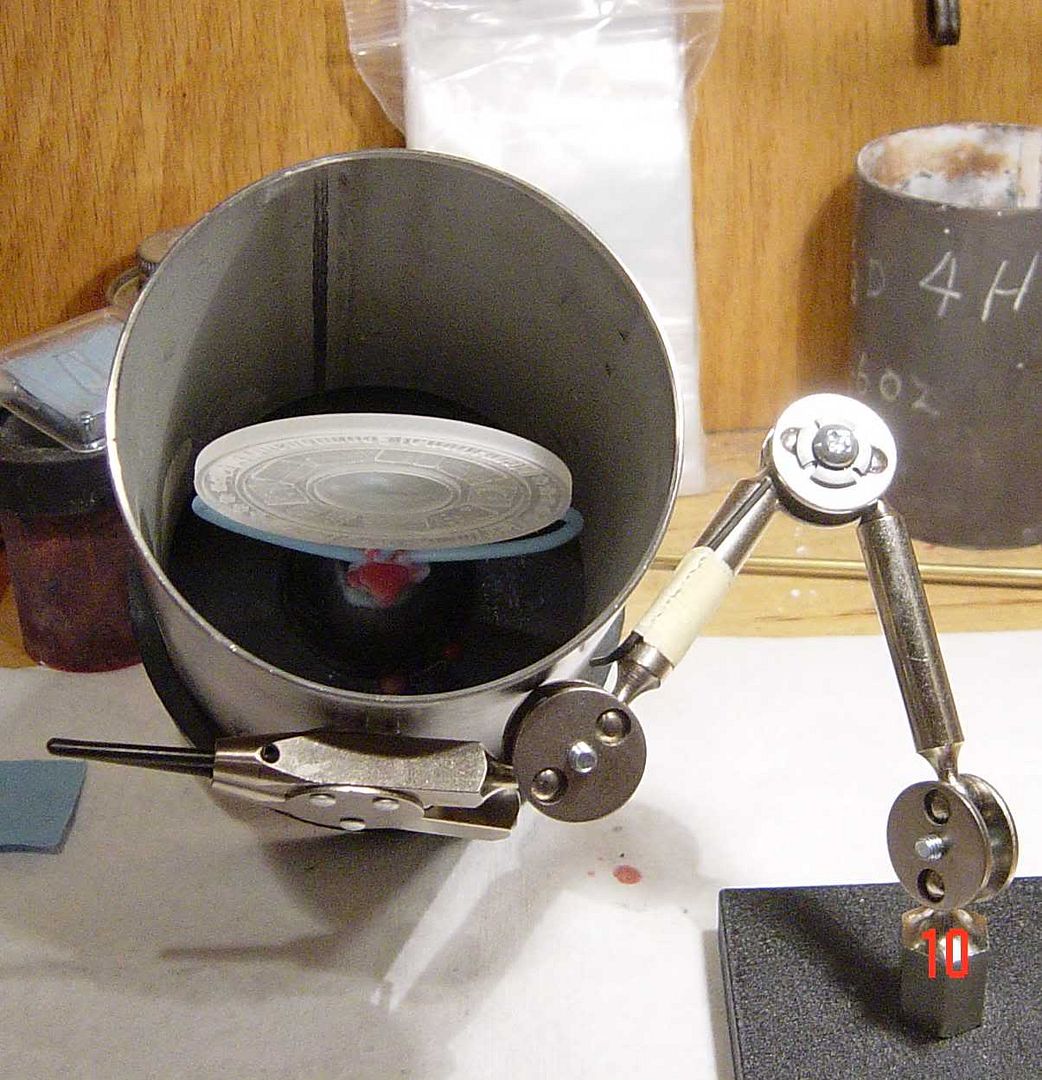
Here are the canisters fully invested and setting on the vacuum plate.  The process is to mix up a closly measured amount of investement with a closly measured amount of water for 2 minutes, vacuum in the mixed mode for 2 minutes (I get about 27.5 in of merc, pour it into the canister and vac and vib for 2 minutes.  Counting the slack time for moving around, 7 to 7 1/2 minutes have passed. And the investment will set solid in another minute or minute and one half.   The base is then removed and the surface top and bottom is trimmed and made concave with a plain old knife and left to dry out as much as possible.  I try to do it overnight.

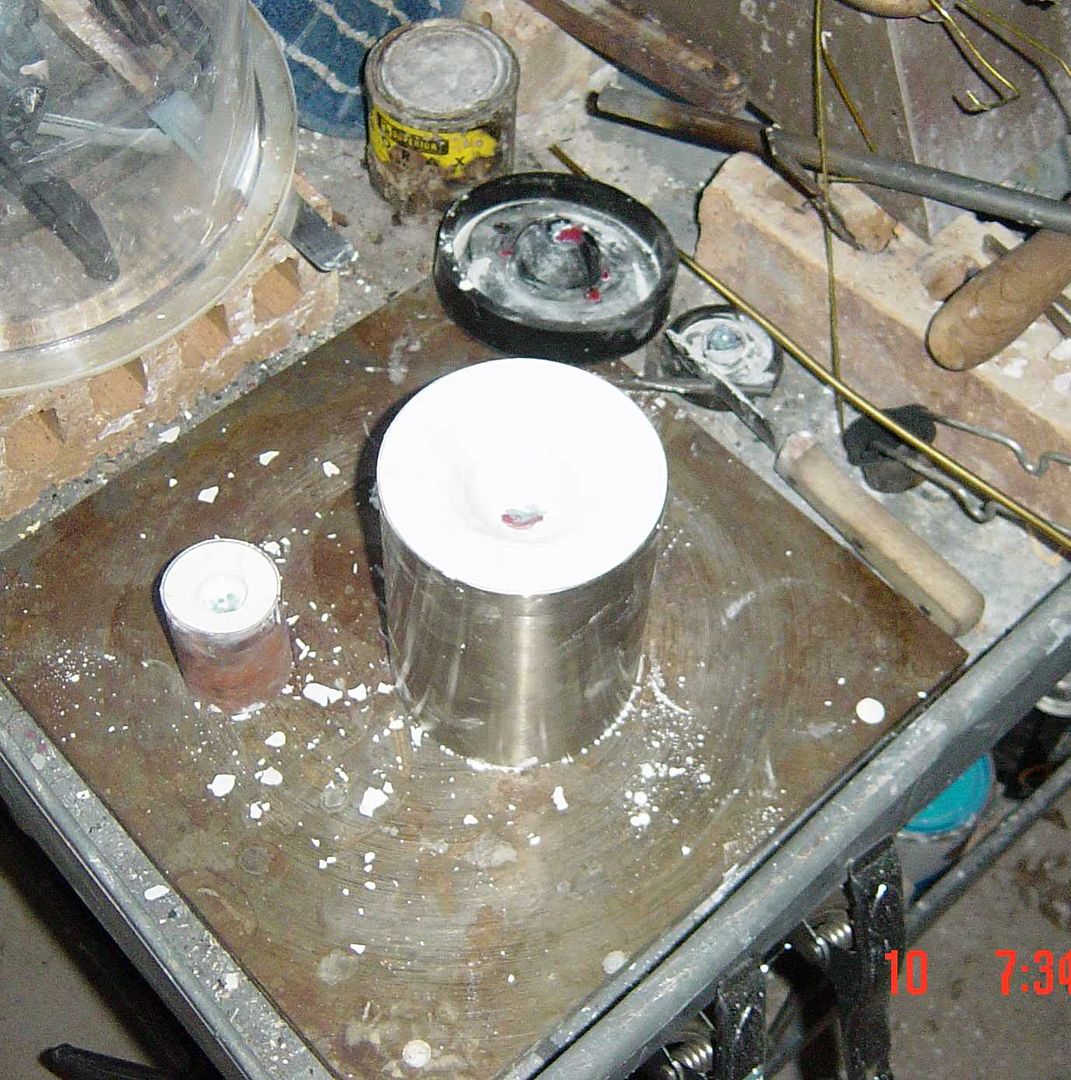
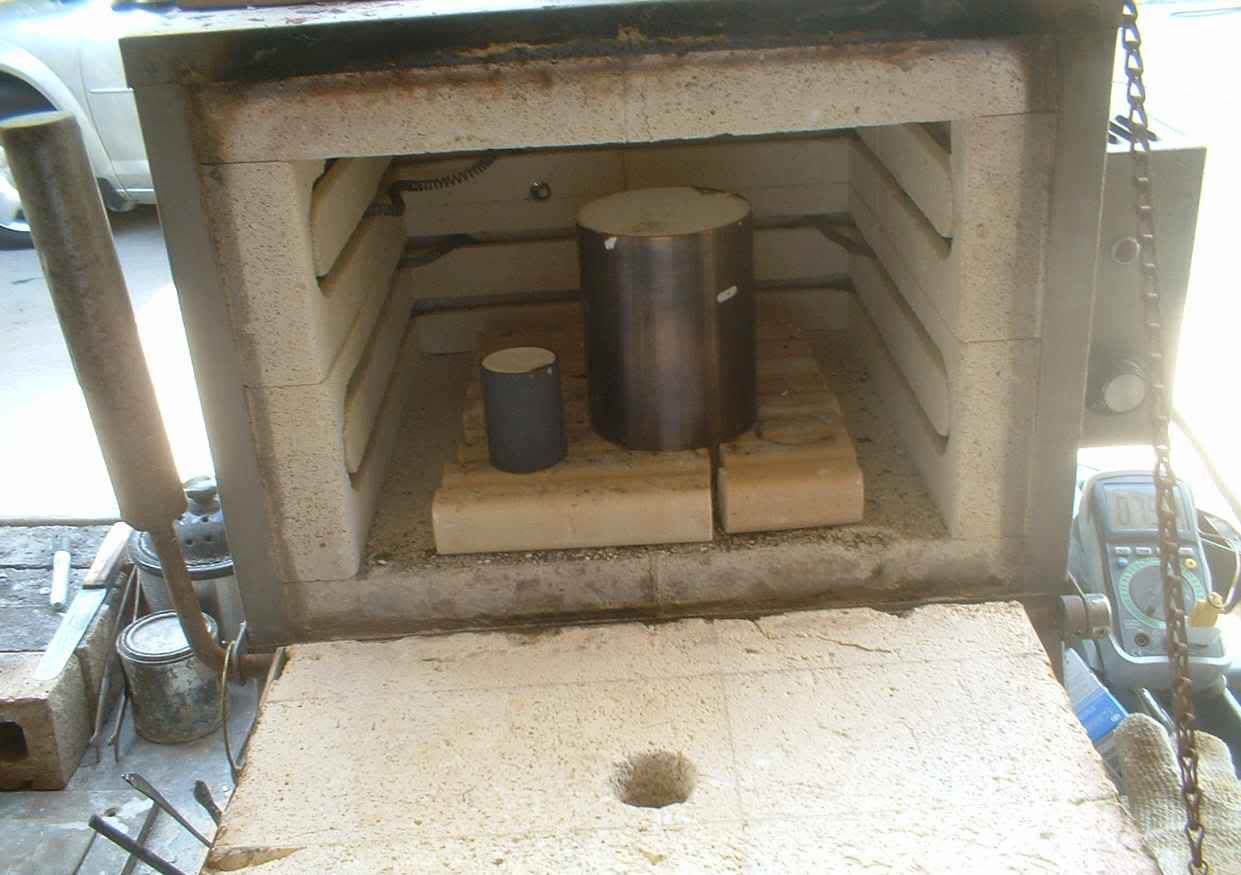
Now put them in the oven to bake.  2 hours at about 450f, 2 hours at about 1000f, 1 hour at about 1400-1500f, rest for another hour after the temp is down to 1100f

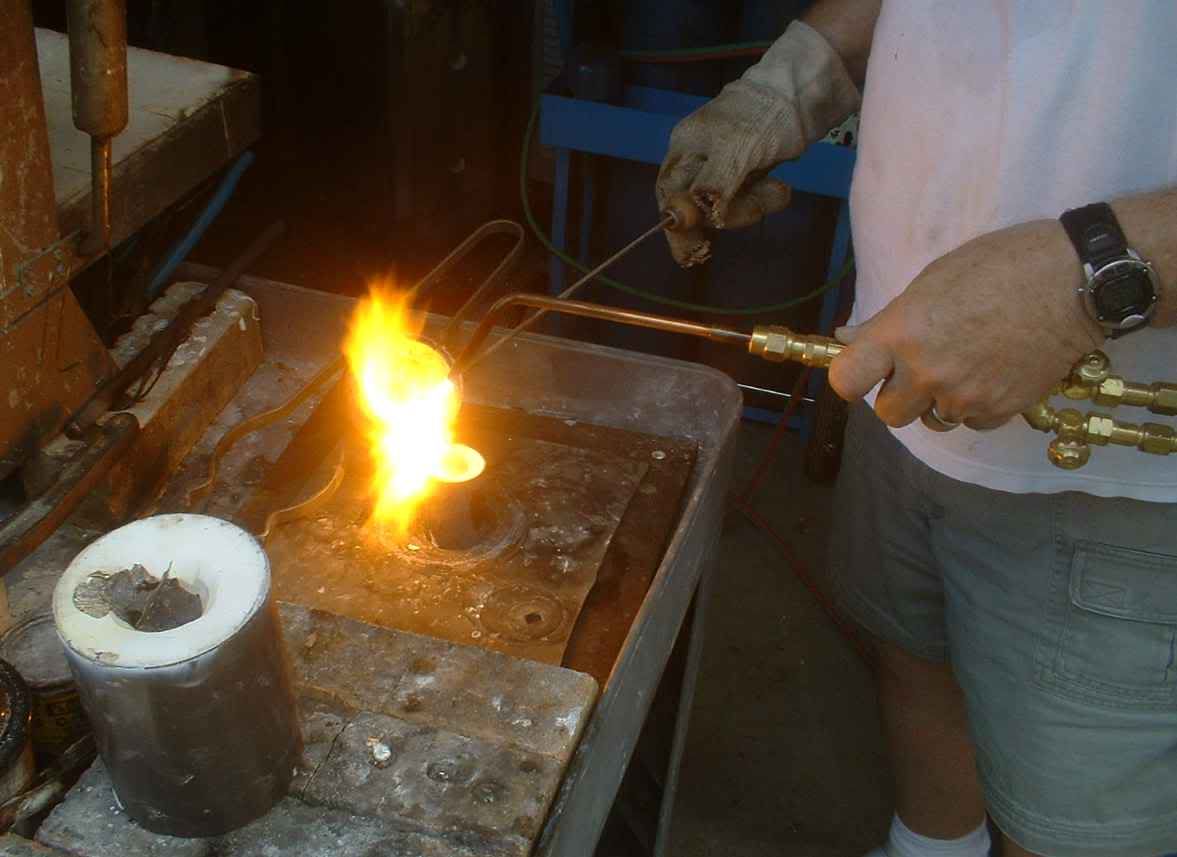
The medallion has been poured and she took the picture during the pour of the small Weapons

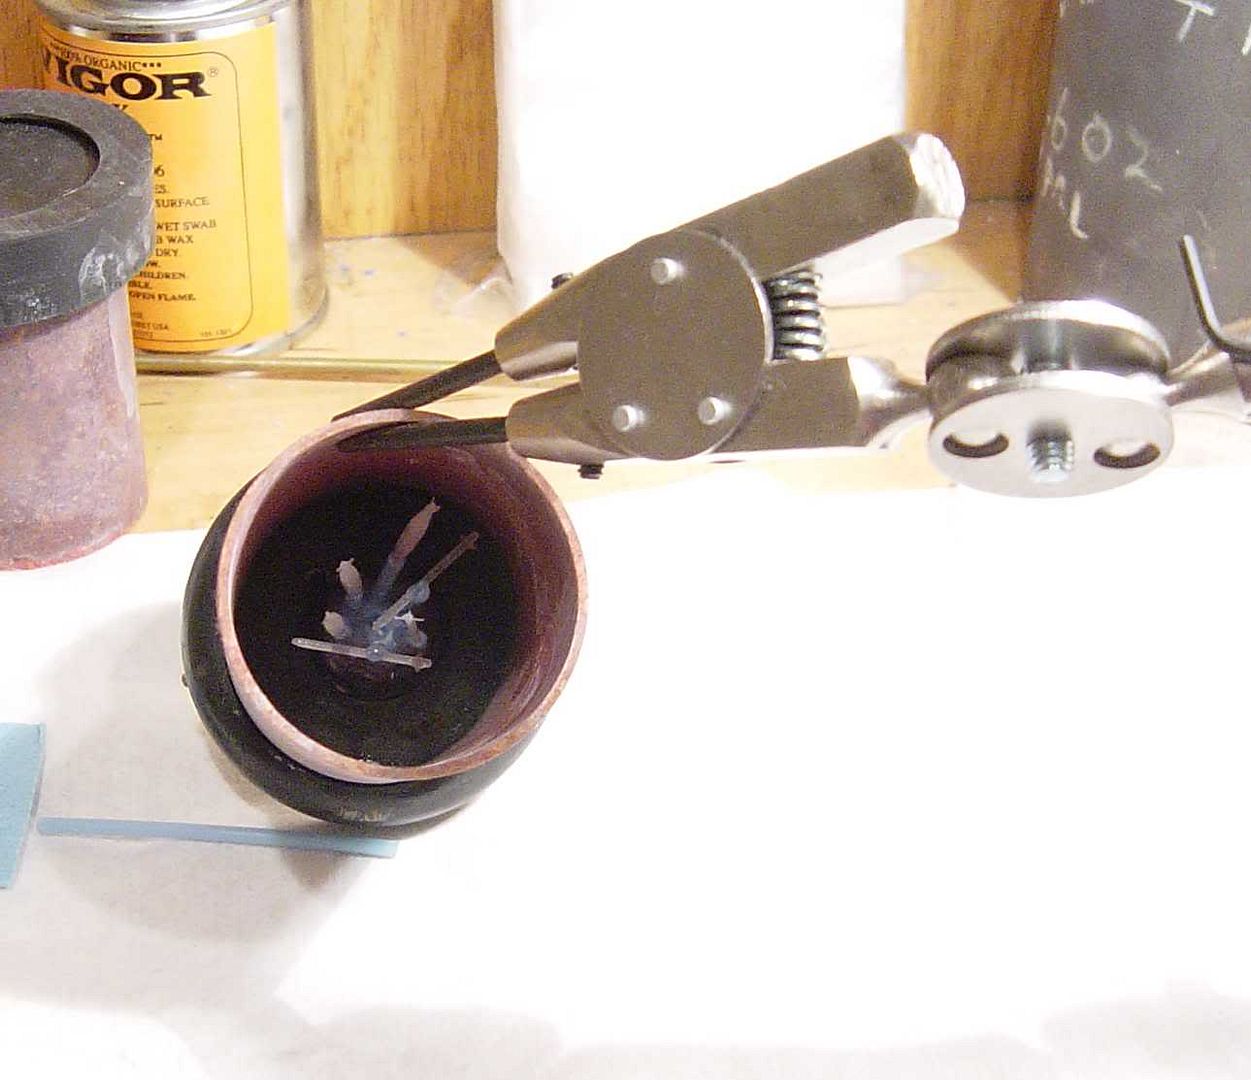
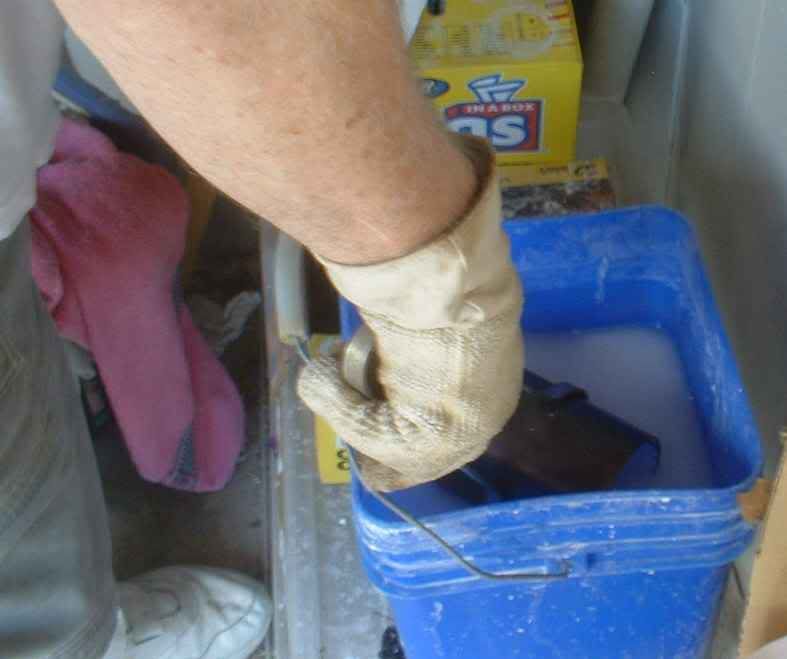
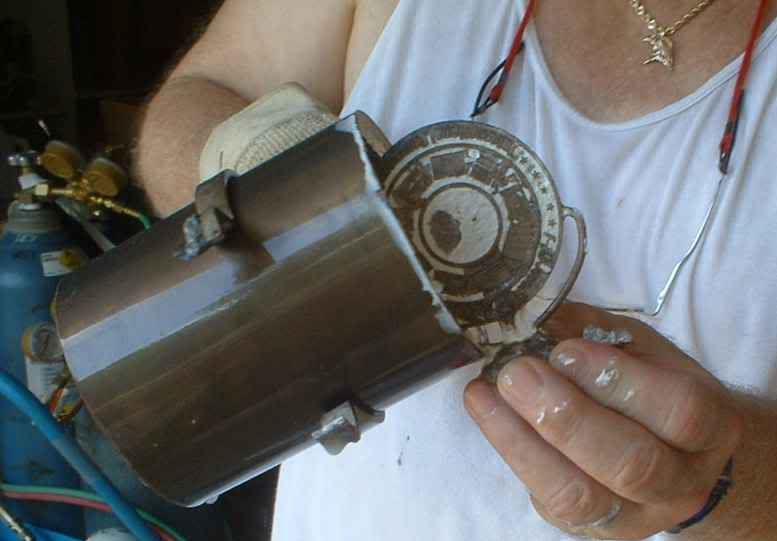
The quench.  After the sprue turnes dull grey, it is submerged sprue end first in water and then totally.  The canister and investment create steam which blows the investment out and the object can be removed

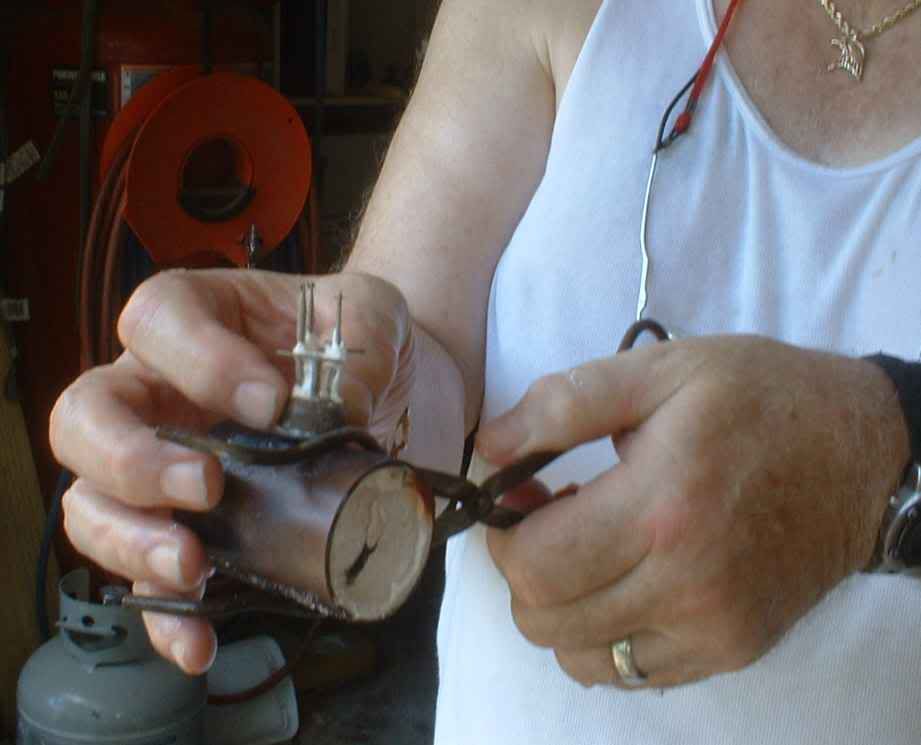
Success on the Medallion

5 of the 6 Weapons turned out.  I mounted them in various positions to see if there was a good or bad way.  One of the horziontal ones must have broke loose during the investment because the sprue end turned out great.

Ed,  I'll contact you with some changes that will be required to be successful.

Regards Caster (RLW)


  • Member since
    November 2005
Posted by Anonymous on Saturday, August 12, 2006 2:22 PM

Did you get it yet ?


e-

  • Member since
    November 2005
Posted by Anonymous on Monday, August 7, 2006 8:24 PM

The round is downrange. Should have them tomorrow or wednesday.


Cheers,


e-

  • Member since
    November 2005
Posted by Anonymous on Monday, August 7, 2006 5:20 PM
 DK666 wrote:

1 hour 45 minutes later. Poof.

Being sent your way today.

I can't wait Smile [:)], I just can't wait Big Smile [:D], I'm so excited Wow!! [wow] , Hurry Yeah!! [yeah], Hurry Smile,Wink, & Grin [swg], Hurry Thumbs Up [tup]


  • Member since
    November 2005
Posted by Anonymous on Monday, August 7, 2006 2:07 PM

1 hour 45 minutes later. Poof.


Being sent your way today.


Cheers,


e-

  • Member since
    November 2005
Posted by Anonymous on Monday, August 7, 2006 8:57 AM
 DK666 wrote:

Last nights fixes.  I will build one this morning should only take about 45 minutes.


I   LOVE the textured effect in the recess and the smooth finish on the top surface.  This will be outstanding when done in Sterling Silver.  I'm also going to try to cast and finish one and then blacken (oxidize) the recessed portion.

What do ya'll think?  Any other ideas out there?

Regards Caster (RLW)

  • Member since
    November 2005
Posted by Anonymous on Monday, August 7, 2006 8:10 AM

Last nights fixes.


I will build one this morning should only take about 45 minutes.


Cheers,


e- 

  • Member since
    July 2003
  • From: Redmond, WA
Posted by bwr1 on Sunday, August 6, 2006 9:59 PM

 RLW wrote:

Hope I not being too presumptious.  Just trying to share some things across the boundary line of hobbies.

No, not at all.  This is very useful stuff.  There are models I want to build that I know will never be kitted, so I've got to learn about a lot of scratchbuilding techniques (casting, photo-etch, vacuum forming etc.), and it's really helpful to get advice from someone who's been there and done that.

Thanks,

Bruce 


  • Member since
    November 2005
Posted by Anonymous on Sunday, August 6, 2006 8:09 PM
 DK666 wrote:

How's This ?

Just have to get the JSF, Mountians & Trees and I'll make one tomorrow.

Awsome!.  The exe file you sent does not do the medallion justice because of the color.  There is very little difference.

Questions:

The letters look shallow, can they be deeper? 

Could the surface that is recessed be a "very tight peen look" if that is possible?  While the top surface should be a very high polish in Sterling Silver.

Can the exe that you convert to be shaded to show the detail better?

Regards RLW

  • Member since
    November 2005
Posted by Anonymous on Sunday, August 6, 2006 7:17 PM

How's This ?

Just have to get the JSF, Mountians & Trees and I'll make one tomorrow.


Cheers,


e-

  • Member since
    November 2005
Posted by Anonymous on Sunday, August 6, 2006 1:41 PM
 DK666 wrote:

spin casting or gravity casting and in which alloy ?

Gravity with vacuum assist on the investment canister. 

Alloy will be Sterling   .925  Alloy from fine to .925 will be copper.

 DK666 wrote:

Oh. How much Draft do you need ?BTW got the other files thanks.

I really don't need any draft.  Both RTV and Rubber flex enough to bend away from the model.  If it is too severe, then I'll do a multi-part [more than two] mold.


  • Member since
    November 2005
Posted by Anonymous on Sunday, August 6, 2006 1:06 PM

I can do the SG thing but I have to finish the model first. I can of course resize it to meet your material needs. Are you spin casting or gravity casting and in which alloy ?

Oh. How much Draft do you need ?


Cheers,


e-


BTW got the other files thanks.

  • Member since
    November 2005
Posted by Anonymous on Sunday, August 6, 2006 1:02 PM
 DK666 wrote:

Just started with my coffee. Something like this. Let me know.

Yup,  very good.

Your too much.  Don't you ever stop to rest [I should talk]

Didn't know how to attach files in this forum so I have sent you some files under separate cover via e-mail.  Should save you some construction time.

Now another question.  If you know the specific gravity of something like silver, and I'm sure that your fancy software can caculate volume, can you tell it that you want it to weigh approximately 2 oz (60 grams) with a thickness no greater than 3/32 to 1/8 inch can it size the object.  Sort of thinking as size as the independent variable.

Forgive my Systems Engineering (Systemic) thinking

Regards RLW


  • Member since
    November 2005
Posted by Anonymous on Sunday, August 6, 2006 12:54 PM

Next Item.


Cheers,


e-

  • Member since
    November 2005
Posted by Anonymous on Sunday, August 6, 2006 12:36 PM

Just started with my coffee. Something like this. Let me know.


Cheers,


e-

  • Member since
    November 2005
Posted by Anonymous on Sunday, August 6, 2006 11:55 AM

A good rule of thumb we use is 1/4" surrounding the object.


Cheers,


e-

  • Member since
    November 2005
Posted by Anonymous on Sunday, August 6, 2006 11:43 AM
 bwr1 wrote:

Here's the mold.  I think I used too much RTV here -.....

Yes, I agree, your mold looks very much like some of my TOO THICK molds.  It really doesn't hurt anything, just is expensive material.  Here is a trick that I read about and tried once and it worked well.  Take an old mold that your not going to use anymore and grind it up.  I use scissors to chunk it and then put it in a CHEAP blender [don't use your wifes, it really makes em mad].  Now take and make your mold as usual but instead of  all new liquid, try the following.  Add the finely groun RTV into areas away from the master to take up space.  Then pour in the new liquid normally allowing it to flow over the master.  As long as the two materials are the same, the RTV will adhere to itself.  You can judge fairly eaisly how much you are able to save by looking at how much space you have put used material into.  I also take a toothpick and mix old and new in the area where I have stacked it.

 bwr1 wrote:

I made 6 castings - I had to use a toothpick to get rid of some air bubbles in the exhausts, ....

I agree this is an absolute pain without a vacuum pump.  I was fortunate in that I bought one from a jewelry widow that had been setting around for a couple of years.  She had got rid of most of the jewelry tools and ovens, but had a bunch of Misc Junk left in his shop.  I agreed to take and clean out what was left good and bad, and thus clean out half of her garage. A half day of work and kicking in a few bucks I came out with a ton of interesting stuff.  You really should consider trying to fiind a vaccum pump on e-bay or maybe if your handy like most hobbiest, build your own.  Here are some website:

http://www.housatonicrr.com/VacChamber.htm

http://www.sas.org/E-Bulletin/2003-08-01/labNotesAS/body.html

http://www.dream-models.com/eco/vacuumpump.html

Another observation, ya'll seem to be concerned with weight.  If every small ounce counts, it looks like when you poured the resin, the spinner was solid.  I haven't worked with resin, but with wax, you can pour it in and then pour the excess out.  Thus creating a hollow inside rather than solid.  I do this with head and bust reproductions that I do for my wife's Clown Collection.

 bwr1 wrote:

..... Next prop I have to do, I'll probably build a full master propeller (spinner plus blades) and cast it with a two-part mold,

Given what I said above about a hollow product, you may want to reconsider the putting them together, unless you design it so you can still make the spinner hollow.

Hope I not being too presumptious.  Just trying to share some things across the boundary line of hobbies.

Regards Caster / RLW

  • Member since
    July 2003
  • From: Redmond, WA
First resin casting
Posted by bwr1 on Saturday, August 5, 2006 5:46 PM

This is just great stuff you guys are doing!

Here's some pictures of my first ever resin casting - it's pretty basic stuff but I'm pretty excited how it turned out.  It's prop spinners and exhausts for a Bv.238 flying boat.  The prop spinner is basswood carved to rough shape and then chucked in my dremel and sanded to final shape. The exhausts are kit parts from a Hasegawa Bf109G kit:

Here's the mold.  I think I used too much RTV here - but I figured a bit too much around the edges and too deep was better than too little for a first try:

I made 6 castings - I had to use a toothpick to get rid of some air bubbles in the exhausts, but that's probably because I poured too fast and directly into the cavity:

The assmbled engine (right) next to the original kit parts (left) for comparison (the original engine shape was wrong, so I've also reworked that with strip styrene and aves putty):

Probably won't have anything else to cast for this kit, but I'm excited to start working on the An-124 and An-225 soon for more casting opportunities.  Next prop I have to do, I'll probably build a full master propeller (spinner plus blades) and cast it with a two-part mold, but since this was my first time I really wanted to start slow and get something successful.

Also, I'd be interested in the CAD data for the C-17 nacelles.  Probably going to be a year or so before I start working on those kits (I'm going to do the C-17 and C-5 kits around the same time), but you never know what info/data can come in handy.

Thanks,

Bruce

  • Member since
    November 2005
Posted by Anonymous on Saturday, August 5, 2006 9:24 AM

 DK666 wrote:
BTW do you also need a JSF ? and I just got access to a jewerly patternmaking machine (uses either blue or green casting wax) that I'm just dying to do a part on.

Yes, I have a small pewter one that is in the center of a Christmas Ornamaent but it is not accurate.  So I'm reluctant to make a mold and reproduce it in more pewter or silver.

And, if you want to design a ring for yourself or a pendant for your significant other, do it in Blue Wax, and send it to me.  You will receive by return mail, the memento in Silver or Pewter.

Another project that I have been working on is a JSF ICE Medallion.  I was ajdunct on the proposal lead for the ICE effort.  We had about 40 people on the team for 2 years.  I have not been able to get a good solid model from Laser because of the detail in the flags and letters.  It works at about 4 inches in dia but trying to get it to about 2 - 2 1/2 has been difficult.  I'll send you the files in a bunch of different formats, and the small center jet that I want to use.  Everything but the jet is laser cut, the jet is done in relief for a coin that I salvaged.  I'll send the blue plexiglass of the medallion and the center jet to get your opinion.  I'll have to wait to get your address when I receive you package.

Oh MY  Wow!! [wow] Big Smile [:D] Yeah!! [yeah]  This Is Fun  --  Here is the jpg rendition of the finished project


  • Member since
    November 2005
Posted by Anonymous on Friday, August 4, 2006 8:12 PM

I have built the prototypes of the actual c-17 nacelles I may be able to find them (its been 4 years) and I could get you the CAD data.


Cheers


e-

  • Member since
    November 2005
Posted by Anonymous on Friday, August 4, 2006 8:09 PM

Im Back.


The reason I have been absent is we host a Annual Rapid Prototype Modelmaking Workshop for Educators we bring in about 50 educators from around the country and Teach them Rapid Prototyping and Modelmaking for a whole week. That being said. RLW I have your models done however I havent had time to ship them yet but I have tomorrow off (well deserved I think) so I will Priority them to you and you can get creative and stun us all with your product of work. BTW do you also need a JSF ? and I just got access to a jewerly patternmaking machine (uses either blue or green casting wax) that I'm just dying to do a part on. I will post some pictures of the conference soom so you can see what it was like. Also we have 2 new laser scanners. The answer to your scanning questions are;

No limit on scanning its free form.

Yes black is bad but we talc the part so its no problem nothing like glass or mirrors (laser passes right through or bounces off)

Yes but we have to talc it first.

I can scan up to 14feet by 14 feet so if its bigger than that I have to target it and stich it together which is no problem I have software for that.

Bigger or smaller no problem just some software settings.

It can but I can remesh it and restore detail.


Cheers


e-


  • Member since
    July 2003
  • From: Redmond, WA
Posted by bwr1 on Thursday, August 3, 2006 10:01 AM

For the landing gear - that makes perfect sense to make them out of metal - that'll solve the strength issue. The front gear looks pretty straightforward. I'll have to look at some more detailed photos and plans that I have for the main gear to see how it's laid out - it may require multiple parts.

For the engines, I think I need to think about the parts breakdown - I was thinking of just a few parts, but based on your questions and how I want it to look it probably makes sense to make the engines as multiple parts. What I want to do ideally for interior detail is something along the lines of this work:

http://www.aircraftresourcecenter.com/Gal4/3301-3400/gal3372_AB380_Greutert/gal3372.htm

He's working in 1/144 scale - at 1/72 things will be a bit different. I think at 1/72, photoetch for fan blades may actually be visibly too thin for the scale, so I'm thinking of making them out of something else. As far as what details to include, I'm thinking the bypass fan, the initial compressor blades and supports, and the final end-stage turbine blades (pretty much what you can see by looking into either end of the engine). I don't plan on including any open panels with engine detail. So the parts breakdown is something like 1. inlet cowl + fan cowls, 2. fan spinner, 3. blades (maybe PE, but maybe from some other material), 4. exhaust nozzle, 5. exhaust cone, 6. thrust reversers cowling, and 7. the pylon. With that breakdown, I think all of it could be done with simple molds. I'll probably start working on this in a month or two - I've got the reference materials (plans, photos, etc.) I need, and I just need to finish a couple of other projects first.

I have C-17, C-5, and KC-10 vac kits in 1/72 scale - I'll have to fish them out of the stash and look at the engine nacelles. I'm betting they won't be the right shape/size to match the Antonovs' engines, but you're right it's definitely worth a look to see if I can use them as starting points. Otherwise, I think I'll just have to scratchbuild the parts. And I suspect it may take more than one try at it since I'll have to work out how to put all the parts together as well.

Thanks for the info/suggestions - very helpful ideas to get me thinking about solutions.

Bruce

  • Member since
    November 2005
Posted by Anonymous on Wednesday, August 2, 2006 1:50 PM

 bwr1 wrote:
Any suggestions/thoughts on ..... landing gear

The nose assembly is straight forward without the tires on.  It looks like if a master was available, I would make a mold with the parting line from top to bottom on the main strut, and on a center line that is parallel with the long axis of the plane.

I would then either pour Low Melt Alloy directly into the mold (if made of the right material) or I would follow my Lost Wax Casting procedures and produce a wax, invest it, burn out, and then pour the Low Melt into the cavity.

Either method would require just a minimum amount of cleanup of the parting line.

The pictures don't show a lot of detail for all of the undercuts, but I don't think they represent a serious problem, and if they are significant, I would simply make a multipart mold to overcome the undercut areas.

RLW


  • Member since
    November 2005
Casting Engine Nacelles
Posted by Anonymous on Wednesday, August 2, 2006 1:32 PM

 bwr1 wrote:
Any suggestions/thoughts on casting jet engine nacelles ...

Ok Bruce,  I'm splitting questions and comments into two responses.  This one is reference to the engine nacelles.  Here is a generic view that I pulled off the web to illustrate the point.

Which parts do you want to inclued?  How many components do you want to group together in a single casting?  What specific interior detail do you want to show?  Aren't there already some plastic or vac formed engines of the type you want that could form the basis of the mold desired?

None of the individual components are particularry difficult.  For example, it would be a piece of cake to make a mold of the Fan Cowl in one casting showing both interior and exterior.  However, much planning would have to go into the Front Cowl and the front of the blades.

JOIN OUR COMMUNITY!

Our community is FREE to join. To participate you must either login or register for an account.

SEARCH FORUMS
FREE NEWSLETTER
By signing up you may also receive reader surveys and occasional special offers. We do not sell, rent or trade our email lists. View our Privacy Policy.