SEARCH FINESCALE.COM

Enter keywords or a search phrase below:

Kitty Hawk 1:35 SH-60b Seahawk: Start to Finish Build

23983 views
149 replies
1 rating 2 rating 3 rating 4 rating 5 rating
  • Member since
    January 2022
Posted by Svt40 on Wednesday, January 12, 2022 12:06 PM

I was torn on getting the res kit tail paddles but opted not to.


One thing you will need to add is the wire that go from the top to bottom of each pitch control link.

Also since you are folding it there is an indexer motor the kit does not come with that is under the tail gearbox cowling.  It indexes the tail paddles to allow the stbd stab to fold.  Drill out the hole indicated and put the rod sticking out of the hole.  The rod will be about half the size of the hole. The head engages with the "crown" to index the paddles.


For the stabs and pylon to be folded you'll also need to fab up the struts used to hold them.  These are some drawings but not to scale obviously. Remove before flight tags would also be on the struts.

  • Member since
    March 2012
  • From: Louisville, KY
Posted by Builder 2010 on Wednesday, January 12, 2022 5:30 PM

Svt40 made a valid input and of course I never ignore valid input. The first thing I did today was add the wiring that goes from the pitch hub into the center fitting on the tail rotor. You can clearly see this wire in this image. This wire's hole would have been MUCH easier to drill had I realized I needed it BEFORE building the whole deal, but I persisted and got the holes drilled. I am NOT installing that finer loop wire that goes from the spider. The wire in question is the fatter one.

It's interesting to note that the rotor has no actual hinging for the pitch control. There are two crossed carbon fiber beams that go from the tip of one blade all the way across the center to the tip of the opposite blade. The fiberglass blade sleeves slips over these beams. The beams act as torsion bars and will twist when pitch motion is introduced into the. The blades leading edge are titanium and there is an applied rubber de-ice boot on the leading edge also.

Svt40 also pointed out several other small details that I'm going to add. One is the ehad of the rotor indexer. The indexer positions the blades so they don't get damaged when the boom is folded. I put the motor shaft in, but his drawing also calls out for some head detail. I'd love to get a picture of it. My search today came up empty.

The other details are the removalable struts that secure the tail planes in their folded position and secure the boom itself. I will make these also. And I need to get some "remove before flight" tags.

This image shows the struts in position keeping the tail plane in the folded position. The picture also nicely shows the color line for the white/light gray bottom.

The strut goes from the movable hinge to the fixed hinge.

I put on the static probes, but they're really flimsy and I constantly was bending and unbending them. They needed to be on becasue it would be awful to try and install them on a painted model. In this image you can see the index motor shaft. The boom is almost done.

Here's a fold test to prove that YOU DO NEED TO FOLD THE TAIL PLANES FOR THIS THING TO WORK. The instructions missed this entirely was a big and almost fatal omission.

I kept breaking that rear antenna support. I fixed it at least three times and each time it was getting worse. I bit the bullet and made one out of soldered wire. Not exactly scale due to the round versus airfoil cross-section, but it ain't gonna break.

We're really closing in to the day when I break out the masking tape and airbrush and start painting this model. All in all, it's one of the most challenging and complex plastic aircraft kits I've ever built. I knew it would be a challenge, but the addition of the ResKits really upped the ante. Some of the challenges were my own doing in fixing my mistakes. Others were just in the nature of the beast.

Any ideas for a carrier deck base for this model? I'm sure there are 1:32 bases. Would they work for 1:35.


  • Member since
    December 2002
  • From: Valrico, FL
Posted by HeavyArty on Wednesday, January 12, 2022 5:43 PM

It is coming along great. Good additions of the prop rods.

For the deck, there is this…

I have one and it looks really nice.

Gino P. Quintiliani - Field Artillery - The KING of BATTLE!!!

Check out my Gallery: https://app.photobucket.com/u/HeavyArty

"People sleep peaceably in their beds at night only because rough men stand ready to do violence on their behalf." -- George Orwell

  • Member since
    January 2022
Posted by Svt40 on Wednesday, January 12, 2022 8:15 PM

Some excellent work completed today.  The wires you added to the tail are for the de-ice harness.  Getting me motivated to start on mine.  I just have a few M1 Abrams and an FT17 to complete first.

Here is a picture of the tail rotor index motor engaged. You can see how it engages with the crown on the back of the tail paddles.


Here is a shot of the rear tensioner for the HF longwire antenna.  The standoff is similar to the rest except it has a spring loaded capture device that holds the wire and provides the correct amount of tension.  You can also see the black wire from teh HF to the tail boom just in front of the standoff.  The black triangle is a weight and there is one before each of the upper standoffs.  The black wire just keeps it from flying up and getting caught in the blades if it were to break.

  • Member since
    March 2012
  • From: Louisville, KY
Posted by Builder 2010 on Thursday, January 13, 2022 5:30 PM

The page just froze... so I''m doing it again.

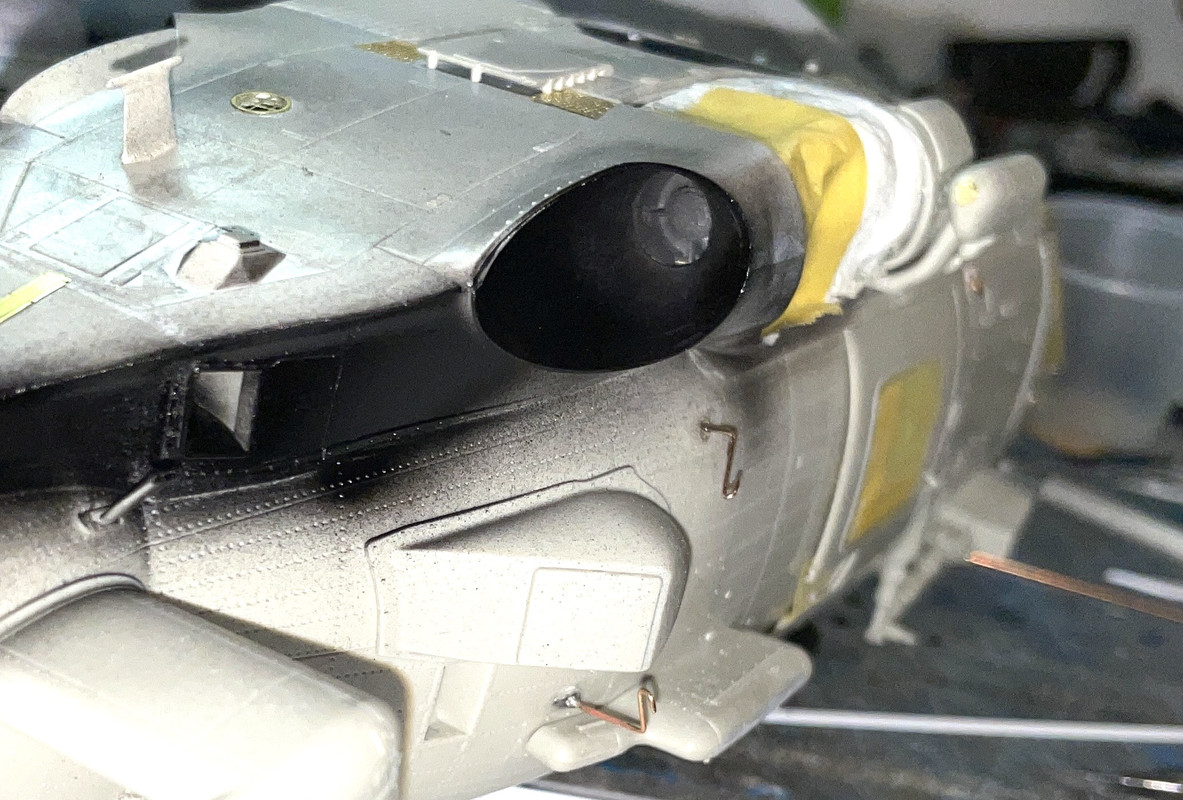
Those are great pictures and I used the tail rotor image to create a index motor head. I didn't go the full route with the roller and pin, but it's shaped so it fits the crown on the tail rotor rear. I was wondering why that part was shaped that way... now I know. (and so do all of you). Looking at this close up, it's still a bit big and I can reduce it.

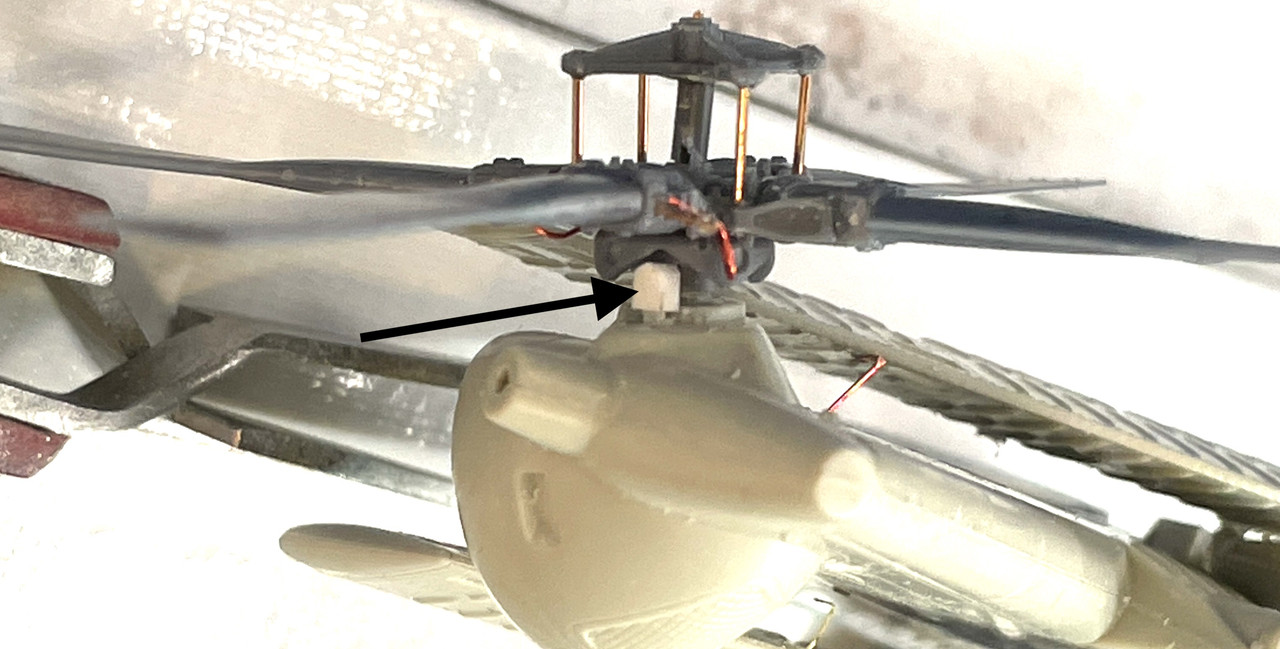
We're at the stage of the model that's equivalent to the punchlist phase of building a new house. The last little bits and pieces take an iordinately long time. Another thought I have is just how much more complicated the helicopter became when they turned the Blackhawk into the Seahawk. All the folding stuff adds mechanical complexity AND sensors to ensure that the flight crews knows everything is in the right place. Blackhawks don't need a blade indexing motor.

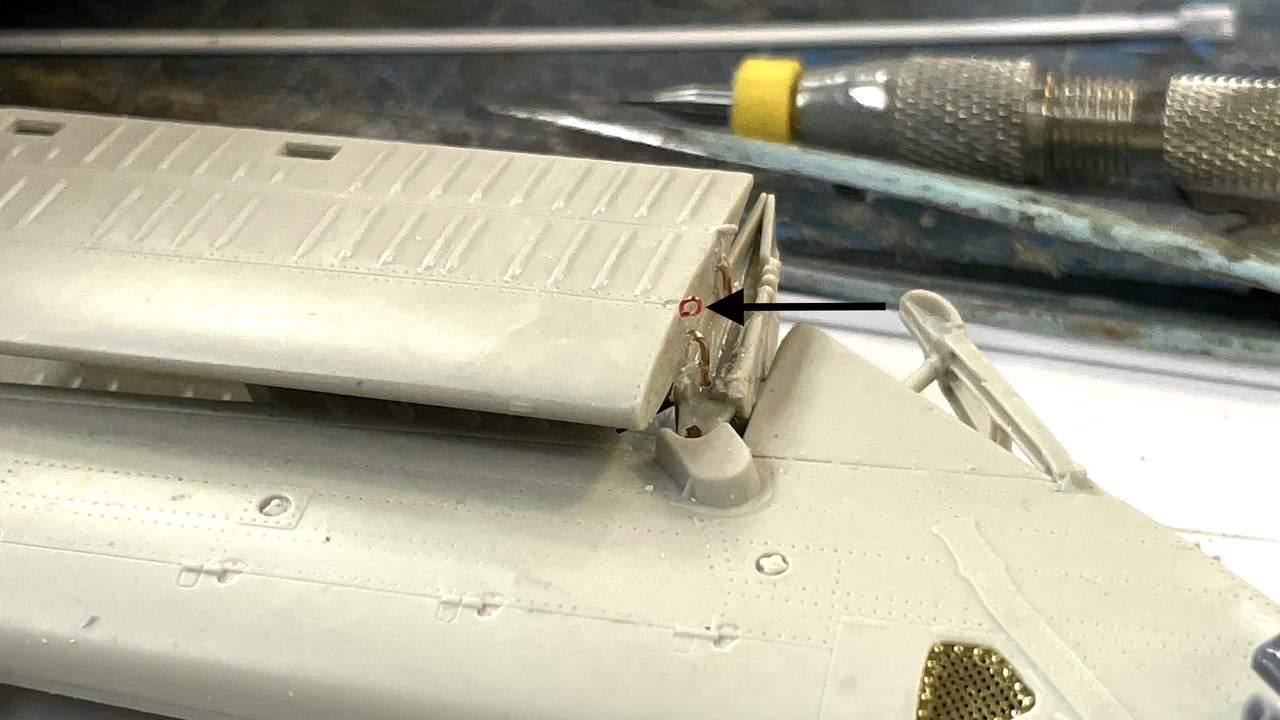
I started cobbling together the tail plane lock bars. They attach to the hinge point on the tail plane and clamp to the edge of the center section. I added doublers to some styrene stock that I'll shape to make the contours more like the real ones. They have to dry overnight since when I tried to shape them before they were fully dry, they didn't like it.

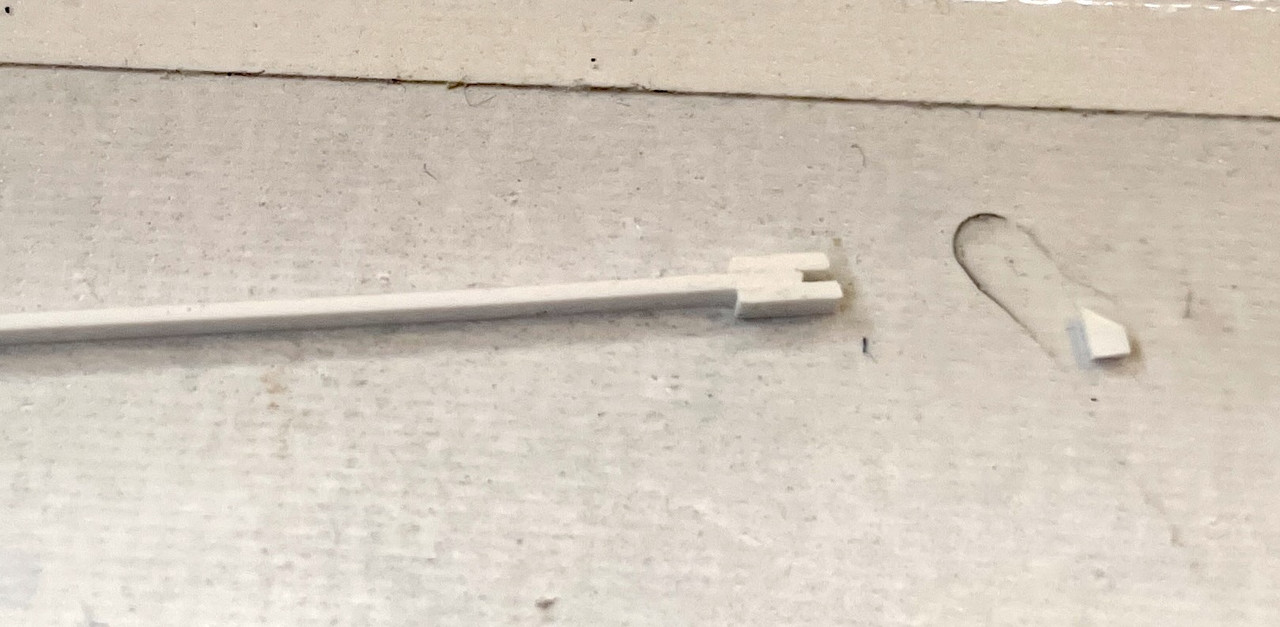
I also had to add back a hinge point so it would have something to hold onto. The kit's part disintegrated when I had to rip off the already-glued tail panels.

I started painting stuff! This is a milestone. I painted the tires rubber black which finished the smaller tail wheels. 

remember I made some round masks for the small wheel hubs a while ago when I painted them white.

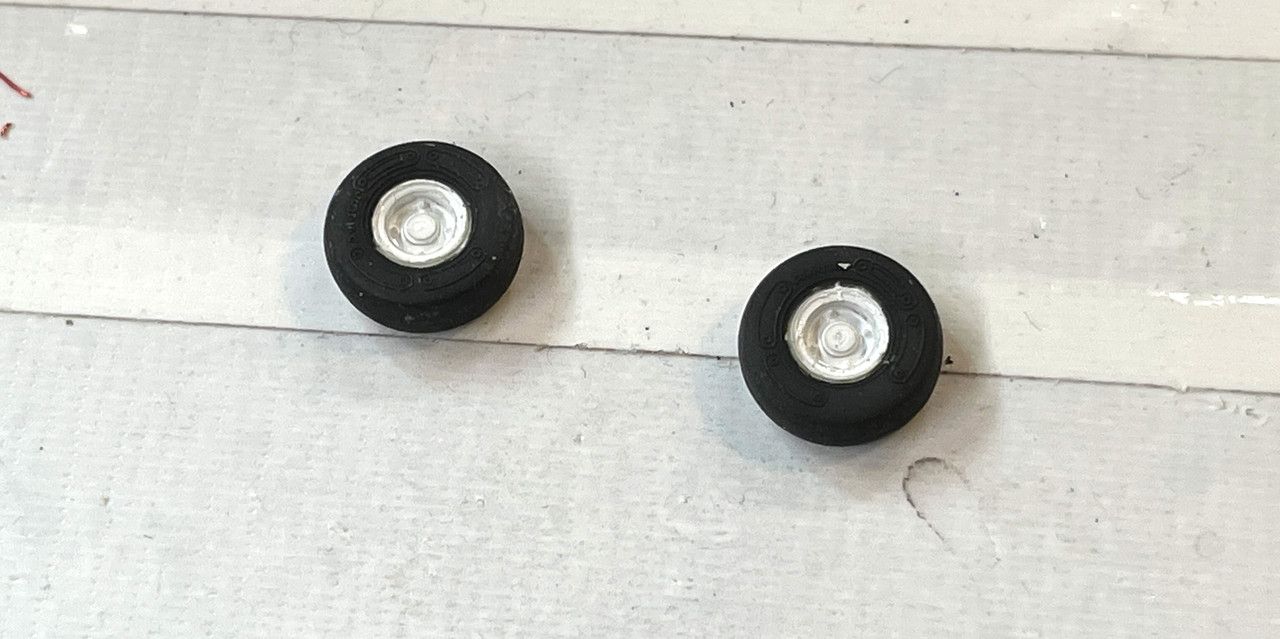
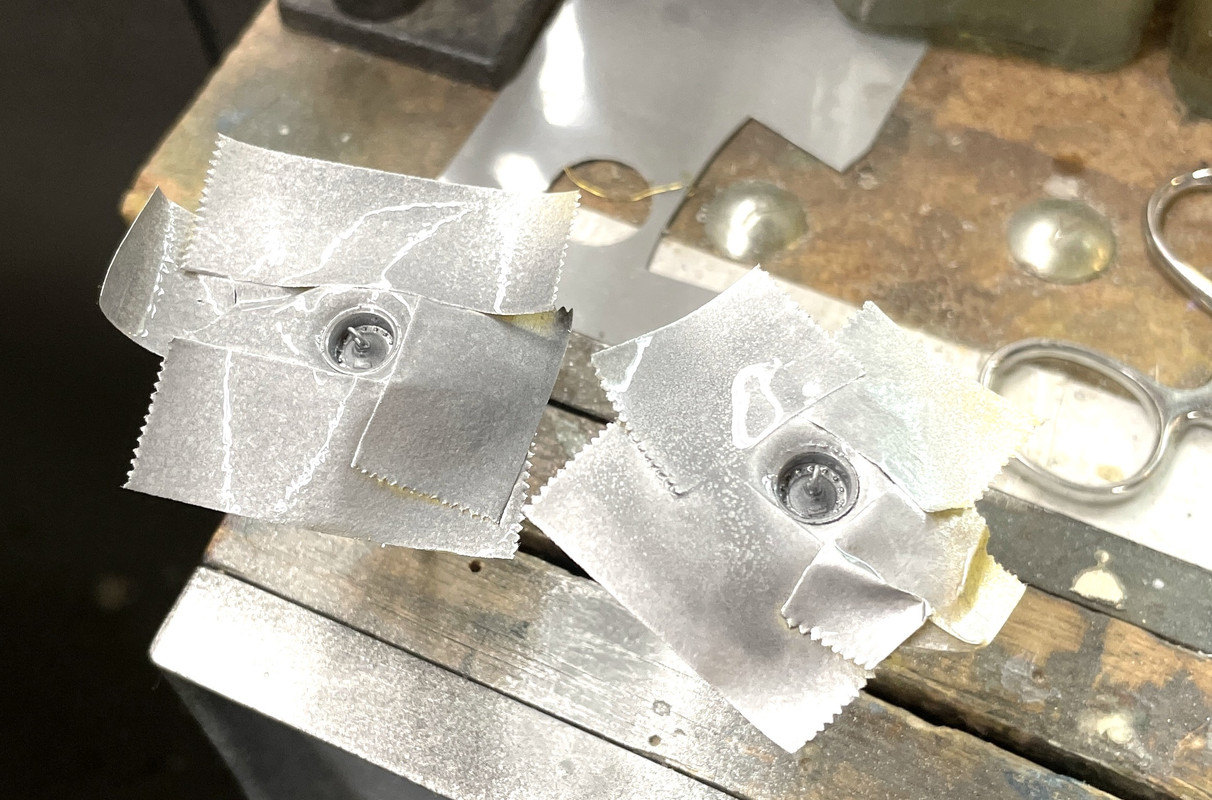
But for the large main wheels I didn't paint and mask the hubs first. The tie-down ring protrudes from the wheel and I didn't want to break it by masking on top. In this case, using the same dividers with one leg sharpened to a chisel edge, I cut the circles, but used the piece with the holes.

I then sprayed them a base coat of lacquer, in this case some Tamiya silver, and I go back and paint the while. The lacquer acts as a barrier and prevents the black from leaking through. I always put on DullCoat when I'm going to change colors and don't want any blending.

The last things I painted was the exhaust chutes. I first shot the turbine outlet some dark iron and then went back and did the whole area with flat black taking car to not overcoat the previously shot dark iron.

This is flash shot (which I rarely use) that lights up the innards.

And here's a non-flash shot showing the whole area. This will be masked to the proper outlines as needed. The last thing I did was shoot this paint with DullCoat to seal the black and make good base for the body colors. BTW: that chute where you can see a little bare color is the APU's exhaust which would be in that part of the overhead.

I have to write a real punchlist to ensure that I don't miss anything. It's a relief that all the ResKit work is now complete and reasonably successful. I still have to solder together the rear view mirror brackets, which I'm doing tomorrow.

I also glued on the big radome on the bottom since it was time.

I need to build a base and want it to duplicate the surface of a hangar deck. I'm going to 3D print my own tie down cups. They're available from Reedoak, but they're expensive and I want to keep my powder dry to buy their 1/35 Naval Aviation service people.

What is the diameter of the modern USN tie down cup?

  • Member since
    January 2022
Posted by Svt40 on Thursday, January 13, 2022 7:46 PM

Builder 2010

The last things I painted was the exhaust chutes. I first shot the turbine outlet some dark iron and then went back and did the whole area with flat black taking car to not overcoat the previously shot dark iron.

This is flash shot (which I rarely use) that lights up the innards.

And here's a non-flash shot showing the whole area. This will be masked to the proper outlines as needed. The last thing I did was shoot this paint with DullCoat to seal the black and make good base for the body colors. BTW: that chute where you can see a little bare color is the APU's exhaust which would be in that part of the overhead.

What is the diameter of the modern USN tie down cup?


The square opening behind the exhaust on the stbd side is the ECS exhaust.  Basically the air conditioner for all of my electronics.  It's a light fiberglass brown color similar to the IPS ducting on the engine.  THe square hole lower on the fuselage, same side, is the intake for the ECS and is the same color deeper inside but often times grey at the edges.

As for the tie down padeyes it all depends on what type of ship.  I was usually on cruisers where the padeye is about 6 inches across with 4 bars. 

Funny story about those.  New guys tend to get hazed a bit and sent on errands to get stuff that does not exist.  Such as a "padeye wrench".  Well we sent the new guy out for one and he came back with one!  Turns out the padeyes on the cruiser were removable with 4 allen head bolts.

  • Member since
    March 2012
  • From: Louisville, KY
Posted by Builder 2010 on Friday, January 14, 2022 5:52 PM

I found a print for a tie down cup. It's 9.81" in diameter and almost 4" deep. I drew them and will print a gaggle of them. I also am drawing a US Navy wheel chock set and the base itself which will duplicate the surface of a hangar deck. The models is a scale 60 feet long so the base is going to be 30" by almost 14" with 60 tie down pucks. Reedoak wanted $5.50 USD for 14 pucks plus shipping from Europe. It would probably be $50 just for the tie downs. It took me 20 minutes to draw them after I found the drawing on Google and the run of 20 will cost $0.25 worth of resin. I'll print 60 for about $1.00. BTW: with the 3D work that I've sold over the last two years, the printer is paid for more than once, so any work I do is a direct cost savings to me.

These will be the modern 5 spoke design. They should print nicely. This is how they will appear on the machine when done (only upside down).

Here's my hangar floor design. I eyeballed the plate and tie down spacing. I looking at a series of hangar deck images, it looks like the plates are 8' wide and the tie downs look like they're 2' off the seams and about 4' apart. Does anyone know the actual dimensions. I making it on a bias so it's more interesting.

I'm also drawing a set of 1:35 Naval wheel chocks. It looks like the only sizes commercially available are 1:32, 48 and 72. Now they'll be 1:35s also.

In the shop I did some stuff also. Got the tail plane clamps done. One of my fabricated clamps worked okay, but the other fell apart during shaping. I chose a different approach making it out of a solid piece. However, as you can see they're not exactly the same. They're on the underside of the tail and difficult to view. I'm calling them done. I also replaced the missing hinge loops on the tail planes that were wrecked when breaking the joints.

I touched up the wheel paint and the rear landing gear. I then went to work making a set of metal rear-view mirror frames. It took a couple of iterations, but got them built.

These small jobs are made very doable with the resistance soldering unit AND the MicroMark ceramic soldering pad that lets you stick the parts into the surface and hold everything still with T-pins. The metal is more scale in appearance than the plastic and a whole lot stronger.

Here's the right side one being fitted.

And the left side...

And with the mirror housing installed.

There is a slight problem. When looking straight ahead the left side is hanging lower than the right. Fixing that (if I fix it) will have to wait until Monday.

  • Member since
    March 2012
  • From: Louisville, KY
Posted by Builder 2010 on Monday, January 17, 2022 10:16 PM

I Redid the left side mirror frame. It's still not perfect, but it's better. It really doesn't take very long to bend and solder a new one togeher.

Painting has officially begun today with the masking of the exhaust channels. This was a finicky masking job because of curves and concave faces. After masking I coated the edges with clean to better seal them.

I was tired of bending and un-bending the static discharge probes and scrapped them and replaced them with 0.012" guitar string (I think it's a B string since I use very like gauge strings). They're tough as nails... well actually tougher than nails since piano wires is harder than most nails. And they're very sharp and will getcha!

I broke my last micro drill, but 20 more are arriving shortly from Drill Bits Unlimited.

I mixed up a very light gray, almost white for the bottom color and air brushed all the bottom facing things including the undersides of the horizontal stab. This all has to be masked and that will probably happen on Wednesday.

I then I find these on the HF sprue. Looks kinda like the support struts to hold the horizontal stabs in the folded position. Too late. That boat has left the dock. I tried to remove the homemade ones, but they were just too well glued and I didn't want to risk any damage. It's part HE33 and is on the Seahawk-only sprue. There was no mention in the instructions or any information about folding the stab at all. If you're following along with me and plan on building this model, now you know. There are parts to fold the stab, but they just don't tell you. Now you've been told.

  • Member since
    December 2002
  • From: Valrico, FL
Posted by HeavyArty on Tuesday, January 18, 2022 4:37 PM

Looking good.  Thanks for the heads up on the folded stab support too.

Gino P. Quintiliani - Field Artillery - The KING of BATTLE!!!

Check out my Gallery: https://app.photobucket.com/u/HeavyArty

"People sleep peaceably in their beds at night only because rough men stand ready to do violence on their behalf." -- George Orwell

  • Member since
    March 2012
  • From: Louisville, KY
Posted by Builder 2010 on Tuesday, January 18, 2022 9:06 PM

Thanks and you're welcome.

Short session today. Paint masking is well underway. I decided, because of the way the side and bottom colors interact, especially around the sponsons and radome, that I would have to mask them carefully. There's a nice seam line running down the fuselage length to demarcate the bottom and side colors.

To mask the dome I measured it's diameter, cut it in half, set the calipers and cut the circle. I've described this before when masking the wheel hubs. This was easier since it's easier to use the dividers as a circle cutter on bigger diameters. I have one point sharpened to a cutting chisel in the direction of the cut.

To mask the lower edge, again, measured its diameter, cut it in half and used that setting. I got a really accurate mask this way.

As seen in this image, the nose has a very specific curve also a circular shape so that too would get the dividers treatment.

And here's how I did it. In the above it also seems to show that the gear legs are bottom color. Is that correct?

And then I got going on the rest using a combination of 3M Blue Tape and three thicknesses of Tamiya. I absolutely love Tamiya tape, but it's more expensive than the 3M so I use them selectively with the 3M covering bigger areas. The curves had to be 3M due to the width I had.

I still have to mask the sponsons on the opposite side and then I'll be ready to shoot some gray base color. I don't think the bottom of the personnel hoist is bottom color. None of my diagrams show that. 

  • Member since
    January 2022
Posted by Svt40 on Wednesday, January 19, 2022 8:57 AM

I love the mirror arms.  I may have to try that on mine.


As for the tactical painting all the edges are feathered with no hard lines. 

The main landing gear can be white on the bottom and grey on top.  The earlier aircraft did this.  Later aircraft are just solid 320 side grey.

Here is my aircraft from Desert Storm.  Just to throw you way off.  We did not even have the black exhaust markings on ours!  The MAD reeling machine was removed and a blank off plate installed.  The bomb racks were sealed up and the sonobouy launcher was also removed as was the UYS-1 Spectrum Analyzer.


  • Member since
    January 2022
Posted by Svt40 on Wednesday, January 19, 2022 3:14 PM

Builder 2010


As seen in this image, the nose has a very specific curve also a circular shape so that too would get the dividers treatment.


I just noticed you're missing the data link radome under the FLIR diving board.  That is one of those required items for an SH-60B.

  • Member since
    March 2012
  • From: Louisville, KY
Posted by Builder 2010 on Wednesday, January 19, 2022 5:38 PM

You guys are messing with my mind... I hope I didn't throw that radome out. The instructions seem to tell me that it was optional with the FLIR. Regarding the painting, I'm still trying to figure out what configuration I'm going to use. In some of the wild schemes I have to do more work on the exhaust black areas. And it would require more masking... ugh!

I did paint today! I laid on all the FS36320 Dark Ghost Grey using the Mission Models paint (which I like a lot) thinned a bit with some A-K interactive thinner. They seem to be compatible.

Started with the tail after finishing the masking of the bottom color areas.

I believe that the fold machinery is body color and not zine chromate. If it's zine, I can do that too.

Did the tail rotor. After I took the pic I used some Dullcoat on selected areas that are going to be painted black. The black ares are the elastomer boot at the blade base and the de-ice book that goes partially out on the leading edge from the root.

And then I painted the main part. I had to go back and shoot some minor light spots, but all in all it painted really well. Dries quickly too, but I'm giving it overnight to make it better for further masking. Right now my edges are going to be pretty hard. If I wanted soft edges I would have stood the tape off the surface a bit. Because of all the stuff sticking out, doing a freehand job wouldn't have worked. The overspray would have hit parts that were supposed to remain the other color. The same goes for the darker top color getting all over the tops of the sponsons, hoists, etc.

I like it alredy now that it's monochromatic. I'm really not all that excited about doing all the additional color work and masking required for the flashy decal schemes. I'm almost ready to just make it a ultilitarian bird. Having readers that have actually FLOWN THE REAL THING adds to my challenge.

Stay tuned.

  • Member since
    January 2022
Posted by Svt40 on Wednesday, January 19, 2022 8:08 PM

Yup the tail hinge is all the same 320 grey.

The pullys are a dark reddish brown.  The hydraulic lines are all stainless steel as is the bottom of the lower hinge.  The rippled piece going from one side to the other is black plastic wire loom. The clamps holding the loom will be silver in the center with yellow rubber bits on the edges.

The two gears on top are going to be a dark greyish black as they're always covered in molybdenum grease.  There will also be a very small grease sling ring around the gear under the #5 driveshaft cover.


  • Member since
    March 2012
  • From: Louisville, KY
Posted by Builder 2010 on Thursday, January 20, 2022 5:09 PM

Didn't work today, but will use your color information for sure.

Still don't know what to do about the non-sharp color edges. Could go back and free the edges and just protect anything that may get hit.

  • Member since
    January 2022
Posted by Svt40 on Thursday, January 20, 2022 5:20 PM

Just use some low pressure and feather the edges should be little to no overspray.  If there is then it's still good.  My first detachment Chief used to say these birds are supposed to be ugly.

  • Member since
    March 2012
  • From: Louisville, KY
Posted by Builder 2010 on Saturday, January 22, 2022 12:08 PM

I bit the bullet and painted the top darker color (Tamiya XF-53) freehand and was satisfied with it. I held the gun at angles that would let the edges drift around the curves without fouling any protrusions getting oversprayed. 

While this was drying I drilled (my new supply of 0.0125 arrived) the rotor blades to accept the lead wire from the nitrogen leak sensor. The real blades are hollow filled with nitrogen. If there's a crack, the nitrogen leaks out, the sensor notes this and alerts the crew that the blades is no longer flyable. This lead is the last wire to tie into the hub along with all the other wires and pipes. It was easy doing this when they weren't on the model.

I also painted the exterior dark parts of the engine hatch and then, after it was dry, put textured black graphic arts tape to simulate the anti-slip tape on the prototype. This door will be open.


I decided on the paint scheme. It requires the entire tail, top and bottom and boom to be gloss black. It also angles onto the fuselage in front of the hinge. At this time I got a nasty shock. The Mission paint has lousy adhesion compared to Tamiya. I tried to mask the de-ice boots on the tail rotor blades and promptly pulled the gray paint off the resin. I touched it up and then had to paint them by hand...ugh!

I thought the paint lifting was limited to resin parts, but then it did the same thing on the boom which was styrene. In other words, Mission paint pulls off. In the future I will have to spray Tamiya primer first and that's aerosol so I'd have to do it outside, which I can't do in winter temperaturs.

Here's the paint scheme. I'm going on an errand will save this so it doesn't time out. I'll edit later.

  • Member since
    January 2022
Posted by Svt40 on Saturday, January 22, 2022 1:49 PM

Builder 2010


While this was drying I drilled (my new supply of 0.0125 arrived) the rotor blades to accept the lead wire from the nitrogen leak sensor. The real blades are hollow filled with nitrogen. If there's a crack, the nitrogen leaks out, the sensor notes this and alerts the crew that the blades is no longer flyable. This lead is the last wire to tie into the hub along with all the other wires and pipes. It was easy doing this when they weren't on the model.


That is actually the de-ice harness.  Most aircraft do not have them installed unless they are deploying somewhere very cold as the system tends to not work so well and it's just one more thing to corrode.  The nitrogen leak detector is the little thing sticking out of the side of the blade opposite the de-ice harness.  It's called a BIM.  IIRC it stands for Blade Indicator Method.

The reflection is from retroflective tape that is put on the blue PCR for use when doing track and balance of the rotor head.


That engine bay door is spot on perfect!  Just add the door latch assembly to the inside and it's complete.


  • Member since
    March 2012
  • From: Louisville, KY
Posted by Builder 2010 on Saturday, January 22, 2022 2:40 PM

Since you gave that great response, I'll finish the post here. It complicates my multiple postings, but i'll perservere.

So the pressure sensor doesn't anunciate remotely? It's one of the visual checks that are made when the crew does the walk around?

Here's the version I'm going with. I like that it doesn't have the lo-viz insignia. Since you have to overcoat the whole deal with gloss so the decals work, the gloss black tail works.  There's more flat black over the exhaust on the roof, but that would mean masking. And masking right now could be a problem. I'm going to leave that bit of black off.

I sprayed the tail boom completely with gloss black and then that little bit of the main fuselage. I freehand painted it. It's not great and I back-painted with body color to get it better, but as you'll notice if you look closely at the color sheet, there's a white line decal that demarcates the black and that will hide any unsteadyness.

And here's that tail bit.

I then took the gun in hand and attempted to fuzzy up the bottom color edges. I was taking a helluva risk doing this, but it didn't ruin anything. I'm not sure I like the result, but it did soften the edges a bit.

Here's the tail rotor with the detail painting, but not totally done. I still have to back paint the de-ice boots to get the line a little cleaner. My freehand painting hands are NOT steady! I wish I could have masked,  but it would have made a bigger mess.

That brings us up to date.... happy weekend.

  • Member since
    January 2022
Posted by Svt40 on Saturday, January 22, 2022 2:50 PM

You are correct it's just a visual check.  IIRC and it's been more than 10 years since I retired the BIM will be all white when it's good and if the blade is leaking it will have three black and three white stripes.


As for the paint do not worry too much about following the paint guide as there was a LOT of variation in the tactical paint schemes.

Heck we even put invasion stripes on one of our birds for a while.  We also used non standard markings while deployed.

  • Member since
    September 2021
Posted by The Lt387 on Saturday, January 22, 2022 7:14 PM

I wish I saw this before i started my KH kit. VERY IMPORTANT if your undertaking this kit. Although I did develop more scratch building techniques, I was disapointed in the directions too.

  • Member since
    March 2012
  • From: Louisville, KY
Posted by Builder 2010 on Monday, January 24, 2022 5:15 PM

Better late than never... Glad I can be of help.

I'm at the stage where waiting for paint to dry is the number one activity. I sprayed Allclad Aqua Gloss as the gloss coat. It's water-based and has no odor. It takes a number of hours to be safe do decaling. I'm champing at the bit to start doing decals, but have to hold off until the finish is all fixed.

I finished touching up the tail rotor, fixed a blemish on the tail boom and went back and touched up damages to the body color. That touch up necessitated doing a deep clean of my airbrush in the ultrasonic.

While all this was drying I built the load outs. I'm adding one towed sonar and two torpedoes. The torpedoes had ridiculous propellers; a series of tiny, bent PE that had to be glued on is a radial array. It was a bit of struggle and, while necessary, i'm not a big PE fan for PE's sake.

Here are both of them complete ready for paint.

The torpedoes have a three-color paint scheme: props and tail = red, back = silver, middle = O.D, and nose Yellow-orange. I shot the tail with Tamiya rattle can silver.

I also shot the main rotor blades with Tamiya White Primer to maine the Misison Paint adhesion problem. I then sprayed more clear on the areas when I re-shot the body color to fix some discolored areas.

When this is fully cured tomorrow, I believe that I can actually start decaling next session. I have to add the mirrors in the rear-view mirrors, paint the outer ends of the sonobuoys in the array. I did remove the masking in the exhaust duct and it came out okay. I can't remove any masking on the glazing until all the decals and any panel accent work is done, and the flat coat is applied. The end is near. I also have to mount the blades and those fold clamps... can't forget that. The last thing to do is add the marker lights.

  • Member since
    December 2002
  • From: Valrico, FL
Posted by HeavyArty on Monday, January 24, 2022 5:35 PM

Coming along really nicely.  The end is in sight.

Gino P. Quintiliani - Field Artillery - The KING of BATTLE!!!

Check out my Gallery: https://app.photobucket.com/u/HeavyArty

"People sleep peaceably in their beds at night only because rough men stand ready to do violence on their behalf." -- George Orwell

  • Member since
    June 2018
  • From: Ohio (USA)
Posted by DRUMS01 on Monday, January 24, 2022 5:56 PM

Looking nice! Having followed this from inception, I feel like we are building this together. I'm happy for you to get to the decal stage. All the little details you've added will really make this build stand out.... good job mate.

DRUMS01, Ben

"Everyones the normal until you get to know them" (Unknown)

LAST COMPLETED:

1/35 Churchill Mk IV AVRE with bridge - DONE

NEXT PROJECT:

1/35 CH-54A Tarhe Helicopter


  • Member since
    March 2012
  • From: Louisville, KY
Posted by Builder 2010 on Tuesday, January 25, 2022 6:08 PM

It makes me very happy when folks are following closely. Posting this stuff takes some effort and it's good that it doesn't go to waste.

Short session made even shorter, which I'll explain later.

Painted the fold joint details and masked and painted the two torpedoes. 

The torps came out nicely and still need the prop areas to be painted red and a decal to be put on. The plans call for the warhead to be yellow-orange.

I was all set to start adding decals to the tail boom now that the fold area was finished and then I noticed that I had OVERSPRAYED YELLOW-ORANGE ALL OVER THE GLOSS BLACK. it seems that I was holding the torpedoes in proximity to the work area and made a slight mess. I then had to go back and re-shoot the black and that killed the decal session.

I did get the first coat of body color on the tops of the main rotors. Tomorrow I'll do the bottom and that will get them ready for assembly.

Tomorrow, decaling will officially commence. I glued back on that fussy antenna that kept getting knocked off. This time with very stout piece guitar B string.

  • Member since
    March 2012
  • From: Louisville, KY
Posted by Builder 2010 on Wednesday, January 26, 2022 5:29 PM

Almost everything that can be painted is. The decaling began in earnest and is basically finished. The aircraft didn't have as many stencils as other models I've built. I use MicroSet first, put down the decal and the MicroSol. I may add more MircroSol if more shriveling is needed.

I started on the starboard side, did the same side of the tail boom, did the port side and then port side boom. I've complained about the instructions, but the decals are excellent. They're thin, have nice narrow margins, didn't tear, laid down well with solvent, have good color registration and opacity.

Because of the folded tail, I had to slide the HSL decal under the folded wing and get it into position. It goes down parallel to the little vertical stab that sticks out the back and that's completely behind the folded horizontal stab.

I did the same routine on the ports side, then I decaled the torpedo and towed sonar. There's only enough decals for one torpedo which makes no sense to me.

And the I added the missing radome under the nose. I thought the FLIR was an option for this part misreading the instructions. It was pointed out to me that it is essential. I traced the part and scraped off the many layers of paint so the solvent cement could do its job. I now have to go back and airbrush the blend of body and bottom color. There's one decal that goes on the front of the dome. And then all the painting will be done! Well actually, I still have to prepare the blade stowage racks and paint them, and put on all the marker lights and missile warning sensors. Can't forget those. The tail sensors are buried deep in the space protected by the folded wings.

The main rotor blades are fully painted also. 

I'm going to do some very conservative weathering including some panel accenting. Then I'll give it an overall flat finish (except the glossy tail, which remains so.) And do final assembly. I still have to order the figures from Reedoak and do the base work. We're almost done.

  • Member since
    April 2003
  • From: USA
Posted by keavdog on Wednesday, January 26, 2022 5:57 PM

Looks great!  Getting close to the finish line now. 

Thanks,

John

  • Member since
    March 2018
  • From: Chicago suburbs
Posted by Luvspinball on Wednesday, January 26, 2022 11:06 PM

Fabulous job.  Got one in my stash and marked this thread so I can come back to it.

Bob

Bob Frysztak

Luvspinball

Current builds:  Revell 1/96 USS Constitution with extensive scratch building

  • Member since
    January 2022
Posted by Svt40 on Thursday, January 27, 2022 9:44 AM

No need to be so concerned with feathering the data link radome paint.  I've seen them all 320 side grey, all 495 bottom grey or a mix of both.


More painting stuff missing from the instructions.

The searchlight will have a black lens on it for an NVG equipped aircraft.  Clear glass if not NVG. All deployable aircraft are NVG compatible.  I'm not sure if they would put the NVG filter on the search light for the show birds.  The searchlight body can be 320 side grey, 495 bottom grey or CARC dark OD. The two hover lights in front of the RADAR radome are always clear glass.

The two RAD-ALT antennas on the bottom of the front ESM fairings (round things on corner) are a light tan-brownish color

The upper TACAN antenna on the nosebay is a darker 320 side grey.

The doppler antenna on the bottom near the tail strut is gloss white with a frame painted in 320 side grey or 495 bottom grey.

The UHF/VHF antennas (with the hot dogs on top) are 320 side grey.

The sono antenna near the tail strut is also 320 side grey

The ELT antenna on the turtleback is gloss white

The GPS antenna "chicklet" as we called it.  Was gloss white, light 320 side grey or CARC dark OD.

The tail rotor indexer head is always a forest green.

The FLIR turret when shut off would have none of the lenses visible.  Just the exhaust fan on the back of the turret would be seen.

  • Member since
    March 2012
  • From: Louisville, KY
Posted by Builder 2010 on Thursday, January 27, 2022 9:18 PM

So get it out of your stash and get cracking while this stuff is still fresh in your mind. Svt40, I am following your terrific instructiosn as best I can.

I started today with the best of intentions to finish up more of the model and get the blades mounted on the hub. I decided to reinforce the flimsy pins that hold the plastic blade knuckle to the hub swivel by drilling and pinning with 0.032" phos-bronze. After drilling I attempted to hold the two parts of the blade knuckle with a clamping tweezers. Before I could get the glue near the joint the small mating part snapped out the tweezers with the wire attached. The wire hit the floor and the part.... well... the part went into the atlernate universe. I swept the entire freaking shop and examined every flat surface, but it was gone, gone, gone. (BTW: Great old Everyly Brothers song from the mid 60s).

So there's three parts when I need four. And I really need that part! 

So I photographed the part from four directions, measured the critical dimensions with the digital calipers and drew a diagram, and then drew it in SketchUp. I put it into the slicer and will print it tomorrow. It will print in a little over an hour.

Here's the drawing.

Here's the array of many parts on the slicer.

Why make one when I can make a bunch. Since they're all the same height, the print time does not change and the total resin use is $0.29. It's really great to know that in some cases, even in desparation, I can still create parts when I need them. This really is only reasonable with small, east-to-visualize parts. If I screwed up one half of the fuselage, that would be a different matter.

I did get one other thing done and that was painting the ends of the sonobuoy dispenser. This view is after painting the NATO black, but BEFORE, back painting to fix all the parts that shouldn't be black. A little touch up with body color and it will be perfect!

JOIN OUR COMMUNITY!

Our community is FREE to join. To participate you must either login or register for an account.

SEARCH FORUMS
FREE NEWSLETTER
By signing up you may also receive reader surveys and occasional special offers. We do not sell, rent or trade our email lists. View our Privacy Policy.