SEARCH FINESCALE.COM

Enter keywords or a search phrase below:

BIG Russian Jet Groupie GB

186756 views
1790 replies
1 rating 2 rating 3 rating 4 rating 5 rating
  • Member since
    August 2009
  • From: Borlando Fla home of the rat
Posted by TREYZX10R on Friday, March 22, 2013 8:03 PM

Vance saw your 109 it came out awesome,looking forward to seeing a Ruskie bird come off your bench.

Dean they are raised and ugly,so they fit right in on a Soviet cold war bird!

  • Member since
    June 2007
Posted by Porkbits on Friday, March 22, 2013 11:11 PM

As for the Frogfoot, I've been beating the heck of out of her finish with all sorts of stuff--artist's oils, Tamiya Smoke, dot filters, enamel wash--I'm just having fun with it, which is why I love building these post-Cold War Russian jets. Big Smile

PB

  • Member since
    August 2009
  • From: Borlando Fla home of the rat
Posted by TREYZX10R on Saturday, March 23, 2013 10:42 AM

PB its looking like a proper front line well used Ruskie piece of hardware!

I've gotten the finish sanding done and the pitot and antenae on ,off to the man cave for some preshading next

  • Member since
    August 2009
  • From: Borlando Fla home of the rat
Posted by TREYZX10R on Saturday, March 23, 2013 4:31 PM

Sprayed the interior color over the canopy

Then started my preshade


Next the bottom color ,just some testors flat sky blue followed by a light dusting of some really thinned flat grey

Masked the bottom and shot some testors od green darkened with some flat black,colors came out close to what they should be I think. Unmasked and ready for some decals!


  • Member since
    November 2005
Posted by Anonymous on Saturday, March 23, 2013 4:53 PM

Very Rapid work on the Mig 21 there TREYZX10R I have to say it looks great, the colours are nice, what Airforce is it going to be part of?

  • Member since
    August 2009
  • From: Borlando Fla home of the rat
Posted by TREYZX10R on Saturday, March 23, 2013 10:10 PM

Dean thanks ,I'm going with the CCCP yellow23 version from 1964

  • Member since
    November 2005
Posted by Anonymous on Sunday, March 24, 2013 3:58 AM

Brilliant, an old-school Mig-21 as it should be! Looking forward to seeing it finished, which at your current pace will be any day now! If you finish that and want to do more go for it, the deadline is gone now so there's time for more.

  • Member since
    November 2005
Posted by Anonymous on Sunday, March 24, 2013 10:16 AM

Got some pictures here, I got some better images of the chipped paint around the nose, and the fuselage, I have been using Humbrol metaliser for that. Also I have started the detail in the canopy frame, you can see the beginning of the brace behind the front seat and the rear view mirrors and also the cables have been made from stretched sprue. I have also shown an image of my chaotic workbench/kitchen table, and the image of the wing shows three circular panels, I have seen on the pictures off this aircraft that there seemed to be spilled fuel around these parts, either that or its oil, but I would guess its fuel being that its in the wings, so I will apply fuel staining there and oil staining at the very end as well as further cosmetic "damage" to the mig, and also last but not least I took a picture of a part of the rest of my unbuilt collection which you can see in the last image, the apartments in Belfast city are small so space is an issue, not that that stops me lol.

  • Member since
    November 2005
Posted by Anonymous on Sunday, March 24, 2013 11:17 AM

So I put the mudguard on the nose wheel, and look! For gods sake, I should have checked!!

  • Member since
    November 2005
Posted by Anonymous on Sunday, March 24, 2013 11:22 AM

These are the fuel stains I was on about, they're all over the place, assuming its fuel.

  • Member since
    June 2007
Posted by Porkbits on Sunday, March 24, 2013 11:38 AM

Wow, Trey, you're moving along quick. I'm downright glacial in comparison, lol.

Weathering looks great, Dean. Does that particular MiG not use a mudguard? Or maybe it just wasn't attached when the photo was taken?

  • Member since
    November 2005
Posted by Anonymous on Sunday, March 24, 2013 1:20 PM

Here's the model after more paint chips, and the oil and fuel stains have now been added, but I cant help but think it does not look right still.

More rust has been added in the appropriate areas

More scratches to the wing, I saw these and realised I had missed them.

Also the mudguard is now gone. I have to say I have never applied so much weathering to one aircraft. I remember reading the comments of the guy who builds the models for Revell saying that the Mig 29 was in such bad condition that it looked like something from Mad Max, he said it was really badly beaten by the weather, well as you have seen in the pictures of the real thing which is what Revell used for this re-box of their old mig 29 that its not exactly going to be winning any awards for a good paint job!

  • Member since
    November 2005
Posted by Anonymous on Sunday, March 24, 2013 1:22 PM

I forgot this one, the other wing, obviously.

Dre
  • Member since
    June 2007
  • From: here, not over there
Posted by Dre on Tuesday, March 26, 2013 11:52 AM

Dang, there's some sweet looking stuff going on in here now..  

  • Member since
    November 2005
Posted by Anonymous on Tuesday, March 26, 2013 4:17 PM

Thanks Dre, I forgot to say, the Frogfoot looks fantastic, I cant wait to see the finished result!

Dre
  • Member since
    June 2007
  • From: here, not over there
Posted by Dre on Tuesday, March 26, 2013 5:06 PM

Oi!   that's Pork's Frogfoot!   (which does look fantastic!   great work on the engine staining!!)

I need to get back to the Russian bench, but I've derailed myself with a new project- turning a 1/35 Sd.Kfz 234-series AFV into a rock-crawler/mud buggy.     

  • Member since
    June 2007
Posted by Porkbits on Tuesday, March 26, 2013 5:32 PM

Lol, thanks Dre! :-)

Well, I just started decaling. After weathering a bit more to tone down the decals (note to self: next time weather AFTER you've done the decals), I hit everything with a flat coat, attach the landing gear, and then dive into putting on all the fiddly bits.

  • Member since
    November 2005
Posted by Anonymous on Tuesday, March 26, 2013 5:44 PM

Lol, sorry Porkbits I never read the thread properly well Porkbits fantastic Frogfoot!

  • Member since
    June 2007
Posted by Porkbits on Tuesday, March 26, 2013 5:48 PM

Aha, no problem, Dean, and thanks!! There's a lot going on in this thread (which is a good thing). :-)

  • Member since
    November 2005
Posted by Anonymous on Tuesday, March 26, 2013 5:52 PM

Yeah definitely! It almost stopped last year but at least its going again

I have to say I have migs and migs to build and I know its a Russian Jet GB but I saw the F-14 final flight and I just thought, Ihave the Trumpeter 1/32 F-14D with Final flight decals, and now I really wanna build it! But not yet, my mig has taken about 6-7 months now and the Tomcat will be built and posted on a thread of its own, but I think I wanna spend about a year on it, to get everything (every detail) exact.

Dre
  • Member since
    June 2007
  • From: here, not over there
Posted by Dre on Tuesday, March 26, 2013 6:06 PM

That MiG 29 is really sharp, Dean.   If that's just 6-7 months of work, I can't wait to see what a full year does for a F-14D!

Trey ought to be weathering that MiG-21 about now...  

  • Member since
    November 2005
Posted by Anonymous on Tuesday, March 26, 2013 6:18 PM

At his speed he would probably have made two by now I would have thought lol. I was thinking, I wonder is it worth getting aftermarket stuff for the Tomcat (I wont go on about it because it's the wrong place to talk about it) but the kit looks superb I have never used Resin, I always scratchbuild, I think I will perhaps do that, like i did with the Mig 29UB and K. Do any of you guys scratchbuild? Or get aftermarket stuff?

Dre
  • Member since
    June 2007
  • From: here, not over there
Posted by Dre on Tuesday, March 26, 2013 6:44 PM

I really think that most 1/32 stuff is improved by a resin cockpit set and/or some PE, especially if there's a big canopy to see through.   I'll scratch some stuff, but I'm a long ways from scratching a complete cockpit in any kind of accurate detail.   Some of these modern resin sets are simply unbelievable in their detail- you'll want to take the time to paint them right because to do otherwise would be a travesty.

  • Member since
    November 2005
Posted by Anonymous on Tuesday, March 26, 2013 7:29 PM

I see, well I will get a walkaround book of the Tomcat and see whats what, and look at whats supplied, I did it with an F-15E and made it into the F-15I the 1/32 Tamiya kit that is, I used an aftermarket set but not completely so I never really got the full benefit. I will definitely get the Eduard Big ED for it, even though it is pricey. I have found a video on Youtube and I'm going to post it, it'd really good, it's about the Tomcat in Iranian service during the Iran Iraq war.

Dre
  • Member since
    June 2007
  • From: here, not over there
Posted by Dre on Wednesday, March 27, 2013 8:47 AM

It's your choice  of course, but I'd go with a resin cockpit and some external PE.  

  • Member since
    November 2005
Posted by Anonymous on Thursday, March 28, 2013 4:03 AM

Back to Russian jets now, if you have not seen this video and don't know what the Flanker can do aerobatic wise then this is good to see, I will be working on the Mig later today so hopefully I will have some pictures up later.

  • Member since
    February 2003
  • From: Rothesay, NB Canada
Posted by VanceCrozier on Saturday, March 30, 2013 2:40 PM

Just checking in folks, should have done progress pics tomorrow or Monday.

On the bench: Airfix 1/72 Wildcat; Airfix 1/72 Vampire T11; Airfix 1/72 Fouga Magister

Dre
  • Member since
    June 2007
  • From: here, not over there
Posted by Dre on Saturday, March 30, 2013 6:43 PM

I'm totally goofing off myself...  but I did manage to sell a bunch of figure sets and paint to a coworker today, so that counts as modeling, right?

  • Member since
    August 2009
  • From: Borlando Fla home of the rat
Posted by TREYZX10R on Sunday, March 31, 2013 8:07 PM

Dean that is really looking sharp!

Dre thanks I probably woulda been weathering by now at the very least but..............................

Epic bench fail! I spilled some solvent on the almost done Ruskie bird and had to backtrack a bit!

Before

So sanded it all back down,broke off every bit of protruding detail and knocked the canopy off to add salt to the open wound!

Of course had to rescribe as all the raised details were sanded away during the repair

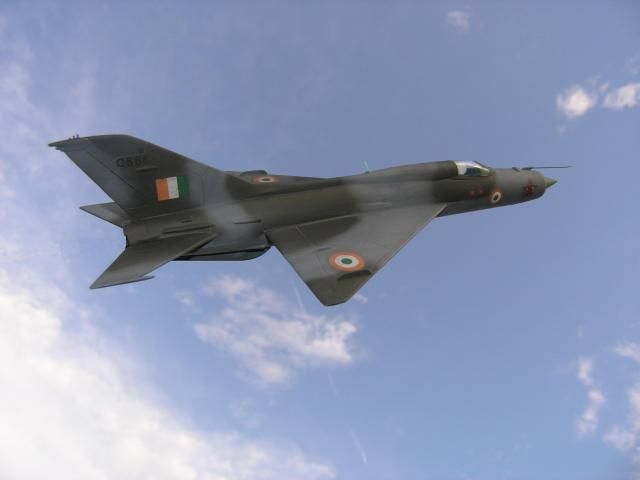
Thankfully the decal sheet came with a second option for the Hindustan built version,so new scheme time

Wrapped it up and weathered ,not a top shelf build but will look okay hanging in the Man cave

  • Member since
    November 2005
Posted by Anonymous on Monday, April 1, 2013 3:41 AM

Very well saved there, and the finished result I think is even better with the fact you said you had to re-scribe all the panel lines, looks great!

JOIN OUR COMMUNITY!

Our community is FREE to join. To participate you must either login or register for an account.

SEARCH FORUMS
FREE NEWSLETTER
By signing up you may also receive reader surveys and occasional special offers. We do not sell, rent or trade our email lists. View our Privacy Policy.