SEARCH FINESCALE.COM

Enter keywords or a search phrase below:

Completed: 1:48 Eduard Spitfire VIII Profipack

11415 views
50 replies
1 rating 2 rating 3 rating 4 rating 5 rating
  • Member since
    January 2015
Completed: 1:48 Eduard Spitfire VIII Profipack
Posted by BrandonD on Monday, April 27, 2015 10:40 PM

----------Finished pics on page 3-----------

I'm building this for the 1945 group build and figured since it's a new kit that just came out last month that I'd do a WIP post for it here as well. Since it's new, I'll give a mini review here.

I was excited to get this, and I have to say that it's one of the single best kits I've ever seen in this scale at first look. The recessed detail is crisp and subtle, much like Eduard's Bf-109 E series in 1:48. There are markings for six aircraft, and I am opting to build the Aussie one because I have a few Brit Spits already and I like the shark mouth. The color PE set is typical Eduard, and is very nice.

As I began building it, it was really apparent that this thing is well-engineered. The wheel wells comprise 15 parts on their own, and they fit perfectly. The cockpit is nice, and even if you don't have the PE set, there are nice touches like the armor plate having a tapered edge to give it the impression of scale thickness. Control surfaces are molded separate from the wings, and while I don't care about that with the ailerons, it's really nice for the elevators, since Spits seem to always have them dipped down (in the dive position) when they're on the ground. Flaps are molded into the wings.

The wings themselves are great - no random open panel options to complicate the building. There are options for three different wingtips, and the LF (clipped) wingtips are molded in both solid, and clear - so you can keep the navigation lights clear.

Masks are included, which is nice since Eduard has you installing the under wind lights before the wings themselves are assembled. I'd still prefer to drop them in at the end, but this probably makes for a tighter fit.

So far, I've done most of the cockpit. There are a bunch of small PE parts for items like the compass, and Eduard gives you spares in case they decide to take flight on their own off the fret. I was able to keep all of mine, so I'll have a compass and a few other parts for my Tamiya Spitfire V that I have in the stash.

The exhaust pipes and cannon are out on the side, and Eduard has molded them with recessed openings, so you don't need to drill them out (I believe this sprue might be the one from their Spitfire IX).

The one complaint I have so far is that the hood is provided as two pieces that need to be joined, and I found it hard to have a consistent depth in the seam. I'll probably have to fill it and describe it so it doesn't look funky.

Decals are Cartograf, and there is no engine. I like that the tires are molded separate from the wheels so you don't have to be as careful painting them.

Here are a couple quick pics I snapped tonight.

I still need to hit some details, like the white handle for the throttle and a few others, but the cockpit is well on its way to being done. I can't wait to get to main assembly.

-BD-

  • Member since
    February 2007
  • From: Brunswick, Ohio
Posted by Buckeye on Tuesday, April 28, 2015 11:21 AM

Looks like a very nice kit and you are off to a great start.

Mike

  • Member since
    May 2013
  • From: Indiana, USA
Posted by Greg on Tuesday, April 28, 2015 12:08 PM

I hope you keep this WIP going. I'm keen on this kit and would like to watch you build it.

Looking good so far.

  • Member since
    January 2015
Posted by BrandonD on Wednesday, April 29, 2015 12:41 AM

Well after posting this last night, I went back to the bench and kept telling myself, "Ok, one more thing" until I realized I had the fuselage halves together and the wings ready to accept them.

There was a somewhat-significant gap in front of the instrument panel. I believe this came more from my trimming it too much than from any fault of Eduard's, but I can't remember. In any case, I masked it and filled it, then let it dry overnight.

Today, I sanded it smooth, finishing it with 12,000-grit micro mesh.

I then fitted the fuselage into the wings. The fit is so tight that I really didn't need any glue, though I of course did glue it. 

Seams on the bottom were minimal, mostly consisting of the rear wing-to-fuselage joint that is a common fill spot on Spits.

The one issue I really have with Eduard so far on the design of this kit is the way they made the hood (or bonnet, I suppose) two pieces.

As we cn see below, the Spitfire Mk. VIII didn't have a seam down the centerline of it.

So I don't know why the kit version is two parts. Anyway, I masked it, filled it and pulled the masks off. There is some subtle rivet detail uncomfortably close to the putty, but I'll lay down new masks before I go to sand it and hopefully avoid losing any (but really, I'm not counting them anyway).

The chin was also two pieces, and I kind of get it here, since it's probably more important to line up the joints to the fuselage halves with the detail there. Maybe that was the rationale on the hood, too, but the chin, having no detail on the seam, is much easier to work with.

I will let these dry overnight before I go back and hit them with the sandpaper. The wings were actually exceptional. The only spot I had to fill was one area on each wing where the sprue attached and I wasn't able to get it perfect with the knife. Each bit was literally about half a millimeter in diameter.

The only thing that has me really perplexed is the exhaust pipes. I prefer Tamiya's habit of making them push-in parts that can be added at the end of the build. The way these are engineered is that they are sandwiched by two pieces, giving great detail. I think I will brush them with the final color before assembly and just mask them entirely for the duration of the build. At the end, if there are any discrepancies between the mask and the paint line, I'll figure it out. Fortunately the one I'm building means one stack will be all ocean gray, and the other one will be 5/6 ocean gray with only the front pipe being surrounded by dark green.

-BD-

  • Member since
    January 2015
Posted by BrandonD on Wednesday, April 29, 2015 12:44 AM

Oh, and just to clarify - those strips of putty are WAY wider than the seams they're meant to fill. The chin seam could probably have been fine with just a little sanding, but I didn't want to flatten it out. The lateral seam in the chin scoop is noticeable, but not anywhere near as big as the photo above looks.

-BD-

  • Member since
    October 2005
  • From: UK
Posted by antoni on Wednesday, April 29, 2015 6:39 AM

Lots of people have had problems with the engine cowlings. Ultracast have one piece resin replacements. They also have exhausts that can inserted from the outside. The fit of the kit cowlings is so glood that you can paint the model first and then insert the kit exhuasts and glue the cowling in place if you want to do it that way.

  • Member since
    January 2015
Posted by BrandonD on Wednesday, April 29, 2015 3:56 PM
Thanks, Antonio. I want to keep this one OOB, but I checked at lunch and yeah that good fit is good enough that I can do it after painting. I'll probably just tack it in place with white glue until the end.
  • Member since
    October 2005
  • From: UK
Posted by antoni on Wednesday, April 29, 2015 5:18 PM

You can also find a way to stop the prop falling out.

  • Member since
    January 2015
Posted by BrandonD on Thursday, April 30, 2015 1:14 AM
Yeah that was strange. I like tamiya's handling of the prop with the plot caps. I can keep it in there no problem, but am looking at finding something in the spares box that can hold a plot cap so it stays in and is still removable.
  • Member since
    February 2012
  • From: Olmsted Township, Ohio
Posted by lawdog114 on Thursday, April 30, 2015 2:42 AM

By far Eduard's best kit so far.  Its looking great Brandon..Yes that cowl seam is a dumb design but not impossible to fix.  

Joe  

 "Can you fly this plane and land it?...Surely you can't be serious....I am serious, and don't call me Shirley"


  • Member since
    January 2015
Posted by BrandonD on Friday, May 1, 2015 12:37 AM

Ok, I got the main assembly done, painted the insides of the scoops and masked them, then added most of the small parts - cannon, PE hooks on the undercarriage, underwing lights, etc.

The horizontal stabilizers and the rudder are on, but not glued yet. I'm going to take them off after shooting the underside for ease of masking, since they fit so well that they won't need filling at the underwing seam (and hopefully not the upper side, either).

After applying the masks and shooting it black, I realized the hood seam was still visible, so it currently has a 1mm-wide strip of white going down the nose that will be sanded off tomorrow. I contrasted the photo a bit here so you can see it. It wasn't too bad, but it was definitely there, and I'd rather lose some rivets than have an extra seam, if that's the end result (fingers crossed that it isn't).

Now I hope I get the seam dialed this time, because it just looks weird in black.

-BD-

  • Member since
    January 2015
Posted by BrandonD on Friday, May 1, 2015 12:45 AM

Oh, and by the way, for anyone who is considering this kit - the way the elevators lock into the horizontal stabilizers with four locating pins ensures you get the perfect dihedral. I am just going to cut off the pins once the stabilizers are glued in so I can drop the elevators down for the parked position.

-BD-

  • Member since
    March 2005
  • From: Lancaster, South Carolina
Posted by Devil Dawg on Saturday, May 2, 2015 10:19 PM

Wow, Brandon! It's looking great! I just bought the Eduard 1/48th ProfiPack Spitfire Mk. IXc Late Version (my first-ever Eduard kit), and, like you, am AMAZED at the quality of this kit, and all the nice little extras, such as the photo-etch parts, instruction book (not just a single instruction page - a BOOK!), pose-able elevators, rudder, & flaps, multi-aircraft decal sheet, etc. Great value, too. I bought this well-equipped kit for what a typical run-of-the-mill Tamiya kit cost. Very much looking forward to seeing how yours turns out. Good Luck!

Devil Dawg

On The Bench: Tamiya 1/32nd Mitsubishi A6M5 Model 52 Zeke For Japanese Group Build

Build one at a time? Hah! That'll be the day!!

  • Member since
    April 2005
  • From: Piscataway, NJ!
Posted by wing_nut on Sunday, May 3, 2015 2:13 PM

Looks really nice.   I've heard good things about this kit.   No question that in you hands it's gonna look great

Marc  

  • Member since
    January 2015
Posted by BrandonD on Monday, May 4, 2015 3:54 PM

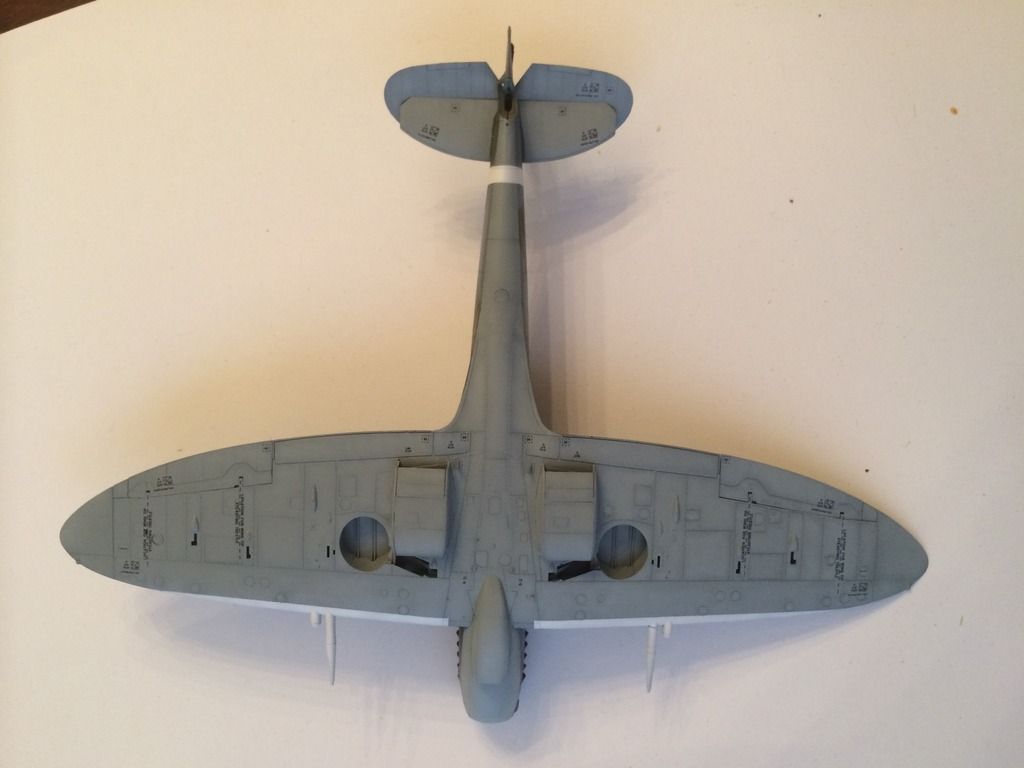
Ok, I got some time to work on it over the weekend, which means I finally got some color on the underside.

It's Tamiya medium sea gray acrylic applied in the three-layer method. After the base coat, I took the stabilizers off, removed the elevators and shot both mating joints with color since they will be displayed in the lowered position and I wanted to make sure they came out well. I'm debating whether I leave them unglued for the upper portion to ease the masking process.

The photo below is after the lightened coat has been sprayed over the base.

The photo below is after the blend coat. This is my fist time using the lacquer thinner with my acrylics instead of Tamiya's X-20, so getting the ratios right was a bit difficult at first. The bond coat ended up being 35 drops of thinner to 12 drops of paint, and that was about the perfect amount.

Now to let it dry and get on with the masking so I can shoot the topside ocean gray.

-BD-

  • Member since
    February 2012
  • From: Olmsted Township, Ohio
Posted by lawdog114 on Monday, May 4, 2015 11:07 PM

Nice work Brandon.  Tamiya lacquer thinner is like painting with silk.  Fantastic stuff.  

 "Can you fly this plane and land it?...Surely you can't be serious....I am serious, and don't call me Shirley"


  • Member since
    January 2015
Posted by BrandonD on Tuesday, May 5, 2015 1:50 AM

Thanks. I was masking the underside and realized one of the ailerons was loose on one side, so I tried to sneak some glue in but managed to get it on the paint (Model Master cement). So I had to wipe it off, which of course removed paint. Fortunately it was a small area, and I got it resprayed tonight.

-BD-

  • Member since
    June 2013
Posted by RobGroot4 on Thursday, May 7, 2015 9:16 PM

Looks great thus far!

Groot

"Firing flares while dumping fuel may ruin your day" SH-60B NATOPS

  • Member since
    January 2015
Posted by BrandonD on Friday, May 8, 2015 1:50 AM

Thanks, Groot!

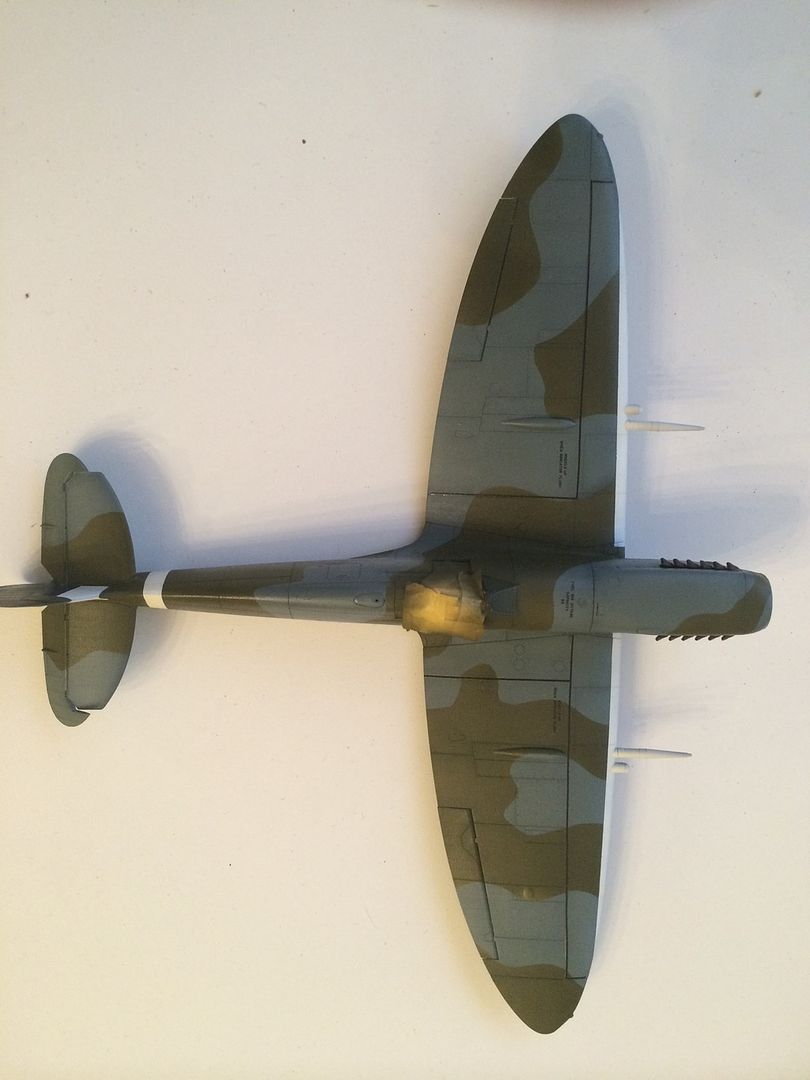
Well, it's been a few days since I posted, but I've got the top colors on. The masking still looks a little sharp on some edges, but overall I'm happy with it. One of the reasons I chose this build is that it's a RAAF bird, and I hadn't done any Commonwealth planes yet. The other was that the camouflage had sharp demarcations, and not the blurred/feathered lines where the colors joined. I've got another Spitfire I want to try out the softer edges on, but this one I wanted to take it easier.

As you can see, I've got the ocean gray and dark green atop the medium sea gray. I'm happy with how it came out save for one spot on the starboard wing where I didn't hit it enough with the green blend coat, leaving too much of the lightened shade peeking through. This would be a problem if it wasn't covered by a roundel :D

A couple of side shots

And you can see the color scheme on the Eduard instructions. The gray on my plane is much more blue than the color drawing, but I think the bluer tint is actually more correct, and it will probably tone down a bit when I clear coat it anyway. (Also, the white balance in this photo is totally off, and I didn't take the time to fix it).

Now I get to basically mask the whole thing again to paint the leading edges of the wings and the cannon barrels white. I suppose I should do the fuselage band at that time, too.

-BD-

  • Member since
    February 2012
  • From: Olmsted Township, Ohio
Posted by lawdog114 on Saturday, May 9, 2015 2:15 AM

Looking great Brandon.  It would have been easier to paint the white and tape it off before the camo.......at least cheaper as Tamiya tape is expernsive........lol.   I look forward to the decaling....

Joe

 "Can you fly this plane and land it?...Surely you can't be serious....I am serious, and don't call me Shirley"


  • Member since
    January 2015
Posted by BrandonD on Saturday, May 9, 2015 3:17 PM

Thanks, Joe.

Yeah, I thought about painting the white first, but the way the leading edges taper to a fine point, it made me think that I'd probably end up knocking the mask off at some point and having to re-shoot it anyway. I did use a cut-up Ziploc sandwich bag for most of the masking, because yeah, that Tamiya tape isn't cheap!

-BD-

  • Member since
    January 2015
Posted by BrandonD on Saturday, May 9, 2015 3:22 PM

I've finished the leading edges, the fuselage stripe and, while I was at it, painted the vertical stabilizer markings because I have yet to get decals for those to work right.

They'll need a tiny bit of touch-up, but after that I can finally glue the elevators and rudder in place. I'm really glad I opted to leave them off until the end, since it's really simplified masking.

I oversprayed the white with a mist coat of Tamiya buff to tone it down. I'm hoping it matches the decals once they're over the paint. If not, I'll have to mist them for uniformity.

I messed up on the blue on the tail, since I used X-4 instead of XF-4 and now have a nice glossy sheen. I'll just have to make sure I hit it well with the flat coat at the end.

-BD-

  • Member since
    December 2003
  • From: Charleston, SC
Posted by sanderson_91 on Saturday, May 9, 2015 4:27 PM

Brandon,

Your Spit is looking great!  Love your paint work!

Steve


  • Member since
    June 2014
Posted by BrandonK on Sunday, May 10, 2015 10:43 AM

Yup,

That is looking really good. Makes me want to start on my Mk XIX and use the same colors. Nice work so far.

On the bench:

A lot !! And I mean A LOT!!

2024 Kits on deck / in process / completed   

                         14 / 5 / 2  

                              Tongue Tied

  • Member since
    June 2013
Posted by RobGroot4 on Sunday, May 10, 2015 1:19 PM

Your paint job looks fantastic!  Really enjoying watching your build.

Groot

"Firing flares while dumping fuel may ruin your day" SH-60B NATOPS

  • Member since
    February 2011
  • From: Bent River, IA
Posted by Reasoned on Sunday, May 10, 2015 7:32 PM

Looks great, Spits are beautiful A/C and I'm enjoying the build.

Science is the pursiut of knowledge, faith is the pursuit of wisdom.  Peace be with you.

On the Tarmac: 1/48 Revell P-38

In the Hanger: A bunch of kits

  • Member since
    June 2013
Posted by bvallot on Tuesday, May 12, 2015 11:57 AM

BrandonD, this 3 layer painting was put together flawlessly.  Nice job there! =] I understand the hard demarcation line is appropriate but I do agree it's a little too sharp here.  The only suggestion I have to fixing this would be to take your masks you have for painting and apply some tape doubled over itself on it so that it rests "just" off the surface some.  Then come back with the right color for the mask and thin it down considerably so it can be painted to "blur" that line somewhat.  I would practice it first on a sheet of paper that way you can tell how much to thin your paint down to.  I also agree with what Joe said about the white markings but sometimes you just gotta go with what you're comfortable doing.  Don't sweat it.  =P

This bird is looking great.  I can't wait for the day when I add one to my collection. =]

On the bench:  

Tamiya F4U-1  Kenneth Walsh


  • Member since
    January 2015
Posted by BrandonD on Wednesday, May 13, 2015 1:11 AM

Thank you for the kind words, all. I appreciate it, really.

Bvallot - I thought about using Blu-Tac for the demarcation, but knew it would be a bit too fuzzy, and figured that even though the real one probably had some fuzziness to it, in scale, a sharp line would probably work. I do like the idea you suggested, and hadn't thought of going back and shooting it with thinned paints per your suggestion, but by the time I read this, I'd already gone too far. But thank you, as I will keep it in mind for next time.

I got a lot done on Sunday, and I just didn't have time to post last night, so here is a decent update.

First, some teasers - stencils applied:
I normally detest using decals for wing walk lines, and I still do, but I have to say the Eduard-printed stencil sheet worked extremely well for that. They took some straightening, and they aren't perfect, but I'm generally happy with them. Next time, I'll probably mask and paint, however.

I've found that it's best to do stencils first, and in this case, three decals went over stencils (both upper wing roundels and the aircraft marking on the starboard side under the rear canopy glass).

Then it was on to the decals, and you know the saying, "You can't miss what you've never had"? Yeah, that's how I feel about Cartograf decals, and I now see just why everyone raves about them. These things were perfectly in register, went down easily, responded to Micro Sol and actually sunk down so tight that the rivets managed to hold a wash on top of them. I'm really impressed, and happy that Eduard supplied markings for six birds, as now I can use the RAF roundels on my Spitfire Vb, and I can probably find a use for the USAAC national insignia, assuming I don't buy another Mk. VIII and build one of the American variants.

I forgot to take a pic of the decals pre-wash, but they were laid down atop Alclad Klear Kote, then oversprayed with the same.

And then the Flory grime wash, which always makes me nervous. What if it doesn't come off?!?!
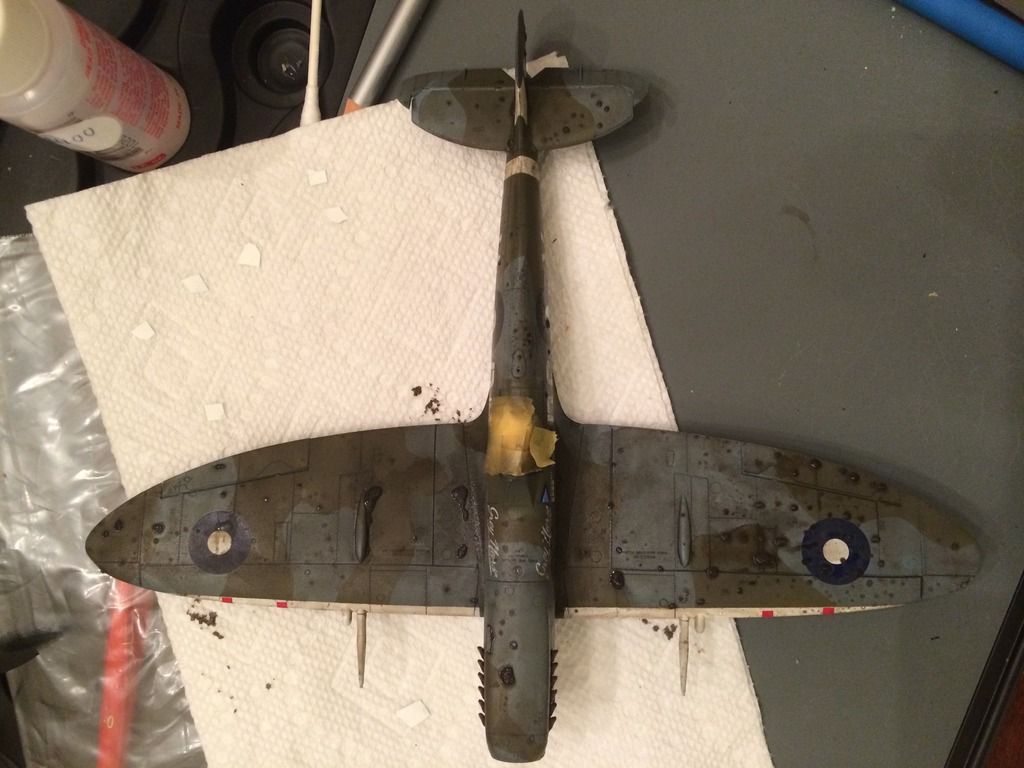
But of course it does, and it looks more and more like a plane.
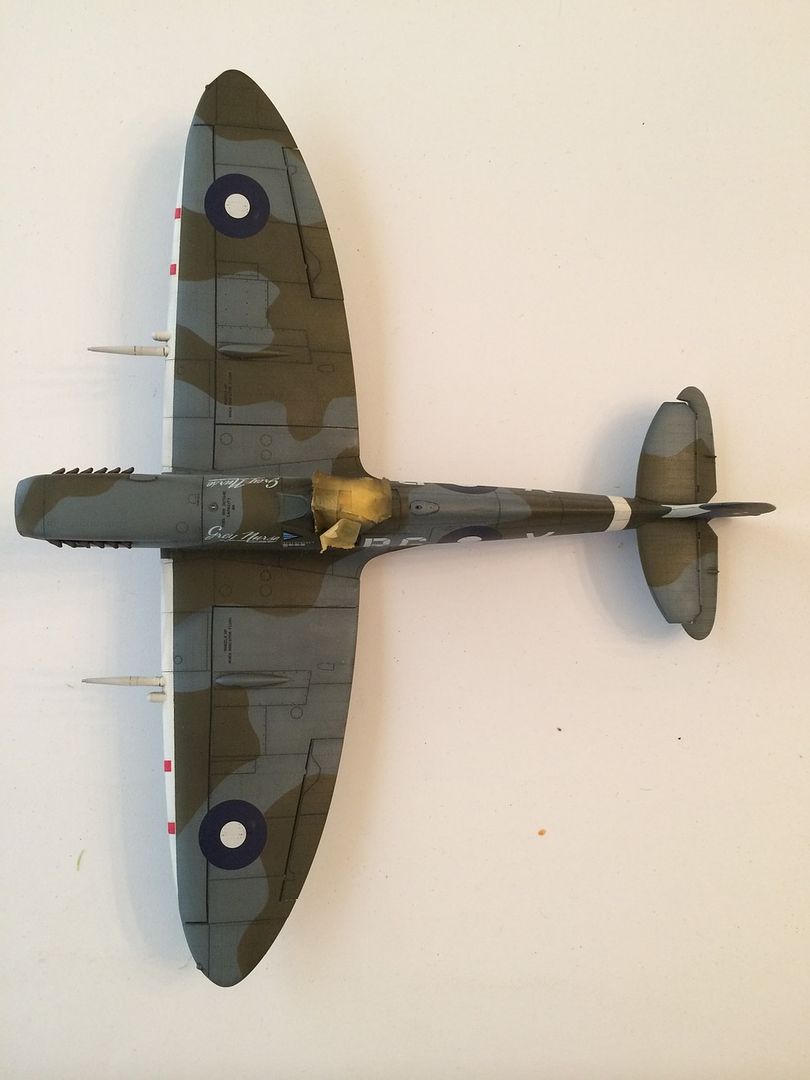
You can also see that I've got the elevators on in the down position, and the rudder is glued in position. I knocked off the starboard cannon, which is nice since I already knocked off the port one and had to reattach, so now neither one thinks it's special.

This evening I hit it with a tack cloth and sprayed the Tamiya dull coat and removed the mask on the canopy, attached the PE shock absorber bits, assembled the wheels (save for the PE wheel covers that need paint first) and got the prop together. I'll need to clear it and the landing gear doors, then wash and dull coat them, but that shouldn't take too long. I also need to attach the pitot tube and radio mast, but she's in her final stages.

-BD-

  • Member since
    January 2015
Posted by BrandonD on Wednesday, May 13, 2015 1:12 AM

I promise that when it's all done I'll use my real camera instead of my phone and actually take the time to edit the photos :)

-BD-

  • Member since
    February 2007
  • From: Brunswick, Ohio
Posted by Buckeye on Wednesday, May 13, 2015 11:28 AM

Looking good! Yes

Mike

JOIN OUR COMMUNITY!

Our community is FREE to join. To participate you must either login or register for an account.

SEARCH FORUMS
FREE NEWSLETTER
By signing up you may also receive reader surveys and occasional special offers. We do not sell, rent or trade our email lists. View our Privacy Policy.