SEARCH FINESCALE.COM

Enter keywords or a search phrase below:

1/48 Revell Messerschmitt Bf-109G-10 (Completed)

19855 views
134 replies
1 rating 2 rating 3 rating 4 rating 5 rating
  • Member since
    January 2015
  • From: Tumwater, WA.
Posted by M. Brindos on Monday, January 4, 2016 8:20 PM

Okay good. I shouldn't be so whiney about it I guess. Sorry for seeming so emo guys. Hard to see my work as good when I admire all of the others so much more than my own.

Thank you.


As for those landing gear, they even seem backwards to me as well as incorrect angles. That's the way they attach and one of the reasons why I would build this kit a second time with a few extras. Like I've stated before, its still a solid kit. It just needs some extra attention in some areas which I have ignored in this build. I'm regretting it now, but its almost finished and I can find this kit again.

The propeller blades do seem on the thick side, but they get a pass from me this round.

I may not be able to complete this build just yet. I have some packing to do and a move to get under way. This thread will probably go dormant again for a while until I settle into a new place. You guys know how it goes.


Thank you again for the comments, the kudos, and the advice. I have grown more as a modeller since joining the few sites I haunt, and this one is really starting to find a warm place in my heart.

Have a great week, you guys!  :)

- Mike Brindos "Lost Boy"

  • Member since
    March 2010
  • From: MN
Posted by Nathan T on Monday, January 4, 2016 3:24 PM

M. Brindos

Thank you, Britt. I certainly hope so. I have my doubts the more I see all of the other 109 builds here. I don't think mine looks right.

None of the other 109 builds look like mine does. Am I doing it wrong?


Very nice camo work and weathering Mike. I've always liked the look of yellow 5. All I can say is the landing gear looks a bit off. Gear legs might need to be angled out more, and just a tad forward. Probably Revells fault? Also, like many other kits, the prop blades look too thick and bulky and out of scale. Hard to correct unless you plan on a resin replacement. 


  • Member since
    March 2012
  • From: Corpus Christi, Tx
Posted by mustang1989 on Monday, January 4, 2016 2:53 PM

Good grief Mike!! You'd never be able to tell that was a Revell kit that's for sure! Great work man. This is extreme!


 Forum | Modelers Social Club Forum (proboards.com) 

  • Member since
    January 2015
  • From: Tumwater, WA.
Posted by M. Brindos on Monday, January 4, 2016 10:01 AM

Thank you, Britt. I certainly hope so. I have my doubts the more I see all of the other 109 builds here. I don't think mine looks right.

None of the other 109 builds look like mine does. Am I doing it wrong?

- Mike Brindos "Lost Boy"

  • Member since
    June 2013
Posted by bvallot on Monday, January 4, 2016 9:47 AM

Glad to see this one back on the bench Mike.  You're making this Revell kit look good. =]

On the bench:  

Tamiya F4U-1  Kenneth Walsh


  • Member since
    January 2015
  • From: Tumwater, WA.
Posted by M. Brindos on Saturday, January 2, 2016 10:18 PM

Thank you very much, freem! Yeah, that canopy needs an update, but otherwise its still a solid kit to work with. I went and visited the GB page and I have to agree with you, that green belly can't be right lol. Other than that, your build looks solid. I like it, aside from the strange color scheme lol.

I hope you build this kit again, as I am thinking I should build it again, with the other paint scheme and maybe a few more scratch built goodies to spruce it up just a tad more.  :)  Oh, and a replacement canopy lol.

Thank you for the compliment.  :D

- Mike Brindos "Lost Boy"

  • Member since
    September 2005
  • From: Central Nebraska
Posted by freem on Saturday, January 2, 2016 9:45 PM

She's a beauty Mike!  I just finished this same kit and agree with the canopy assesment. I posted some pics on the 109 Group Build page.

Once again excellent work, Mike!

Chris Christenson


  • Member since
    January 2015
  • From: Tumwater, WA.
Posted by M. Brindos on Saturday, January 2, 2016 8:53 PM

You have advanced as much as you have, not only because you have heeded our advice, but because you have the raw talent to apply it correctly.

But alas, I am still waiting for you to break out of your comfort zone and build something the way you want to build it and get creative. ;)

- Mike Brindos "Lost Boy"

  • Member since
    March 2015
  • From: Streetsboro, Ohio
Posted by Toshi on Saturday, January 2, 2016 7:42 PM

M. Brindos

Toshi, your words puzzle me. I'm not sure what you mean by extensive, for one. I could've finished this far sooner if I hadn't been on so many other projects. Your builds are really well done and keep getting better with every new build you complete. My patience has obviously run a bit thin, if I broke something and decided to forget about it and move forward anyways without repairing it properly.

Aside from the scratch building in the pit, this is almost straight out of the box with some weathering tricks.

You can build like this. You just need to step out of your comfort zone. You have the talent and we have all seen that. Toshi, my friend, you are in control of how much time and effort you put into your builds. If you want to finish a plane like this, then you just have to put your mind into it.

Don't put me on a pedestal when you are standing next to me. That's just silly. :)


The way I used "Extensive" is that you're able to draw on your veteran experience and literally focus that into a build.  Where I have but eight months to draw upon.  Don't get me wrong, I was able to excel on my builds because of you and forum members that answer my questions.  

Toshi

On The Bench: Revell 1/48 B-25 Mitchell


Married to the most caring, loving, understanding, and beautiful wife in the world.  Mrs. Toshi


  • Member since
    January 2015
  • From: Tumwater, WA.
Posted by M. Brindos on Saturday, January 2, 2016 1:09 PM

Toshi, your words puzzle me. I'm not sure what you mean by extensive, for one. I could've finished this far sooner if I hadn't been on so many other projects. Your builds are really well done and keep getting better with every new build you complete. My patience has obviously run a bit thin, if I broke something and decided to forget about it and move forward anyways without repairing it properly.

Aside from the scratch building in the pit, this is almost straight out of the box with some weathering tricks.

You can build like this. You just need to step out of your comfort zone. You have the talent and we have all seen that. Toshi, my friend, you are in control of how much time and effort you put into your builds. If you want to finish a plane like this, then you just have to put your mind into it.

Don't put me on a pedestal when you are standing next to me. That's just silly. :)

- Mike Brindos "Lost Boy"

  • Member since
    March 2015
  • From: Streetsboro, Ohio
Posted by Toshi on Saturday, January 2, 2016 6:49 AM

This build has to be one of the most extensive projects I have seen on this forum.  Your patience on this project is nothing short of amazing.  I hope one day, I'll be able to build a kit like this.

Toshi

On The Bench: Revell 1/48 B-25 Mitchell


Married to the most caring, loving, understanding, and beautiful wife in the world.  Mrs. Toshi


  • Member since
    January 2015
  • From: Tumwater, WA.
Posted by M. Brindos on Sunday, December 27, 2015 6:02 PM

I really needed a break from all of the armor I've been working on. I'm too close into it and my vision has lost focus. I needed to step back for a bit and regain my perspective so I got into my closet and pulled out the G-10 again.

I finished off the positive post shading on the left side of the fuselage and then on the bottom of the plane. I also learned that you can't seal artist's oil paint under a cote of acrylic. That didn't go well at all and I had to strip, and re-do the effects on part of the left side under the pit. In some smaller places where it did the same thing I simply left them as wear on the paint which doesn't look too bad in small amounts lol.

I used some packing paper for the leather walls in the wheel wells and I think I will add some more wash to the area and landing struts later.


The next time I make a "winged thingy" I'm going for a clean build. I'm starting to realize that just because I know how to apply all of these effects, it doesn't mean that I have to use them all every time I paint something.


I think I will finish this soon. It still a good old kit and doesn't need much out of the box, except for a replacement canopy. The kit one has not aged well and has huge gaps if you choose to model it closed. Otherwise its still a competitor with a few mods.

Thanks for checking in my friends.  :)


Edit:

I know. Not much to say here til I finish it, right? lol

- Mike Brindos "Lost Boy"

  • Member since
    January 2015
  • From: Tumwater, WA.
Posted by M. Brindos on Thursday, August 20, 2015 2:39 PM

Yeah, I'm really loving this AB. Combined with the Iwata compressor it works like a dream. I also found that if I unscrew the cap on the tip a few turns I can get an even finer mist out of it. Its more versatile than I would have imagined it could be.  :)

So far I've only run my own acrylic mixes through it with great results. I've yet to try running any enamels through it.

- Mike Brindos "Lost Boy"

  • Member since
    March 2015
  • From: Streetsboro, Ohio
Posted by Toshi on Thursday, August 20, 2015 5:08 AM

I forgot to add, it comes with a five year warranty from Iwata.

On The Bench: Revell 1/48 B-25 Mitchell


Married to the most caring, loving, understanding, and beautiful wife in the world.  Mrs. Toshi


  • Member since
    March 2015
  • From: Streetsboro, Ohio
Posted by Toshi on Thursday, August 20, 2015 5:06 AM

I have that same AB, it's one of the most reliable tools I've used so far!  I had two AB from Harbor Frieght Tools break on me, but the Iwata has held it's own and paid itself in dividends.

Toshi

On The Bench: Revell 1/48 B-25 Mitchell


Married to the most caring, loving, understanding, and beautiful wife in the world.  Mrs. Toshi


  • Member since
    January 2015
  • From: Tumwater, WA.
Posted by M. Brindos on Wednesday, August 19, 2015 3:04 PM

http://www.luftwaffe.cz/petzschler.html

He ended up working for Boeing. :)  His plane will fit nicely into my collection of Boeing workers who fought in WWII.

- Mike Brindos "Lost Boy"

  • Member since
    February 2011
  • From: Bent River, IA
Posted by Reasoned on Tuesday, August 18, 2015 10:13 PM

Looking REAL nice Mike, that is a better than average kit from Revell and you're spot on concerning the canopy.  I built that exact subject several years ago, you're doing it up right.  Interesting story on that plane, if memory serves me the pilot "stole" it from the fighter row in the waning days of the war and flew it to Sweden in order to avoid the Soviets.


Science is the pursiut of knowledge, faith is the pursuit of wisdom.  Peace be with you.

On the Tarmac: 1/48 Revell P-38

In the Hanger: A bunch of kits

  • Member since
    April 2015
  • From: New Hampshire, USA
Posted by UKguyInUSA on Tuesday, August 18, 2015 11:55 AM
She's looking fabulous so far, Mike! I use the same method on some of my builds when I'm not happy with the color- post shading, filtering with oils to tone down or darken up. Keep having fun! Cheers- Martin : )
  • Member since
    January 2015
  • From: Tumwater, WA.
Posted by M. Brindos on Sunday, August 16, 2015 8:49 PM

lawdog114
Excellent! Let us know how you like that Iwata. I'm considering trying out one of their brushes myself.

After replacing a piston seal in my Iwata compressor it works like a dream.


Of course the only other AB I have to compare it to is a no-name-clone siphon feed that I have modified.

I've heard lots of good things about these brushes from my friends on Genessis, but I didn't know that I had it so bad til now lol. I love this brush.


- Mike Brindos "Lost Boy"

  • Member since
    February 2012
  • From: Olmsted Township, Ohio
Posted by lawdog114 on Friday, August 14, 2015 11:23 PM
Excellent! Let us know how you like that Iwata. I'm considering trying out one of their brushes myself..

 "Can you fly this plane and land it?...Surely you can't be serious....I am serious, and don't call me Shirley"


  • Member since
    January 2015
  • From: Tumwater, WA.
Posted by M. Brindos on Thursday, August 13, 2015 3:55 PM

I'm back in business!!!  :D:D:D:D

- Mike Brindos "Lost Boy"

  • Member since
    January 2015
  • From: Tumwater, WA.
Posted by M. Brindos on Tuesday, August 11, 2015 1:18 PM

Thanks Bish. I'm just using the same bag of tricks I use on armor. Decals before weathering. It's almost completely wiped out all of the stencils, but I'm not worried about it too much. You can still see them if you look for them, but they don't stand out.

- Mike Brindos "Lost Boy"

  • Member since
    December 2002
  • From: Bury St Edmunds, Suffolk, England
Posted by Bish on Monday, August 10, 2015 3:37 PM

Thats loking a real beaut Mike.The paint job is great and i dolike the look of the decals you have achieved.

I am a Norfolk man and i glory in being so


On the bench: Airfix 1/72nd Harrier GR.3/Fujimi 1/72nd Ju 87D-3

  • Member since
    January 2015
  • From: Tumwater, WA.
Posted by M. Brindos on Monday, August 10, 2015 2:52 PM

Groot
Mike, I really like the faded look of the crosses on it. Did you paint those, or just weather over the decals? Groot

I wish I had painted them. They are too thick and you can see the edges of the carrier film. But to answer your question, I weathered over the decals.

Thank you Will.  :)  I really like this kit, except for the canopy glass. But I've got that handled lol.

- Mike Brindos "Lost Boy"

  • Member since
    June 2007
  • From: Seabrook, TX
Posted by Axemanwb on Saturday, August 8, 2015 8:31 PM
I echo the comments on the build, it is great! I love this kit. I first built it as a kid in the 80's and I have built it a couple times since. It fits together well and I love the subject as well.

William 'Axeman' Hawes

In Progress: Tamiya 1/35 Panzer II

'Just' Completed: Testors P-51 1:48


  • Member since
    June 2013
Posted by RobGroot4 on Thursday, August 6, 2015 10:26 PM
Mike, I really like the faded look of the crosses on it. Did you paint those, or just weather over the decals? Groot

"Firing flares while dumping fuel may ruin your day" SH-60B NATOPS

  • Member since
    January 2015
  • From: Tumwater, WA.
Posted by M. Brindos on Thursday, August 6, 2015 9:24 PM

Thank you Mustang!  :)

I've just picked up some badly needed supplies and I should be able to finish this up a little sooner now.

Its not as nice as some of the other 109's I've seen tonight, but it should look okay after I'm done.  :)

Thank you for checking in on this one.  :)

- Mike Brindos "Lost Boy"

  • Member since
    March 2012
  • From: Corpus Christi, Tx
Posted by mustang1989 on Tuesday, August 4, 2015 6:22 AM

Gaaah!!! That paint and weathering!!! You'd never know it was an ol' Revell bird that's for sure!!


 Forum | Modelers Social Club Forum (proboards.com) 

  • Member since
    January 2015
  • From: Tumwater, WA.
Posted by M. Brindos on Saturday, August 1, 2015 7:01 PM

Thank you VERY much gentlemen! :)

I've made little progress because of real world issues these days. But all in all I hope to be getting back to work very soon  :D

I've only managed to get the left wing and the elevators finished up. They still need a clearing before I can move on to the other side of the fuselage and then begin work on the underside of the plane. I'd have finished it by now if oil paints didn't rub off so easily lol.'

Anyways, Pictures!

So yeah, not much done, but it's going along when I'm not day dreaming at the bench lol.

Thank you gentlemen, for all of your kind words.  :)

- Mike Brindos "Lost Boy"

  • Member since
    January 2010
  • From: Nebraska, USA
Posted by CallSignOWL on Friday, July 31, 2015 6:03 PM

this is one of my favorite kits to pick up as a relax build: Simple, and with good fits!

yours is looking fan-freaking-tastic!!

------------------------

Now that I'm here, where am I??

  • Member since
    June 2013
Posted by RobGroot4 on Wednesday, July 29, 2015 4:24 PM

Mike,

 I really like the way you did the mottling.  I think it's really turned out fantastic.

Groot

"Firing flares while dumping fuel may ruin your day" SH-60B NATOPS

  • Member since
    February 2012
  • From: Olmsted Township, Ohio
Posted by lawdog114 on Monday, July 27, 2015 6:55 PM

Stunning paint work.....and dont call me surely..

 "Can you fly this plane and land it?...Surely you can't be serious....I am serious, and don't call me Shirley"


  • Member since
    December 2002
  • From: Bury St Edmunds, Suffolk, England
Posted by Bish on Sunday, July 26, 2015 7:06 AM

Looking really nice Mike.

I am a Norfolk man and i glory in being so


On the bench: Airfix 1/72nd Harrier GR.3/Fujimi 1/72nd Ju 87D-3

  • Member since
    March 2012
  • From: Corpus Christi, Tx
Posted by mustang1989 on Sunday, July 26, 2015 7:02 AM

Haven't checked in on this one in a while there Mike and man have I been missing out! That paint is just mind blowing!!! It's awesome how somebody can take a kit like this and turn it into a jewel. That's truly all modeling skill right there!!!


 Forum | Modelers Social Club Forum (proboards.com) 

  • Member since
    September 2005
  • From: Central Nebraska
Posted by freem on Saturday, July 25, 2015 9:30 PM

 This is great work, Mike.  Ya couldn't make the real thing look any better!!

  I have the same kit scattered out on my bench for the 109 Group build but work, grandkids, work and

  more work have squashed any progress.  Nevertheless your build is inspiring for sure!!

Chris Christenson


  • Member since
    January 2015
  • From: Tumwater, WA.
Posted by M. Brindos on Friday, July 24, 2015 11:20 PM

I applied the spinner decal with Testors decal setting solution, which I don't think actually does anything at this point (that's another story). I carefully prodded the decal into position and let it dry for about 15 minutes... or twenty. Once I had all of the water dried up I applied liquid cement over the decal. Using liquid cement is not something I recommend using for a decal fixer. The results are sometimes disastrous, and I'd prefer not to be known as the guy who taught all of you how to melt your decals lol.

After 7 applications of the liquid cement the decal still had not completely settled onto the spinner. I let it sit overnight to fully cure before I handled it any further. The next day when I returned to it I could still see bits that were still raised up from the spinner. I sanded those areas lightly until the raised bits were flush. Of course this leaves little areas were there is no decal. That's when I pull out my brushes and do some repairs and fix those areas I had removed by sanding. This also helps my decals look like they've actually been panted on by hand. By closely matching paint colors and then adjusting the warmth or coolness of a color you get some wonderful results.

After the repairs were made I cleared in flat.

That was my process. I hope that makes sense. lol

BrandonK, thank you sir.  :)

- Mike Brindos "Lost Boy"

  • Member since
    July 2015
Posted by Liveaxle on Friday, July 24, 2015 4:06 PM
Looks great. What was your process/materials for the spinner decal?
  • Member since
    June 2014
Posted by BrandonK on Friday, July 24, 2015 9:00 AM

It looks great. The weathering is looking superb. Can't wait to see the finally.

BK

On the bench:

A lot !! And I mean A LOT!!

2024 Kits on deck / in process / completed   

                         14 / 5 / 2  

                              Tongue Tied

  • Member since
    January 2015
  • From: Tumwater, WA.
Posted by M. Brindos on Thursday, July 23, 2015 3:20 PM

Thank you very much Jay.  :)

- Mike Brindos "Lost Boy"

  • Member since
    August 2013
Posted by Jay Jay on Thursday, July 23, 2015 8:03 AM

...and beautifully !


 I'm finally retired. Now time I got, money I don't.

  • Member since
    January 2015
  • From: Tumwater, WA.
Posted by M. Brindos on Wednesday, July 22, 2015 4:00 PM

Coming along slowly...

...but surely.

- Mike Brindos "Lost Boy"

  • Member since
    January 2015
  • From: Tumwater, WA.
Posted by M. Brindos on Tuesday, July 21, 2015 6:27 PM

I started into the last effects phase. Using white artist's oil paint I started to rub it into the panels creating positive post shading. Since the plane was too dark overall this seemed the logical way to go.

I've only done the right wing and side of the plane at this point. Its subtle but makes an overall impact on how the plane is shaded. Plus its nice that I can simply remove any excess if its too much with just a wipe of my finger tip.

You can see the right wing vs the left wing and the nose where I added some there as well, in the picture below.

I know it doesn't look like much is getting done. I've been taking my time.

- Mike Brindos "Lost Boy"

  • Member since
    January 2015
  • From: Tumwater, WA.
Posted by M. Brindos on Sunday, July 19, 2015 9:55 PM

Thank you my friend!  :D

I've only recently started using an Airbrush. I've been dry brushing for decades lol. I've been learning how to blend enamels by brush and more recently how to blend enamels and acrylics. Blending acrylics was easy after years of enamel work only.

So thank you. I am proud of that skill lol.

As for the modifications to the airbrush, well, if it were a good one I wouldn't have had to modify it in the first place lol. Genius, not really. But I did save some money on my....  Automobile (har de har, yeah, not funny)

I'm a smart guy, but anyone who gave it any  serious thought could have come up with that solution. It seemed pretty logical to just change the feeding system since it was causing the problems.

- Mike Brindos "Lost Boy"

  • Member since
    March 2015
  • From: Streetsboro, Ohio
Posted by Toshi on Sunday, July 19, 2015 7:23 PM

I'm glad everything worked out for you sir, I'm just another brother, from another mother, looking out for you!  Your dry brush is exceptional.  I am amazed by your improvisational skills in assembling a airbrush.  Your a genius.

Toshi

On The Bench: Revell 1/48 B-25 Mitchell


Married to the most caring, loving, understanding, and beautiful wife in the world.  Mrs. Toshi


  • Member since
    January 2015
  • From: Tumwater, WA.
Posted by M. Brindos on Sunday, July 19, 2015 5:11 PM

I ran a filter over it and it blended things a bit better. Its all still too dark, but I think I'm going either live with it, or go with a transparent white filter later to lighten it all up.

- Mike Brindos "Lost Boy"

  • Member since
    January 2015
  • From: Tumwater, WA.
Posted by M. Brindos on Friday, July 17, 2015 2:49 PM

Life is going well guys, thank you for the kindness. :)

Just fixing all that broke down while I was depressed. Life gets away from you then and I've made quite a mess of things, but I'm back on track and things are looking good. Don't worry about me mates, I'm okay lol.

Okay, now for some updates. I decided to do something neat with the spots along the side of the fuselage. Having my AB break down on me at the beginning of summer has had me utilizing my dry brushing skills to get some interesting results.

First I decided to clean off the fuselage markings just a bit more as I didn't think what I was trying to do was looking like I wanted it to. It kinda worked from a distance, but looked like crap when you got close to it. I'm sure most of you looked at those last pictures and thought that looked horrible and that's okay. Turns out I didn't like it either lol.
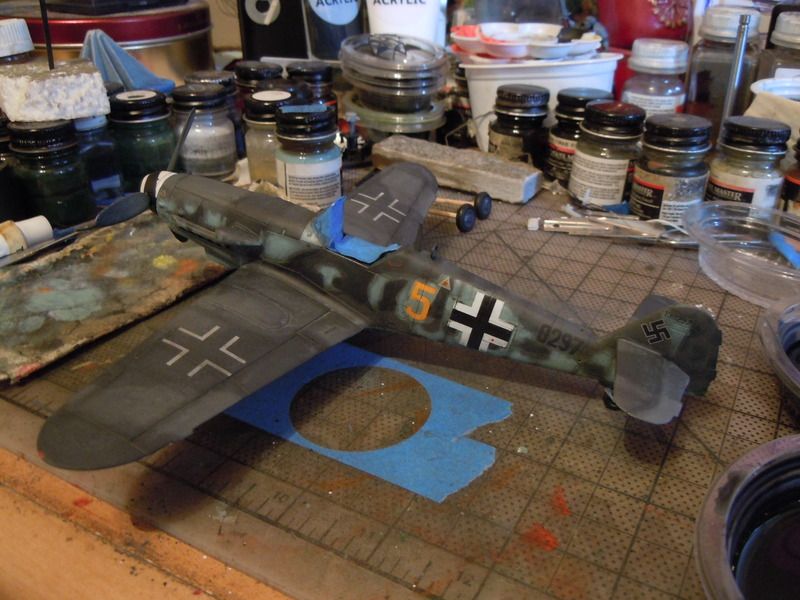
I decided I needed add more spots and break this camo up a bit more as, after looking for reference pics for this plane, it looked nothing like it was supposed to. So first up was more light blue.
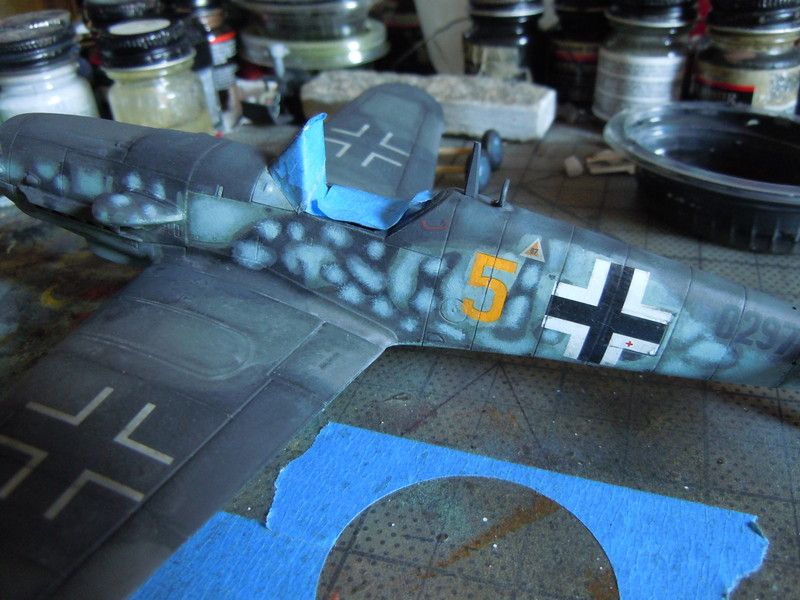
Okay, so that's not bad. But then there are those really big patches of blue. AH! I got it.
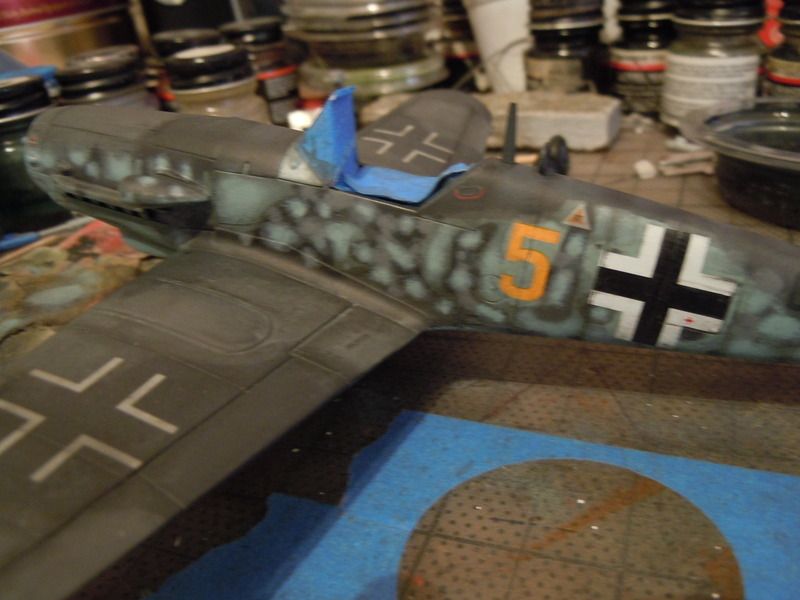
I'll add more of the lighter grey in there and break up the dark grey...
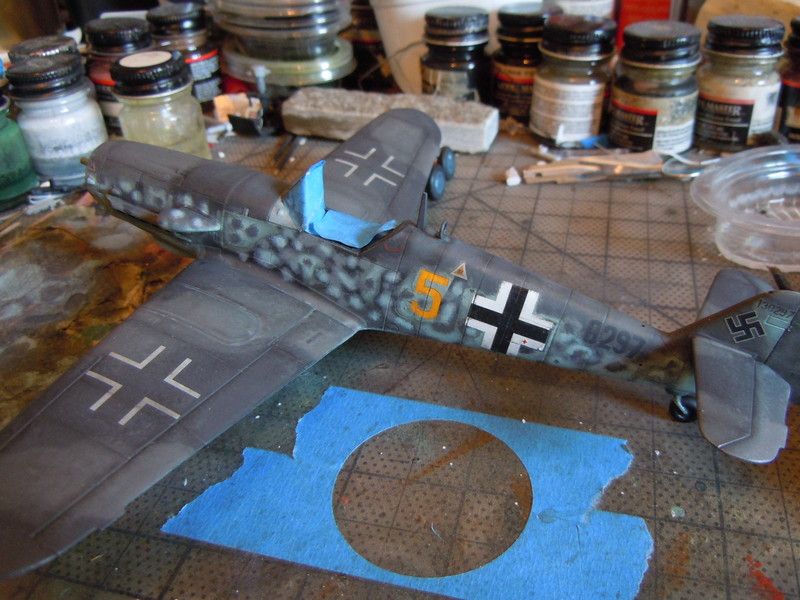
And add some dark grey spots in the big blue areas.

Yeah, that's really busy now. his aircraft should have light grey along the sides with dark gray spotting, but I'm in a zone, I suppose, and I'm going to filter this up a bit and see how it turns out.

Any ideas about toning it down just a bit without losing it all?

I finally figured out what was wrong with my AB and it turned out that the siphon wasn't feeding the brush at all. It would pull up little bits of paint at a time and there was not consistency, which was causing the splattering.

So being the smart and creative monkey that I am, I built myself a gravity feed system from the siphon jar parts and some left over metal smoking pipe pieces I've had for decades.
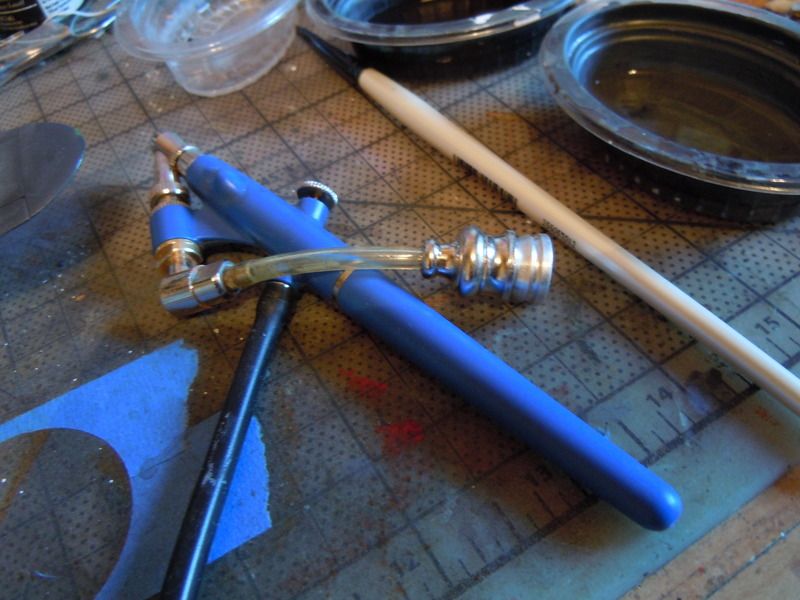
I simply gutted the siphon lid for the connector and the siphon tube and stuck  the chromed mouthpiece on the end of it with a good tight fit. Then a small metal pipe bowl for a splash lid. Now I'm getting a consistent feed. This particular type of clone AB doesn't and never has been the greatest for fine line spraying, but at least I have one and its working again.

I think I will be using it on the bottom of the plane now as I was looking at doing it by dry brush until now. Big sigh of relief there lol.

In conclusion, things are good... and who knew those parts would ever come in this handy lol.

Thanks for checking in. :)

- Mike Brindos "Lost Boy"

  • Member since
    December 2002
  • From: Bury St Edmunds, Suffolk, England
Posted by Bish on Friday, July 17, 2015 1:46 AM

Looking good there Mike. Hope life sorts itself out for you soon.

I am a Norfolk man and i glory in being so


On the bench: Airfix 1/72nd Harrier GR.3/Fujimi 1/72nd Ju 87D-3

  • Member since
    March 2015
  • From: Streetsboro, Ohio
Posted by Toshi on Wednesday, July 15, 2015 5:18 AM

I hope everything is fine for you in regards to your life.  If you need any assistance, please don't hesitate to contact me at anytime.

Your weathering and final phase of your build is astonishing!  I am very excited in seeing the final product of this build.

Toshi

On The Bench: Revell 1/48 B-25 Mitchell


Married to the most caring, loving, understanding, and beautiful wife in the world.  Mrs. Toshi


  • Member since
    January 2015
  • From: Tumwater, WA.
Posted by M. Brindos on Wednesday, July 15, 2015 2:27 AM

Well here's an update. Been working on fixing things in my life recently and have not spent as much time sitting at my pig sty of a desk. But I picked up my brushes earlier today and made some progress.

I finished getting all of the decals on it and clearing them with flat. They're really dang thick and my trick with the liquid cement didn't even phase these things. I gave the top and bottom of the plane a dark grey acrylic sludge wash and let that dry before scrubbing it down with tap water and a fairly stiff old toothbrush. After that was all dry I then dry brushed some of the RLM 76 sky blue back into the scheme.


After I did that I then used a small brush dipped in paint thinner to go over the "5" and the Balkencruse to remove some of the effects and brighten them back up. They were looking a bit too faded out and I approached it as if the ground crew made an effort to scrub some of the grime off of those parts. I know, they look horrible in this picture but I didn't make any adjustments on my camera before quickly taking these. They don't appear to be glowing when its sitting on my table.


So that's where I'm at with it right now. I've been having fun with my effects again lol.


- Mike Brindos "Lost Boy"

  • Member since
    September 2011
Posted by fightnjoe on Saturday, July 11, 2015 6:35 PM

Mike most impressive.  Neat work on the cammo.

Joe

Veterans,

Thank You For Your Sacrifices,

Never To Be Forgotten

Where you can find me:

Workbench on FaceBook  Google Plus  YouTube

  • Member since
    January 2015
  • From: Tumwater, WA.
Posted by M. Brindos on Saturday, July 11, 2015 2:25 PM

Mopar, you're welcome. I'll look for your thread.  :)

Mustang, oh man. Sometimes its frustrating enough just to get good pictures lol.

Brandon, lol maybe. But I've seen so much better.

Thanks guys! :D

- Mike Brindos "Lost Boy"

  • Member since
    June 2014
Posted by BrandonK on Friday, July 3, 2015 9:10 AM

I have this kit in my stash. You've done a fantastic job on it. You most certainly have set the bar very high. Great work!!!

BK

On the bench:

A lot !! And I mean A LOT!!

2024 Kits on deck / in process / completed   

                         14 / 5 / 2  

                              Tongue Tied

  • Member since
    March 2012
  • From: Corpus Christi, Tx
Posted by mustang1989 on Monday, June 29, 2015 6:35 PM

M. Brindos
Normally I use a better camera, but my laptop needs an ISP  so I can upload pictures lol. I haven't been near an ISP with my laptop in a week. So I'm using my wife's droid. It works.

Man I'll tell ya, I totally understand this. I started out with my phone as a camera a few years back and while it was better than nothin', it was a far cry from what I've got now. lol . I feel your pain brutha!


 Forum | Modelers Social Club Forum (proboards.com) 

  • Member since
    April 2015
Posted by Mopar Madness on Monday, June 29, 2015 5:54 PM

Oops... I hit reply too soon.  Thanks again for the tips.  I tried them out and my 110 looks so much better, particularly the sides of the fuselage!  Really makes a difference!

Chad

God, Family, Models...

At the plate: 1/48 Airfix Bf109 & 1/35 Tamiya Famo

On deck: Who knows!

  • Member since
    April 2015
Posted by Mopar Madness on Monday, June 29, 2015 5:49 PM
Thanks again for the tips!

Chad

God, Family, Models...

At the plate: 1/48 Airfix Bf109 & 1/35 Tamiya Famo

On deck: Who knows!

  • Member since
    January 2015
  • From: Tumwater, WA.
Posted by M. Brindos on Monday, June 29, 2015 1:06 PM

When using the multiple thin cotes just let them overlap each other a little. That way they should blend a little so you don't have a stark line between the colors. It will take time and it won't look like its working at first. Just be patient.

Good luck Mopar.

- Mike Brindos "Lost Boy"

  • Member since
    April 2015
Posted by Mopar Madness on Saturday, June 27, 2015 11:15 PM

Glad to see there's life after splatters!  I'm painting my first kit in 20 years and am having a difficult time getting that nice smooth camo line on my 1/72 Airfix Bf 110.  I'm slowly figuring out the right combination of paint/thinner/pressure/masking/etc... but its nice to see others work through it too.  I'll try the thin multiple coats method to cover up some of my splattered lines.  Nice work btw!

Chad

God, Family, Models...

At the plate: 1/48 Airfix Bf109 & 1/35 Tamiya Famo

On deck: Who knows!

  • Member since
    January 2015
  • From: Tumwater, WA.
Posted by M. Brindos on Friday, June 26, 2015 11:58 AM

Well thank you very much Toshi!  :D. That is a huge compliment indeed. I don't know if it belongs Ina museum, but its something I'll be proud to display when its done.  :)

From what I've seen of your most recent work, you're not too far behind me buddy.  :)

- Mike Brindos "Lost Boy"

  • Member since
    March 2015
  • From: Streetsboro, Ohio
Posted by Toshi on Friday, June 26, 2015 7:46 AM

Oh wow!  That is such an amazing build.  It looks like it should be in a museum.  I love the way you utilized your technique in the camo on the 109.  I've never made a German WWII kit as the extensive use of camo has always scared me.  Thanks for sharing and I can't wait for your next build!

Toshi

On The Bench: Revell 1/48 B-25 Mitchell


Married to the most caring, loving, understanding, and beautiful wife in the world.  Mrs. Toshi


  • Member since
    January 2015
  • From: Tumwater, WA.
Posted by M. Brindos on Thursday, June 25, 2015 10:05 PM

Normally I use a better camera, but my laptop needs an ISP  so I can upload pictures lol. I haven't been near an ISP with my laptop in a week. So I'm using my wife's droid. It works.

There aren't much for markings on this particular aircraft but there are a fair amount of stencils. If not for that I'd already be over halfway to being finished with the decals lol.

One last shot before I call it a night. Because of the heat and humidity I've had a little trouble moving the decals into position but they are snuggling down really well. I'm used to having more problems getting them to stick, but not today lol.

- Mike Brindos "Lost Boy"

  • Member since
    March 2012
  • From: Corpus Christi, Tx
Posted by mustang1989 on Thursday, June 25, 2015 9:54 PM

I hear you loud and clear on the phone picture taking. I started out with that too about 3 years ago and progressed up to what I have now. I'm still learning this camera I have. lol

Decals are lookin' good! I love this part of the build. Decals, my favorite part of any build, give personality to the builds and it really starts to come alive at this stage.


 Forum | Modelers Social Club Forum (proboards.com) 

  • Member since
    January 2015
  • From: Tumwater, WA.
Posted by M. Brindos on Thursday, June 25, 2015 5:12 PM

The first two decals have gone on without any trouble.  :)

- Mike Brindos "Lost Boy"

  • Member since
    January 2015
  • From: Tumwater, WA.
Posted by M. Brindos on Thursday, June 25, 2015 11:49 AM
Thank you Mustang. I'm using the phone right now and we all know how that goes sometimes lol.

Jay - I'm happy to have inspired you to go forward with your unfinished projects. I sometimes pick something off the shelf just to repaint it. I mean, why not? If you're not happy with it there is nothing wrong with doing it over.

Make sure you post results. :)

- Mike Brindos "Lost Boy"

  • Member since
    August 2013
Posted by Jay Jay on Thursday, June 25, 2015 9:19 AM

Very nice recovery.  You've inspired me to redo a coupke of my shelved aircraft.  The ones I wanted to step on not step away  lol


 I'm finally retired. Now time I got, money I don't.

  • Member since
    March 2012
  • From: Corpus Christi, Tx
Posted by mustang1989 on Thursday, June 25, 2015 4:04 AM

The photo is a little grainy but I do see a great camo job through it all.


 Forum | Modelers Social Club Forum (proboards.com) 

  • Member since
    January 2015
  • From: Tumwater, WA.
Posted by M. Brindos on Wednesday, June 24, 2015 8:22 PM

Thank you very, very much guys!  :)

After having it sit for a while and staring at it I finally decided to gloss it. There were a few tiny spots to touch up and there are more details to finish once I get the decals on, but I'm at the point where I'm comfortable going forward from where I'm at now.

- Mike Brindos "Lost Boy"

  • Member since
    June 2013
Posted by RobGroot4 on Monday, June 22, 2015 5:58 PM

Mike,

 Looks like stepping away for a minute worked.  You've really done a great job resurrecting it!

Groot

"Firing flares while dumping fuel may ruin your day" SH-60B NATOPS

  • Member since
    June 2014
Posted by BrandonK on Monday, June 22, 2015 10:18 AM

Wow, you really did a bang up job on that camo scheme. Super nice and very cool.

On the bench:

A lot !! And I mean A LOT!!

2024 Kits on deck / in process / completed   

                         14 / 5 / 2  

                              Tongue Tied

  • Member since
    March 2012
  • From: Corpus Christi, Tx
Posted by mustang1989 on Monday, June 22, 2015 4:02 AM

Lookin' great Mike!!! Totally awesome and great recovery thus far buddy!Cool


 Forum | Modelers Social Club Forum (proboards.com) 

  • Member since
    February 2012
  • From: Olmsted Township, Ohio
Posted by lawdog114 on Friday, June 19, 2015 8:15 PM

Nice camo Mike.  Looks like you replicated it perfectly....

Joe  

 "Can you fly this plane and land it?...Surely you can't be serious....I am serious, and don't call me Shirley"


  • Member since
    January 2015
  • From: Tumwater, WA.
Posted by M. Brindos on Wednesday, June 17, 2015 1:37 PM

Thank you my friend. I just had to walk away for a while. I give that advice all the time, but it is good to follow it too. Lol

Here's a wet paint shot. Just slowly layering it on while keeping an eye on the instructions. Of course I have some artistic impression going into it. :)

- Mike Brindos "Lost Boy"

  • Member since
    March 2015
  • From: Streetsboro, Ohio
Posted by Toshi on Wednesday, June 17, 2015 1:22 PM

As I stated, you will supersede your current paint issues.  Everything on your 109 looks and feels 100%.  The camouflage fix is amazing.

Toshi

On The Bench: Revell 1/48 B-25 Mitchell


Married to the most caring, loving, understanding, and beautiful wife in the world.  Mrs. Toshi


  • Member since
    January 2015
  • From: Tumwater, WA.
Posted by M. Brindos on Wednesday, June 17, 2015 1:16 PM

Thank you very much! Your support is very much appreciated gentlmen.

I have been playing with it a little. I decided to just fix what I already started. Just thin cotes of paint over time to get the effect I tried to get before by rushing through it. Its beginning to look like it should.

I did choose the more difficult scheme because I wanted the challenge. I'll let you guys be the judges. 

- Mike Brindos "Lost Boy"

  • Member since
    March 2015
  • From: Streetsboro, Ohio
Posted by Toshi on Tuesday, June 16, 2015 5:58 AM

To MBrindos,

This is a very minor/minuscule obstacle for you.  With your experience and knowledge, you will supersede and accomplish your goal.  

This build reminds me of your Corsair, you mentioned that you had to repaint it.  Your determination on your Corsair is what inspired me and drove me to repaint my P-61 Black Widow.  Do you recall that thread?  What's funny is that all I had to do was paint the Widow a single mono color, black.  LOL!

Here, you have several multi layers of a intricate design being blended and, it's a camouflage motif.  On top of that, it's from the German Air Force the Luftwaffe .  You know as well as I know, German aircraft from this era carried some of the most difficult and intricate paint schemes.  

In due time, you'll have another thread with your completed, show stopping piece of art work.  I can't wait to be inspired by another great piece from you.  I do nothing but wish you the best during the 109 build.  I anxiously await on the sidelines.

Toshi

On The Bench: Revell 1/48 B-25 Mitchell


Married to the most caring, loving, understanding, and beautiful wife in the world.  Mrs. Toshi


  • Member since
    March 2012
  • From: Corpus Christi, Tx
Posted by mustang1989 on Tuesday, June 16, 2015 4:07 AM

M. Brindos
Thank you guys.  :)

We're back here cheerin' you on Mike! Cool


 Forum | Modelers Social Club Forum (proboards.com) 

  • Member since
    December 2002
  • From: Bury St Edmunds, Suffolk, England
Posted by Bish on Monday, June 15, 2015 4:49 PM

Certainly sounds like a damaged needle or tip. Real shame as it was looking good, but I am sure you can sort it.

I am a Norfolk man and i glory in being so


On the bench: Airfix 1/72nd Harrier GR.3/Fujimi 1/72nd Ju 87D-3

  • Member since
    January 2015
  • From: Tumwater, WA.
Posted by M. Brindos on Monday, June 15, 2015 2:42 PM

It certainly would not be the first time I've decided to repaint a model lol. But I'm now thinking of how to rework what I've already done. It's not all bad, but it's certainly not that good right now. It can be fixed to look like it should, or I can just go forward with what I have to make it look far more weathered than it should ever have been.

I still have options available to me. I just need to make a decision.

Thank you guys.  :)

- Mike Brindos "Lost Boy"

  • Member since
    March 2012
  • From: Corpus Christi, Tx
Posted by mustang1989 on Monday, June 15, 2015 5:06 AM

You've got the right mindset to see this thing through Mike. I'm sure most of us have been there a time.....or two. You'll get it worked out and when you do you'll have a great outcome.


 Forum | Modelers Social Club Forum (proboards.com) 

  • Member since
    June 2013
Posted by RobGroot4 on Monday, June 15, 2015 3:10 AM

Mike, I feel your pain, I ruined one or two due to the same issues (and did bin them).  I think your approach is better, walk away and come back after cooling.  I certainly struggle with that!

Groot

"Firing flares while dumping fuel may ruin your day" SH-60B NATOPS

  • Member since
    January 2015
  • From: Tumwater, WA.
Posted by M. Brindos on Sunday, June 14, 2015 12:20 PM

I will check those closely. Thanks Rob. I've been thinking of checking my air hose for leaks also.

This will get fixed. Just not right now. I can feel it still upsetting me and I' don;t want to touch it while I'm still in the mood to bin it.

Back to WoW for now.

Thanks again Rob.  :)

- Mike Brindos "Lost Boy"

  • Member since
    June 2013
Posted by RobGroot4 on Sunday, June 14, 2015 6:29 AM

Mike,

 Sorry to see the struggles.  I'm not sure what kind of AB you're using, but I had similar issues on an older one when I bent the tip of the needle and subsequently damaged the nozzle.  Have you closely checked those, even the tiniest crack in the nozzle can make a huge difference?  If they are damaged, you can more than likely get replacements for just the parts you need vice a whole brush.

Groot

"Firing flares while dumping fuel may ruin your day" SH-60B NATOPS

  • Member since
    January 2015
  • From: Tumwater, WA.
Posted by M. Brindos on Friday, June 12, 2015 6:56 PM

[sigh]

I've got an update. But this did not go as planned at all.

I started with the top camo pattern.

And I had some spattering issues. I completely broke down and cleaned my AB twice, checked the pressure, checked the paint consistency... it just was not a good day for spraying.

Okay. Moving on to the side camo pattern......  ....

... and I went all artistic on it with a standard set of brushes.

It looks like crap and I hate it. So since the AB wouldn't spray right I didn't follow some very good advice and decant some clear for the M-103. That didn't go well either.

I'm not having a good time with this right now and I need to take a break.

This sums up how I'm feeling about this one;

Kirk Lazarus: Everybody knows you never go full retard.

Tugg Speedman: What do you mean?

Kirk Lazarus: Check it out. Dustin Hoffman, 'Rain Man,' look retarded, act retarded, not retarded. Counted toothpicks, cheated cards. Autistic, sho'. Not retarded. You know Tom Hanks, 'Forrest Gump.' Slow, yes. Retarded, maybe. Braces on his legs. But he charmed the pants off Nixon and won a ping-pong competition. That ain't retarded. Peter Sellers, "Being There." Infantile, yes. Retarded, no. You went full retard, man. Never go full retard. You don't buy that? Ask Sean Penn, 2001, "I Am Sam." Remember? Went full retard, went home empty handed...

- Mike Brindos "Lost Boy"

  • Member since
    March 2012
  • From: Corpus Christi, Tx
Posted by mustang1989 on Friday, June 12, 2015 3:55 AM

M. Brindos
You'll also notice that I knocked off the antennae post. First casualty of my handling.

  Man I hate it when that happens!! Looking forward to more updates Mike! :D


 Forum | Modelers Social Club Forum (proboards.com) 

  • Member since
    December 2009
  • From: West Chester,Ohio
Posted by roger_wilco on Thursday, June 11, 2015 7:28 PM

Looking really good my friend! Can't wait to see the finished project...Douglas

"Build what YOU want, the way YOU want, and above all have fun!" - RIP Modeler Al. 

  • Member since
    January 2015
  • From: Tumwater, WA.
Posted by M. Brindos on Wednesday, June 10, 2015 1:14 PM

I'm pretty sure it should be RLM 76, which I think I have (bottle has no RLM # but is a slight shade lighter than this one.), but I need this layer to be a bit darker for what I'm going to do.

Edit:  Patching up the hole.

You'll also notice that I knocked off the antennae post. First casualty of my handling. Not a problem though. I figured this would happen so I'll probably just make a new one so I don't have to deal with the odd skewed shape after scraping the seams on the original one. I usually end up doing this anyways.

- Mike Brindos "Lost Boy"

  • Member since
    March 2012
  • From: Corpus Christi, Tx
Posted by mustang1989 on Wednesday, June 10, 2015 12:36 PM

This looks great Mike! I do have one question though. Did they use 78 or 76 on these bad boys? I've never seen 78 on a 109 G before.


 Forum | Modelers Social Club Forum (proboards.com) 

  • Member since
    January 2015
  • From: Tumwater, WA.
Posted by M. Brindos on Wednesday, June 10, 2015 11:11 AM

I've got some blue on it . RLM 78. I was lucky to have this particular color in my inventory lol.


I couldn't see the sunken depression just in front of the windscreen before I painted the blue. That's got to be fixed.


There are some areas that will need a respray. You'll notice I've done no preshading at all. I've got a plan lol.

- Mike Brindos "Lost Boy"

  • Member since
    January 2015
  • From: Tumwater, WA.
Posted by M. Brindos on Saturday, June 6, 2015 1:03 AM

Thank you Brandon. :D

- Mike Brindos "Lost Boy"

  • Member since
    January 2015
Posted by BrandonD on Saturday, June 6, 2015 12:50 AM

You're showing what cane done with a dated kit, and I am looking forward to seeing the paint work. I really like the landing lights, and it was from this post that I learned about Micro Kristal Klear. Your gel super glue method looks great, and I almost went that route, but I prefer the thinner CA.

And yes, those panel lines sure did come out great.

-BD-

  • Member since
    January 2015
  • From: Tumwater, WA.
Posted by M. Brindos on Friday, June 5, 2015 11:00 PM

lol. Be my guest Groot. The toothpicks are just easier to whittle down in a Dremel.

My first choice was plastic of course, but if you get too carried away with the files the plastic heats up and melts, which is neat to watch happen I guess, but frustrating after you spend 10 minutes filing it into shape just to have it fly sideways and whip you in the hand lol.

I've made the wing cannons for a Zero in this way.

- Mike Brindos "Lost Boy"

  • Member since
    June 2013
Posted by RobGroot4 on Friday, June 5, 2015 4:43 PM

Mike,

 It's looking great, I really like your toothpick gun barrel, I may have to try that one!

Groot

"Firing flares while dumping fuel may ruin your day" SH-60B NATOPS

  • Member since
    January 2015
  • From: Tumwater, WA.
Posted by M. Brindos on Friday, June 5, 2015 4:39 PM

Well I started with a decal Toshi. My painting was merely repairs to it after I sanded off the stuff that wouldn't lay flat. That's nothing to be shocked about lol.

- Mike Brindos "Lost Boy"

  • Member since
    March 2015
  • From: Streetsboro, Ohio
Posted by Toshi on Friday, June 5, 2015 4:36 PM

I'm still in shock on how you patiently and skillfully painted that prop nose!  Beautiful detail.

Toshi

On The Bench: Revell 1/48 B-25 Mitchell


Married to the most caring, loving, understanding, and beautiful wife in the world.  Mrs. Toshi


  • Member since
    January 2015
  • From: Tumwater, WA.
Posted by M. Brindos on Friday, June 5, 2015 3:58 PM

Thank you kindly.  :)

I'm glad you like it. :)

- Mike Brindos "Lost Boy"

  • Member since
    December 2006
  • From: Phoenix, AZ
Posted by Fly-n-hi on Thursday, June 4, 2015 6:16 PM

Excellent work so far!  You really nailed that spinner and prop!

  • Member since
    January 2015
  • From: Tumwater, WA.
Posted by M. Brindos on Thursday, June 4, 2015 6:11 PM

Thank you. I do try lol.

After the M-103. Yes sir!

- Mike Brindos "Lost Boy"

  • Member since
    December 2002
  • From: Bury St Edmunds, Suffolk, England
Posted by Bish on Thursday, June 4, 2015 2:03 PM

ye, looks nice. Looking forward to seeing the paint go on.

I am a Norfolk man and i glory in being so


On the bench: Airfix 1/72nd Harrier GR.3/Fujimi 1/72nd Ju 87D-3

  • Member since
    March 2012
  • From: Corpus Christi, Tx
Posted by mustang1989 on Thursday, June 4, 2015 1:58 PM

Lookin' great so far Mike!!!! Yes


 Forum | Modelers Social Club Forum (proboards.com) 

  • Member since
    January 2015
  • From: Tumwater, WA.
Posted by M. Brindos on Thursday, June 4, 2015 1:53 PM

Okay, this will be my last update while this primer cures for a few days. I've got to finish up the M-103.

The panel lines turned out great as well.

Thanks for looking guys. Your support means a lot to me.  :)

- Mike Brindos "Lost Boy"

  • Member since
    December 2002
  • From: Bury St Edmunds, Suffolk, England
Posted by Bish on Wednesday, June 3, 2015 5:39 PM

Ok, I know the sort of thing you mean. thanks.

I am a Norfolk man and i glory in being so


On the bench: Airfix 1/72nd Harrier GR.3/Fujimi 1/72nd Ju 87D-3

  • Member since
    January 2015
  • From: Tumwater, WA.
Posted by M. Brindos on Wednesday, June 3, 2015 5:19 PM

Just the gel type super glue. Nothing fancy at all. Until this application I found myself wishing I had bought the liquid type.

I hope this helps. I think the brand is Krazy Glue, but I'm pretty positive that doesn't matter.

- Mike Brindos "Lost Boy"

  • Member since
    December 2002
  • From: Bury St Edmunds, Suffolk, England
Posted by Bish on Wednesday, June 3, 2015 5:00 PM

I  do like those landing lights. You mentioned you use a gel. I may have missed it, if so sorry for asking to repeat yourself, but what sort of gel do you mean.

I am a Norfolk man and i glory in being so


On the bench: Airfix 1/72nd Harrier GR.3/Fujimi 1/72nd Ju 87D-3

  • Member since
    January 2015
  • From: Tumwater, WA.
Posted by M. Brindos on Wednesday, June 3, 2015 4:43 PM

Just a minor update. I've got the landing struts glued on and the tiny bits and bobs attached. Once all of this cures I'll be shooting her with primer. The spinner, wheels, and drop tank will be left off and painted separately.

Painting time is very soon.  [smile]

- Mike Brindos "Lost Boy"

  • Member since
    January 2015
  • From: Tumwater, WA.
Posted by M. Brindos on Tuesday, June 2, 2015 9:32 PM

My friend Ted on Genessis used this trick for his landing light on an old Frog P-38 he's working on. Its an old, dog of a kit, but he's a very talented modeller and I'm expecting to see something great come out of it. He's pretty reliable in that way lol. Use this trick to your heart's content Mustang. It's not as clear as using clear sprue, but for tiny fiddly things like the lights on the wing tips, it does make things a bit simpler. This method would work best if you had constructed the lights internal parts such as Ted's landing light.

Darren - Thank YOU. :D

- Mike Brindos "Lost Boy"

  • Member since
    January 2003
Posted by Darren Roberts on Tuesday, June 2, 2015 9:24 PM

That's looking quite NOICE!!!!

  • Member since
    March 2012
  • From: Corpus Christi, Tx
Posted by mustang1989 on Tuesday, June 2, 2015 9:17 PM

M. Brindos
? Be prepared for a bit of frustration. They don't want to lay down easy at all lol.

Man you aint a woofin' there!!! I've done 3 decal spinners and use between 7 and 10 applications of Microsol every time!!! Whew!!!  The results are worth it but it makes you sweat the whole time while waiting on the decal to dry!  

 Great work on the 109 there Mike! I like that position light method you are doing. Will have to adopt that one!


 Forum | Modelers Social Club Forum (proboards.com) 

  • Member since
    January 2015
  • From: Tumwater, WA.
Posted by M. Brindos on Tuesday, June 2, 2015 7:12 PM

I did more work on the landing struts and installed some tiny brake lines.

Thanks for looking.  :)

- Mike Brindos "Lost Boy"

  • Member since
    January 2015
  • From: Tumwater, WA.
Posted by M. Brindos on Tuesday, June 2, 2015 1:32 PM

My friend Ted was not wrong when he said it would take a long time to dry. I waited an hour, then two, then four, and then finally waited overnight. But the results are actually pretty good in my opinion.

To pass some time I made a cannon barrel for the nose. Good ol' toothpick for the win here. I tried using some sprue for this but it would get hot and them bend on me long before I whittled it down enough. The toothpick worked great.

And that worked out really well after I painted it.

This morning I sanded and polished the marker lights.

And finished up the landing gear. Even though the wheels came in halves they still flattened perfectly. A Bic lighter and a desktop was all I needed.

And I'm sittin' pretty lol.

- Mike Brindos "Lost Boy"

  • Member since
    January 2015
  • From: Tumwater, WA.
Posted by M. Brindos on Monday, June 1, 2015 4:04 PM

If you have the talent you can try it with a brush while the spinner is on a toothpick. I tried it once a long time ago with fair results. Not good enough though.

- Mike Brindos "Lost Boy"

  • Member since
    December 2002
  • From: Bury St Edmunds, Suffolk, England
Posted by Bish on Monday, June 1, 2015 3:41 PM

ye, I have seen those. Unfortunately they don't seem to do them in 72nd any more.

I am a Norfolk man and i glory in being so


On the bench: Airfix 1/72nd Harrier GR.3/Fujimi 1/72nd Ju 87D-3

  • Member since
    March 2010
  • From: MN
Posted by Nathan T on Monday, June 1, 2015 3:29 PM

Speaking of spinner spirals, Eduard has a nice set of spiral masks of all shapes, sizes, and scales. They work awesome. Just burnish them down real well. Not saying you have to use them, but another option in case you all didn't know.


  • Member since
    December 2002
  • From: Bury St Edmunds, Suffolk, England
Posted by Bish on Monday, June 1, 2015 3:28 PM

I know, hard to believe with all the German subject I do. I was going to do one on the big 1/18th engine I recently finished, but after trying to mask for 30mins, I didn't have a decal for it, I gave up and went with the same spinner you did on your 72nd build. But I will have to before long.

I am a Norfolk man and i glory in being so


On the bench: Airfix 1/72nd Harrier GR.3/Fujimi 1/72nd Ju 87D-3

  • Member since
    January 2015
  • From: Tumwater, WA.
Posted by M. Brindos on Monday, June 1, 2015 3:22 PM

I posted the tip on a FB group I just joined and the only comment so far has been "Micro Krystal Klear". I would use it if I had it lol. Here I am being all helpful and stuff and somebody just has to be a smart guy lol.

Micro krystal klear is not the only answer to this problem. I could have gone with some clear sprue, but this is something I've not heard of, nor tried before and I'd like to share how it works.

Just more proof that there is more than one way to do anything.  :)

Ah well, that's nothing new as far as FB goes. Hard to tell how someone has toned their statement just by reading it. Its probably not meant to be sarcastic, but how am I to know?

I may not be part of that group for long. Hard to say so far.

Bish- YOU haven't done a spinner decal before?? Be prepared for a bit of frustration. They don't want to lay down easy at all lol. If it were not for the liquid cement trick I'd have painted it solid and just moved on. Normally it only takes a couple of swipes to get anything to lay flat.  :/

Best solution to the problem that I've read about so far has been to use the decal as a mask and just paint it on.

jelliott-  I only possess some Testors decal set at this time. Wish I still had my Set and Sol still. Those always worked well.

- Mike Brindos "Lost Boy"

  • Member since
    January 2014
  • From: Nampa, Idaho
Posted by jelliott523 on Monday, June 1, 2015 2:15 PM

Looking great Mike!!  I had the same issue with the spinner decal on my 1/32 109G-6.  I couldnt for the life of me get the darn thing to lay down properly.  Finally after a couple of coats of decal solvent and coating with clear it finally smoothed out.

On the Bench:  Lots of unfinished projects!  Smile

  • Member since
    December 2002
  • From: Bury St Edmunds, Suffolk, England
Posted by Bish on Monday, June 1, 2015 1:50 PM

Nice work so far, the spinner spiral looks really nice, I still have to do one of those. be interested to see how those lights come out.

I am a Norfolk man and i glory in being so


On the bench: Airfix 1/72nd Harrier GR.3/Fujimi 1/72nd Ju 87D-3

  • Member since
    January 2015
  • From: Tumwater, WA.
Posted by M. Brindos on Monday, June 1, 2015 1:13 PM

Just decided to go with a tip on the wing marker lights. I'm going to use the Gel type super glue for the lenses.

I cut out where the lights will go.

and then colored them in. after the paint dries I will set some of the gel in there and wait for that to dry.

I admit I do not like having to wait lol.

Thanks for looking.  :)

- Mike Brindos "Lost Boy"

  • Member since
    January 2015
  • From: Tumwater, WA.
Posted by M. Brindos on Monday, June 1, 2015 11:53 AM

Good point Nathan. Wanted to paint the canopy on the model but I can just do it after I paint the plane. I'm too used to closing up canopies lol.

So, yes, perhaps a plan "B" is needed.

- Mike Brindos "Lost Boy"

  • Member since
    March 2010
  • From: MN
Posted by Nathan T on Monday, June 1, 2015 11:45 AM

Hey, nice brush painting skills alrightYes If posing the canopy open, I wouldn't fix a thing. No way to tell there would be a gap if it were to be shut. But I'm sure Squadron has a Vac Canopy for like 5-7 bucks?


  • Member since
    January 2015
  • From: Tumwater, WA.
Posted by M. Brindos on Monday, June 1, 2015 11:39 AM

Thank you for the compliments guys!!

I do have a small update for you. I found the Achilles heel of this kit; the canopy glass. Its something I wish I had the money to replace.

The gap is 1mm wide in 1:48, wich is about 2.48 inches in 1:1. I'm not sure how I'm going to fix this yet. I've been thinking it over and fortunately I have some black Sheet styrene but it is on the thick side. The canopy frames are not pronounced and if Revell were to update this kit it wouldn't take much besides re-working the canopy in this kit.

I'm glad I'm not displaying this one with the canopy closed, but I could fix it easier if it did it that way. Hiding the new sheet parts when the canopy is not a uniform thickness is going to be tricky enough.  :/

I am indeed an experience brush painter and for the last 5 months now I've been using an air brush and loving it. But yes I think I'm going to put down the main colors with the AB and then brush the camo onto the sides. I've done it before so I know what to expect.

I did this 1/72 109 from Testors last year and had loads of trouble with the decals and had to paint half of them on there after a masking tape problem lifted them off. You can see the mottling on the sides. The entire model was painted by brush and turned out okay.

You can clearly see that the swastika on the tail was far too big for this kit. They all were. So I made this one up as a game piece and it sits on the shelf looking pretty.

So yeah. That canopy is going to take me some time to figure out.

Thanks for your interest. I'll get more pictures up after some more progress has been made.

- Mike Brindos "Lost Boy"

  • Member since
    March 2012
  • From: Corpus Christi, Tx
Posted by mustang1989 on Monday, June 1, 2015 3:44 AM

 Got any updates for us there Mike? Big Smile


 Forum | Modelers Social Club Forum (proboards.com) 

  • Member since
    August 2009
  • From: MOAB, UTAH
Posted by JOE RIX on Sunday, May 31, 2015 7:18 PM

Super work on the 109, Mike. Some great scratchbuilding skills you've got there. Impressive work indeed. I'm certainly looking forward to the finished product.

"Not only do I not know what's going on, I wouldn't know what to do about it if I did". George Carlin

  • Member since
    March 2010
  • From: MN
Posted by Nathan T on Sunday, May 31, 2015 7:07 PM

Great work here! I'm really digging the look of those seat belts. So you're a brush painter huh? Tough to do Luftwaffe stuffs that way. Looking forward to your results.


  • Member since
    January 2015
  • From: Tumwater, WA.
Posted by M. Brindos on Saturday, May 30, 2015 4:58 PM

Thank you very much Brandon.  :) I'll be watching your 190 thread as well.

- Mike Brindos "Lost Boy"

  • Member since
    January 2015
Posted by BrandonD on Saturday, May 30, 2015 3:03 PM

You, sir, are doing a fantastic job on that one. I'm looking forward to following it!

-BD-

  • Member since
    January 2015
  • From: Tumwater, WA.
Posted by M. Brindos on Saturday, May 30, 2015 11:44 AM

Ah, yeah. The liquid cement trick is not for everybody and I can't recommend it. You can totally ruin decals with this trick. It takes vast patience and you have to be 100% sure you never want that decal to move ever again. If you are still interested send me a PM and I'll fill you in on it. But it's a scary thing to watch and if you are not confident in your brush painting skills then you risk ruining your model.

Thank you Toshi! I totally recommend this kit to you my friend. It has just enough detail to make it fun to add stuff. Scratch building 101 is all I've done here. Nothing advanced except for the spinner I suppose, and that only because of the trick I used to get the decal stuck on there. You will really like this kit. The decals are thick as card stock and the paint schemes are a bit tricky, but the kit itself goes together really well and that is a bonus.  :)

Thank you Martin! Not too much further to go before I can start painting the "clothes" lol. The schemes are tricky though and I'm thinking of using some oddball tricks to get the Fuselage patterns right. I've chosen the second scheme which was based in Sweden in 1945. The camo is more intricate on the alt scheme, but the primary box art scheme confuses me. I like the yellow on the primary scheme, but those dark grey patches just don't make sense to my artsy side. They don't belong on one side of the plane only and my OCD triggers just light up when I think of it lol.

Thank you guys for your comments. :)

- Mike Brindos "Lost Boy"

  • Member since
    April 2015
  • From: New Hampshire, USA
Posted by UKguyInUSA on Saturday, May 30, 2015 8:06 AM

Great detail work within that cockpit, it looks awesome! Looking forward to seeing her clothes go on, now!

Cheers,

Martin : )

  • Member since
    March 2015
  • From: Streetsboro, Ohio
Posted by Toshi on Saturday, May 30, 2015 8:02 AM

To M. Brindos,

The detail and discipline needed to to your level is nothing short of amazing!

Toshi

On The Bench: Revell 1/48 B-25 Mitchell


Married to the most caring, loving, understanding, and beautiful wife in the world.  Mrs. Toshi


  • Member since
    June 2013
Posted by RobGroot4 on Saturday, May 30, 2015 4:38 AM

Mike,

 Looking really good thus far, particularly the IP and spinner.  I've never heard of using liquid cement on decals, could you elaborate?

Groot

"Firing flares while dumping fuel may ruin your day" SH-60B NATOPS

  • Member since
    March 2012
  • From: Corpus Christi, Tx
Posted by mustang1989 on Saturday, May 30, 2015 3:09 AM

I didn't know it was that recent of a kit. PM sent.


 Forum | Modelers Social Club Forum (proboards.com) 

  • Member since
    January 2015
  • From: Tumwater, WA.
Posted by M. Brindos on Saturday, May 30, 2015 1:10 AM

Thank you very much Lawdog. :D

- Mike Brindos "Lost Boy"

  • Member since
    February 2012
  • From: Olmsted Township, Ohio
Posted by lawdog114 on Saturday, May 30, 2015 1:08 AM

I echo Mustangs sentiments.  Looking great Mike...

 "Can you fly this plane and land it?...Surely you can't be serious....I am serious, and don't call me Shirley"


  • Member since
    January 2015
  • From: Tumwater, WA.
Posted by M. Brindos on Friday, May 29, 2015 9:43 PM

Thank you very much Mustang! I did not expect a reply so quickly lol.

This is coming together really well for me. It was this or their Dauntless kit with it's all raised details and this one won hands down, but mostly because this is one of my absolute favorite birds.

For a kit released in 1979 it still fits together really well. The decals are rather thick but I know how to make them conform to my will lol.

Thank you again for your compliment! :D

- Mike Brindos "Lost Boy"

  • Member since
    March 2012
  • From: Corpus Christi, Tx
Posted by mustang1989 on Friday, May 29, 2015 9:34 PM

It takes somebody with a load of patience and good skills to bring one of these puppies to life. Looks like you've got both Mike.Yes


 Forum | Modelers Social Club Forum (proboards.com) 

JOIN OUR COMMUNITY!

Our community is FREE to join. To participate you must either login or register for an account.

SEARCH FORUMS
FREE NEWSLETTER
By signing up you may also receive reader surveys and occasional special offers. We do not sell, rent or trade our email lists. View our Privacy Policy.