SEARCH FINESCALE.COM

Enter keywords or a search phrase below:

1/48 Revell Messerschmitt Bf-109G-10 (Completed)

19847 views
134 replies
1 rating 2 rating 3 rating 4 rating 5 rating
  • Member since
    March 2015
  • From: Streetsboro, Ohio
Posted by Toshi on Tuesday, June 16, 2015 5:58 AM

To MBrindos,

This is a very minor/minuscule obstacle for you.  With your experience and knowledge, you will supersede and accomplish your goal.  

This build reminds me of your Corsair, you mentioned that you had to repaint it.  Your determination on your Corsair is what inspired me and drove me to repaint my P-61 Black Widow.  Do you recall that thread?  What's funny is that all I had to do was paint the Widow a single mono color, black.  LOL!

Here, you have several multi layers of a intricate design being blended and, it's a camouflage motif.  On top of that, it's from the German Air Force the Luftwaffe .  You know as well as I know, German aircraft from this era carried some of the most difficult and intricate paint schemes.  

In due time, you'll have another thread with your completed, show stopping piece of art work.  I can't wait to be inspired by another great piece from you.  I do nothing but wish you the best during the 109 build.  I anxiously await on the sidelines.

Toshi

On The Bench: Revell 1/48 B-25 Mitchell


Married to the most caring, loving, understanding, and beautiful wife in the world.  Mrs. Toshi


  • Member since
    January 2015
  • From: Tumwater, WA.
Posted by M. Brindos on Wednesday, June 17, 2015 1:16 PM

Thank you very much! Your support is very much appreciated gentlmen.

I have been playing with it a little. I decided to just fix what I already started. Just thin cotes of paint over time to get the effect I tried to get before by rushing through it. Its beginning to look like it should.

I did choose the more difficult scheme because I wanted the challenge. I'll let you guys be the judges. 

- Mike Brindos "Lost Boy"

  • Member since
    March 2015
  • From: Streetsboro, Ohio
Posted by Toshi on Wednesday, June 17, 2015 1:22 PM

As I stated, you will supersede your current paint issues.  Everything on your 109 looks and feels 100%.  The camouflage fix is amazing.

Toshi

On The Bench: Revell 1/48 B-25 Mitchell


Married to the most caring, loving, understanding, and beautiful wife in the world.  Mrs. Toshi


  • Member since
    January 2015
  • From: Tumwater, WA.
Posted by M. Brindos on Wednesday, June 17, 2015 1:37 PM

Thank you my friend. I just had to walk away for a while. I give that advice all the time, but it is good to follow it too. Lol

Here's a wet paint shot. Just slowly layering it on while keeping an eye on the instructions. Of course I have some artistic impression going into it. :)

- Mike Brindos "Lost Boy"

  • Member since
    February 2012
  • From: Olmsted Township, Ohio
Posted by lawdog114 on Friday, June 19, 2015 8:15 PM

Nice camo Mike.  Looks like you replicated it perfectly....

Joe  

 "Can you fly this plane and land it?...Surely you can't be serious....I am serious, and don't call me Shirley"


  • Member since
    March 2012
  • From: Corpus Christi, Tx
Posted by mustang1989 on Monday, June 22, 2015 4:02 AM

Lookin' great Mike!!! Totally awesome and great recovery thus far buddy!Cool


 Forum | Modelers Social Club Forum (proboards.com) 

  • Member since
    June 2014
Posted by BrandonK on Monday, June 22, 2015 10:18 AM

Wow, you really did a bang up job on that camo scheme. Super nice and very cool.

On the bench:

A lot !! And I mean A LOT!!

2024 Kits on deck / in process / completed   

                         14 / 5 / 2  

                              Tongue Tied

  • Member since
    June 2013
Posted by RobGroot4 on Monday, June 22, 2015 5:58 PM

Mike,

 Looks like stepping away for a minute worked.  You've really done a great job resurrecting it!

Groot

"Firing flares while dumping fuel may ruin your day" SH-60B NATOPS

  • Member since
    January 2015
  • From: Tumwater, WA.
Posted by M. Brindos on Wednesday, June 24, 2015 8:22 PM

Thank you very, very much guys!  :)

After having it sit for a while and staring at it I finally decided to gloss it. There were a few tiny spots to touch up and there are more details to finish once I get the decals on, but I'm at the point where I'm comfortable going forward from where I'm at now.

- Mike Brindos "Lost Boy"

  • Member since
    March 2012
  • From: Corpus Christi, Tx
Posted by mustang1989 on Thursday, June 25, 2015 4:04 AM

The photo is a little grainy but I do see a great camo job through it all.


 Forum | Modelers Social Club Forum (proboards.com) 

  • Member since
    August 2013
Posted by Jay Jay on Thursday, June 25, 2015 9:19 AM

Very nice recovery.  You've inspired me to redo a coupke of my shelved aircraft.  The ones I wanted to step on not step away  lol


 I'm finally retired. Now time I got, money I don't.

  • Member since
    January 2015
  • From: Tumwater, WA.
Posted by M. Brindos on Thursday, June 25, 2015 11:49 AM
Thank you Mustang. I'm using the phone right now and we all know how that goes sometimes lol.

Jay - I'm happy to have inspired you to go forward with your unfinished projects. I sometimes pick something off the shelf just to repaint it. I mean, why not? If you're not happy with it there is nothing wrong with doing it over.

Make sure you post results. :)

- Mike Brindos "Lost Boy"

  • Member since
    January 2015
  • From: Tumwater, WA.
Posted by M. Brindos on Thursday, June 25, 2015 5:12 PM

The first two decals have gone on without any trouble.  :)

- Mike Brindos "Lost Boy"

  • Member since
    March 2012
  • From: Corpus Christi, Tx
Posted by mustang1989 on Thursday, June 25, 2015 9:54 PM

I hear you loud and clear on the phone picture taking. I started out with that too about 3 years ago and progressed up to what I have now. I'm still learning this camera I have. lol

Decals are lookin' good! I love this part of the build. Decals, my favorite part of any build, give personality to the builds and it really starts to come alive at this stage.


 Forum | Modelers Social Club Forum (proboards.com) 

  • Member since
    January 2015
  • From: Tumwater, WA.
Posted by M. Brindos on Thursday, June 25, 2015 10:05 PM

Normally I use a better camera, but my laptop needs an ISP  so I can upload pictures lol. I haven't been near an ISP with my laptop in a week. So I'm using my wife's droid. It works.

There aren't much for markings on this particular aircraft but there are a fair amount of stencils. If not for that I'd already be over halfway to being finished with the decals lol.

One last shot before I call it a night. Because of the heat and humidity I've had a little trouble moving the decals into position but they are snuggling down really well. I'm used to having more problems getting them to stick, but not today lol.

- Mike Brindos "Lost Boy"

  • Member since
    March 2015
  • From: Streetsboro, Ohio
Posted by Toshi on Friday, June 26, 2015 7:46 AM

Oh wow!  That is such an amazing build.  It looks like it should be in a museum.  I love the way you utilized your technique in the camo on the 109.  I've never made a German WWII kit as the extensive use of camo has always scared me.  Thanks for sharing and I can't wait for your next build!

Toshi

On The Bench: Revell 1/48 B-25 Mitchell


Married to the most caring, loving, understanding, and beautiful wife in the world.  Mrs. Toshi


  • Member since
    January 2015
  • From: Tumwater, WA.
Posted by M. Brindos on Friday, June 26, 2015 11:58 AM

Well thank you very much Toshi!  :D. That is a huge compliment indeed. I don't know if it belongs Ina museum, but its something I'll be proud to display when its done.  :)

From what I've seen of your most recent work, you're not too far behind me buddy.  :)

- Mike Brindos "Lost Boy"

  • Member since
    April 2015
Posted by Mopar Madness on Saturday, June 27, 2015 11:15 PM

Glad to see there's life after splatters!  I'm painting my first kit in 20 years and am having a difficult time getting that nice smooth camo line on my 1/72 Airfix Bf 110.  I'm slowly figuring out the right combination of paint/thinner/pressure/masking/etc... but its nice to see others work through it too.  I'll try the thin multiple coats method to cover up some of my splattered lines.  Nice work btw!

Chad

God, Family, Models...

At the plate: 1/48 Airfix Bf109 & 1/35 Tamiya Famo

On deck: Who knows!

  • Member since
    January 2015
  • From: Tumwater, WA.
Posted by M. Brindos on Monday, June 29, 2015 1:06 PM

When using the multiple thin cotes just let them overlap each other a little. That way they should blend a little so you don't have a stark line between the colors. It will take time and it won't look like its working at first. Just be patient.

Good luck Mopar.

- Mike Brindos "Lost Boy"

  • Member since
    April 2015
Posted by Mopar Madness on Monday, June 29, 2015 5:49 PM
Thanks again for the tips!

Chad

God, Family, Models...

At the plate: 1/48 Airfix Bf109 & 1/35 Tamiya Famo

On deck: Who knows!

  • Member since
    April 2015
Posted by Mopar Madness on Monday, June 29, 2015 5:54 PM

Oops... I hit reply too soon.  Thanks again for the tips.  I tried them out and my 110 looks so much better, particularly the sides of the fuselage!  Really makes a difference!

Chad

God, Family, Models...

At the plate: 1/48 Airfix Bf109 & 1/35 Tamiya Famo

On deck: Who knows!

  • Member since
    March 2012
  • From: Corpus Christi, Tx
Posted by mustang1989 on Monday, June 29, 2015 6:35 PM

M. Brindos
Normally I use a better camera, but my laptop needs an ISP  so I can upload pictures lol. I haven't been near an ISP with my laptop in a week. So I'm using my wife's droid. It works.

Man I'll tell ya, I totally understand this. I started out with my phone as a camera a few years back and while it was better than nothin', it was a far cry from what I've got now. lol . I feel your pain brutha!


 Forum | Modelers Social Club Forum (proboards.com) 

  • Member since
    June 2014
Posted by BrandonK on Friday, July 3, 2015 9:10 AM

I have this kit in my stash. You've done a fantastic job on it. You most certainly have set the bar very high. Great work!!!

BK

On the bench:

A lot !! And I mean A LOT!!

2024 Kits on deck / in process / completed   

                         14 / 5 / 2  

                              Tongue Tied

  • Member since
    January 2015
  • From: Tumwater, WA.
Posted by M. Brindos on Saturday, July 11, 2015 2:25 PM

Mopar, you're welcome. I'll look for your thread.  :)

Mustang, oh man. Sometimes its frustrating enough just to get good pictures lol.

Brandon, lol maybe. But I've seen so much better.

Thanks guys! :D

- Mike Brindos "Lost Boy"

  • Member since
    September 2011
Posted by fightnjoe on Saturday, July 11, 2015 6:35 PM

Mike most impressive.  Neat work on the cammo.

Joe

Veterans,

Thank You For Your Sacrifices,

Never To Be Forgotten

Where you can find me:

Workbench on FaceBook  Google Plus  YouTube

  • Member since
    January 2015
  • From: Tumwater, WA.
Posted by M. Brindos on Wednesday, July 15, 2015 2:27 AM

Well here's an update. Been working on fixing things in my life recently and have not spent as much time sitting at my pig sty of a desk. But I picked up my brushes earlier today and made some progress.

I finished getting all of the decals on it and clearing them with flat. They're really dang thick and my trick with the liquid cement didn't even phase these things. I gave the top and bottom of the plane a dark grey acrylic sludge wash and let that dry before scrubbing it down with tap water and a fairly stiff old toothbrush. After that was all dry I then dry brushed some of the RLM 76 sky blue back into the scheme.


After I did that I then used a small brush dipped in paint thinner to go over the "5" and the Balkencruse to remove some of the effects and brighten them back up. They were looking a bit too faded out and I approached it as if the ground crew made an effort to scrub some of the grime off of those parts. I know, they look horrible in this picture but I didn't make any adjustments on my camera before quickly taking these. They don't appear to be glowing when its sitting on my table.


So that's where I'm at with it right now. I've been having fun with my effects again lol.


- Mike Brindos "Lost Boy"

  • Member since
    March 2015
  • From: Streetsboro, Ohio
Posted by Toshi on Wednesday, July 15, 2015 5:18 AM

I hope everything is fine for you in regards to your life.  If you need any assistance, please don't hesitate to contact me at anytime.

Your weathering and final phase of your build is astonishing!  I am very excited in seeing the final product of this build.

Toshi

On The Bench: Revell 1/48 B-25 Mitchell


Married to the most caring, loving, understanding, and beautiful wife in the world.  Mrs. Toshi


  • Member since
    December 2002
  • From: Bury St Edmunds, Suffolk, England
Posted by Bish on Friday, July 17, 2015 1:46 AM

Looking good there Mike. Hope life sorts itself out for you soon.

I am a Norfolk man and i glory in being so


On the bench: Airfix 1/72nd Harrier GR.3/Fujimi 1/72nd Ju 87D-3

  • Member since
    January 2015
  • From: Tumwater, WA.
Posted by M. Brindos on Friday, July 17, 2015 2:49 PM

Life is going well guys, thank you for the kindness. :)

Just fixing all that broke down while I was depressed. Life gets away from you then and I've made quite a mess of things, but I'm back on track and things are looking good. Don't worry about me mates, I'm okay lol.

Okay, now for some updates. I decided to do something neat with the spots along the side of the fuselage. Having my AB break down on me at the beginning of summer has had me utilizing my dry brushing skills to get some interesting results.

First I decided to clean off the fuselage markings just a bit more as I didn't think what I was trying to do was looking like I wanted it to. It kinda worked from a distance, but looked like crap when you got close to it. I'm sure most of you looked at those last pictures and thought that looked horrible and that's okay. Turns out I didn't like it either lol.
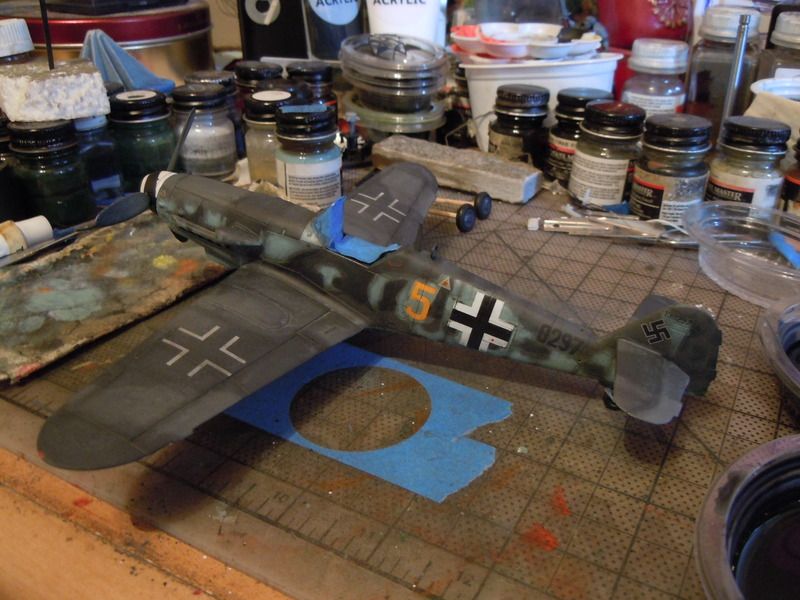
I decided I needed add more spots and break this camo up a bit more as, after looking for reference pics for this plane, it looked nothing like it was supposed to. So first up was more light blue.
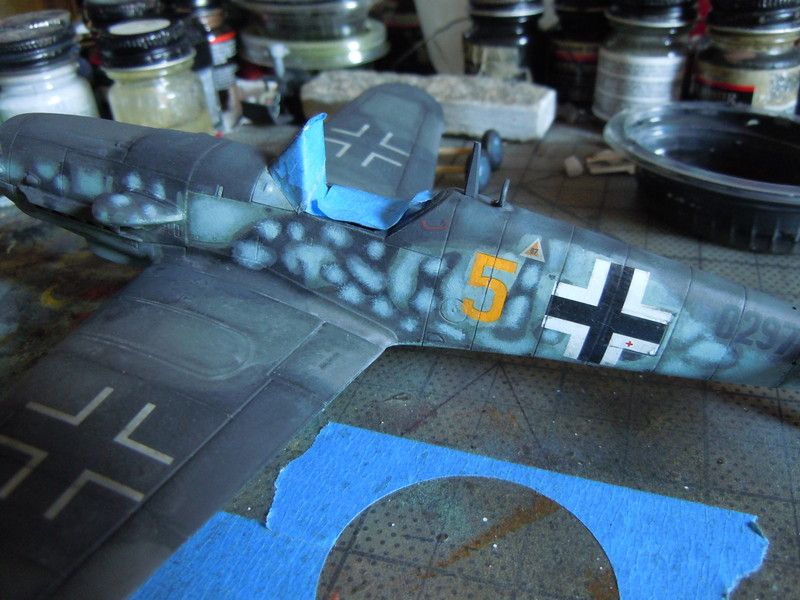
Okay, so that's not bad. But then there are those really big patches of blue. AH! I got it.
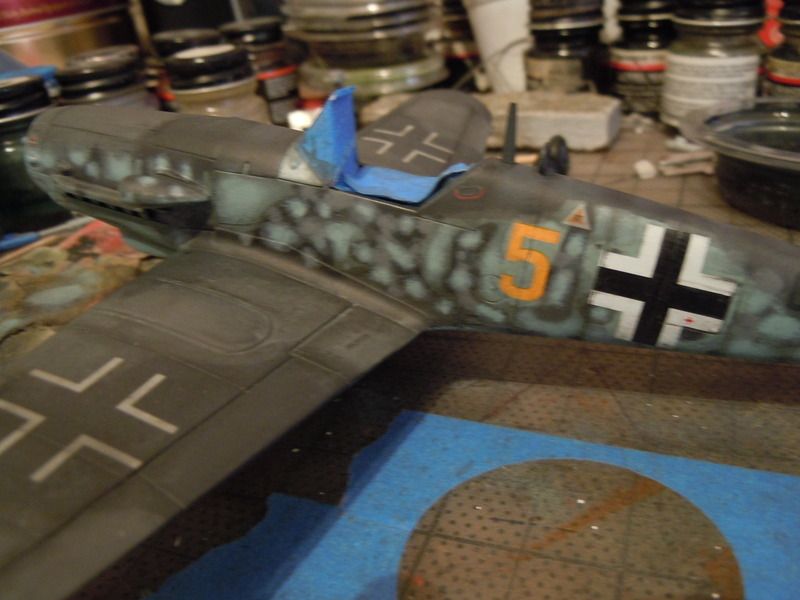
I'll add more of the lighter grey in there and break up the dark grey...
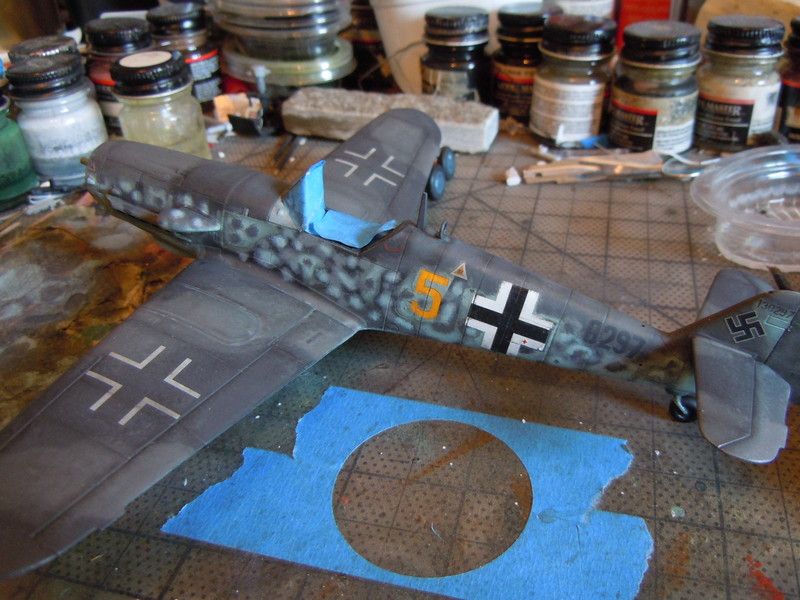
And add some dark grey spots in the big blue areas.

Yeah, that's really busy now. his aircraft should have light grey along the sides with dark gray spotting, but I'm in a zone, I suppose, and I'm going to filter this up a bit and see how it turns out.

Any ideas about toning it down just a bit without losing it all?

I finally figured out what was wrong with my AB and it turned out that the siphon wasn't feeding the brush at all. It would pull up little bits of paint at a time and there was not consistency, which was causing the splattering.

So being the smart and creative monkey that I am, I built myself a gravity feed system from the siphon jar parts and some left over metal smoking pipe pieces I've had for decades.
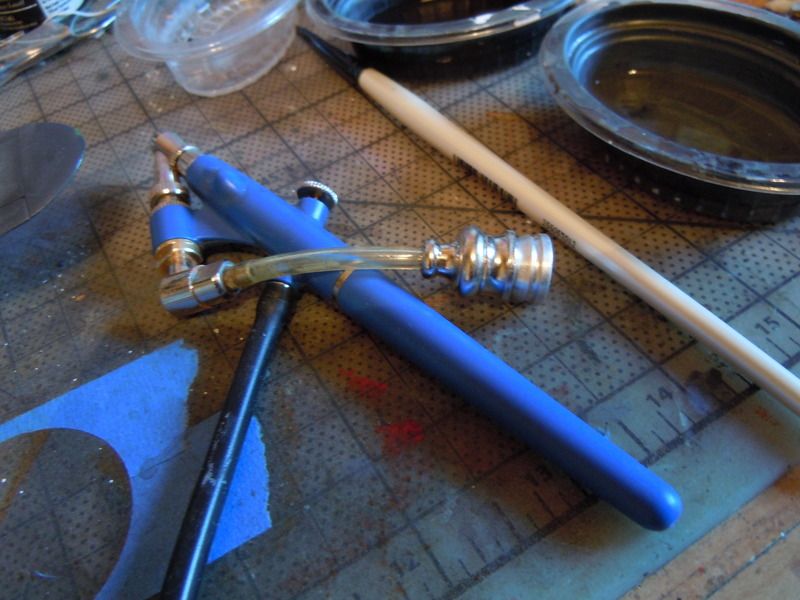
I simply gutted the siphon lid for the connector and the siphon tube and stuck  the chromed mouthpiece on the end of it with a good tight fit. Then a small metal pipe bowl for a splash lid. Now I'm getting a consistent feed. This particular type of clone AB doesn't and never has been the greatest for fine line spraying, but at least I have one and its working again.

I think I will be using it on the bottom of the plane now as I was looking at doing it by dry brush until now. Big sigh of relief there lol.

In conclusion, things are good... and who knew those parts would ever come in this handy lol.

Thanks for checking in. :)

- Mike Brindos "Lost Boy"

  • Member since
    January 2015
  • From: Tumwater, WA.
Posted by M. Brindos on Sunday, July 19, 2015 5:11 PM

I ran a filter over it and it blended things a bit better. Its all still too dark, but I think I'm going either live with it, or go with a transparent white filter later to lighten it all up.

- Mike Brindos "Lost Boy"

JOIN OUR COMMUNITY!

Our community is FREE to join. To participate you must either login or register for an account.

SEARCH FORUMS
FREE NEWSLETTER
By signing up you may also receive reader surveys and occasional special offers. We do not sell, rent or trade our email lists. View our Privacy Policy.