SEARCH FINESCALE.COM

Enter keywords or a search phrase below:

Wingnut Wings Albatros D.V build - update #5 interior started (2/14/16)

7352 views
41 replies
1 rating 2 rating 3 rating 4 rating 5 rating
  • Member since
    October 2011
  • From: Lake Villa, Illinois
Wingnut Wings Albatros D.V build - update #5 interior started (2/14/16)
Posted by Chuck Davis on Thursday, December 31, 2015 11:35 AM
I’ve decided 2016 will be the year I try to do some WIP postings here – my New Year’s resolution if you will.  I’ve done a bit of this in a handful of Group Builds on this site, but not “out in public” as it were.  I’m looking forward to hints and tips, and all constructive criticism y’all can give me.
My first subject will be a 1/32 Wingnut Wings Albatros D.V that I’ve been asked to build for someone.  He’s requested I do the Albie flown by Ltn. Erwin Bohme when he commanded Jasta 2 – Jasta Boelcke.  A successful ace and effective commander, Bohme is unfortunately best remembered as the pilot that collided in mid-air with the father of fighter tactics, Oswald Boelcke, during a dogfight.  Bohme survived -  his friend and commander Boelcke did not.  The markings for Bohme’s Albatros are included in a gorgeous sheet of options from Pheon Decals.
Pheon provides all the individual markings needed for any of nine options, relying on the standard markings from the Wingnut Wings kit decals sheet.
In addition, many of the Pheon options require lozenge.  I’ll be using 5-color upper and lower lozenge decals from Aviattic, which many regard as the best lozenge decals out there.  I’ll need rib tapes, too – these are from Wingnut Wings.
Normally, I “do my own” wood grain, but I’ve been asked to use wood grain decals from Uschi van der Rosten.  Let’s see…by my count, I’ll be using parts of at least 11 decal sheets.  Sheeeesh.
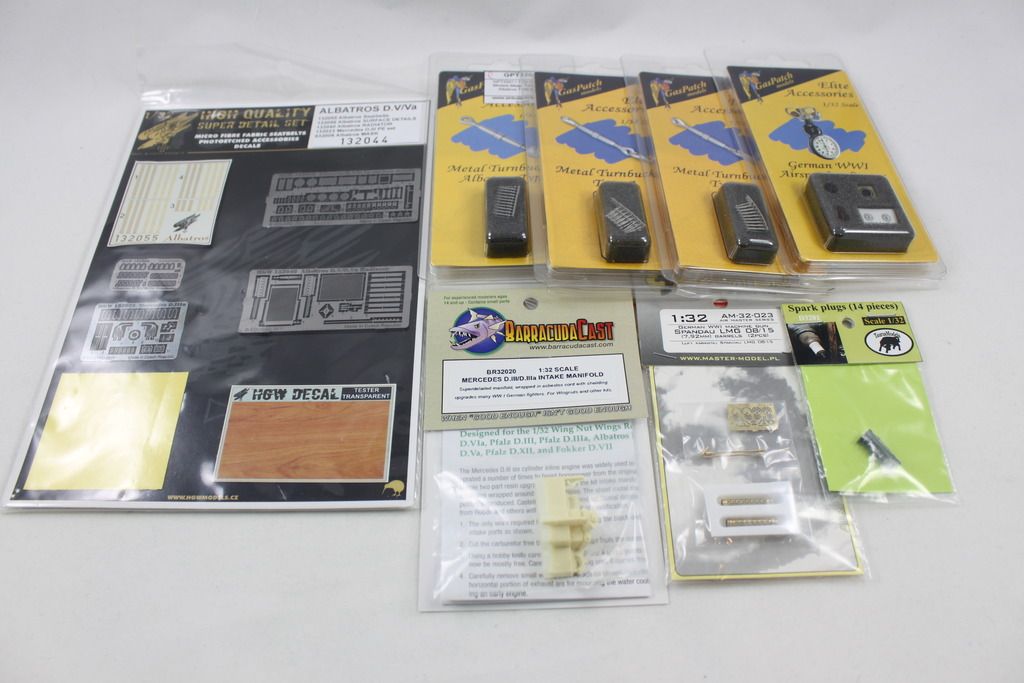
Generally, Wingnut Wings kits don’t need aftermarket parts to look good or to fix problems.  There are a few items that can add nice detail, however.  For this build I’ve put together a selection – detailed, 3D printed turnbuckles and an airspeed indicator from GasPatch Models, a resin intake manifold complete with cloth wrapping from Barracuda Studios, resin spark plugs from Taurus Models, and some cloth seat belts, etched radiator, and other miscellaneous details from HGW.  Oh, and they have yet another decal sheet for the floor.  Yeah.
I think I’ll start with the engine.  Wingnut kits are famous for their detailed engines.  Their website has a boatload of extra pictures, along with numerous hints and tips.  And if you didn’t know, Wingnut Wings is loosely associated with a company called The Vintage Aviator Limited (TVAL).  Look them up on the web – but only if you have some time available.  They manufacture flying full-scale WW1 aircraft – and they’re even made Mercedes engines and others from scratch.  Astounding stuff.  There is an entire section devoted to the Mercedes engine, with numerous very helpful photos.  I’ll be referring to these as I detail the engine.  Again, the extra detail isn’t necessary, but…I guess I can’t help it.Wink  Here is the engine in its initial state, before paint and extra detail.
That’s all for now folks – I’ll be back sometime soon with updates.  If I don’t show up, y’all keep me honest and yell at me.  Happy New Year’s everyone!
 

Chuck Davis

  • Member since
    June 2013
Posted by bvallot on Thursday, December 31, 2015 12:03 PM

It'll be interesting to see this come together Chuck.  I'll be watching to see how those wooden decals do. =]

On the bench:  

Tamiya F4U-1  Kenneth Walsh


  • Member since
    October 2011
  • From: Lake Villa, Illinois
Posted by Chuck Davis on Sunday, January 3, 2016 10:01 PM
Hello everyone.  I hope you had a joyous and safe New Years.  I had time to do a bit of engine work on the Albatros.  First up is the exhaust – an easy added detail is to hollow out the end.  A few minutes with a couple of drill bits and a Dremel tool did the trick.


For detail work, I usually use Model Master Metalizer paints.  I first pre-shaded the end and attachment points of the exhaust with…go figure…Exhaust.
 
Next, I filled in the remainder with Burnt Metal
 
Next, I added Tamiya Clear Orange at the junctions
 
 
I then coated the entire exhaust in Tamiya Smoke.
Everything looks “wet” right now, but washes and a flat coat, plus adding depth to the end will finish it off nicely.  All that will have to wait though.  Next, I wanted to add a bit of detail to the Mercedes based on the fabulous pictures from The Vintage Aviator website and some other references I have.  These pictures from a Janes compilation show some added oil and other lines, as well as the spark plugs.
 
I drilled holes into the cylinders and glued the Taurus Models spark plugs in place with a dot of super glue.  They’re the little green things sticking out from the sides of the cylinders.
 
I drilled holes in what I think is the water pump at the top of the engine to accept two lines made from solder on the left hand side, and an additional hole on the right side to accept a copper line.  I’ll use a piece of copper wire, since nothing simulates copper like copper.  First, I had to straighten the wire.  I use two metal rulers and roll the wire between them like a sausage – after a bit, the wire is nice and straight.
 
I also added the additional oil line down low on the engine block, again using solder.  I made sure I drilled the hole for this line as close to the molded mounting bolt as possible to clear the engine mount.  Planning ahead always pays off…when I remember!   Here’s a trial fit:
 
Time for some paint.  I shot some Tamiya NATO black on the cylinders, not forgetting that the bases of the cylinders are actually molded on top of the engine casing.  I created a quick mask using soda straws to cover the majority of the cylinder moldings on the engine, and then added Metalizer Aluminum – I’ll touch up later.


That’s all for tonight folks!   Hope you enjoyed – comments, criticisms, and questions welcome as always…

Chuck Davis

GAF
  • Member since
    June 2012
  • From: Anniston, AL
Posted by GAF on Sunday, January 3, 2016 10:07 PM

This looks like it will be a great build, especially with all the AM goodies!  Smile Their kits are top notch.

And that's why I'll never build one.  Can't afford it.

Gary


  • Member since
    June 2013
Posted by bvallot on Sunday, January 3, 2016 10:35 PM

Nicely done. =]

On the bench:  

Tamiya F4U-1  Kenneth Walsh


  • Member since
    June 2014
Posted by BrandonK on Monday, January 4, 2016 9:04 AM

That is some really nice detail. This is gonna be good.

BK

On the bench:

A lot !! And I mean A LOT!!

2024 Kits on deck / in process / completed   

                         14 / 5 / 2  

                              Tongue Tied

  • Member since
    April 2005
  • From: Piscataway, NJ!
Posted by wing_nut on Tuesday, January 5, 2016 8:19 AM
I've done 2 of these and boy howdy these are nice kits.  I too am looking forward to seeing how the wood decals work out.  Good call on the gas patch stuff.  Great addition.  I have to build another DV now so I can use that straw idea for the bottom of the cylinders. 
 
Great work .  Here's a link to the engine I did mainly to show you the spark plugs I used.  They look real nice.


Marc  

  • Member since
    March 2015
  • From: Streetsboro, Ohio
Posted by Toshi on Tuesday, January 5, 2016 10:53 AM

This is excellent workmanship.  You're doing a great job!

Toshi

On The Bench: Revell 1/48 B-25 Mitchell


Married to the most caring, loving, understanding, and beautiful wife in the world.  Mrs. Toshi


  • Member since
    October 2011
  • From: Lake Villa, Illinois
Posted by Chuck Davis on Tuesday, January 5, 2016 7:42 PM

Thanks everyone. I appreciate your comments.

Marc, thanks for reposting your link.  I love your work.  If I remember right, you're the one that turned me on to RB Productions spark plugs.  I usually use them, but I was given the Taurus plugs so I thought I'd try them.  They seem ok.  You've made me reconsider my plug wire "tube" - I'm going to look into using a brass tube.  I can't rise to your level on the wires, but I have a system that works.

i hope to have another update in a couple of days.  Day job and all...

Chuck Davis

  • Member since
    June 2003
  • From: Cavite, Philippines
Posted by allan on Tuesday, January 5, 2016 8:22 PM

Im definitely following this.


No bucks, no Buck Rogers

  • Member since
    November 2011
Posted by Newtothis on Wednesday, January 6, 2016 8:02 PM

I got me a Sopwith Scout recently, so I'm jumping on this thread to pay close attention to your expertise :0)

  • Member since
    January 2016
Posted by JackReacher on Thursday, January 7, 2016 5:07 PM

Looking good...

  • Member since
    November 2015
Posted by The Migrant on Thursday, January 7, 2016 6:01 PM

wing_nut
Here's a link to the engine I did mainly to show you the spark plugs I used.  They look real nice.


Mike G

Western Canada

  • Member since
    October 2004
  • From: Colorado
Posted by StephenLawson on Friday, January 8, 2016 9:48 AM

Just for your convienience ". . .Machines built by Albatros received salmon pink or camouflage rib tapes. OAW machines received light blue or camouflage rib tapes. . ."


Stachel...unconfirmed by Armee means unconfirmed!!!!

  • Member since
    October 2011
  • From: Lake Villa, Illinois
Posted by Chuck Davis on Friday, January 8, 2016 11:35 AM

StephenLawson

Just for your convienience ". . .Machines built by Albatros received salmon pink or camouflage rib tapes. OAW machines received light blue or camouflage rib tapes. . ."


Ahhhh...so that's how you know.  Thank you Stephen!  So...maybe I should have gotten camo rib tapes and avoided the stress of deciding!  Better to know for sure - thanks.

I'm hoping to have another update in a couple of days - I'm working thru a couple of things on the plug wires.  I have most of the base painting of the engine done as well.

Chuck Davis

  • Member since
    October 2011
  • From: Lake Villa, Illinois
Posted by Chuck Davis on Sunday, January 10, 2016 11:49 PM
Good evening everyone.  Hope you all had a great weekend.  I didn’t have as much bench time as I thought I would – basketball games with our boys and company over precluded that…but that’s okay.
I did manage to finish the rough painting of the engine components.  Believe it or not, there are 13 different colors represented here…plus a silver colored pencil.  Phew!  Maybe I got more done than I thought!
 
I also refined my tactic for creating the spark plug wires and attaching them to the distributors at the rear of the engine.  Looking again at Marc’s wonderful work (posted in a link above) made me decide to try something a bit closer to what he does – though I can’t pull it off like him.  Plus…well, I’m lazy.  I used .010” lead wire that I flatten with the pinch point on a pair of pliers, creating a simulated plug lead.  I then trim it so the lead is not too long.  Then…I poke a hole in it with a straight pin.  Not terribly detailed, but easy.  I like using the lead wire because it is so compliant when I bend it to shape.

 
There is a tube that runs on each side of the engine enclosing the plug leads, protecting and routing them to the rear for connection to the distributors.  I am simulating this with a 0.7 mm x 0.5 mm brass micro tube from Albion Alloys.  I had to cheat on the aft end of this tub to represent all 6 plug wires by using .006” brass wire.  I did a fit check to make sure all was well.
 
I want to have somewhere to attach the plug leads off the engine, so I am drilling holes into the brass tube with a #79 (.0145”) drill bit, using the dimples molded into the Wingnut Wings part as a spacing guide.  I score the hole position lightly with a blade, use the tip to create a dimple, then carefully drill the hole out with the bit.
 
Sadly, I bent what turned out to be my last #79 bit.  Bang Head You’d think by now I would know better and have stocked up prior to starting.  Oh well…more are on order.  Maybe for the next update I’ll have to switch to guns.  Sounds kinda like Maverick in Top Gun…


Have a great week everyone!

Chuck Davis

  • Member since
    April 2005
  • From: Piscataway, NJ!
Posted by wing_nut on Monday, January 11, 2016 6:43 AM

Chuck you are doing an outstanding job. Great idea on the flattened solder. And I owe you an apology for not warning you about when you drill those tubes.Whistling

Marc  

  • Member since
    June 2003
  • From: Cavite, Philippines
Posted by allan on Monday, January 11, 2016 7:36 PM

This is such a convincing build, I have to ask:  does it work? :)


No bucks, no Buck Rogers

  • Member since
    June 2013
Posted by bvallot on Tuesday, January 12, 2016 11:28 AM

Happily following along. =] This is all the same kind of scratch work that I enjoy being challenged with myself.  You're doing an excellent job.

Looking forward to the rest.

On the bench:  

Tamiya F4U-1  Kenneth Walsh


  • Member since
    October 2011
  • From: Lake Villa, Illinois
Posted by Chuck Davis on Tuesday, January 12, 2016 12:26 PM

allan

This is such a convincing build, I have to ask:  does it work? :)


Hah!  When people (non-model people that is) ask me "that's cute...does it fly?" I always reply "Yes it can.  Once."


Thanks for the comments guys.  My drill bits haven't arrived yet, so I'm working on the guns.  Man, dose are some itty bitty PE parts Geeked

Chuck Davis

  • Member since
    December 2015
Posted by Loydb on Thursday, January 14, 2016 3:01 PM
Subbed, looking good!
  • Member since
    July 2010
  • From: Tempe AZ
Posted by docidle on Thursday, January 14, 2016 9:33 PM

Chuck,

That is some fine model building. I think I might have to try a WingNut kit, maybe the Se-5....... Thanks for posting this wip, I never tire of looking at your work. 

Steve


  • Member since
    October 2011
  • From: Lake Villa, Illinois
Posted by Chuck Davis on Friday, January 15, 2016 12:08 PM

docidle

Chuck,

That is some fine model building. I think I might have to try a WingNut kit, maybe the Se-5....... Thanks for posting this wip, I never tire of looking at your work. 

Steve


Thanks Steve - I appreciate the comment.  You definately need to try one of these kits.  If I can learn how to do this, anyone can!  If you decide to pick the SE-5a, be aware that the cowl panels by the exhausts won't allow you to leave the top engine cover removable...you have to pick on or off.  I built one "uncovered" and it still shows enough of the SE's fine lines.  My advice - pick up one of their kits and enjoy!

Chuck Davis

  • Member since
    January 2016
Posted by suomi39 on Friday, January 15, 2016 12:41 PM

Yesterday I watched "The First Air War", a PBS Nova documentary about flying replicas of some of these birds. Their Albatross, with screen-printed lozenge fabric and everything, made me think of this thread. Your engine looks about as good as theirs too, and theirs pulls a real plane. Indifferent

Following along with interest. Yes

  • Member since
    October 2011
  • From: Lake Villa, Illinois
Posted by Chuck Davis on Saturday, January 16, 2016 3:32 PM

suomi39

Yesterday I watched "The First Air War", a PBS Nova documentary about flying replicas of some of these birds. Their Albatross, with screem-printed lozenge fabric and everything, made me think of this thread. Your engine looks about as good as theirs too, and theirs pulls a real plane. Indifferent

Following along with interest. Yes


Yes!  My daughter got that DVD for me for Christmas…I love it.  The aircraft featured in that film are from The Vintage Aviator Limited (TVAL) that I mentioned earlier in the thread.  The number of detail pics they have on their website of the Albie is fantastic!

Chuck Davis

  • Member since
    October 2011
  • From: Lake Villa, Illinois
Posted by Chuck Davis on Saturday, January 16, 2016 3:42 PM
So, a quick update.  While I was waiting for my #79 bits I managed to get one of the Spandau’s together using the Master Details replacement jacket, barrel, and detail.  Fussy work but worth it, I think.
 
After my pack of bits came, I got back at the spark plug tubes.  I was having “fun” trying to drill them by hand so I decided to call in the big guns – I borrowed a drill press from work.  That helped, but it’s going to take a couple of days to let my eyes uncross. Black Eye  Cutting the tubing to length is easy – just roll it under a sharp blade.  Pardon my thumb - my wife hates it when my fingers show up in the photo Embarrassed...but the parts are kinda small!
 
To finish the tubes, I will use some laser-cut fiber washers from Vector Cut for the end caps (handy parts…check them out), and some flat lead wire from UMM for the mounts.
 
The mounts are easy to make – just roll the lead strip around a correctly sized piece of metal, squeeze the end, and voila – a tube mount.  They can be slid on to the tubing and tacked in place with superglue.  The tubes are handed, so make sure you make one of each.
 
Here’s one finished spark plug tube. Look carefully and you'll see the fiber washer at front end of the tube, just in front of one of the mounts.  The mounts will be trimmed to size after I paint the assembly.


That’s all for now folks – enjoy the rest of the weekend.  Off to basketball with the kids!...

Chuck Davis

  • Member since
    August 2013
Posted by Jay Jay on Sunday, January 17, 2016 9:05 AM

TY so much for your WIP Chuck.  

There are many ways to do these scratch building techniques but you seem to have a knack for finding and showing us how to do it the eaziest way. i am gratefull


 I'm finally retired. Now time I got, money I don't.

  • Member since
    June 2003
  • From: Cavite, Philippines
Posted by allan on Sunday, January 17, 2016 8:24 PM

Agree with JayJay 100%.  Thank you for sharing.  

No bucks, no Buck Rogers

  • Member since
    October 2011
  • From: Lake Villa, Illinois
Posted by Chuck Davis on Sunday, January 17, 2016 9:30 PM

Thanks for the comments guys.  One of the beauties of sites like this is the exchange of ideas and techniques.  After all, I sure didn't figure this stuff out on my own - and I'm still learning.  Part of the fun...

The next few days will be busy with the day job...not much chance for bench time I'm afraid.   Besides, I still have one gun and one spark plug tube to catch up on.   I'm behind my own post...or something like that Confused

Have a great week everyone.

Chuck Davis

  • Member since
    May 2005
  • From: Eugene, Oregon
Posted by hughes2682 on Tuesday, January 19, 2016 3:28 PM

Hello Chuck,

I am always up for a WnW build.  This one is certainly no exception. I've got a couple of their kits in the stash so, I'll be taking notes if you don't mind. 

Dave

http://img.photobucket.com/albums/v317/Aaronw/Groupbuilds/ClassicAviationGB2010bomb.jpg

With enough thrust, pigs fly just fine.

JOIN OUR COMMUNITY!

Our community is FREE to join. To participate you must either login or register for an account.

SEARCH FORUMS
FREE NEWSLETTER
By signing up you may also receive reader surveys and occasional special offers. We do not sell, rent or trade our email lists. View our Privacy Policy.