SEARCH FINESCALE.COM

Enter keywords or a search phrase below:

Wingnut Wings Albatros D.V build - update #5 interior started (2/14/16)

7354 views
41 replies
1 rating 2 rating 3 rating 4 rating 5 rating
  • Member since
    June 2003
  • From: Cavite, Philippines
Posted by allan on Monday, February 15, 2016 7:45 PM

Excellent! Im learning a lot from every post, Chuck.

No bucks, no Buck Rogers

  • Member since
    October 2011
  • From: Lake Villa, Illinois
Posted by Chuck Davis on Sunday, February 14, 2016 11:46 PM
Good evening everyone.  It’s been awhile since my last update, but I have managed to get a little bit done.  Now that the engine is pretty much wrapped up until I install it, I’ve switched focus to the interior.  I was poking around some shots of TVAL’s Albie, and I noticed that what I assume is the throttle cable on the left hand wall is not “copper” as the instructions would have you paint it.  I also realized that the cable runs from the wooden plate on the left sidewall to the magneto, but it doesn’t run thru the wooden former like the model has it.  I’ll need to cut that off and replace it with solder or some wire, and have it run around the former, not thru it.
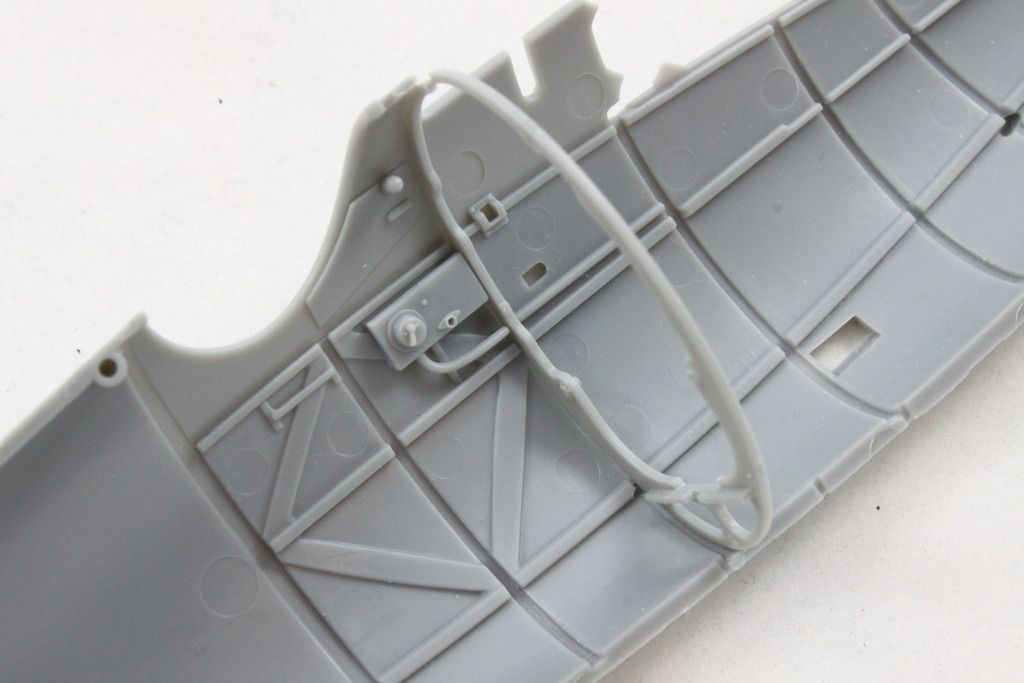
 
Having built one of these kits in the past, I learned that a bit of prevention is worth a pound of scraping.  I’ve used some thin masking tape to run in the slots for the formers.  This saves a lot of work, and keeps the fit nice and tight – the molding tolerance on early WNW kits can be affected by something as small as layers of paint.
 
To begin painting the wood interior, I coated the inside with Tamiya Buff, a good base wood color.
 
For wood graining, I use some Windsor-Newton Burnt Umber oil paint thinned with Turpenoid thinner into a wash.  I paint that on using a cheap nylon brush, leaving it a bit streaky – kinda like wood grain.  Next, I let it dry about an hour and then I use a wide, stiff brush to streak the paint and leave “grain” marks.  The oil paint is very forgiving, and you can play with the grain a while until you’re satisfied.
I made it a bit thicker than usual this time – I think I liked how the grain started to be apparent even before I “streaked” it.
A bit of streaking and swirling, and you have something that looks a lot like wood grain.  Remember to vary the direction of the grain on different pieces of wood.
 
I sealed the wood with a clear coat, and then masked it in preparation for applying the interior green.  Some light washes, and the fuselage sides will be ready to go.
 
While I was spraying the Buff for the wood, I shot the rear bulkhead and flor board as well.  I’ve never used HGW wood or Aviatic lozenge decals before.  They’re a bit odd – both are very translucent.  This means the undercoated color will have a large role to play in the appearance.  I cut slightly oversize pieces and applied them.  Both worked fine, and were less touchy to apply than I feared.
A sharp scalpel and a couple of drops of setting solution were all that was required to finish them off.


That’s all for a while.  Aaron has me busy with the new Airfix Beaufighter and the HK Models Do-335.  I’ll have to move the Albatros to the back of the hangar for a bit.  Back before too long, I hope.  Take care all!

Chuck Davis

  • Member since
    December 2002
  • From: Northern California
Posted by jeaton01 on Saturday, January 30, 2016 2:49 PM

I'm enjoying your progress, Chuck.  I don't need a loose sweatshirt to launch things, my clumsy fingers do it all day long.

John

To see build logs for my models:  http://goldeneramodel.com/mymodels/mymodels.html


  • Member since
    October 2011
  • From: Lake Villa, Illinois
Posted by Chuck Davis on Friday, January 29, 2016 1:39 PM

Well, that was easy.  I looged on to Photobucket and there's a picture of a cat hanging by it's claws, with a note that they are down for maintenance...and to "hang in there."

See?...ignore computer problems long enough and they fix themselves Stick out tongue

Chuck Davis

  • Member since
    October 2011
  • From: Lake Villa, Illinois
Posted by Chuck Davis on Friday, January 29, 2016 1:33 PM

wing_nut
I can only see the pic at the top of the page. But I can also see the badges in your signature but not in my own.
 

Huh.  And I can see your badges but not my own.  And I can't see the lead pciture, or any others.

Like other computer problems, I will ignore it and hope that it goes away or fixes itself Whistling

Thanks for the additonal tip on the cowls.  I forgot to mention that I'll be leaving the right hand cowl off.  That may give me some more wiggle room.

Chuck Davis

  • Member since
    April 2005
  • From: Piscataway, NJ!
Posted by wing_nut on Friday, January 29, 2016 1:23 PM
Almost forgot.... On the one i did with the top pieces if the cowl in place I needed to do some trimming, and at the same time keeping the odd shaped edge, to get the right fit around the engine.

Marc  

  • Member since
    April 2005
  • From: Piscataway, NJ!
Posted by wing_nut on Friday, January 29, 2016 1:21 PM
I can only see the pic at the top of the page. But I can also see the badges in your signature but not in my own.

Marc  

  • Member since
    October 2011
  • From: Lake Villa, Illinois
Posted by Chuck Davis on Friday, January 29, 2016 12:37 PM

wing_nut

1st  outstanding work on the components. Wiring & manifold are really nice.  The spandex are awesome.   Check your refs... I want to say it was pointed out to me that they didn't have the cocking levers.  


I put my engine in fully assembled after painting but before decals if I recall.   I do remember that I needed to monitor the engine mount alignment very very carefully.  Had a problem both times, scratching my head trying to figure out wtf... some how it worked out in the end


Thanks Marc - I appreciate it.  It looked like it was possible, but tight.  Thanks for the confirmation.  It should help keep me from having to fix the stuff I smash...I'm good at that.

Hmmmm.  It would seem all my pictures have gone MIA.  Maybe I've been infected with whatever bug PB has been spreading.  My posting last night went fine.  Unless y'all can see them and I can't... Confused

Chuck Davis

  • Member since
    April 2005
  • From: Piscataway, NJ!
Posted by wing_nut on Friday, January 29, 2016 9:47 AM

1st  outstanding work on the components. Wiring & manifold are really nice.  The spandex are awesome.   Check your refs... I want to say it was pointed out to me that they didn't have the cocking levers.  


I put my engine in fully assembled after painting but before decals if I recall.   I do remember that I needed to monitor the engine mount alignment very very carefully.  Had a problem both times, scratching my head trying to figure out wtf... some how it worked out in the end

Marc  

  • Member since
    June 2014
Posted by BrandonK on Friday, January 29, 2016 9:07 AM

This is a very well detailed kit. Superb work.

BK

On the bench:

A lot !! And I mean A LOT!!

2024 Kits on deck / in process / completed   

                         14 / 5 / 2  

                              Tongue Tied

  • Member since
    June 2003
  • From: Cavite, Philippines
Posted by allan on Friday, January 29, 2016 12:03 AM

The details are just awesome! Love the Spandaus!  

No bucks, no Buck Rogers

  • Member since
    October 2011
  • From: Lake Villa, Illinois
Posted by Chuck Davis on Thursday, January 28, 2016 11:06 PM
Welcome aboard, Dave - the more the merrier.  Good evening everyone, time for a quick update.  Work and life have been busy, but I’ve managed to finally get the plugs squared away.  At least on one side. Huh?
I installed the solder plug wires, painted them Testors Armor Sand, and then gently folded them into place using a toothpick as a mandrel to keep a bit of “droop” to the wire.  I left the flattened connector portion of the solder unpainted.  A drop of superglue secured them to the plugs.  Note to file - don't wear a loose sweatshirt near the part holder that's hanging on to your delicate subassembly.  Bang Head Luckily, the solder bent for the most part, and only one tubeholder broke away - but it was close!
 
 
I’ve also completed painting the rest of the engine subassemblies using various Model Master Metalizer shades.
 
The engine should be finished soon.  Well, sort of.  Tongue Tied  I’ve decided I won’t finish final assembly until I do a fit check in the engine bay.  If possible, I want to leave the engine out until after the fuselage has been completed and decaled.  That will minimize the possibility of damage.  If I can’t pull that off, I at least want to try leaving the “upper engine” off – the cylinders and the rocker arms – to allow masking the installed engine block.  Either way, I won’t want the full engine assembled until I can answer my question.  I built an Albatros when they first came out, but I don’t remember when I installed the engine in the build process.  Anyone else care to comment?  Marc?
 
Oh…and I finally finished the Spandaus.  I was going to paint the cocking lever in some sort of wood color, but luckily I checked the Vintage Aviator website – the handles are metal.  Basically, the whole gun is dark metal except for the brass colored mounting lug.  How boring.  Ah well.


Next up, I’ll be starting the interior.  That means going to wood shop.  Have a great weekend!

Chuck Davis

  • Member since
    May 2005
  • From: Eugene, Oregon
Posted by hughes2682 on Tuesday, January 19, 2016 3:28 PM

Hello Chuck,

I am always up for a WnW build.  This one is certainly no exception. I've got a couple of their kits in the stash so, I'll be taking notes if you don't mind. 

Dave

http://img.photobucket.com/albums/v317/Aaronw/Groupbuilds/ClassicAviationGB2010bomb.jpg

With enough thrust, pigs fly just fine.

  • Member since
    October 2011
  • From: Lake Villa, Illinois
Posted by Chuck Davis on Sunday, January 17, 2016 9:30 PM

Thanks for the comments guys.  One of the beauties of sites like this is the exchange of ideas and techniques.  After all, I sure didn't figure this stuff out on my own - and I'm still learning.  Part of the fun...

The next few days will be busy with the day job...not much chance for bench time I'm afraid.   Besides, I still have one gun and one spark plug tube to catch up on.   I'm behind my own post...or something like that Confused

Have a great week everyone.

Chuck Davis

  • Member since
    June 2003
  • From: Cavite, Philippines
Posted by allan on Sunday, January 17, 2016 8:24 PM

Agree with JayJay 100%.  Thank you for sharing.  

No bucks, no Buck Rogers

  • Member since
    August 2013
Posted by Jay Jay on Sunday, January 17, 2016 9:05 AM

TY so much for your WIP Chuck.  

There are many ways to do these scratch building techniques but you seem to have a knack for finding and showing us how to do it the eaziest way. i am gratefull


 I'm finally retired. Now time I got, money I don't.

  • Member since
    October 2011
  • From: Lake Villa, Illinois
Posted by Chuck Davis on Saturday, January 16, 2016 3:42 PM
So, a quick update.  While I was waiting for my #79 bits I managed to get one of the Spandau’s together using the Master Details replacement jacket, barrel, and detail.  Fussy work but worth it, I think.
 
After my pack of bits came, I got back at the spark plug tubes.  I was having “fun” trying to drill them by hand so I decided to call in the big guns – I borrowed a drill press from work.  That helped, but it’s going to take a couple of days to let my eyes uncross. Black Eye  Cutting the tubing to length is easy – just roll it under a sharp blade.  Pardon my thumb - my wife hates it when my fingers show up in the photo Embarrassed...but the parts are kinda small!
 
To finish the tubes, I will use some laser-cut fiber washers from Vector Cut for the end caps (handy parts…check them out), and some flat lead wire from UMM for the mounts.
 
The mounts are easy to make – just roll the lead strip around a correctly sized piece of metal, squeeze the end, and voila – a tube mount.  They can be slid on to the tubing and tacked in place with superglue.  The tubes are handed, so make sure you make one of each.
 
Here’s one finished spark plug tube. Look carefully and you'll see the fiber washer at front end of the tube, just in front of one of the mounts.  The mounts will be trimmed to size after I paint the assembly.


That’s all for now folks – enjoy the rest of the weekend.  Off to basketball with the kids!...

Chuck Davis

  • Member since
    October 2011
  • From: Lake Villa, Illinois
Posted by Chuck Davis on Saturday, January 16, 2016 3:32 PM

suomi39

Yesterday I watched "The First Air War", a PBS Nova documentary about flying replicas of some of these birds. Their Albatross, with screem-printed lozenge fabric and everything, made me think of this thread. Your engine looks about as good as theirs too, and theirs pulls a real plane. Indifferent

Following along with interest. Yes


Yes!  My daughter got that DVD for me for Christmas…I love it.  The aircraft featured in that film are from The Vintage Aviator Limited (TVAL) that I mentioned earlier in the thread.  The number of detail pics they have on their website of the Albie is fantastic!

Chuck Davis

  • Member since
    January 2016
Posted by suomi39 on Friday, January 15, 2016 12:41 PM

Yesterday I watched "The First Air War", a PBS Nova documentary about flying replicas of some of these birds. Their Albatross, with screen-printed lozenge fabric and everything, made me think of this thread. Your engine looks about as good as theirs too, and theirs pulls a real plane. Indifferent

Following along with interest. Yes

  • Member since
    October 2011
  • From: Lake Villa, Illinois
Posted by Chuck Davis on Friday, January 15, 2016 12:08 PM

docidle

Chuck,

That is some fine model building. I think I might have to try a WingNut kit, maybe the Se-5....... Thanks for posting this wip, I never tire of looking at your work. 

Steve


Thanks Steve - I appreciate the comment.  You definately need to try one of these kits.  If I can learn how to do this, anyone can!  If you decide to pick the SE-5a, be aware that the cowl panels by the exhausts won't allow you to leave the top engine cover removable...you have to pick on or off.  I built one "uncovered" and it still shows enough of the SE's fine lines.  My advice - pick up one of their kits and enjoy!

Chuck Davis

  • Member since
    July 2010
  • From: Tempe AZ
Posted by docidle on Thursday, January 14, 2016 9:33 PM

Chuck,

That is some fine model building. I think I might have to try a WingNut kit, maybe the Se-5....... Thanks for posting this wip, I never tire of looking at your work. 

Steve


  • Member since
    December 2015
Posted by Loydb on Thursday, January 14, 2016 3:01 PM
Subbed, looking good!
  • Member since
    October 2011
  • From: Lake Villa, Illinois
Posted by Chuck Davis on Tuesday, January 12, 2016 12:26 PM

allan

This is such a convincing build, I have to ask:  does it work? :)


Hah!  When people (non-model people that is) ask me "that's cute...does it fly?" I always reply "Yes it can.  Once."


Thanks for the comments guys.  My drill bits haven't arrived yet, so I'm working on the guns.  Man, dose are some itty bitty PE parts Geeked

Chuck Davis

  • Member since
    June 2013
Posted by bvallot on Tuesday, January 12, 2016 11:28 AM

Happily following along. =] This is all the same kind of scratch work that I enjoy being challenged with myself.  You're doing an excellent job.

Looking forward to the rest.

On the bench:  

Tamiya F4U-1  Kenneth Walsh


  • Member since
    June 2003
  • From: Cavite, Philippines
Posted by allan on Monday, January 11, 2016 7:36 PM

This is such a convincing build, I have to ask:  does it work? :)


No bucks, no Buck Rogers

  • Member since
    April 2005
  • From: Piscataway, NJ!
Posted by wing_nut on Monday, January 11, 2016 6:43 AM

Chuck you are doing an outstanding job. Great idea on the flattened solder. And I owe you an apology for not warning you about when you drill those tubes.Whistling

Marc  

  • Member since
    October 2011
  • From: Lake Villa, Illinois
Posted by Chuck Davis on Sunday, January 10, 2016 11:49 PM
Good evening everyone.  Hope you all had a great weekend.  I didn’t have as much bench time as I thought I would – basketball games with our boys and company over precluded that…but that’s okay.
I did manage to finish the rough painting of the engine components.  Believe it or not, there are 13 different colors represented here…plus a silver colored pencil.  Phew!  Maybe I got more done than I thought!
 
I also refined my tactic for creating the spark plug wires and attaching them to the distributors at the rear of the engine.  Looking again at Marc’s wonderful work (posted in a link above) made me decide to try something a bit closer to what he does – though I can’t pull it off like him.  Plus…well, I’m lazy.  I used .010” lead wire that I flatten with the pinch point on a pair of pliers, creating a simulated plug lead.  I then trim it so the lead is not too long.  Then…I poke a hole in it with a straight pin.  Not terribly detailed, but easy.  I like using the lead wire because it is so compliant when I bend it to shape.

 
There is a tube that runs on each side of the engine enclosing the plug leads, protecting and routing them to the rear for connection to the distributors.  I am simulating this with a 0.7 mm x 0.5 mm brass micro tube from Albion Alloys.  I had to cheat on the aft end of this tub to represent all 6 plug wires by using .006” brass wire.  I did a fit check to make sure all was well.
 
I want to have somewhere to attach the plug leads off the engine, so I am drilling holes into the brass tube with a #79 (.0145”) drill bit, using the dimples molded into the Wingnut Wings part as a spacing guide.  I score the hole position lightly with a blade, use the tip to create a dimple, then carefully drill the hole out with the bit.
 
Sadly, I bent what turned out to be my last #79 bit.  Bang Head You’d think by now I would know better and have stocked up prior to starting.  Oh well…more are on order.  Maybe for the next update I’ll have to switch to guns.  Sounds kinda like Maverick in Top Gun…


Have a great week everyone!

Chuck Davis

  • Member since
    October 2011
  • From: Lake Villa, Illinois
Posted by Chuck Davis on Friday, January 8, 2016 11:35 AM

StephenLawson

Just for your convienience ". . .Machines built by Albatros received salmon pink or camouflage rib tapes. OAW machines received light blue or camouflage rib tapes. . ."


Ahhhh...so that's how you know.  Thank you Stephen!  So...maybe I should have gotten camo rib tapes and avoided the stress of deciding!  Better to know for sure - thanks.

I'm hoping to have another update in a couple of days - I'm working thru a couple of things on the plug wires.  I have most of the base painting of the engine done as well.

Chuck Davis

  • Member since
    October 2004
  • From: Colorado
Posted by StephenLawson on Friday, January 8, 2016 9:48 AM

Just for your convienience ". . .Machines built by Albatros received salmon pink or camouflage rib tapes. OAW machines received light blue or camouflage rib tapes. . ."


Stachel...unconfirmed by Armee means unconfirmed!!!!

JOIN OUR COMMUNITY!

Our community is FREE to join. To participate you must either login or register for an account.

SEARCH FORUMS
FREE NEWSLETTER
By signing up you may also receive reader surveys and occasional special offers. We do not sell, rent or trade our email lists. View our Privacy Policy.