SEARCH FINESCALE.COM

Enter keywords or a search phrase below:

1/48 Hasegawa A6M2-N Type 2 Rufe Complete

6375 views
73 replies
1 rating 2 rating 3 rating 4 rating 5 rating
  • Member since
    September 2014
Posted by rooster513 on Tuesday, January 19, 2016 11:28 AM

Wow! Looking amazing Steve!

-Andy

  • Member since
    December 2002
  • From: NYC, USA
Posted by waikong on Tuesday, January 19, 2016 10:14 AM

I am loving this build, its the exact thing I've been thinking about for ages.  But been too timid to attempt water.  

My only comment is post bigger pictures or at least link to them.  I want look at every detail!

  • Member since
    March 2015
  • From: Streetsboro, Ohio
Posted by Toshi on Tuesday, January 19, 2016 4:47 AM

You do the entire diorama genre with such passion it shows in your work.  This is really a sight to see, absolutely amazing.  You can put together a one man show!  

Toshi

On The Bench: Revell 1/48 B-25 Mitchell


Married to the most caring, loving, understanding, and beautiful wife in the world.  Mrs. Toshi


  • Member since
    July 2014
Posted by modelcrazy on Monday, January 18, 2016 11:00 PM
Here’s where I’m at on the Rufe. I poured just a little resin with a lot of hardener to make the waves, so here it is. Right now I’m going over the whole thing with cotton for the whitecaps and high gloss acrylic varnish. I still want to add more coats of varnish before the water is done.


Steve

Steve

Building a kit from your stash is like cutting a head off a Hydra, two more take it's place.


http://www.spamodeler.com/forum/

  • Member since
    July 2014
Posted by modelcrazy on Sunday, January 17, 2016 10:34 AM
Thanks Steve,
The only drawbacks are cost and time. Resin is pricy and it takes a good 24 to 48 hours before it isn't tacky anymore. During that time it is very vulnerable to dust.
Also the thicker it is the more it heats up while it cures. If you have a model imbedded in it you run the risk of melting the plastic, but you can’t beat the look of realism.
Steve

Steve

Building a kit from your stash is like cutting a head off a Hydra, two more take it's place.


http://www.spamodeler.com/forum/

  • Member since
    December 2003
  • From: Charleston, SC
Posted by sanderson_91 on Sunday, January 17, 2016 10:16 AM

Steve,

Your Dino look awesome! I really like how the beach base and water - very realistic looking.  Thanks for posting this - the resin looks fairly easy to use. I can think of several dio ideas after seeing this.

Steve


  • Member since
    February 2014
  • From: Michigan
Posted by silentbob33 on Saturday, January 16, 2016 7:26 AM
That is looking really good! I have an LCVP sitting on the shelf waiting for me to get around to putting together a coastline for a D-Day diorama, but I've been nervous about trying the resin.

On my bench: Academy 1/35 UH-60L Black Hawk

  • Member since
    July 2014
Posted by modelcrazy on Saturday, January 16, 2016 12:10 AM
I bought some more resin, mixed and poured the next layer. Once this is dry, I pour the last layer and form the waves….hopefully.
Steve

Steve

Building a kit from your stash is like cutting a head off a Hydra, two more take it's place.


http://www.spamodeler.com/forum/

  • Member since
    July 2014
Posted by modelcrazy on Thursday, January 14, 2016 2:00 PM

I haven't progressed on the Rufe much, HL is out of the resin and I'm waiting for them to restock.

Steve

Steve

Building a kit from your stash is like cutting a head off a Hydra, two more take it's place.


http://www.spamodeler.com/forum/

  • Member since
    June 2013
Posted by bvallot on Monday, January 11, 2016 4:15 PM

Steve.  Hot damn! That's coming out very nice. =]  Very impressive.  I hope to one day fool with something like this.  But I'm guessing it won't be in the near future. =[  Too many irons on the fire. 

Looking forward to how this turns out. 

On the bench:  

Tamiya F4U-1  Kenneth Walsh


  • Member since
    July 2014
Posted by modelcrazy on Monday, January 11, 2016 9:40 AM

wing_nut
How long does it take for the resin to set up and doe sthe stink stop as soon as it does?

I put in twice the hardner that is called for so it sets up pretty quickly, and gets hot doing it, about 3-4 hours. I won't put in as much hardner for thee last layers to keep the heat down now that the kit is in the resin. The smell does go away after it hardens, but wow, what a stink while it is.

Steve

Building a kit from your stash is like cutting a head off a Hydra, two more take it's place.


http://www.spamodeler.com/forum/

  • Member since
    April 2005
  • From: Piscataway, NJ!
Posted by wing_nut on Monday, January 11, 2016 6:27 AM

That really looks great.  How long does it take for the resin to set up and doe sthe stink stop as soon as it does?

Marc  

  • Member since
    March 2015
  • From: Streetsboro, Ohio
Posted by Toshi on Monday, January 11, 2016 5:43 AM

Another beautiful diorama.  I'd love to see the completed kit!!

Toshi

On The Bench: Revell 1/48 B-25 Mitchell


Married to the most caring, loving, understanding, and beautiful wife in the world.  Mrs. Toshi


  • Member since
    July 2014
Posted by modelcrazy on Sunday, January 10, 2016 10:00 PM


Thanks guys,
PJ, I used "Castin' Craft Clear Polyester Casting Resin" 16oz. I picked it up at HL with the 40% coupon. It is $20 here and I need to get another can to finish off the last levels. Stinks to high heaven and I needed to put it outside and put a cardboard box over it to offgas. The cold doesn’t seem to hurt the curing process and keeps the heat down. Once it has hardened enough I bring it in to warm up.

Steve

Building a kit from your stash is like cutting a head off a Hydra, two more take it's place.


http://www.spamodeler.com/forum/

  • Member since
    June 2003
  • From: Cavite, Philippines
Posted by allan on Sunday, January 10, 2016 9:07 PM

You are a true master modeler Steve. Your works are simply amazing!

No bucks, no Buck Rogers

  • Member since
    November 2008
  • From: Central Florida
Posted by plasticjunkie on Sunday, January 10, 2016 8:04 PM

Looks superv Steve. I'm glad you chipped the hinomarus cause often modelers leave them in one piece with the wear around them. It looks like real water so excellent effort. What kind of resin did you use? I happen to have a small two bottle set of Envirotts Lite plastic Pouring Resin that I used  on a plaque 20+ years back.

 GIFMaker.org_jy_Ayj_O


Too many models to build, not enough time in a lifetime!!

  • Member since
    February 2014
  • From: Michigan
Posted by silentbob33 on Sunday, January 10, 2016 7:44 PM
This looks really good!

On my bench: Academy 1/35 UH-60L Black Hawk

  • Member since
    July 2014
Posted by modelcrazy on Sunday, January 10, 2016 7:12 PM

Thanks GH, I was going to blow than with the heat off. It seems like it may not take much to form them.

Steve

Building a kit from your stash is like cutting a head off a Hydra, two more take it's place.


http://www.spamodeler.com/forum/

  • Member since
    August 2014
  • From: Willamette Valley, Oregon
Posted by goldhammer on Sunday, January 10, 2016 7:06 PM

Just watch the heat levels on blowing in the waves, don't want to start deforming floats at this stage of the game

  • Member since
    July 2014
Posted by modelcrazy on Sunday, January 10, 2016 7:00 PM
OK guys I put the Rufe on the “water” and OMG! I am soooo pleased with this. This is actually looking like water! I will give this a few days to dry before I apply the last few layers. I will blow some waves in the last layer for some small surf. Oh boy, I can’t wait!
Steve

Steve

Building a kit from your stash is like cutting a head off a Hydra, two more take it's place.


http://www.spamodeler.com/forum/

  • Member since
    August 2014
  • From: Willamette Valley, Oregon
Posted by goldhammer on Sunday, January 10, 2016 6:42 PM

The upside may be that the last layer of resin will/might anchor the floats and keep her in place permanently.


Looks great.

  • Member since
    November 2003
  • From: Naples, FL
Posted by tempestjohnny on Sunday, January 10, 2016 6:11 PM
Steve that is just too cool. It's going to look great


  • Member since
    July 2014
Posted by modelcrazy on Sunday, January 10, 2016 6:06 PM
GH, that probably would have worked had I thought about it.
Here's another update. I believe I’m done with the Rufe once I finish the canopy.
 
I was able to pour quite a few more layers of resin and just about ready to install the build. In fact, once this last layer sets up enough I will set the Rufe on the surface so it sinks into the last layer a bit.
 
Steve

Steve

Building a kit from your stash is like cutting a head off a Hydra, two more take it's place.


http://www.spamodeler.com/forum/

  • Member since
    August 2014
  • From: Willamette Valley, Oregon
Posted by goldhammer on Sunday, January 10, 2016 4:16 PM

If not to late, how about making a silicone mold of the float and a copy of it, then use the copy of the float to set in your pours.  Could give the copy a coat or cooking oil to make it not stick to the resin pour.

  • Member since
    June 2014
Posted by BrandonK on Sunday, January 10, 2016 3:41 PM

It's coming along very nicely. Super work my friend.

BK

On the bench:

A lot !! And I mean A LOT!!

2024 Kits on deck / in process / completed   

                         14 / 5 / 2  

                              Tongue Tied

  • Member since
    July 2014
Posted by modelcrazy on Sunday, January 10, 2016 2:00 PM
New progress on the Rufe and beach. I sprayed the Worn Effects, let that dry then sprayed the IJN Grey, let that dry for about a day and a half. This morning I masked and sprayed the green and applied the decals. Interestingly, after pulling off the mask, some of the gray peeled off, which is just fine and adds to the effect. This was probably due to the Worn Effects. The cowl was not glued on yet but it did work on its weathering..
 
The beach is turning out very well in my opinion. I mixed up another layer of resin and mixed in some turquoise, maybe a little too much, but it is at depth so again this should work to my favor.


Steve

Steve

Building a kit from your stash is like cutting a head off a Hydra, two more take it's place.


http://www.spamodeler.com/forum/

  • Member since
    May 2014
Posted by SubarooMike on Saturday, January 9, 2016 7:17 PM

I wish I had a Rufe to build... OH WAIT! Big Smile     Looking amazing, Steve. Absolutely love what you're doing with her.  I'm literally in the middle of working on my Tam offering right now.  I'm just taking a quick break.  

  • Member since
    July 2014
Posted by modelcrazy on Friday, January 8, 2016 7:47 PM

LOL, thanks PJ,

I completed the beach and painted the sand. I then taped some poster board around the edge to prepare for a resin pour

.
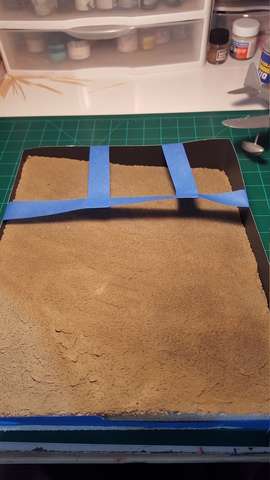
I made my first resin pour, and now I know what not to do.
First off, I used a few drops of blue water color to try to tint the “water”. It was like mixing water and oil, just slower. I finally was able to mix it by using the paint mixer. The turquoise color I wanted didn’t materialize, more of a light blue. Not bad but not what I was looking for.
Second, I was hoping the resin would harden fast enough so that running a sealer around the poster board would not be necessary. I apparently did not put enough hardener in the mix for it to harden fast enough and I had leaks. In fact, most of it leaked out. Oh well, this may actually work to my advantage

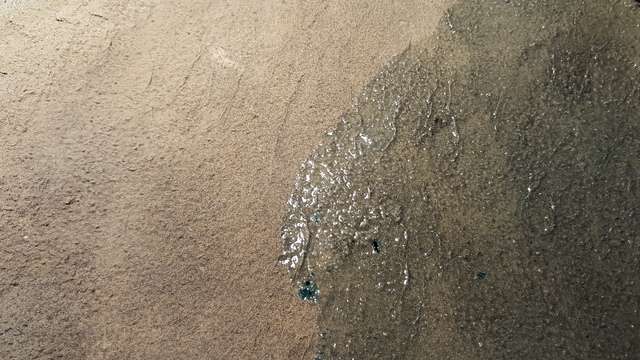
 

Ok, lessons learned....so far.
1. Seal the edges. I'm now using white glue.
2. Put in more hardener.
3. Put in a few drops of turquoise if you want turquoise.

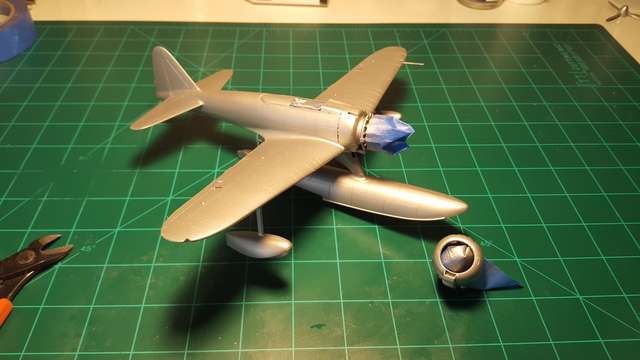
Also, I painted the Rufe silver, air brushed the Worn Effects and am ready for the exterior colors.
 

Steve

Steve

Building a kit from your stash is like cutting a head off a Hydra, two more take it's place.


http://www.spamodeler.com/forum/

  • Member since
    November 2008
  • From: Central Florida
Posted by plasticjunkie on Friday, January 8, 2016 3:26 PM

All eyes are on you buddy!:nerd

 GIFMaker.org_jy_Ayj_O


Too many models to build, not enough time in a lifetime!!

  • Member since
    June 2014
Posted by BrandonK on Friday, January 8, 2016 9:00 AM

This is pretty much the type of scheme I was thinking of doing. I just have no idea where to start or how to do it. This will be very helpful.

BK

On the bench:

A lot !! And I mean A LOT!!

2024 Kits on deck / in process / completed   

                         14 / 5 / 2  

                              Tongue Tied

JOIN OUR COMMUNITY!

Our community is FREE to join. To participate you must either login or register for an account.

SEARCH FORUMS
FREE NEWSLETTER
By signing up you may also receive reader surveys and occasional special offers. We do not sell, rent or trade our email lists. View our Privacy Policy.