SEARCH FINESCALE.COM

Enter keywords or a search phrase below:

He 162 Trio WiP

3079 views
39 replies
1 rating 2 rating 3 rating 4 rating 5 rating
  • Member since
    December 2002
  • From: Bury St Edmunds, Suffolk, England
He 162 Trio WiP
Posted by Bish on Sunday, February 26, 2017 6:13 AM

So while taking a break from my 4 kit Rudel build, i am easing off a bit and doing 3 He 162 kits. But where as the Rudel build has been on the burner for the best part of 20 years, this one has only be an idea for 18 months. After doimng my first, and up till now only 1/32nd kit, a Bf 109, i thought it would be interesting to build 2 kits of the same subject in 2 differant scales. My main scale 1/72nd and my occasional one, 1/32nd. I kew i wanted my next 32nd kit to be a jet and so it made sense to go for the 32nd kit that was my first addition, Revell He 162. and so that meant also building Dragons 1/72nd version.

But that was not all. Earlier in 2015 i had built the HPH 1/18th DB 605 engine and even then i knew i wanted to do their BMW 003 engine, as used in the He 162. So soon after decideing to build the 2 kits, i figured i migt as well make it 3 and add the engine.
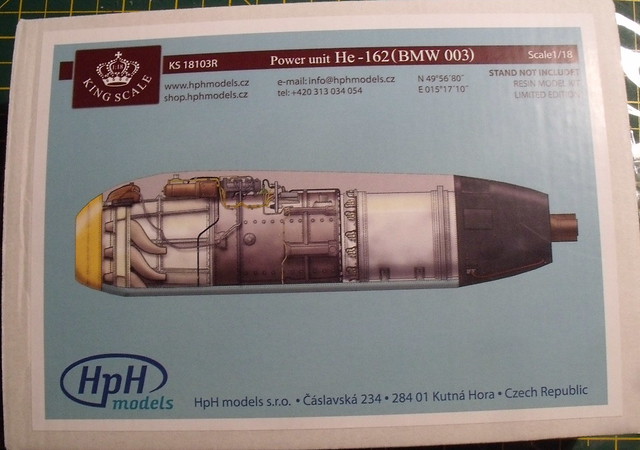
I was planning on doing this last year. But not having the time to fit it in combinded with not having the engine kit meant i had to put it off. Finally having got the engine in Dec, i decided this was going to be an early build this year.

The plan is to work on both aircraft in the same way as i am with the Rudel build, working on the 72nd to a certain stage, then the 32nd and then painting. And i'll put one or two nights ashide each wek for the engine.

As with most aircraft builds, i started with the cockpits. For the Dragon, i am adding a resin pit from pavla. Unlike resin ones from companies like Aires, this has no PE, but i do have an Eduard PE set i can use if needed.

And on the larger kit, i am useing the Eduard Big Ed set. I got all this before i discovered HGW but i decided to stick with what i have, PE belts and all.

The side walls are a good example of PE not being the right option. The molded on kit sidewalls looked more like the real thing than the PE does which is to flat. But i didn't spot this until after i started sanding. There is still the pre coloured buts to add after painting and weathering.

I do rather like the ejection seat and its spports with this PE set.

And then off to the paint booth for some primer and RLM 66.

And while that was dring, i started on the big engine. Most of the main body is together.
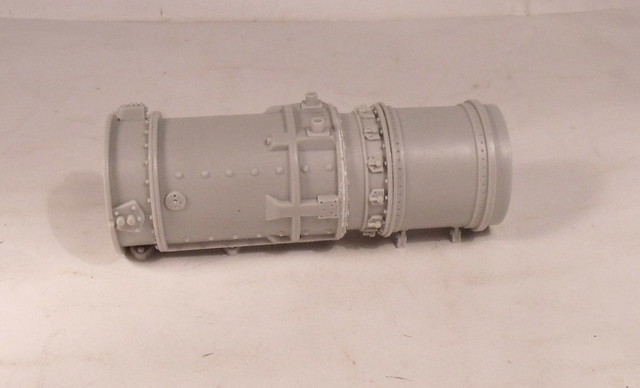
And the sub assembelies are cleaned up and ready for painting which i will do before fitting.
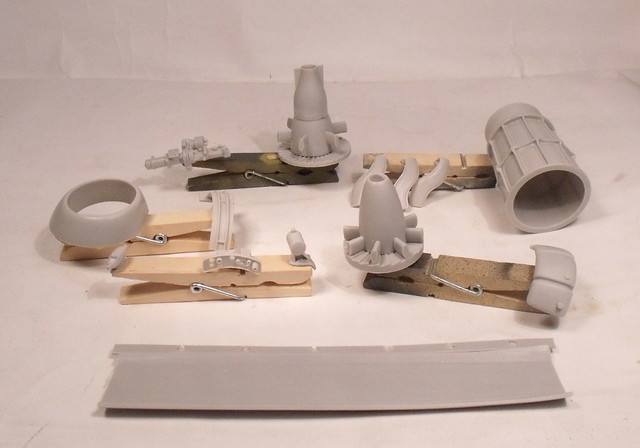
Next up will be getting some primer on the engine and some washes and dry brushing in the pits before adding the finer details and getting the fuselages together.

More soon. Thanks for looking and all comments welcome as always.

I am a Norfolk man and i glory in being so


On the bench: Airfix 1/72nd Harrier GR.3/Fujimi 1/72nd Ju 87D-3

  • Member since
    August 2005
  • From: Sydney, Australia
Posted by Phil_H on Sunday, February 26, 2017 6:44 AM

Nice. As I remember it, the Dragon kit is almost a miniaturised version of the 1/48 TriMaster kit. Should look great when finished.

  • Member since
    March 2015
  • From: Streetsboro, Ohio
Posted by Toshi on Sunday, February 26, 2017 7:00 AM

You're a very ambitious builder.  Building not one but two this time.  I like the 1/72 build but am really passionate with the 1/32 as you have the Big Ed set.  Both builds look fantastic, as always a great start!  I'll be following as usual and as usual, you never seize to surprise me with your builds!!!

Toshi

On The Bench: Revell 1/48 B-25 Mitchell


Married to the most caring, loving, understanding, and beautiful wife in the world.  Mrs. Toshi


  • Member since
    December 2002
  • From: Bury St Edmunds, Suffolk, England
Posted by Bish on Sunday, February 26, 2017 7:24 AM

Thnaks guys. Phil, i have built the Dragon kit before as it is part of their Mistel 5 kits. I am rather a fan of Dragon kits and from what i remember there is only one fit issue and thats the tail cone.

Toshi, i do like these BigEd sets. though for my more recent 32nd kits i have bougt i have opted for resin cockpits, though i do still have a few of these big PE sets.

And after doing 4 at once, this is a nice break. Big Smile

I am a Norfolk man and i glory in being so


On the bench: Airfix 1/72nd Harrier GR.3/Fujimi 1/72nd Ju 87D-3

  • Member since
    April 2015
Posted by Mopar Madness on Sunday, February 26, 2017 4:08 PM

Very ambitious.  I'm certain these will look great!

Chad

God, Family, Models...

At the plate: 1/48 Airfix Bf109 & 1/35 Tamiya Famo

On deck: Who knows!

  • Member since
    December 2002
  • From: Bury St Edmunds, Suffolk, England
Posted by Bish on Sunday, February 26, 2017 4:15 PM

Thanks MM.

I am a Norfolk man and i glory in being so


On the bench: Airfix 1/72nd Harrier GR.3/Fujimi 1/72nd Ju 87D-3

  • Member since
    November 2003
  • From: Naples, FL
Posted by tempestjohnny on Monday, February 27, 2017 7:47 AM

Bow DownI'll be watching these builds


  • Member since
    December 2002
  • From: Bury St Edmunds, Suffolk, England
Posted by Bish on Monday, February 27, 2017 3:08 PM

Cheers Johnny, hope i don't disappoint.

I am a Norfolk man and i glory in being so


On the bench: Airfix 1/72nd Harrier GR.3/Fujimi 1/72nd Ju 87D-3

  • Member since
    January 2015
Posted by BrandonD on Tuesday, February 28, 2017 11:50 AM

Looking good, Bish. Why you gotta skip 1/48 though?

In all seriousness, this is cool, and I love that your "taking a break" build is to do three kits.

I can't wait to see these come together.

-BD-

  • Member since
    December 2002
  • From: Bury St Edmunds, Suffolk, England
Posted by Bish on Tuesday, February 28, 2017 4:53 PM

Cheers BD. 1/48th, what you trying to do, fra my nerves completly Big Smile

I am a Norfolk man and i glory in being so


On the bench: Airfix 1/72nd Harrier GR.3/Fujimi 1/72nd Ju 87D-3

  • Member since
    December 2002
  • From: Bury St Edmunds, Suffolk, England
Posted by Bish on Friday, March 10, 2017 11:22 AM

Been falling behind a bit on this so time to do some catching up. Afer getting the pits painted RLM 66 it was time to add some colour. I did this is reverse by adding the colour PE to the 32nd kit and then useing that as a guide to paint the 72nd one.

On the resin pit for the Dragon kit, there some nice moulded detail on the side walls which i much prefer to the usual PE levers and such. I have had to thin the fuselage sides to fit the rear and front cockpit bulkheads.

On the Revell kit was added the remaining PE and some pasking tape on the gun barrels, the idea coming from PJ's build. The guns in the Revell kit are prety awful bearing no resembelance to the real thing. Good thing they can't be seen. I do like this PE pit, but if i was to do this again or be asked for a suggestion, i would go for the CMK resin pit that PJ has used.

And the ejecion set all ready to slide into place.

And the main wheel bay fitted with PE added. Still got to oput the indentation in one piece.

Then finally time to close up. Still have some seams to clean up and some more to add to the wheel well on the Revell kit.

And both together. The Dragon is the one in front, just in case your woundering.

The engine is down in the shed having been primed and the first paint added. Still some more to add to that. Hopefully will have some pics next time alng with the two aircraft having their wings on.

I am a Norfolk man and i glory in being so


On the bench: Airfix 1/72nd Harrier GR.3/Fujimi 1/72nd Ju 87D-3

  • Member since
    December 2002
  • From: Bury St Edmunds, Suffolk, England
Posted by Bish on Monday, March 20, 2017 2:58 PM

Geting some where with this now. Painting has begun. The Dragon kit went together well with just a bit of filler on the wings and tail cone which i had expected.

And after a coat of primer, got the RLM 76 put on the underside.

because i need to mask for the top colours i left it for a couple of days. Was able to get the RLM 81 on tonight so thats now drying before doing the 82.

But i was able to get a bit further on the Revell kit.

Wings and tail went on really well.

And then after letting it dry for a day i applied the top colours freehand. On both kits i used Xtracolour RLM 76 but colorcoats 81 and 82 as they do the 81 in the brown version rather than green. But this means i'll have to apply a gloss coat before the decals.

I did a bit of tidying up along the edges tonight, so will gloss coat tomorrow.

In the mean time i have been working on the engines. The 2 kit engines have had a primer coat and the aluminium parts painted as well as the rear.

And the HPH is now all painted up. I still have 2 small parts to add plus the intake colwing which i will do at the end. The engine is painted in useing several Alclad colours in some cases mixed.

I can now focus on thge wiring for this while everything else is drying.

And finally, made a start on the dio base for the 72nd kit.

I got the concrete painted tonight so i can get to the celluclay over the next couple of days.

Thanks for looking, more soon.

I am a Norfolk man and i glory in being so


On the bench: Airfix 1/72nd Harrier GR.3/Fujimi 1/72nd Ju 87D-3

  • Member since
    April 2015
Posted by Mopar Madness on Monday, March 20, 2017 5:52 PM

That Dragon kit looks great!!

Chad

God, Family, Models...

At the plate: 1/48 Airfix Bf109 & 1/35 Tamiya Famo

On deck: Who knows!

  • Member since
    December 2002
  • From: Bury St Edmunds, Suffolk, England
Posted by Bish on Tuesday, March 21, 2017 12:56 AM

Cheers MM.

I am a Norfolk man and i glory in being so


On the bench: Airfix 1/72nd Harrier GR.3/Fujimi 1/72nd Ju 87D-3

  • Member since
    March 2015
  • From: Streetsboro, Ohio
Posted by Toshi on Tuesday, March 21, 2017 1:37 AM

As always, exceptional work!

Toshi

On The Bench: Revell 1/48 B-25 Mitchell


Married to the most caring, loving, understanding, and beautiful wife in the world.  Mrs. Toshi


  • Member since
    December 2002
Posted by Bossman on Tuesday, March 21, 2017 5:44 AM

Youve been a busy man Bish.

Interiors and engines look great !

Chris

  • Member since
    December 2002
  • From: Bury St Edmunds, Suffolk, England
Posted by Bish on Tuesday, March 21, 2017 7:28 AM

Cheers guys.

I am a Norfolk man and i glory in being so


On the bench: Airfix 1/72nd Harrier GR.3/Fujimi 1/72nd Ju 87D-3

  • Member since
    December 2002
  • From: Bury St Edmunds, Suffolk, England
Posted by Bish on Tuesday, April 4, 2017 2:25 PM

Quick update as i come to the end of this build. Can't believe its taken me two weeks to get to this, been draging my feet a bit.

So, after painting and a gloss coat, i added the decals then a litle flory wash. Keeping these clean given their very short service life. For the Dragon kit i just used the kit decals.

Revell kit had a mix of kit and Eagle Cal decals.

And got the engine all wired up.

Almost there. Really want to get this wrapped up now, so hopefully just a couple more days.

Thanks for looking, all comments welcome.

I am a Norfolk man and i glory in being so


On the bench: Airfix 1/72nd Harrier GR.3/Fujimi 1/72nd Ju 87D-3

  • Member since
    November 2008
  • From: Central Florida
Posted by plasticjunkie on Tuesday, April 4, 2017 3:03 PM

Great looking models Bish. The engine looks fantastic. 

I finally gave up and ordered  some decals for mine but I have seen the one I'm doing both in one color or the 2 tone green.  Do you have a good source to verify the schemes used on the 162?

 GIFMaker.org_jy_Ayj_O


Too many models to build, not enough time in a lifetime!!

  • Member since
    December 2002
  • From: Bury St Edmunds, Suffolk, England
Posted by Bish on Tuesday, April 4, 2017 3:36 PM

Thanks PJ.

I think the whole colour thing with these is a bit tricky. There was only one offical scheme. 82 on right wing and horizontal tail and 81 on the rest. But there are 2 problems. Not everyone followed the rule, and which version of 81 was it. Even though i have gone brown, i have a feeling it may have been the green one. The Eagle cal decals users the offical scheme and implies the brown version, but most colour plates seem to show green.

I think it really is a case of take your pic. If you have pics of the aircraft your doing, the only 2 things you can be sure of is the demarcation line and which colour for the vdertical surfaces. Here there was some leeway.

I am a Norfolk man and i glory in being so


On the bench: Airfix 1/72nd Harrier GR.3/Fujimi 1/72nd Ju 87D-3

  • Member since
    November 2008
  • From: Central Florida
Posted by plasticjunkie on Tuesday, April 4, 2017 5:54 PM

Bish

Thanks PJ.

I think the whole colour thing with these is a bit tricky. There was only one offical scheme. 82 on right wing and horizontal tail and 81 on the rest. But there are 2 problems. Not everyone followed the rule, and which version of 81 was it. Even though i have gone brown, i have a feeling it may have been the green one. The Eagle cal decals users the offical scheme and implies the brown version, but most colour plates seem to show green.

I think it really is a case of take your pic. If you have pics of the aircraft your doing, the only 2 things you can be sure of is the demarcation line and which colour for the vdertical surfaces. Here there was some leeway.


Thanks Bish. I really see the two color version odd and maybe replacement parts? Who knows since at that stage of the war anything went. Just look at some of the 190s and 109s with nmf and multiple colored lowers. 


 GIFMaker.org_jy_Ayj_O


Too many models to build, not enough time in a lifetime!!

  • Member since
    December 2002
  • From: Bury St Edmunds, Suffolk, England
Posted by Bish on Wednesday, April 5, 2017 4:16 AM

Yep, thats my thinking. And given how tehse werebuilt, that may well explain therather simple scheme, no mottling or splinter pattern. Just paint it up and get it out the door.

I am a Norfolk man and i glory in being so


On the bench: Airfix 1/72nd Harrier GR.3/Fujimi 1/72nd Ju 87D-3

  • Member since
    December 2015
  • From: providence ,r.i.
Posted by templar1099 on Wednesday, April 5, 2017 4:53 AM

Taking a break from a build to build three,you're killin' me. That engine is primo. The reasoning for the color scheme would be nice to pin down.

"le plaisir delicieux et toujours nouveau d'une occupation inutile"

  • Member since
    December 2002
  • From: Bury St Edmunds, Suffolk, England
Posted by Bish on Wednesday, April 5, 2017 4:58 AM

Thanks templar, and tell me about it. I wasgoing to get back to my 4 Rudelkits after this, but have decided to swicth around and get some sanity by just doing one for the RAF GB. Rudel has waited 20 years, another month won't hurt.

I agree, its so differant to what was German standard scheme. But then there are some other aircraft such as 109's which just have 2 colours sprayed all over, even leaving out the blue underneath. It must be a case of getting them done as fast as possable.

I am a Norfolk man and i glory in being so


On the bench: Airfix 1/72nd Harrier GR.3/Fujimi 1/72nd Ju 87D-3

  • Member since
    November 2003
  • From: Naples, FL
Posted by tempestjohnny on Wednesday, April 5, 2017 5:20 AM
Looks great Bish. The nice thing about a subject like yours is who is around now to say if it was brown or green. If you like it that's all that matters


  • Member since
    December 2002
  • From: Bury St Edmunds, Suffolk, England
Posted by Bish on Wednesday, April 5, 2017 5:31 AM

tempestjohnny
Looks great Bish. The nice thing about a subject like yours is who is around now to say if it was brown or green. If you like it that's all that matters
 

Thats whats i figure. All the pics are B&W and its the right RLM code and i do like that brown.

I am a Norfolk man and i glory in being so


On the bench: Airfix 1/72nd Harrier GR.3/Fujimi 1/72nd Ju 87D-3

  • Member since
    November 2010
  • From: Florida-West Central
Posted by Eagle90 on Wednesday, April 5, 2017 5:32 AM

You!......Doing a 1/32?!......Wha?!...:0

Just kidding (you know I have to dog you about that)...they look awesome Bish.  Great work mate!

Bobby


  • Member since
    December 2002
  • From: Bury St Edmunds, Suffolk, England
Posted by Bish on Wednesday, April 5, 2017 5:40 AM

Cheers buddy. Better prepare yourself, i should have a couple more of these large ones on the bench this year. I can hear a big Stuka with big cannon calling my name.

I am a Norfolk man and i glory in being so


On the bench: Airfix 1/72nd Harrier GR.3/Fujimi 1/72nd Ju 87D-3

  • Member since
    November 2010
  • From: Florida-West Central
Posted by Eagle90 on Wednesday, April 5, 2017 5:42 AM

Bish

Cheers buddy. Better prepare yourself, i should have a couple more of these large ones on the bench this year. I can hear a big Stuka with big cannon calling my name.


STUKA!!!!  I can't wait to see that one!  Love them Stukas!


  • Member since
    December 2002
  • From: Bury St Edmunds, Suffolk, England
Posted by Bish on Friday, April 7, 2017 4:05 PM

Time to wrap this up. The final stage was adding canopy engine undercarrage and a few finaltouches and then get them on there bases. For the Dragon kit a very simple dio. The engine intake is shown in several colours and i went for the red option as i rather like that.

As with red 1, the intake on yellow 11 i have seen in a couple of colours and i wnet for the NMF option.

And finnaly the engine. Again, went for the red cowling. The part underneath is supposed to mate up with the back of the intake. Buts its a touch to long, maybe i took to much of one of the engine sections, and it doesn't curve up. I tried to force it but no go and i didn't wnat to break anything so decided to leave as is.

And all 3 together.

And i decided to get a pic of the two German engine together. I have been hoping they wouldproduce some new ones, a Jumo 211 would be my choice, but so far nothing new. But i live in hope.

Glad to have these done, somthing a bit differant. But now to a bit of normality.

Thnaks for following along. All comments welcome as always.

I am a Norfolk man and i glory in being so


On the bench: Airfix 1/72nd Harrier GR.3/Fujimi 1/72nd Ju 87D-3

JOIN OUR COMMUNITY!

Our community is FREE to join. To participate you must either login or register for an account.

SEARCH FORUMS
FREE NEWSLETTER
By signing up you may also receive reader surveys and occasional special offers. We do not sell, rent or trade our email lists. View our Privacy Policy.