SEARCH FINESCALE.COM

Enter keywords or a search phrase below:

Tamiya 1/48 Wild-Canal Guadal-Cat

4203 views
39 replies
1 rating 2 rating 3 rating 4 rating 5 rating
  • Member since
    July 2003
  • From: Cincinnati, Ohio
Tamiya 1/48 Wild-Canal Guadal-Cat
Posted by ridleusmc on Wednesday, June 14, 2017 9:08 PM

Hello Everybody,

I picked up Tamiya's 1/48 F4F-4 Wildcat from a vendor table at a local show, and I was very excited to build it.  The reviews were very consistent, and most reviewers liked the kit.  Each reviewer did mention the very thick decals.  

I didn't want to spend any money on aftermarket stuff for this project.  I've been doing that too much lately, but I did want to make some improvements.  

One thing that I missed is the cockpit floor of the kit isn't correct.  It should be cut out along the sides from the bases of the instrument panel and the aft bulkhead.  This is to allow the pilot to be able to use the windows on the underside of the fuselage.  I read about this detail too late, but I'm generally happy with the pit.  The seatbelt is the only addition, and it's from an old photo etch set from another project.  
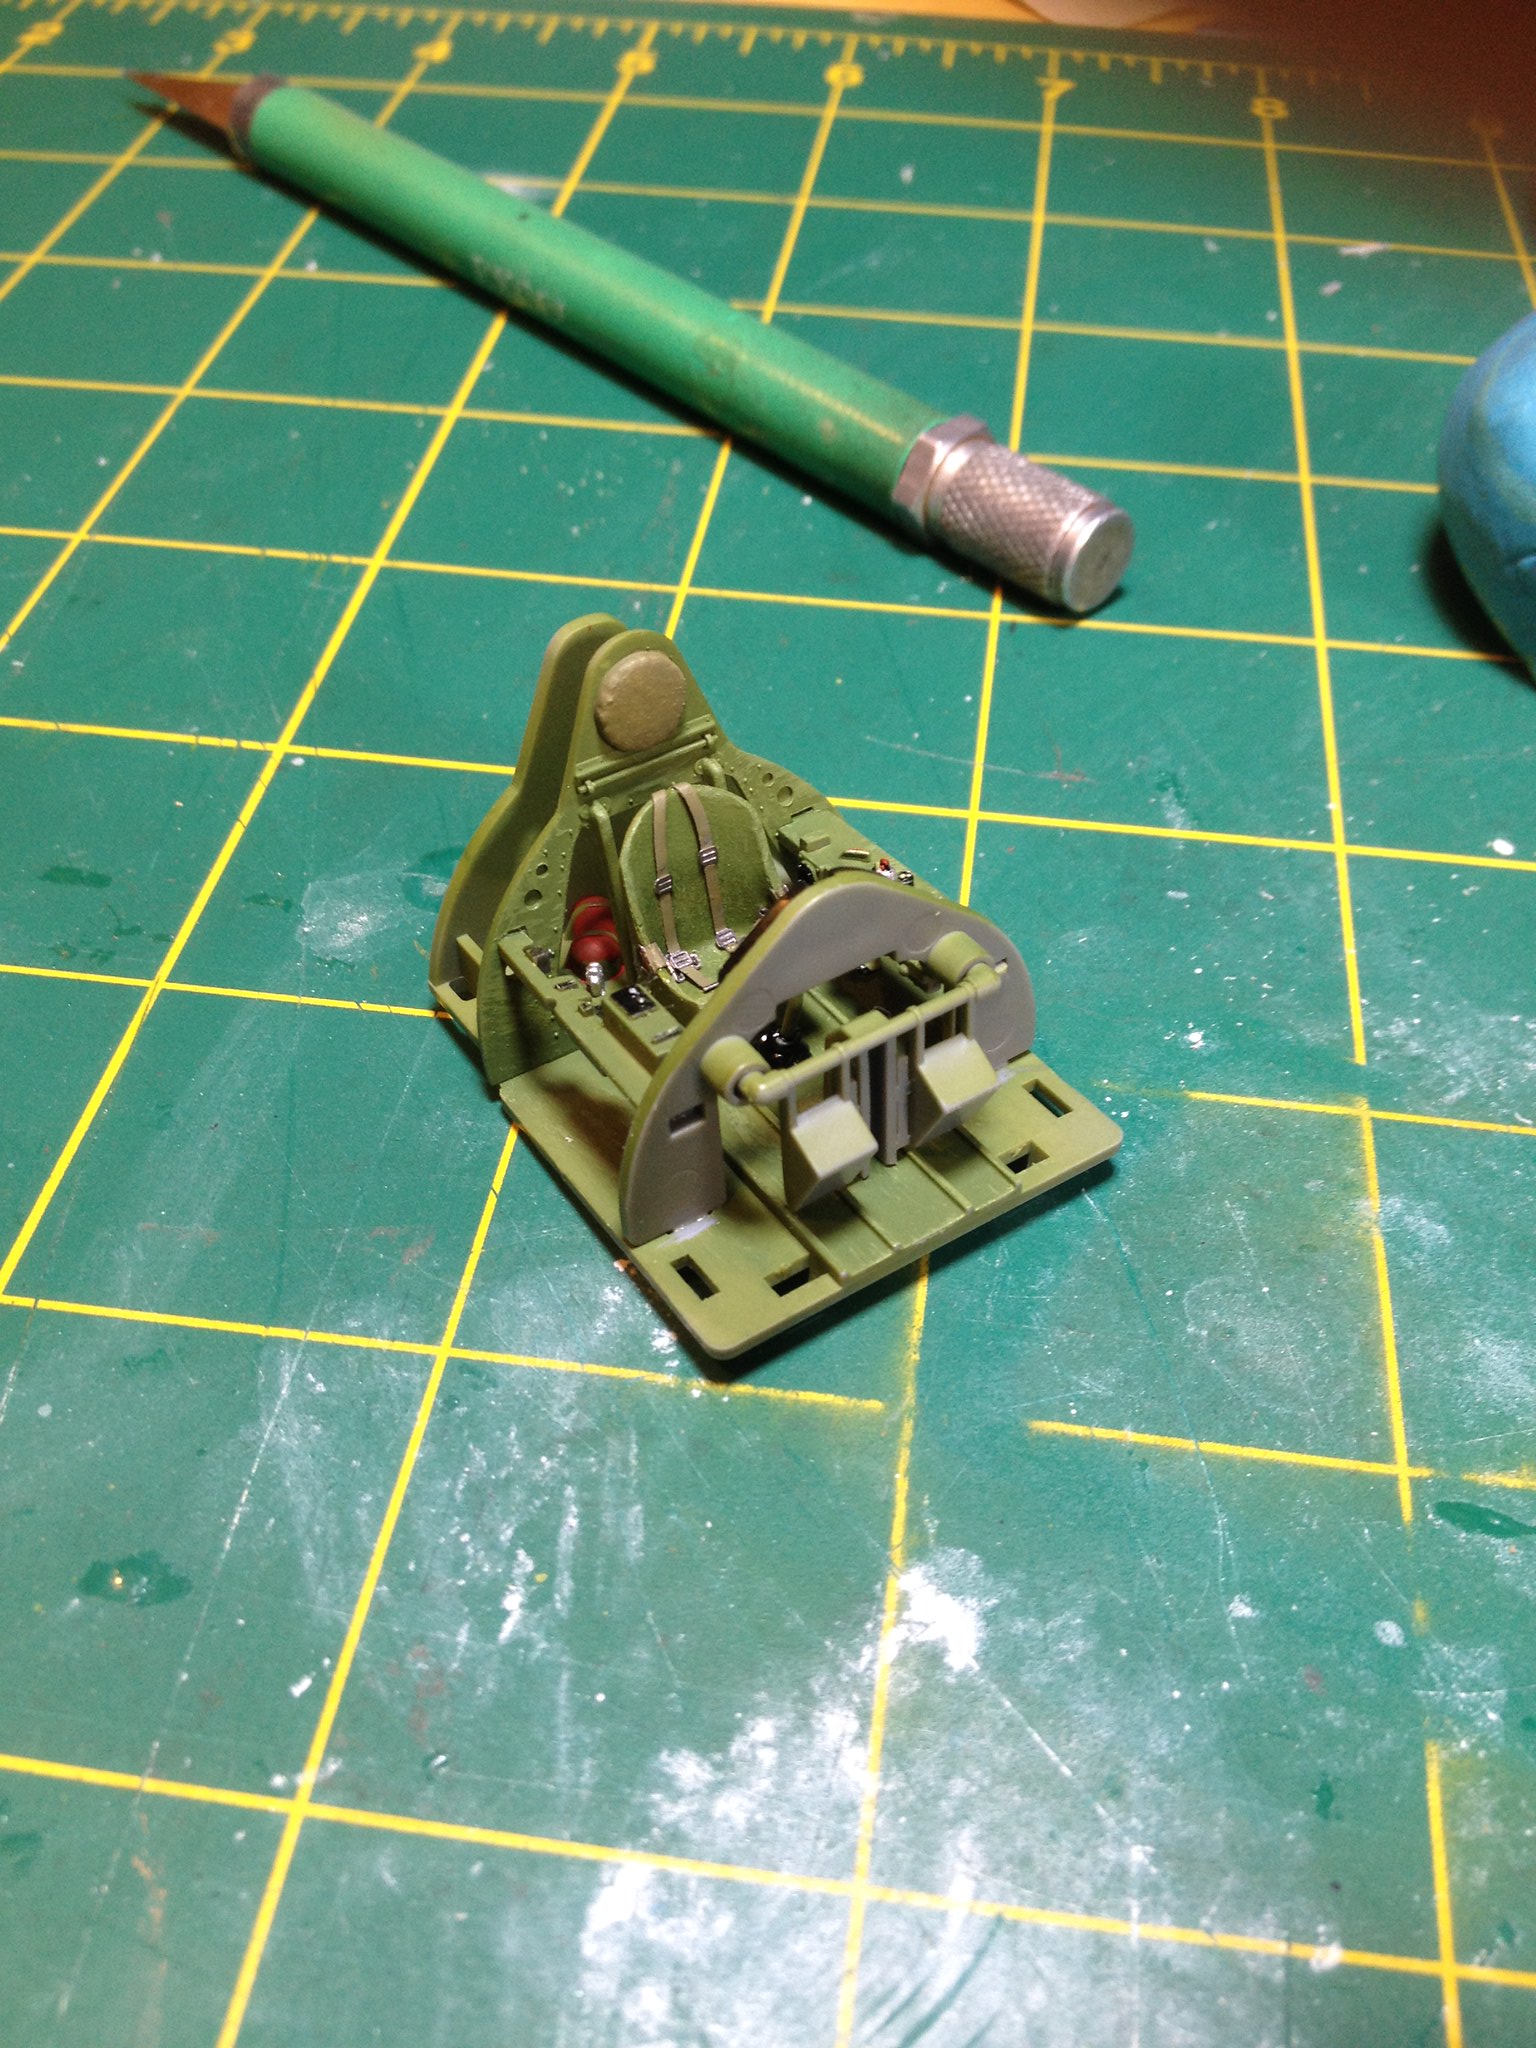
 IMG_1818 by Christopher Ridle, on Flickr
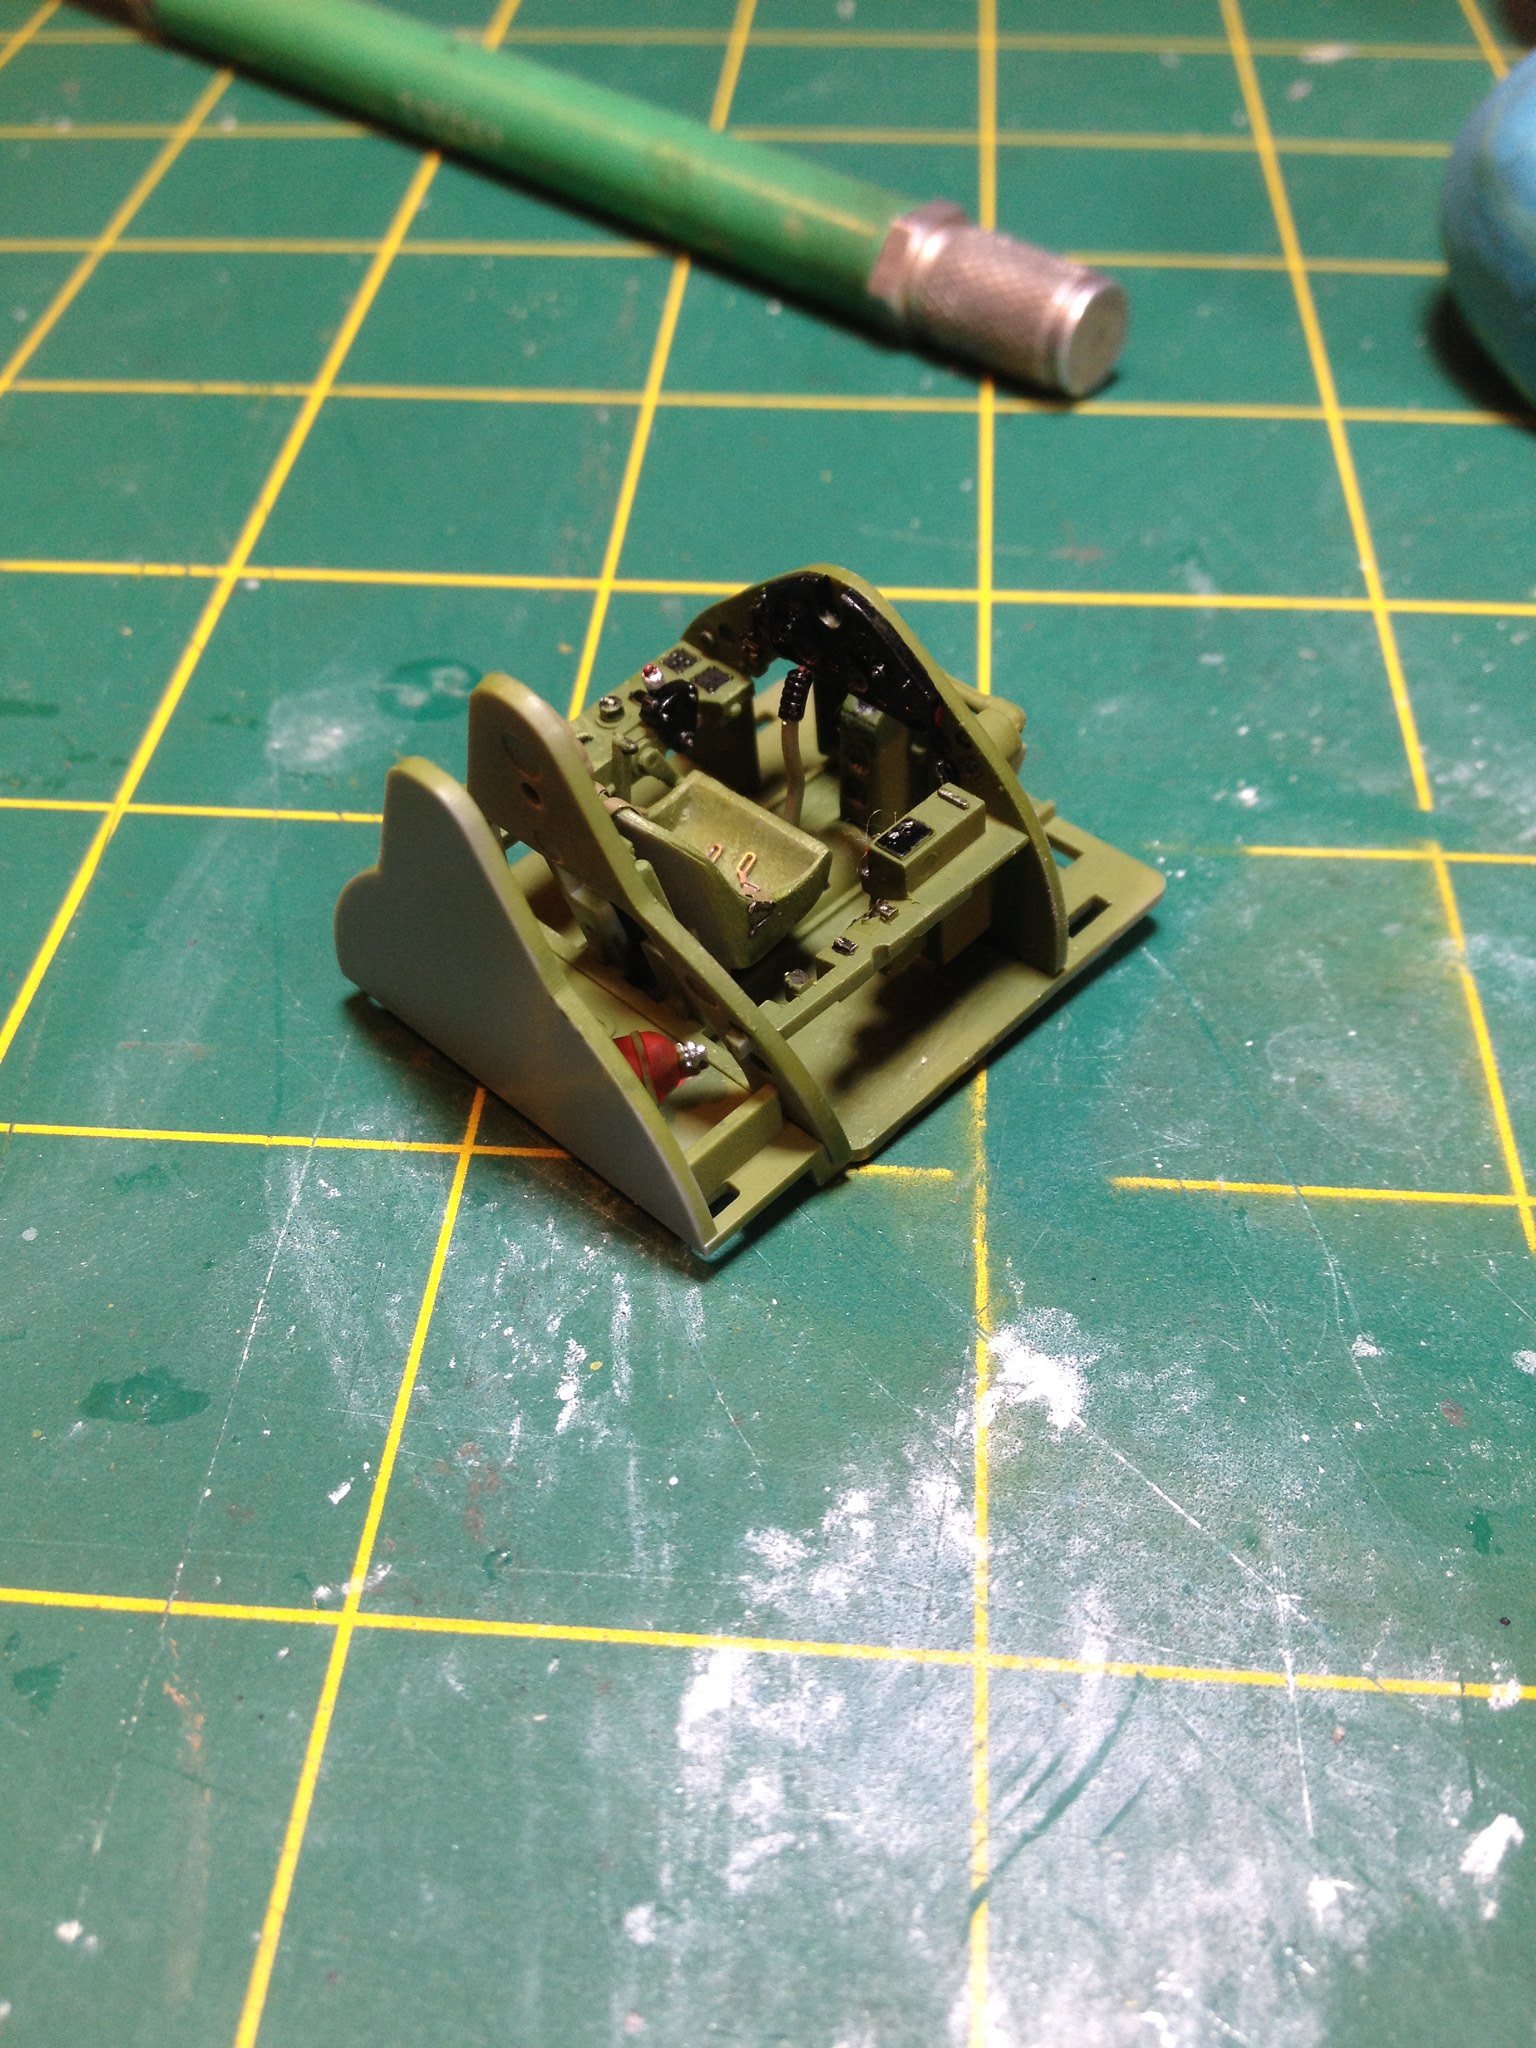
 IMG_1819 by Christopher Ridle, on Flickr

I wanted to pose the Wildcat as it would have sat on the flightline of Henderson Field on Guadalcanal in the autumn of 1942.  The aircraft in the pictures tended to have off-center rudders, drooping elevators, and open cowl flaps.  Cuts were made.  
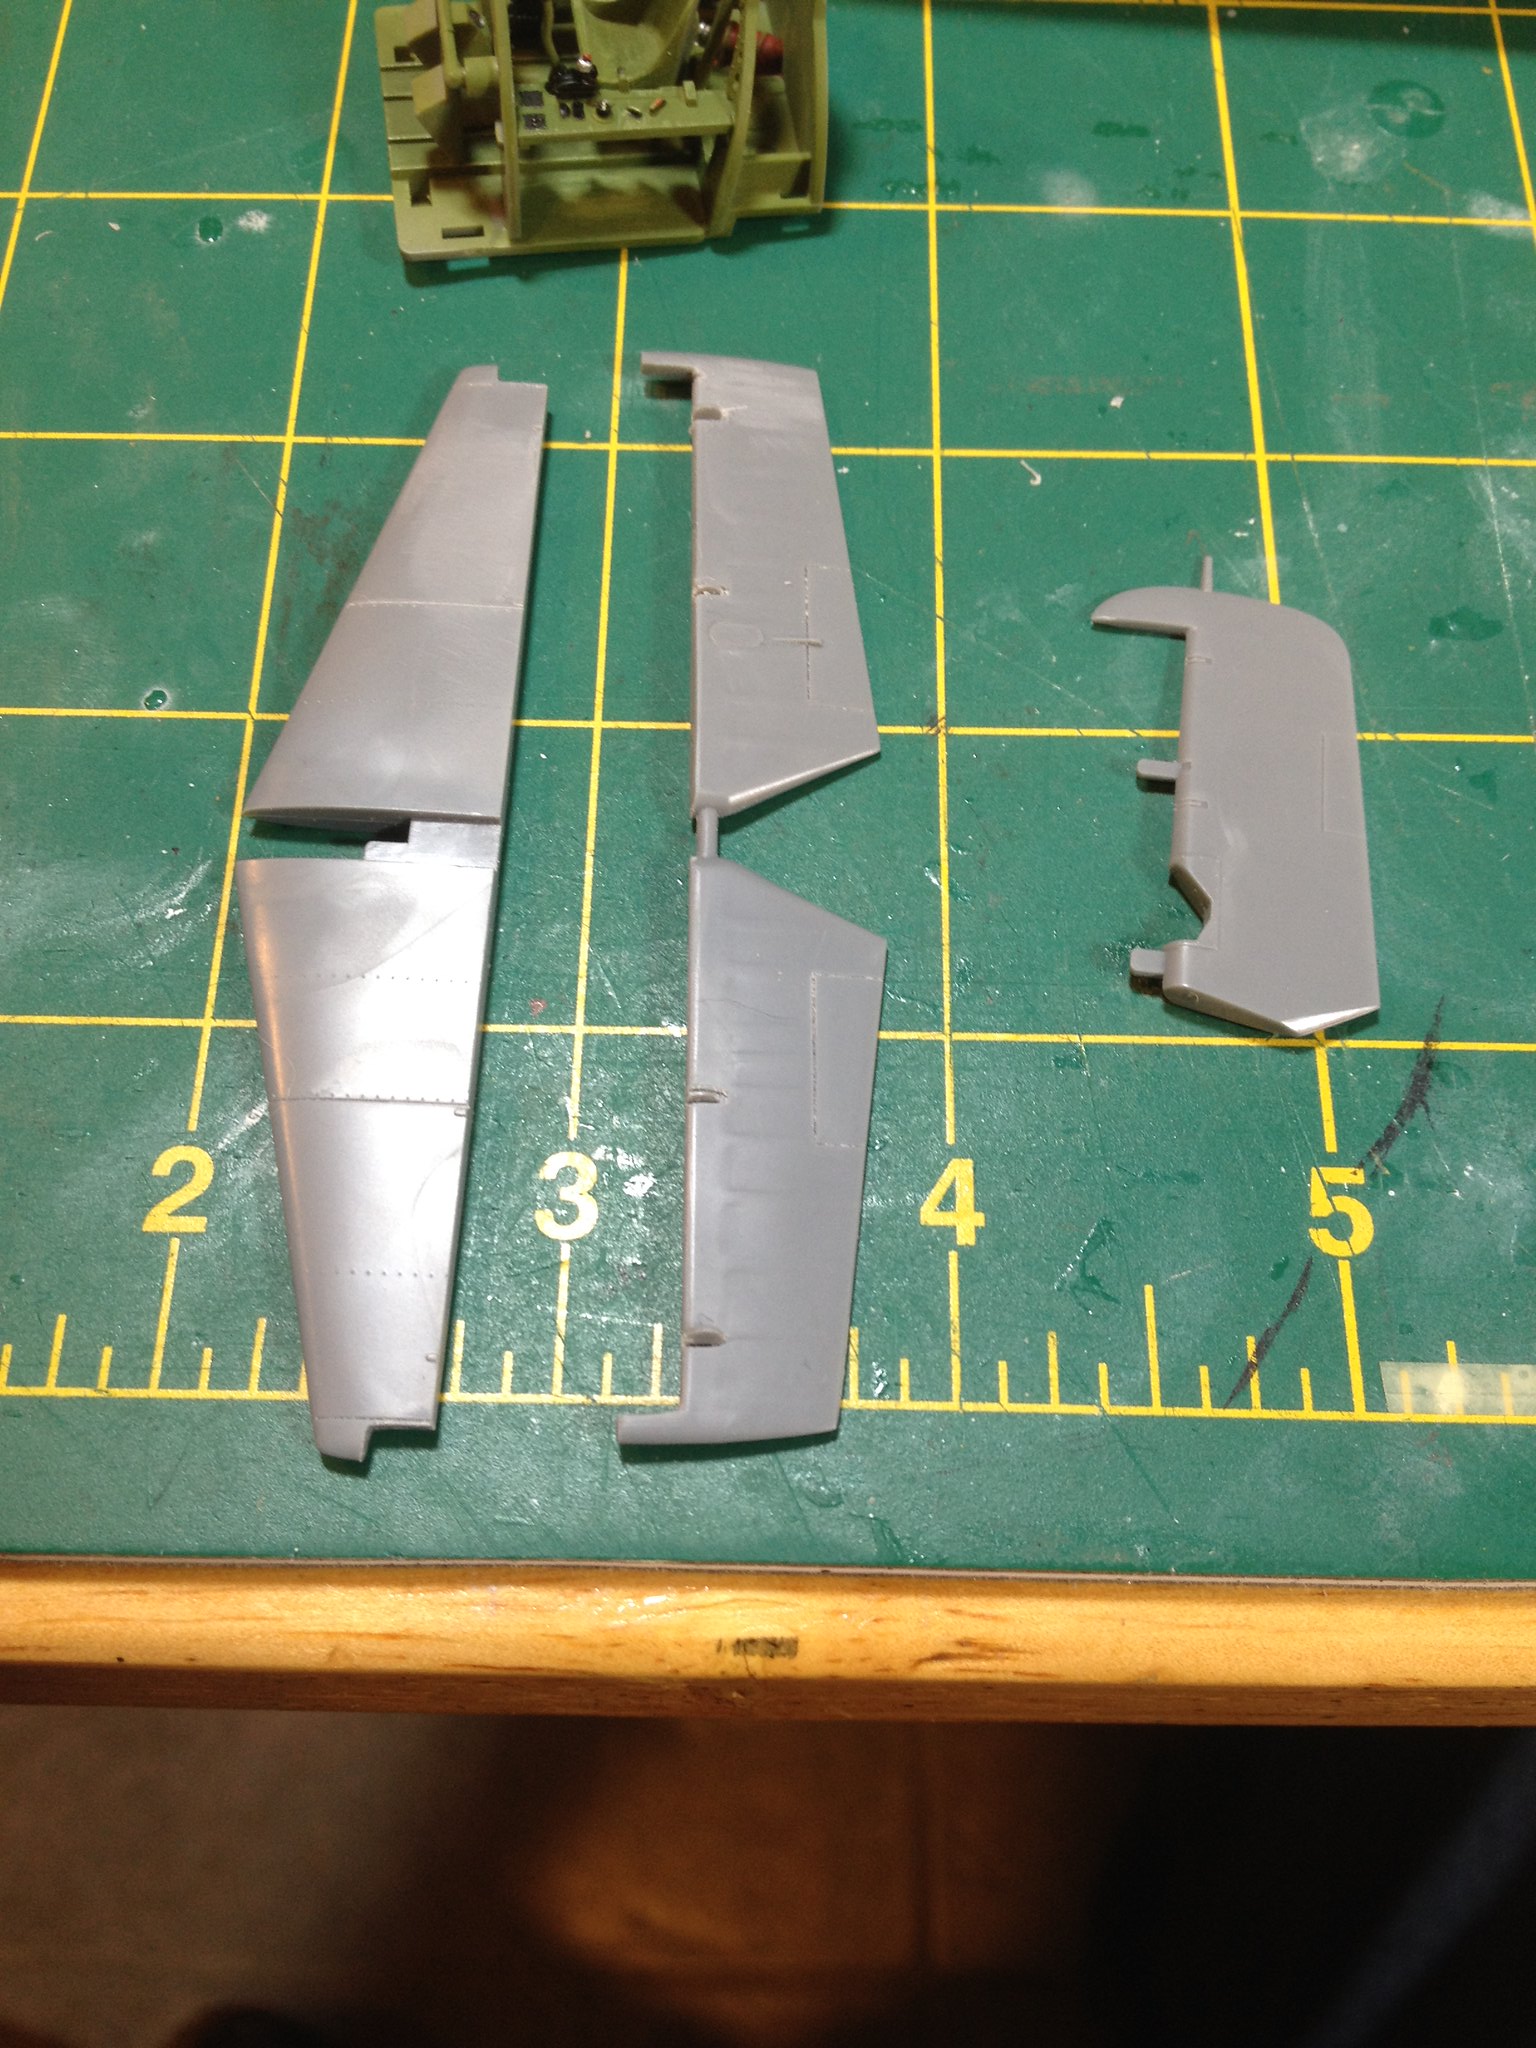
 IMG_1796 by Christopher Ridle, on Flickr
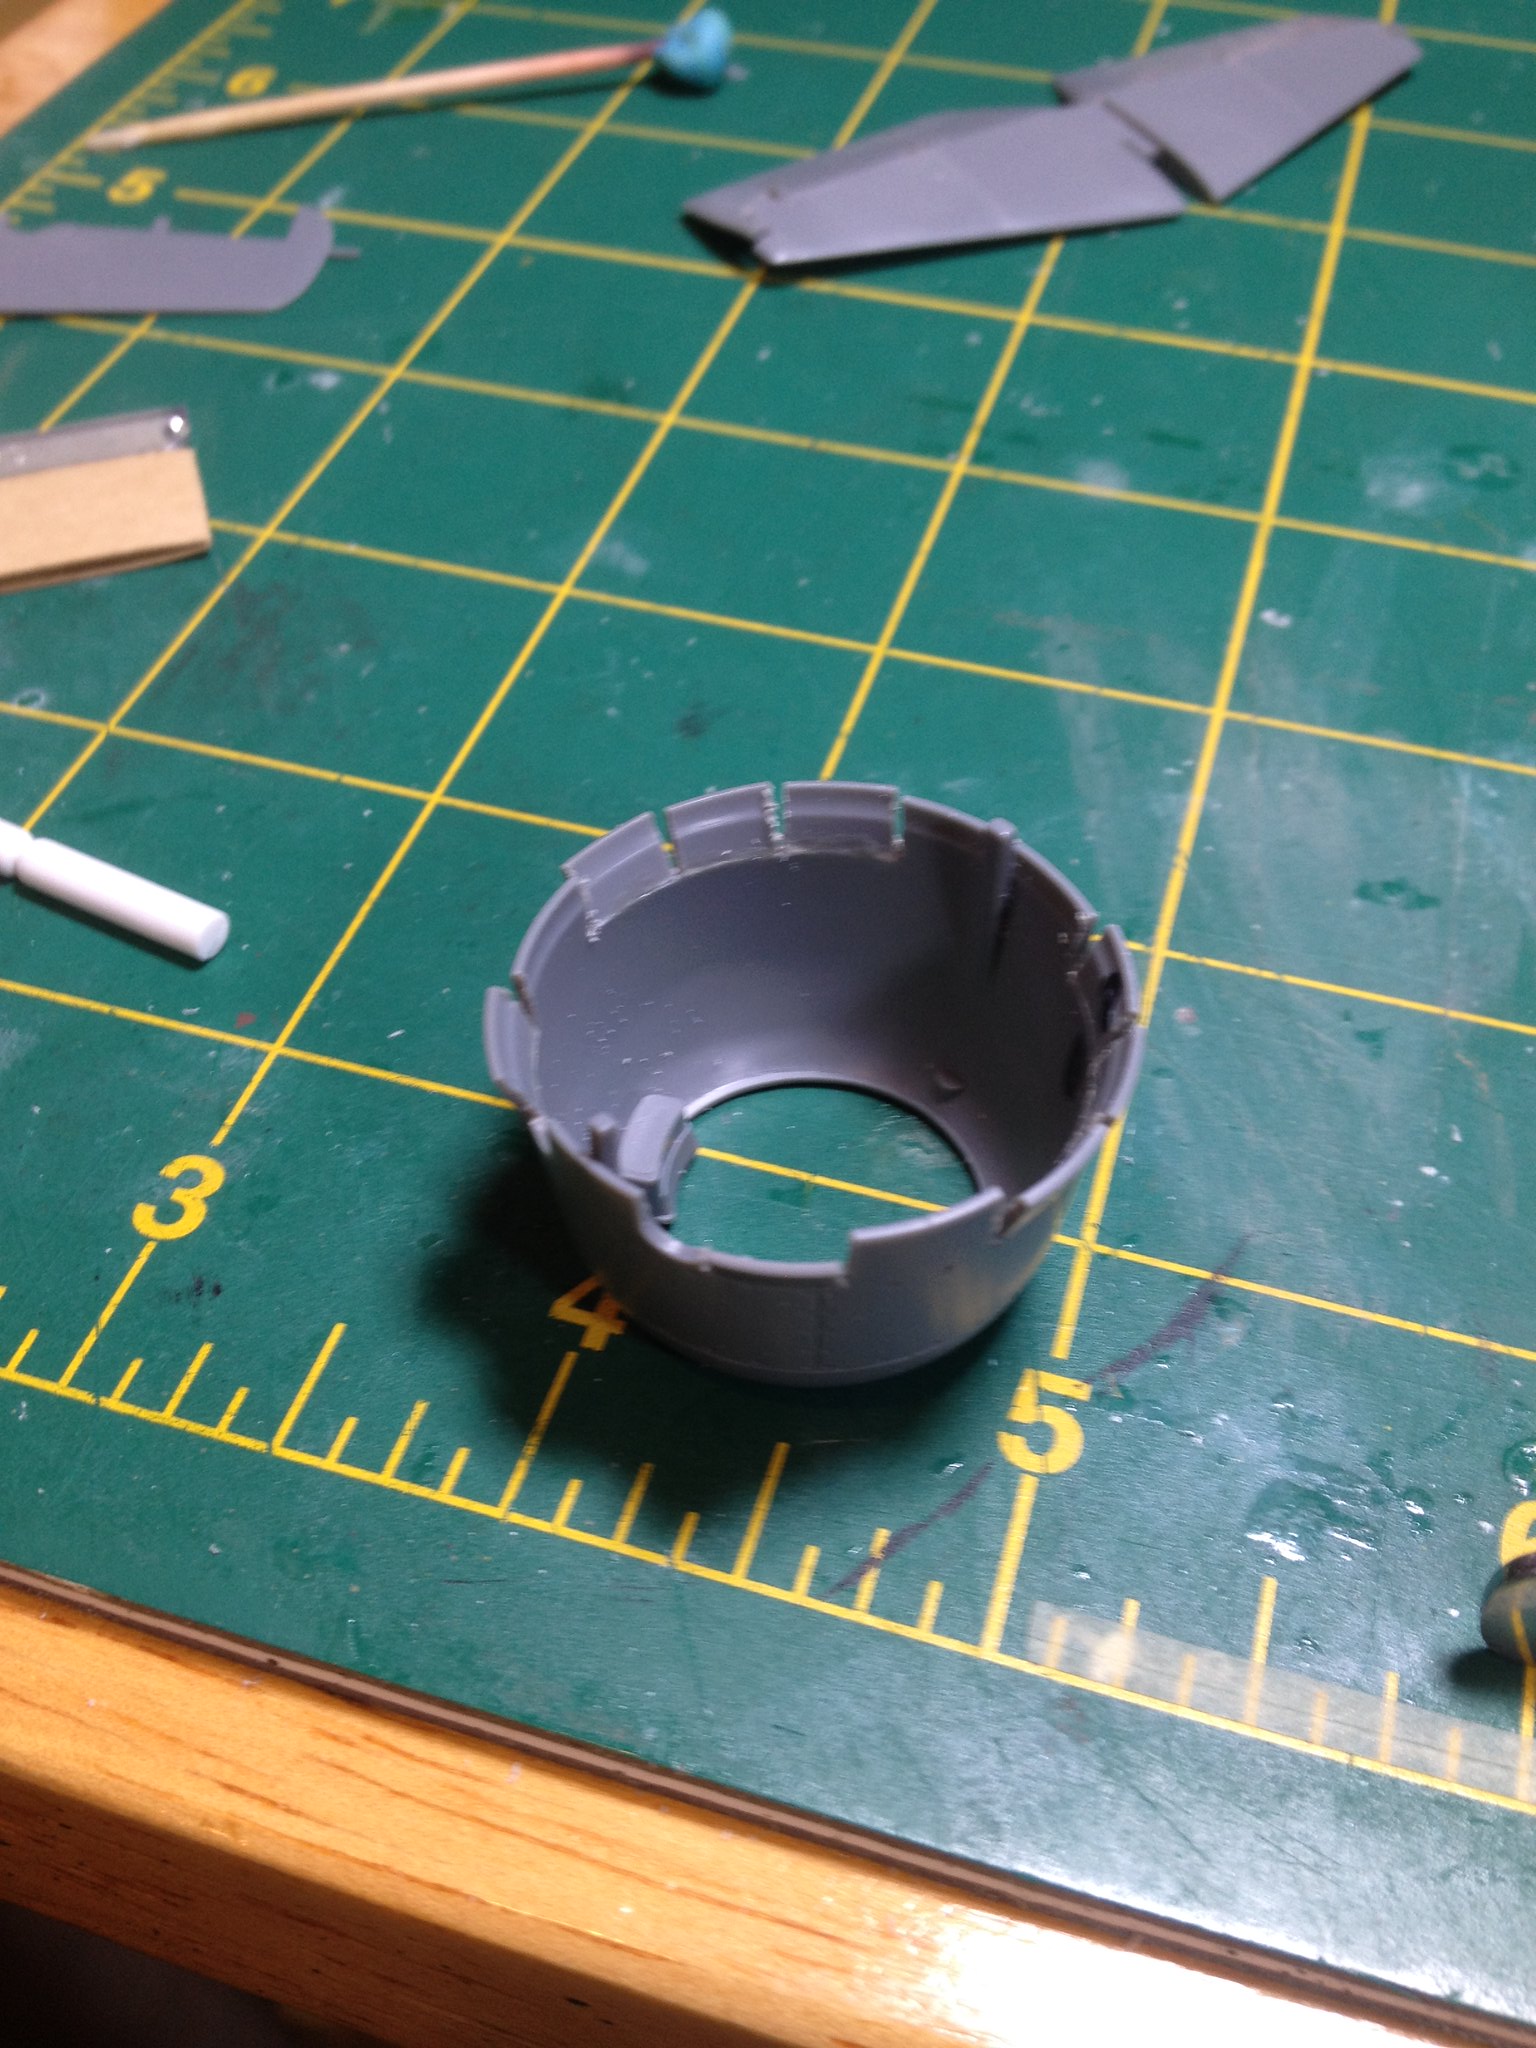
 IMG_1822 by Christopher Ridle, on Flickr

Other than the modifications, construction was straight forward.  Finishing was fun.  I wanted to try black basing as described by doog.

https://doogsmodels.com/2014/07/03/technique-black-basing/
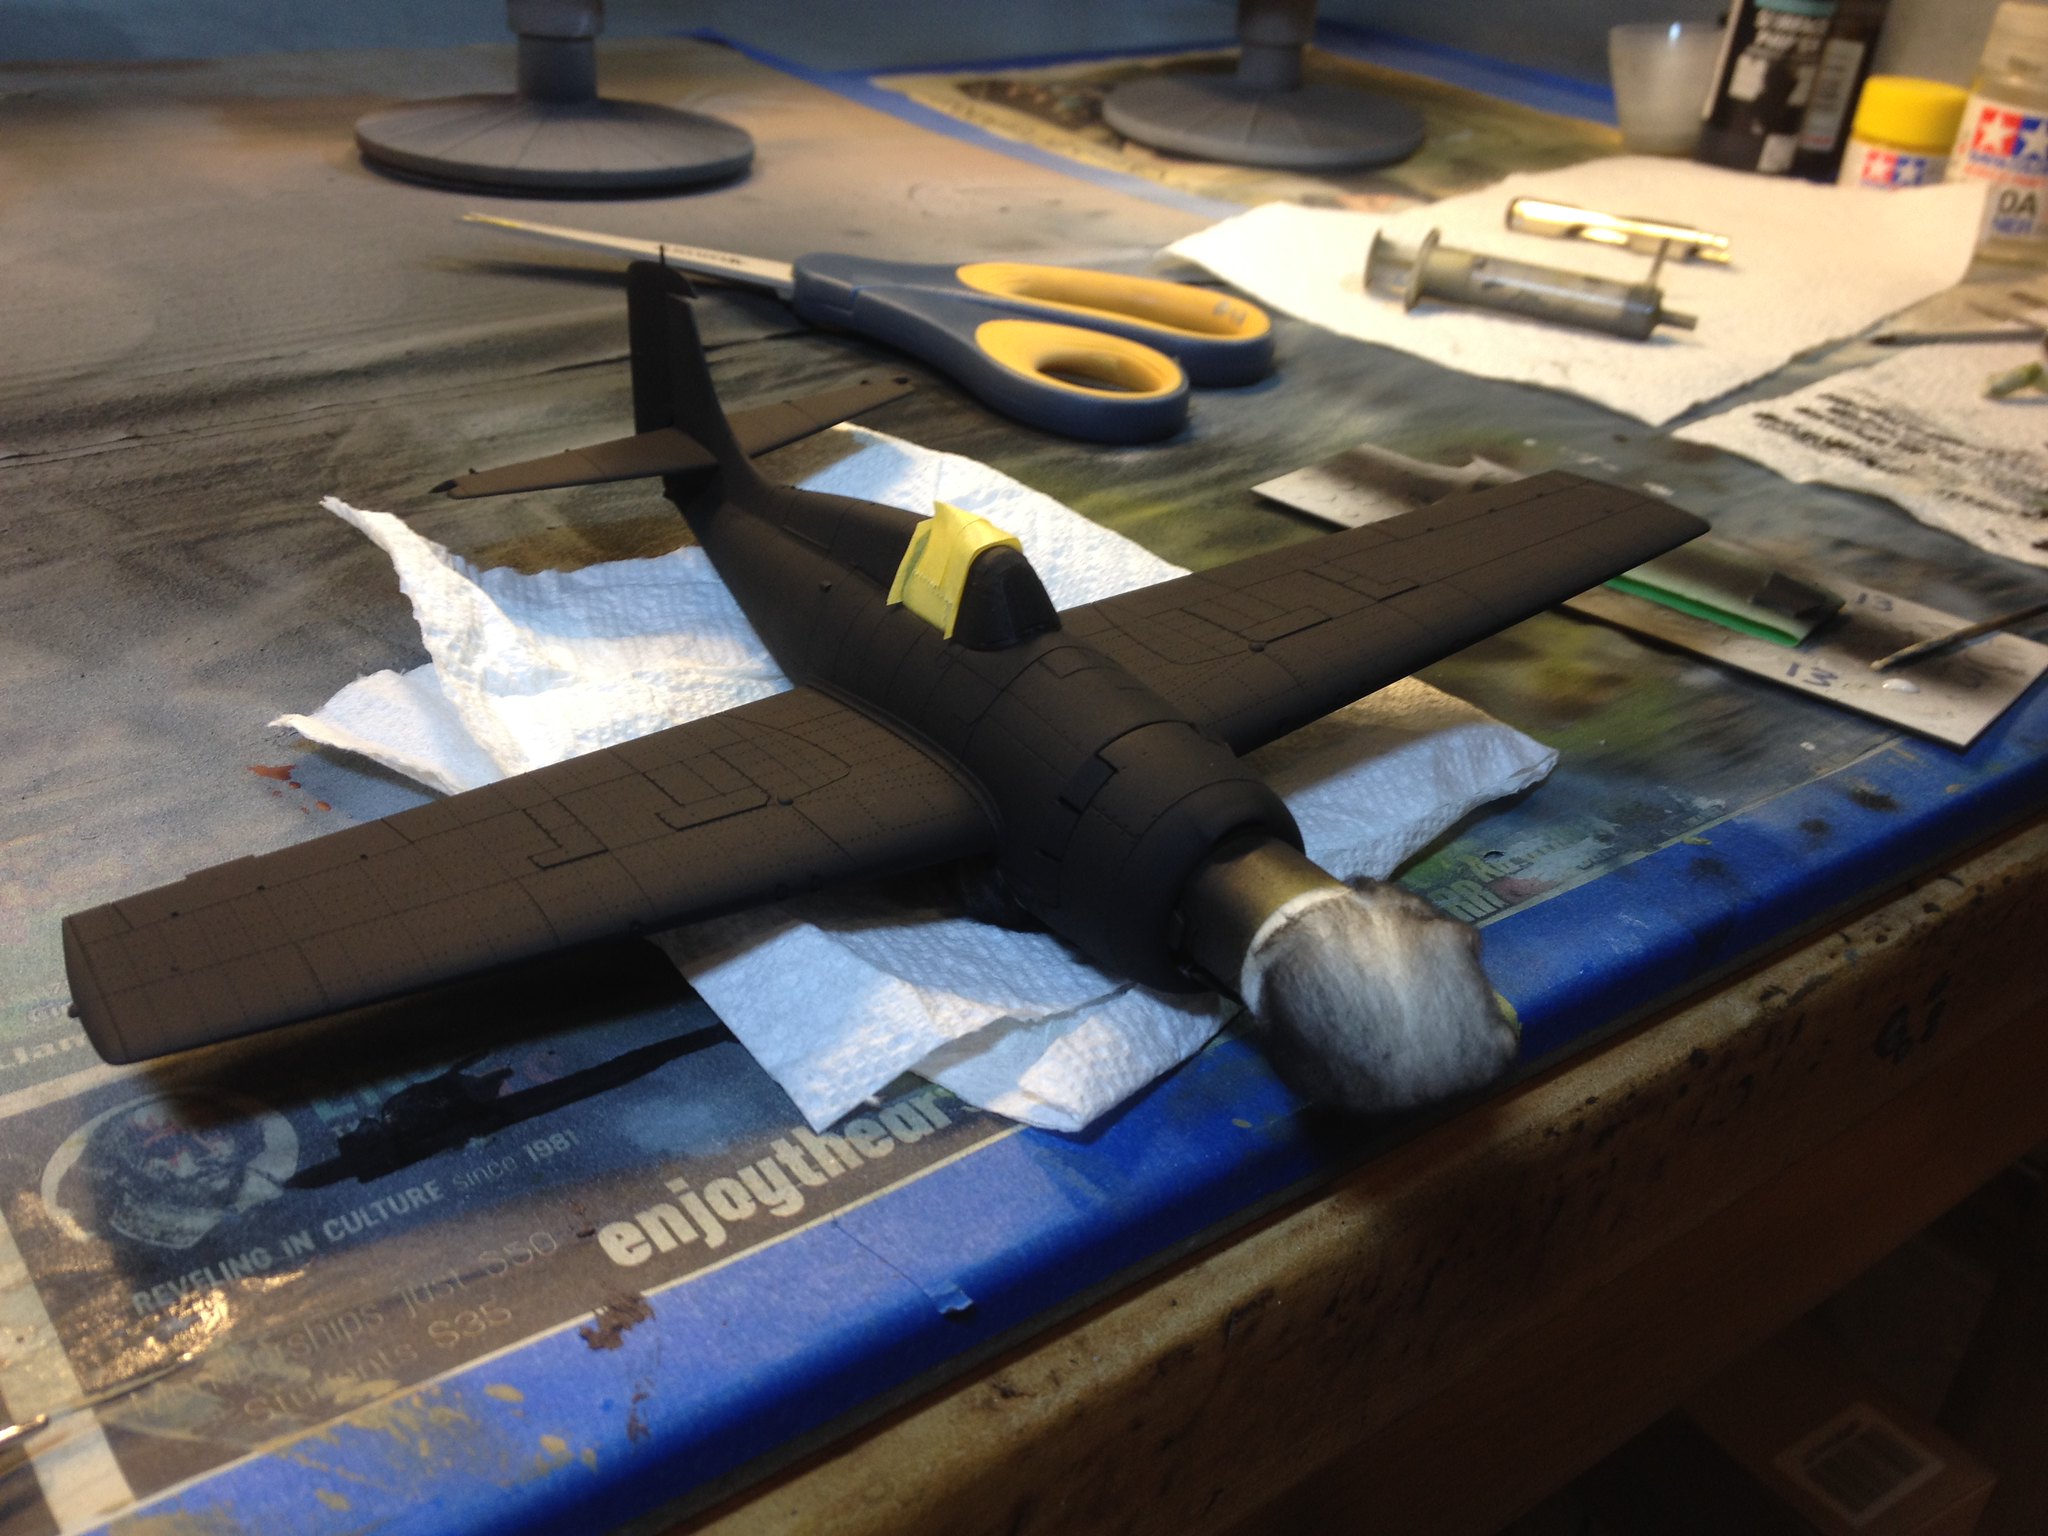
 IMG_1837 by Christopher Ridle, on Flickr

I don't think I got the technique 100% correct, but I was pretty happy with the results. 
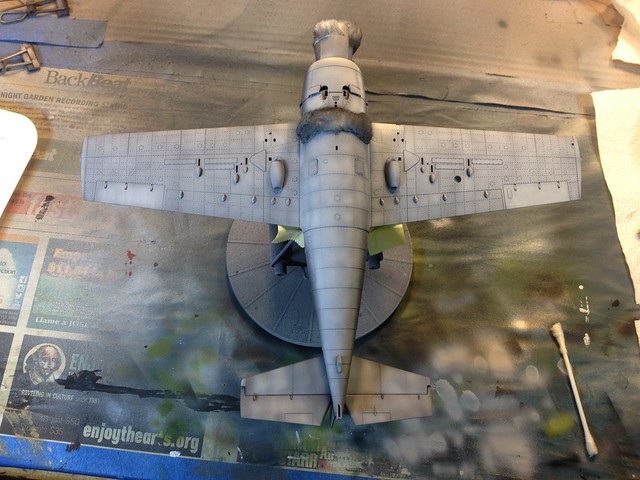
 IMG_1838 by Christopher Ridle, on Flickr
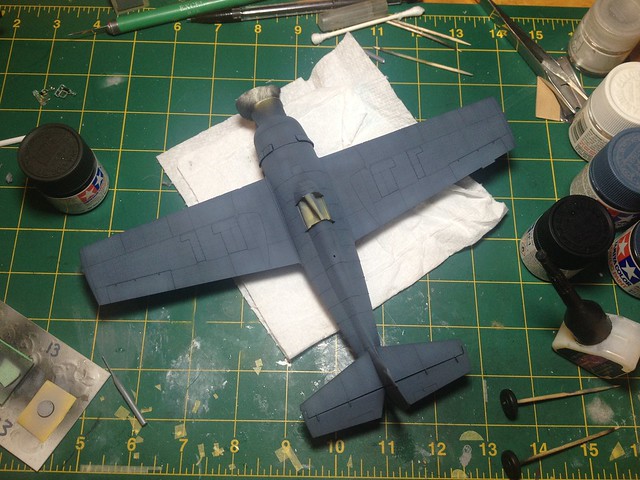
 IMG_1839 by Christopher Ridle, on Flickr

Decals, I hate the decals. They're thick and they don't want to settle in.  This is while using Micro Set in applying the decals, and while using Micro Sol after applying them.   
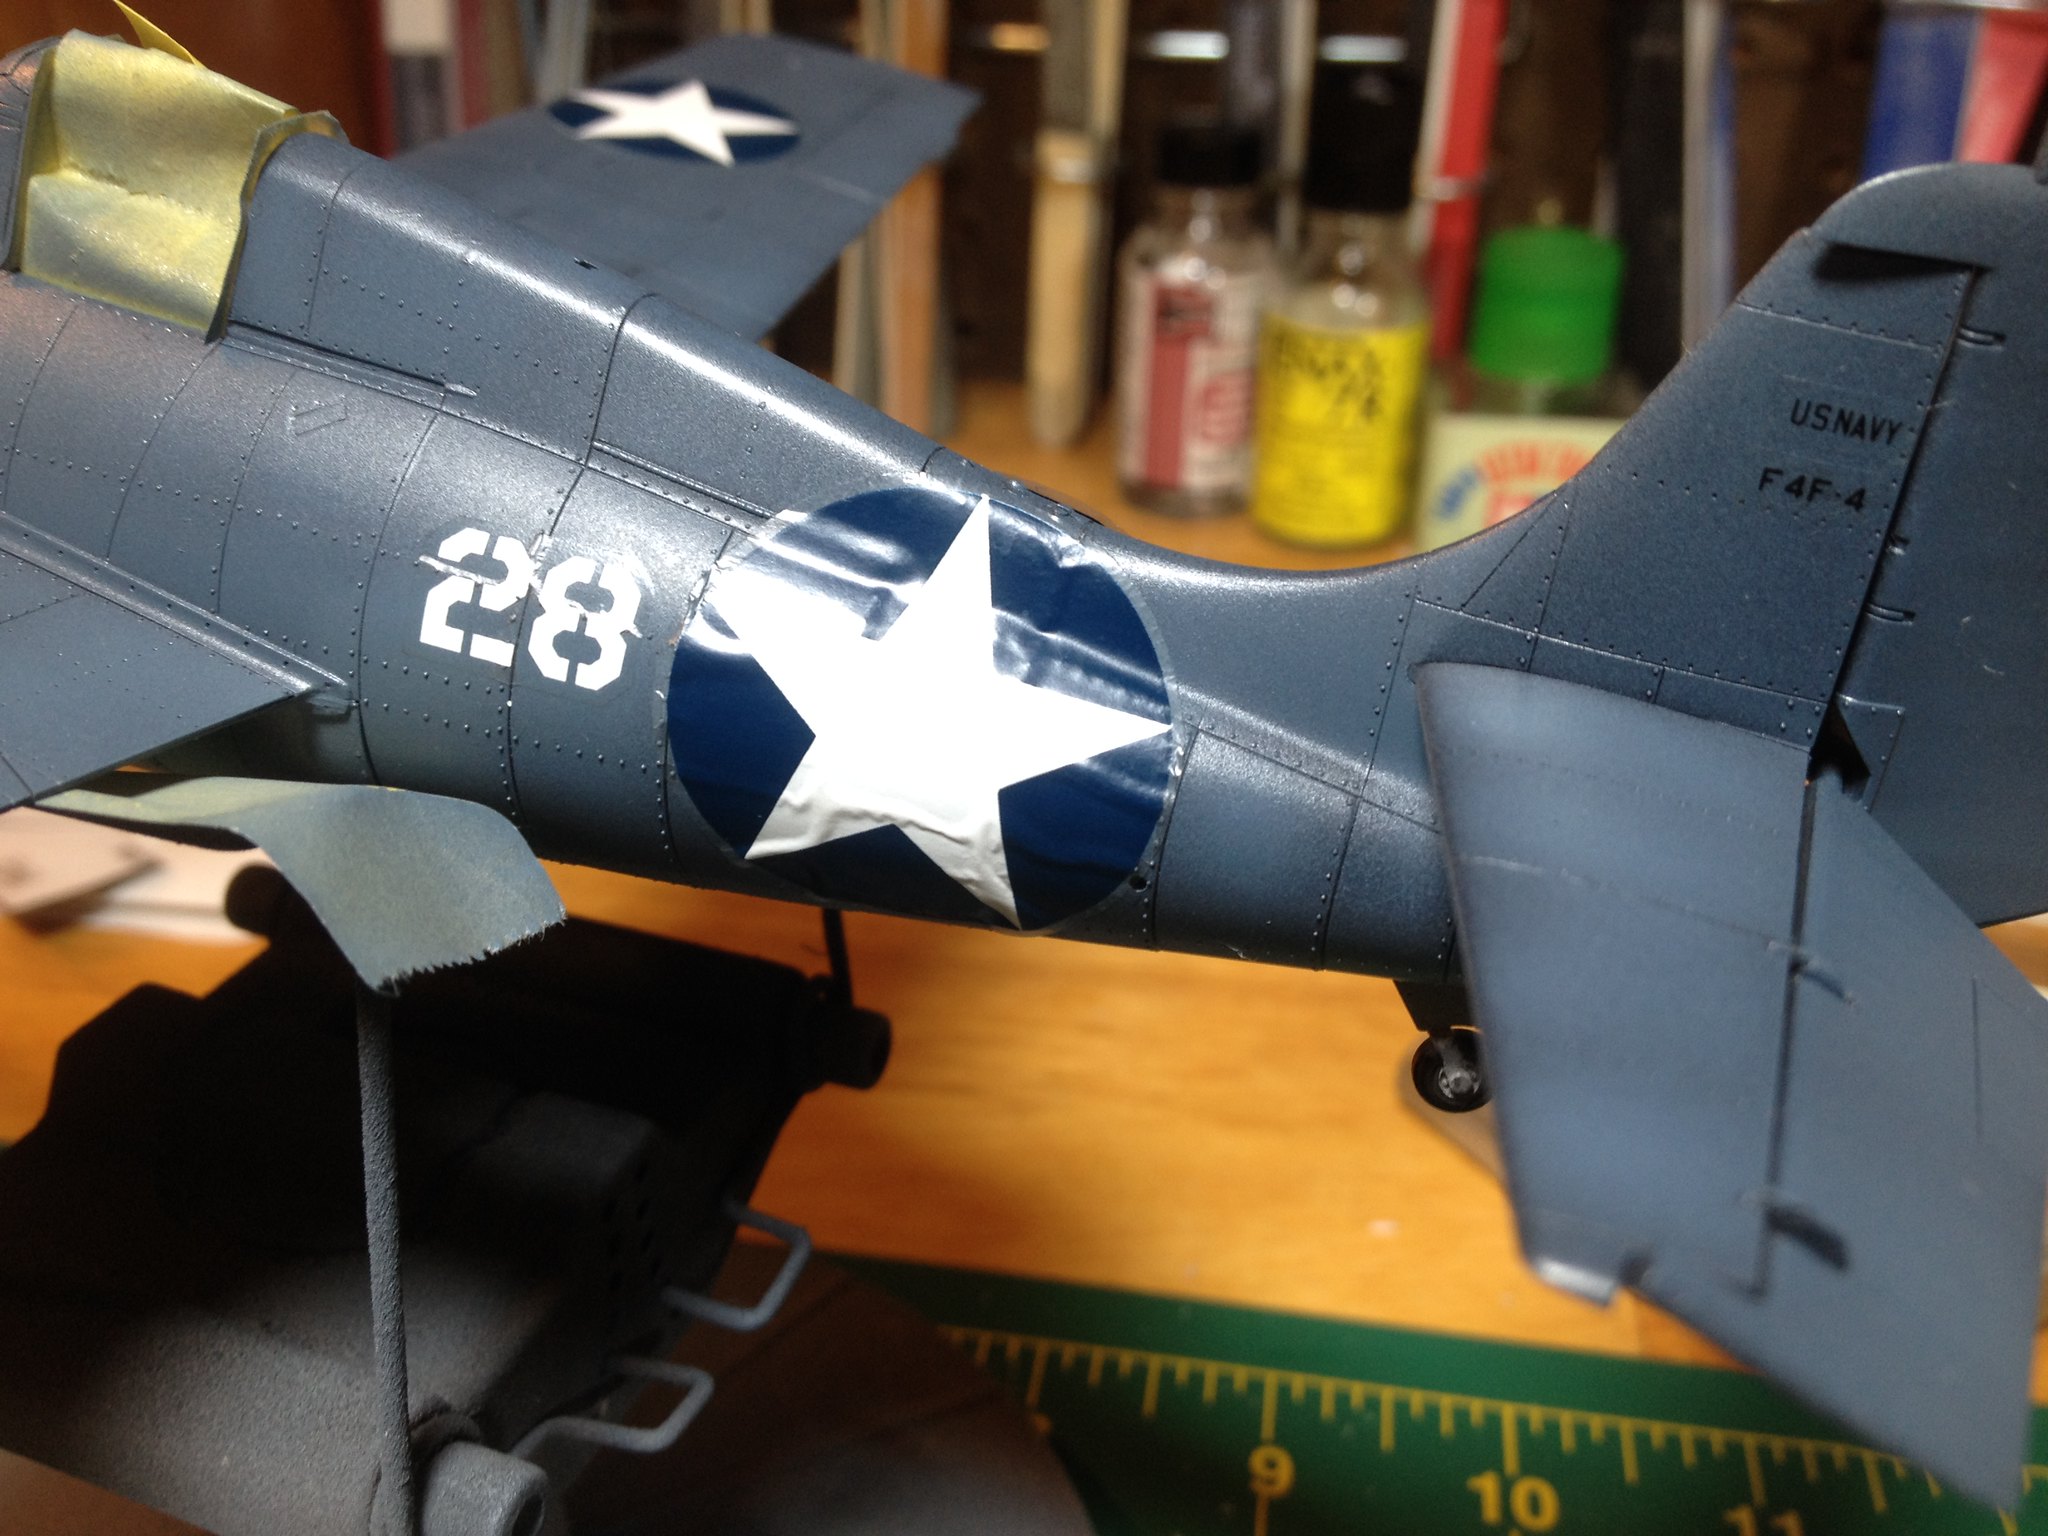
 IMG_1857 by Christopher Ridle, on Flickr

And, notice the white edges of the upper wing star decals.  
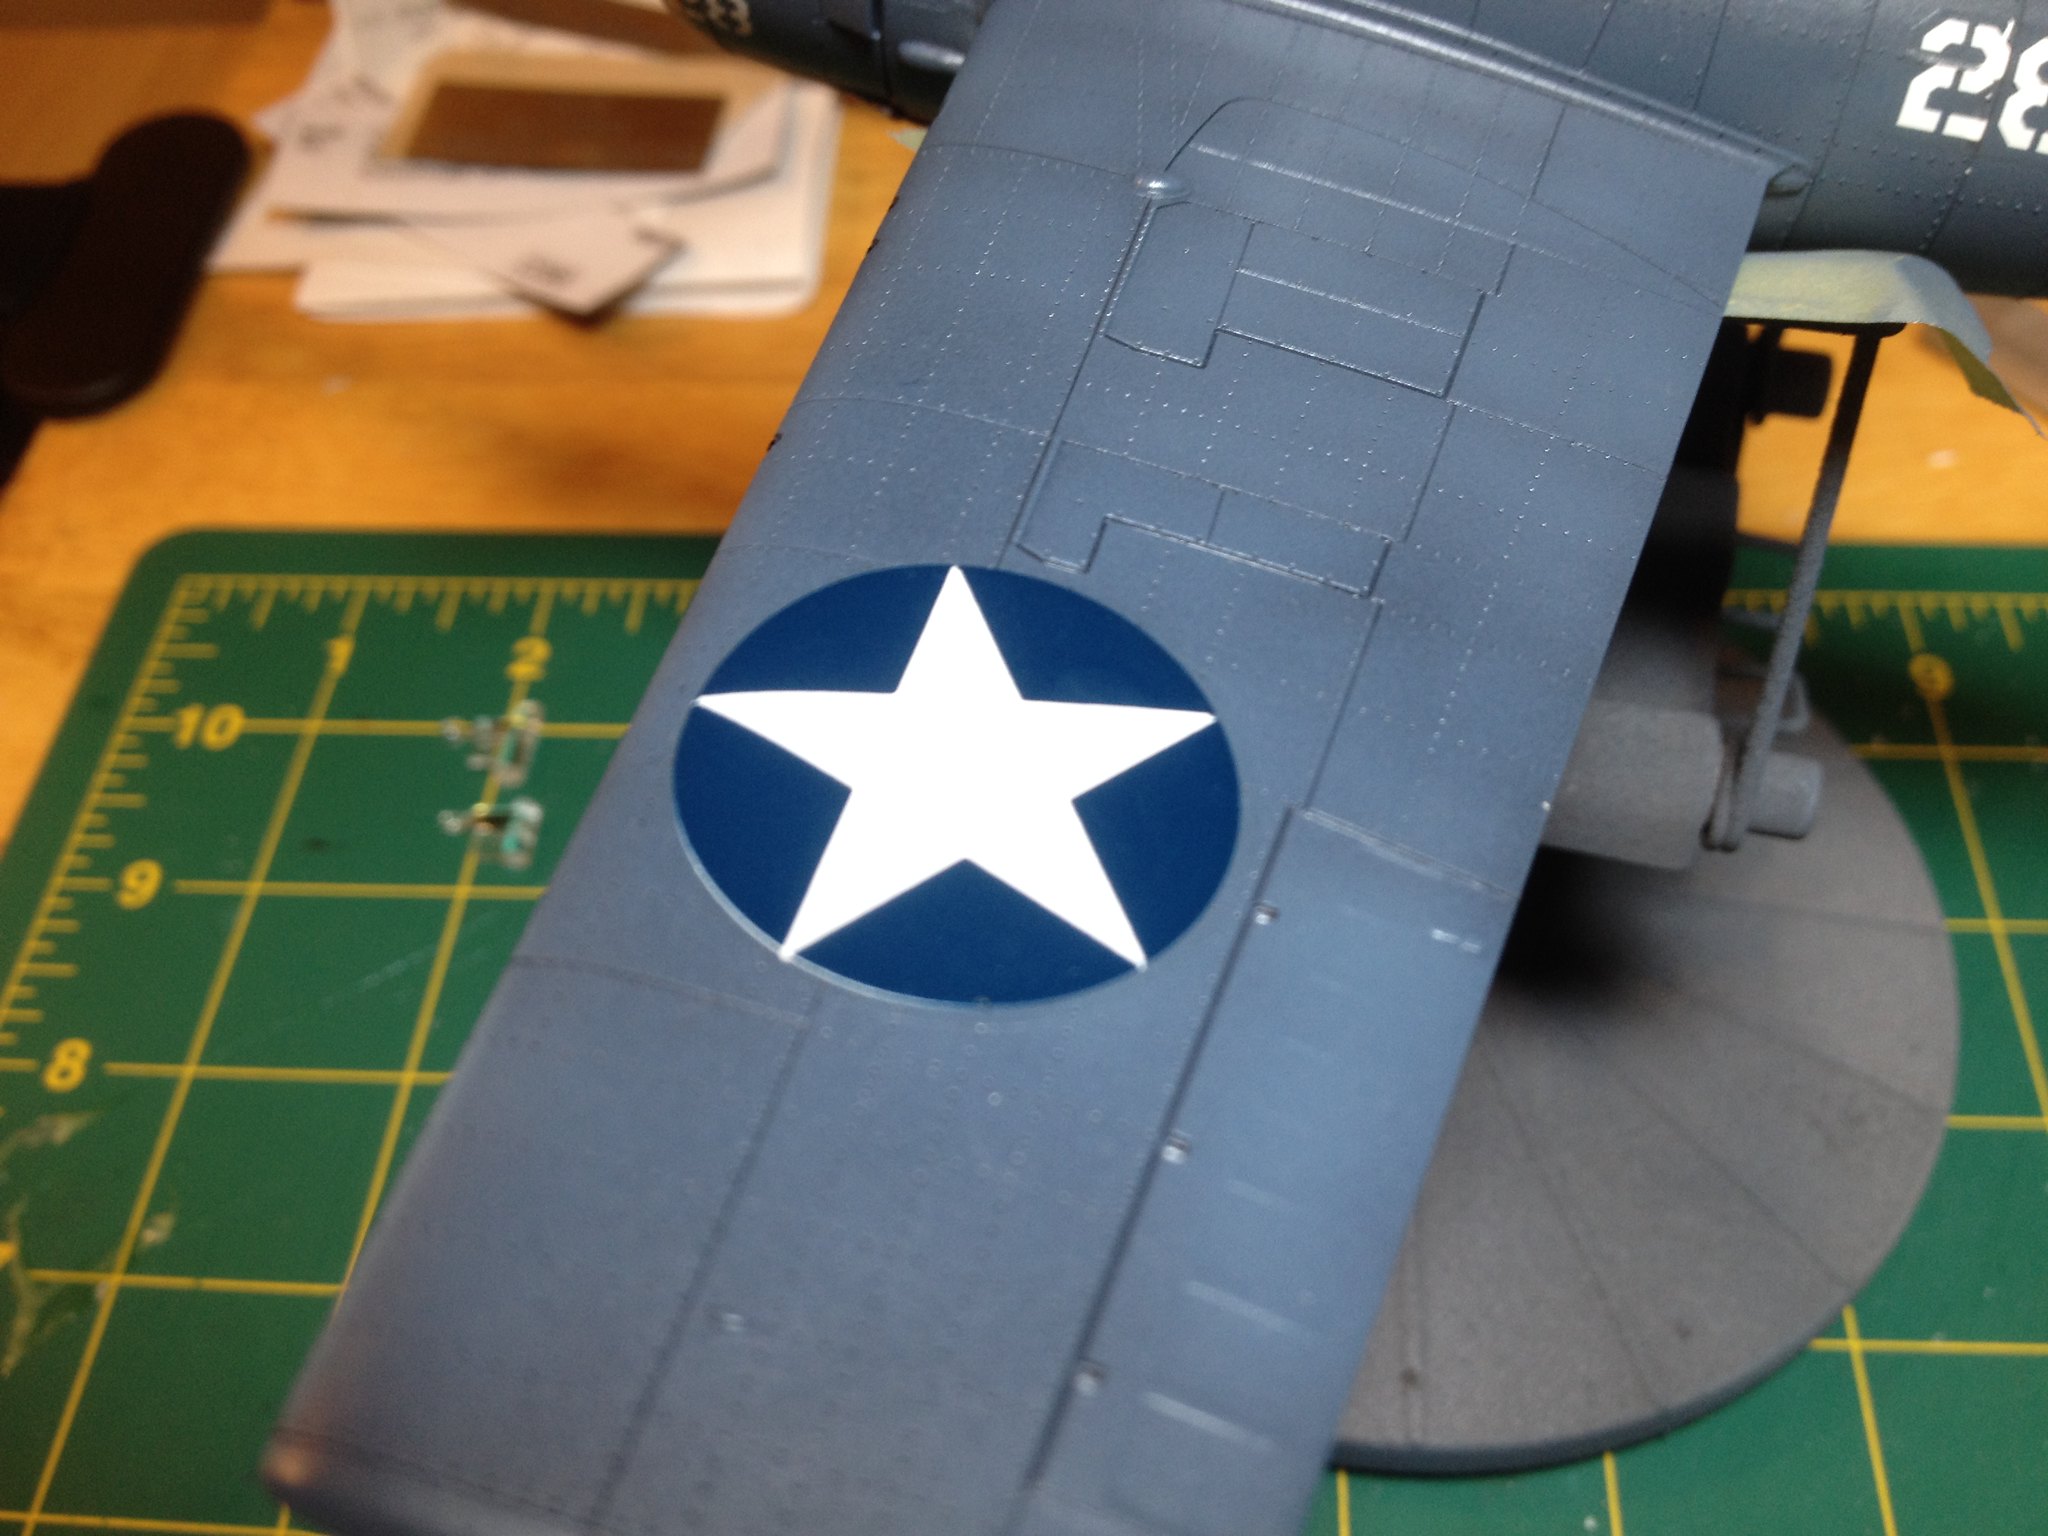
 IMG_1858 by Christopher Ridle, on Flickr

I've decided that I don't like these decals enough to try any harder to save them.  I just ordered a set for Marine Corps birds at Guadalcanal.  I hope to update this thread soon with a nice completed model.  

Thank you for looking,

Chris 


  • Member since
    September 2014
Posted by rooster513 on Wednesday, June 14, 2017 9:20 PM

Looking really good Chris! Looking forward to seeing it with the better decals. If I might ask, what blue did you use for the topside? I like that shade.

-Andy

  • Member since
    February 2012
  • From: Olmsted Township, Ohio
Posted by lawdog114 on Wednesday, June 14, 2017 9:29 PM
Looks great Chris. I like what you did with the cowl flaps. I should have done that on mine.

 "Can you fly this plane and land it?...Surely you can't be serious....I am serious, and don't call me Shirley"


  • Member since
    January 2015
  • From: Tumwater, WA.
Posted by M. Brindos on Wednesday, June 14, 2017 10:51 PM

All I can say is that I am impressed, Chris. Those colors are amazing! But it is a shame about those decals. They look horrible! Worse than Revell's standard issue! Those I've figured out how to work with... but yours look naff!! What a way to let a builder down.

Everything else looks amazing!  :D well freakin' done. YesYes

- Mike Brindos "Lost Boy"

  • Member since
    March 2015
  • From: Streetsboro, Ohio
Posted by Toshi on Wednesday, June 14, 2017 11:30 PM

I'm sorry and feel your frustrations about the decals.  Though everything else is superb.  I love the finish on your F4F!

Toshi

On The Bench: Revell 1/48 B-25 Mitchell


Married to the most caring, loving, understanding, and beautiful wife in the world.  Mrs. Toshi


  • Member since
    September 2012
Posted by GMorrison on Wednesday, June 14, 2017 11:41 PM

If you were to paint the nat marks, faded and chipped, this would be out of this world.

 Modeling is an excuse to buy books.


  • Member since
    July 2003
  • From: Cincinnati, Ohio
Posted by ridleusmc on Thursday, June 15, 2017 8:17 AM

rooster513

Looking really good Chris! Looking forward to seeing it with the better decals. If I might ask, what blue did you use for the topside? I like that shade.


Actually, the topside shade is just the mix described by Tamiya in the instructions.  I believe that it's a mix of XF-18 Medium Blue with XF-2 Flat white.  I'll check the instructions when I get home, but I believe it's a 3:1 mix, majority Medium Blue.  

Thank you gentelmen for the kind words.  I did have fun with the paint on this one.  Maybe I should mask and paint the insignia.  I'll check into that.  


  • Member since
    June 2014
  • From: New Braunfels , Texas
Posted by Tanker - Builder on Thursday, June 15, 2017 8:42 AM

Ah;

 Now this is why I got to hate decals . All that work and them thick wrinkly things . Drove me bonkers . Finally got back to using them when the aftermarket came up with high quality thin ones .  T.B.

  • Member since
    February 2012
  • From: Olmsted Township, Ohio
Posted by lawdog114 on Thursday, June 15, 2017 5:37 PM

ridleusmc


Thank you gentelmen for the kind words.  I did have fun with the paint on this one.  Maybe I should mask and paint the insignia.  I'll check into that.  


If you want to go this route, look into Montex masks.  They work great.  Once you use these its hard to go back to decals.  I get mine from ebay.  

 "Can you fly this plane and land it?...Surely you can't be serious....I am serious, and don't call me Shirley"


  • Member since
    July 2003
  • From: Cincinnati, Ohio
Posted by ridleusmc on Thursday, June 15, 2017 7:19 PM

I've seen them on Amazon.  

  • Member since
    November 2008
  • From: Hatboro, PA
Posted by Justinryan215 on Thursday, June 15, 2017 8:41 PM

ridleusmc

Hello Everybody,

I picked up Tamiya's 1/48 F4F-4 Wildcat from a vendor table at a local show, and I was very excited to build it.  The reviews were very consistent, and most reviewers liked the kit.  Each reviewer did mention the very thick decals.  

I didn't want to spend any money on aftermarket stuff for this project.  I've been doing that too much lately, but I did want to make some improvements.  

One thing that I missed is the cockpit floor of the kit isn't correct.  It should be cut out along the sides from the bases of the instrument panel and the aft bulkhead.  This is to allow the pilot to be able to use the windows on the underside of the fuselage.  I read about this detail too late, but I'm generally happy with the pit.  The seatbelt is the only addition, and it's from an old photo etch set from another project.  


I wanted to pose the Wildcat as it would have sat on the flightline of Henderson Field on Guadalcanal in the autumn of 1942.  The aircraft in the pictures tended to have off-center rudders, drooping elevators, and open cowl flaps.  Cuts were made.  

Other than the modifications, construction was straight forward.  Finishing was fun.  I wanted to try black basing as described by doog.

https://doogsmodels.com/2014/07/03/technique-black-basing/

I don't think I got the technique 100% correct, but I was pretty happy with the results. 

Decals, I hate the decals. They're thick and they don't want to settle in.  This is while using Micro Set in applying the decals, and while using Micro Sol after applying them.   

And, notice the white edges of the upper wing star decals.  

I've decided that I don't like these decals enough to try any harder to save them.  I just ordered a set for Marine Corps birds at Guadalcanal.  I hope to update this thread soon with a nice completed model.  

Thank you for looking,

Chris 


 !


 I've always loved the wildcat line, and this one is spectacular!   Except the decals....being out of register, makes them just about unusable!  But, I have has successfully used Tamiya x20a acrylic thinner as a solvent, and it worked a treat on my ROG Lancaster bomber's thick, unruly decals, after several applications. ..


Can't wait to see her all finished

"...failure to do anything because someone else can do better makes us rather dull and lazy..."

Mortal as I am,I know that I am born for a day.  But when I follow at my pleasure the serried multitude of the stars in their circular course, my feet no longer touch the Earth...


  • Member since
    July 2003
  • From: Cincinnati, Ohio
Posted by ridleusmc on Friday, June 16, 2017 8:08 AM

Thank you all,

I was able to get the decals off last night.  There was some damage to the paint, but light airbrush touch up should even it all out.  I don't know how long the decals will take to ship, but it shouldn't be too long.  

I'm getting the decals here:

http://fineartofdecals.com/goodies/f4f-wildcat-photo-page/

The set is at the very bottom of the page.  I was thinking I'd go with either Joe Foss' bird or the "unknown unit" aircraft.  

-Chris

  • Member since
    July 2003
  • From: Cincinnati, Ohio
Posted by ridleusmc on Saturday, June 17, 2017 8:52 PM

I repaired the damage to the paint caused by decal removal.  I feathered in some flat black.  Then I covered masked panels with my Medium Blue mix.  I believe some clear coat will adequately reduce or eliminate the contrast between the new and old paint.  

 IMG_1861 by Christopher Ridle, on Flickr

  • Member since
    July 2003
  • From: Cincinnati, Ohio
Posted by ridleusmc on Thursday, July 6, 2017 7:59 PM

I'm calling this one done.  I had trouble with the new decals as well as the old ones.  Overall, I'm happy with the it.  I set it next to a 1/48 Corsair, and it looks tiny.  I'm posting with flickr now.  It seems ok.  

 IMG_1906 by Christopher Ridle, on Flickr

 IMG_1909 by Christopher Ridle, on Flickr

 IMG_1910 by Christopher Ridle, on Flickr

 IMG_1911 by Christopher Ridle, on Flickr

 IMG_1912 by Christopher Ridle, on Flickr

 IMG_1913 by Christopher Ridle, on Flickr

 IMG_1914 by Christopher Ridle, on Flickr

 IMG_1915 by Christopher Ridle, on Flickr

 IMG_1916 by Christopher Ridle, on Flickr


  • Member since
    October 2009
Posted by Ultra on Thursday, July 6, 2017 11:21 PM

That looks great!

  • Member since
    January 2015
  • From: Tumwater, WA.
Posted by M. Brindos on Friday, July 7, 2017 12:48 AM

That didn't turn out just good, it turned out great! That is nicely finished, Chris! :D

- Mike Brindos "Lost Boy"

  • Member since
    July 2003
  • From: Cincinnati, Ohio
Posted by ridleusmc on Friday, July 7, 2017 8:09 AM

Thank you, 

I tried black basing for the finish.  I think it works well with these colors.  

  • Member since
    September 2014
Posted by rooster513 on Friday, July 7, 2017 8:17 AM

That really did come out great! Nice job all around!

-Andy

  • Member since
    November 2009
  • From: SW Virginia
Posted by Gamera on Friday, July 7, 2017 10:07 AM

Oh cool, super job there! 

"I dream in fire but work in clay." -Arthur Machen


  • Member since
    July 2003
  • From: Cincinnati, Ohio
Posted by ridleusmc on Saturday, July 8, 2017 9:09 PM

Thank you gentlemen.

I think I'll stay in South Pacific mode for a while.  I have a P-400 going, and I'm tempted to start a Zero that the LHS got for me.  

  • Member since
    January 2015
  • From: Tumwater, WA.
Posted by M. Brindos on Saturday, July 8, 2017 9:17 PM

A P-400 you say? Oh tell us more. :)

- Mike Brindos "Lost Boy"

  • Member since
    July 2003
  • From: Cincinnati, Ohio
Posted by ridleusmc on Sunday, July 9, 2017 9:37 PM

Yeah, I've jumped into Eduard's P-400.  It's a nice kit, and I promise to post about it.  So far, I've assembled the cockpit and joined the fuselage halves. I've been taking pictures, but I'm going to wait until it's at completion before I post about it.  Sometimes, work, family, and/or life causes a subject to stall, so I want to avoid in-progress build logs for now.  

I will say this.  Eduard put some thought into the kit, and it shows.  It shows in the masks included in the kit, and it shows in the instructions.  The parts go together well.  I joined the fuselage halves together tonight.  It took a minimum of finger pressure to get everything to line up nice.  I did some sanding, but nothing out-of-the-ordinary.   


  • Member since
    January 2015
  • From: Tumwater, WA.
Posted by M. Brindos on Sunday, July 9, 2017 9:44 PM

I found a 1989 boxing of Monograms P-39 and I plan on giving that one a go much later. Slowly but surely I'm tracking down all of the old Monogram kits around town lol. 

Since you won't be making a WIP thread for that P-400 I guess I have no choice but to wait for it to pop up eventually. Maybe I'll be building mine by then lol.

- Mike Brindos "Lost Boy"

  • Member since
    December 2010
  • From: Salem, Oregon
Posted by 1943Mike on Monday, July 10, 2017 12:12 AM

Looks really good! The exhaust and gun deposits look very realistic. I'll be thinking about opening up the cowl flaps just a tad on at least one of my aircraft in my stash thanks to you.

Mike

"Le temps est un grand maître, mais malheureusement, il tue tous ses élèves."

Hector Berlioz

  • Member since
    July 2003
  • From: Cincinnati, Ohio
Posted by ridleusmc on Monday, July 10, 2017 7:58 AM

1943Mike

Looks really good! The exhaust and gun deposits look very realistic. I'll be thinking about opening up the cowl flaps just a tad on at least one of my aircraft in my stash thanks to you.


I was surprised with how easy it was to open the cowl flaps.  I just repeatedly scoured the seams between the flaps with the back side of a #11 blade until they were thin enough to cut.  I scoured the leading edges of the cowl flaps until they were easy to bend outward.  I had to be careful with my passes with the blade, but the occasional slip sanded out.   

  • Member since
    February 2012
  • From: Olmsted Township, Ohio
Posted by lawdog114 on Tuesday, July 11, 2017 2:49 AM
That turned out great. Tape over the gun ports is a nice touch.

 "Can you fly this plane and land it?...Surely you can't be serious....I am serious, and don't call me Shirley"


  • Member since
    December 2002
Posted by 7474 on Tuesday, July 11, 2017 10:15 AM

Really great work, I think it turned out fantastic. Your decal issues are why I'm going towards painting as many of the markings that I can. 

  • Member since
    January 2015
Posted by BrandonD on Tuesday, July 11, 2017 11:16 AM

Nice job. I love the Wildcat. On the one hand, I think it's such a stubby, ungainly looking plane, but on the other hand, what a workhorse, and so much history.

-BD-

  • Member since
    July 2003
  • From: Cincinnati, Ohio
Posted by ridleusmc on Tuesday, July 11, 2017 8:22 PM

lawdog114
That turned out great. Tape over the gun ports is a nice touch.
 

Thank you, the tape is just the new Tamiya curve masking tape.  It's the 3mm wide stuff cut to 3mm in length.  I like how it turned out.  

  • Member since
    July 2003
  • From: Cincinnati, Ohio
Posted by ridleusmc on Tuesday, July 11, 2017 8:23 PM

7474

Really great work, I think it turned out fantastic. Your decal issues are why I'm going towards painting as many of the markings that I can. 


Yes sir, 

me too.

JOIN OUR COMMUNITY!

Our community is FREE to join. To participate you must either login or register for an account.

SEARCH FORUMS
FREE NEWSLETTER
By signing up you may also receive reader surveys and occasional special offers. We do not sell, rent or trade our email lists. View our Privacy Policy.