SEARCH FINESCALE.COM

Enter keywords or a search phrase below:

Tamiya 72nd Bf 109E-3 Completed page 3

5868 views
90 replies
1 rating 2 rating 3 rating 4 rating 5 rating
  • Member since
    December 2002
  • From: Bury St Edmunds, Suffolk, England
Posted by Bish on Monday, February 5, 2018 3:37 PM

John, checked my stash of carpets from reality in scale. When i looked, it says can be used in a range of scales right down to 72nd. So i cut a thin slice, removed some of the backing paper so it was not to thick, and it works a treat.

Cheers for the suggestion.

I am a Norfolk man and i glory in being so


On the bench: Airfix 1/72nd Harrier GR.3/Fujimi 1/72nd Ju 87D-3

  • Member since
    December 2002
  • From: Bury St Edmunds, Suffolk, England
Posted by Bish on Monday, February 5, 2018 2:16 AM

jeaton01

Old rug material has often been used to cover stands like that one, Martin.


O yes, didn't think of that. I have already put a thin piece of wood on, but maybe i can find somthing to go on top. I have some 35th rugs, i'll have a look for somthing that will work.

Cheers John.

I am a Norfolk man and i glory in being so


On the bench: Airfix 1/72nd Harrier GR.3/Fujimi 1/72nd Ju 87D-3

  • Member since
    December 2002
  • From: Northern California
Posted by jeaton01 on Sunday, February 4, 2018 5:49 PM

Old rug material has often been used to cover stands like that one, Martin.

John

To see build logs for my models:  http://goldeneramodel.com/mymodels/mymodels.html


  • Member since
    December 2002
  • From: Bury St Edmunds, Suffolk, England
Posted by Bish on Sunday, February 4, 2018 4:23 PM

Cheers Clint. I have AM decals for some of my other Tamiya kits, but otehrs i plan on useing the kits. In fact i was going to use the decals from the E-4/7 kit for the Academy E-4. I'll see how the kit decals go on the Mossie i plan doing later this year.

I am a Norfolk man and i glory in being so


On the bench: Airfix 1/72nd Harrier GR.3/Fujimi 1/72nd Ju 87D-3

  • Member since
    August 2012
  • From: Parker City, IN.
Posted by Rambo on Sunday, February 4, 2018 2:52 PM
Looking good Bish glad the decals didn't discourage you to much. I've only built Tamiya zeros in this scale before and most of the time used aftermarket decals.

Clint

  • Member since
    December 2002
  • From: Bury St Edmunds, Suffolk, England
Posted by Bish on Saturday, February 3, 2018 5:06 PM

Cheers PJ.

I am a Norfolk man and i glory in being so


On the bench: Airfix 1/72nd Harrier GR.3/Fujimi 1/72nd Ju 87D-3

  • Member since
    November 2008
  • From: Central Florida
Posted by plasticjunkie on Saturday, February 3, 2018 2:59 PM

Looking great Bish Toast

 GIFMaker.org_jy_Ayj_O


Too many models to build, not enough time in a lifetime!!

  • Member since
    December 2002
  • From: Bury St Edmunds, Suffolk, England
Posted by Bish on Saturday, February 3, 2018 2:22 PM

Cheers guys.

mm, its a pretty standard base for me now, the armour ones tend to vary a bit more but same principal.

I am a Norfolk man and i glory in being so


On the bench: Airfix 1/72nd Harrier GR.3/Fujimi 1/72nd Ju 87D-3

  • Member since
    March 2015
  • From: Streetsboro, Ohio
Posted by Toshi on Saturday, February 3, 2018 1:32 AM

That’s Some Awesomeness!  Looks excellent sir!

Your friend, Toshi

On The Bench: Revell 1/48 B-25 Mitchell


Married to the most caring, loving, understanding, and beautiful wife in the world.  Mrs. Toshi


  • Member since
    December 2017
  • From: Plano (Dallas), Texas
Posted by mmthrax on Friday, February 2, 2018 4:46 PM

Good progress sir.  I am very interested in your base procedures.  I'll be watching.  Keep up the good work.  Should be a very neat diorama.

Just keep picking away at it...

  • Member since
    December 2002
  • From: Bury St Edmunds, Suffolk, England
Posted by Bish on Friday, February 2, 2018 3:43 PM

I have fallen behind a touch so time for soome catching up. So after masking and painting the RLM 71 on top i then did the same for the 65 on the sides and underneath.
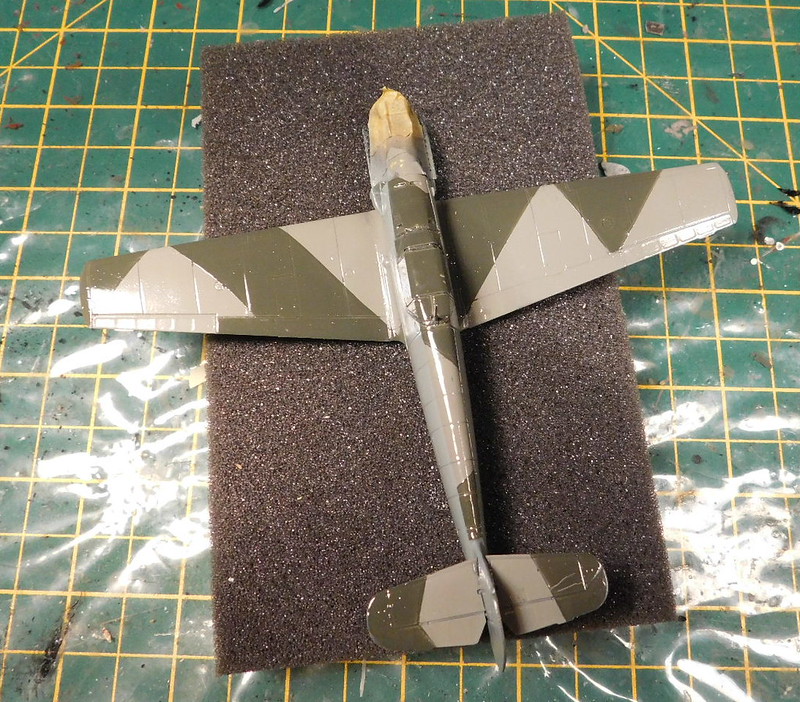
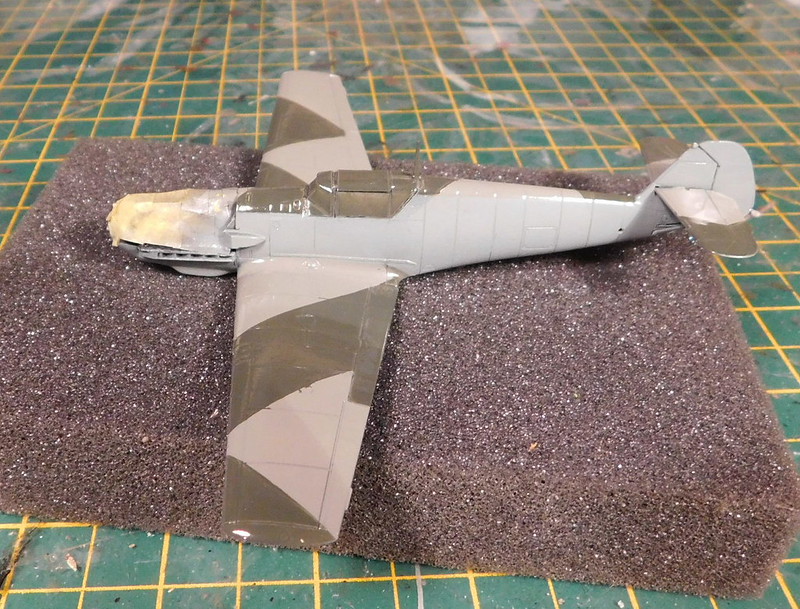
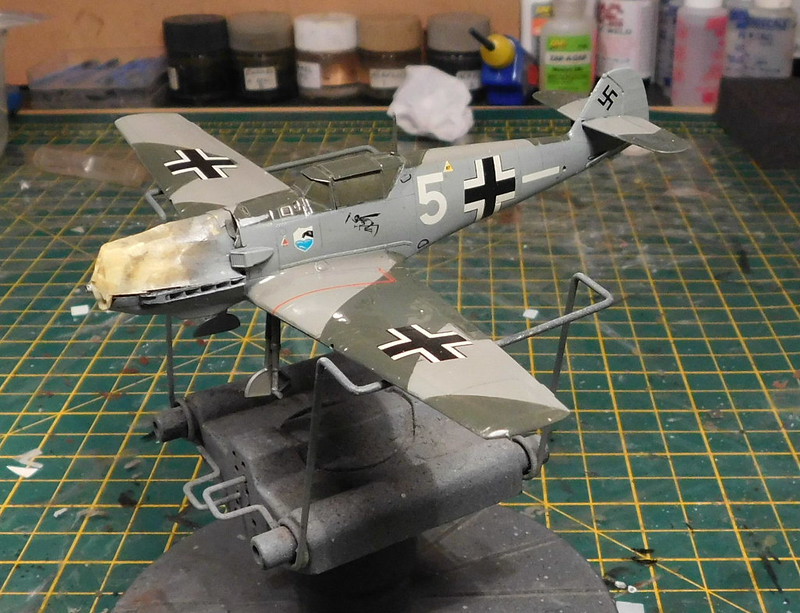
Then came the fun part, decals. As i mentioned before, this is my first tamiya aircraft. I have bult plenty of their armour kits with no decals issues. And i hope the ones for this kit on not a reflection of their usuall aircraft decals because they were, as we would say in Blighty, bloody awful. Half of them broke. I applied the underwing decals which also broke up, but after applying i realised they were to big. So i removed them and replaced them from the decal stash. I also applied the swastika as per instructions so it was over lapping onto the rudder. I then found a pic of White 5, bloody typical, and saw this was wrong. So after removing the decals, which had been in place over 24 hours, i had to re-paint the tail and apply new decals, also from the decal stash. So that was a fun 5 days.
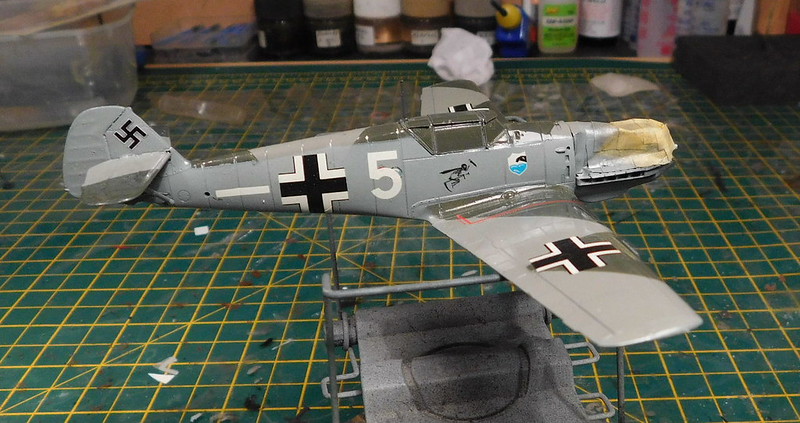
I also did some work on the base. After the sides wdere stained and varnished, i added the celluclay. This will get a light dry brush and then i will add the grass this weekend.

The winch and crate have also been painted. I could not quite make out the colour of the inside of the crate from the photo. Not sure if its painted a light colour or bare wood. So i painted it buff.

And finally, got started on the tail stand. I was not to worried about it looking a bit rough given that it was knocked up in the workshops. I am thinking about putting some wood on top as i don't think the metal frame of the aircraft would be put straight onto a metal stand.
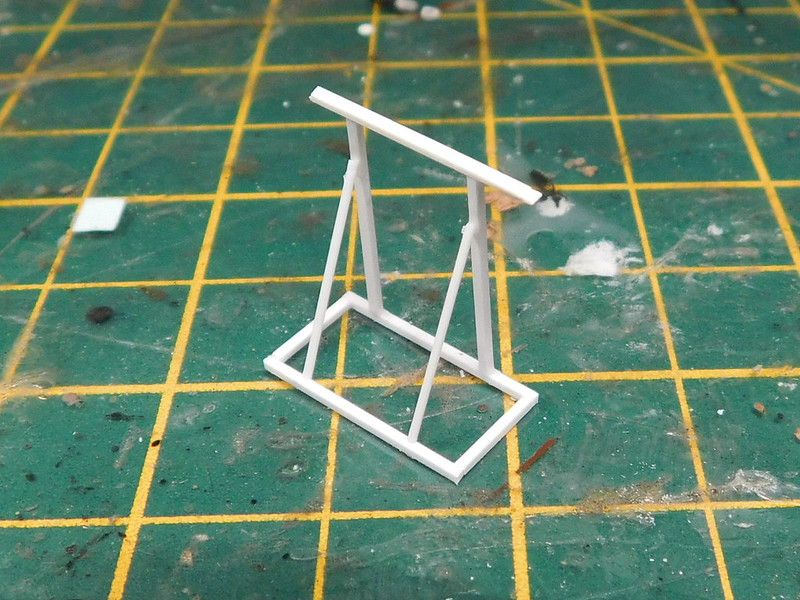
And thats it for now. I had hoped this would have been completed by last weekend, but you know what they say, perfection can't be rushed right Big Smile. Hopfully i will have it done by early next week.


I am a Norfolk man and i glory in being so

 

On the bench: Airfix 1/72nd Harrier GR.3/Fujimi 1/72nd Ju 87D-3

  • Member since
    December 2002
  • From: Bury St Edmunds, Suffolk, England
Posted by Bish on Monday, January 22, 2018 6:50 AM

Thanks PJ. I have seen pics of aircraft having there guns sighted, i plan on doing a Ju 87 in that position at a later date. But no, this will be an engine change scene. I am guessing its easier to remove the engine if the fuselage is level rather than at an angle. If it was at an angle, once the bolts are released holding the engine in place, you would risk it swinging back into the airframe.

And thanks for the tip, will look at that. Though its not to much of a problem as i start the base early, i can usually get it stained and varnished over a weekend so its usually ready before the kit is finished.

I am a Norfolk man and i glory in being so

 

On the bench: Airfix 1/72nd Harrier GR.3/Fujimi 1/72nd Ju 87D-3

  • Member since
    November 2008
  • From: Central Florida
Posted by plasticjunkie on Monday, January 22, 2018 6:30 AM

Bish

From the pictures I have seen when the tail is up like that they are sighting in the guns so is that something your boys will be doing?

The base is looking great as usual. Lately I've ben doing something different for finishing the wood base sides. Instead of using the tradional wood stain/poly product which takes a while to dry and cure I have been using dark brown craft acrylic paint as the stain. It dries in minutes and then I brush on some Future. A couple of coats does the trick for a semi gloss/egg shell finish. More coats if a glossier finish is preferred. It takes but a few minutes and BAM it's done and looks identical to the traditional oil stain finish. 

 GIFMaker.org_jy_Ayj_O


Too many models to build, not enough time in a lifetime!!

  • Member since
    December 2002
  • From: Bury St Edmunds, Suffolk, England
Posted by Bish on Monday, January 22, 2018 6:01 AM

Cheers Bobby.

I am a Norfolk man and i glory in being so


On the bench: Airfix 1/72nd Harrier GR.3/Fujimi 1/72nd Ju 87D-3

  • Member since
    November 2010
  • From: Florida-West Central
Posted by Eagle90 on Monday, January 22, 2018 5:31 AM

Hey Bish, great looking work as usual my friend!  And do I need to say anything about the base?  LOL!  Your bases are always spectacular and this one is looking awesome!


  • Member since
    December 2002
  • From: Bury St Edmunds, Suffolk, England
Posted by Bish on Monday, January 22, 2018 2:10 AM

Cheers guys.

Clint, i have used thema couple of times before but they were fine. But they were canopies with all flat pieces. The problem seems to be where there is a curve in the canopy close to the edge of a panel of glass. On this kit its the top of the opening section and the top of the front wind shieled. Eduard often does those in 2 sections and you have to fill in the middle with liquid mask. But Montex have used one piece for each panel and it does not work.

MM, it is rather nice. The other parts are quite nice as well. There are no instructions for this so i had to use the images on the website, but managed to work it out.

 Steve, i have had this and a few other Tamiya aircraft for a few years now but just never got around to it. But now i have, i've got the itch. Next one will be one of their Moisquito kits at the end of the year. And don't you just hate iut when kits start doing that, you just feel obliged to give them a good home.

I am a Norfolk man and i glory in being so


On the bench: Airfix 1/72nd Harrier GR.3/Fujimi 1/72nd Ju 87D-3

  • Member since
    July 2010
  • From: Tempe AZ
Posted by docidle on Sunday, January 21, 2018 10:16 PM

Phenomenal build you have going Bish. I’m amazed that this is your first one! I too just did my first Tamiya kit recently and now have become obsessed with them and to top it off,  they’re now following me home. I can’t wait to see the diorama you’re have planned.

Steve


  • Member since
    April 2015
Posted by Mopar Madness on Sunday, January 21, 2018 4:29 PM

Everything is coming along quite well Bish.  That’s a smart looking winch for such a small scale! 

Chad

God, Family, Models...

At the plate: 1/48 Airfix Bf109 & 1/35 Tamiya Famo

On deck: Who knows!

  • Member since
    August 2012
  • From: Parker City, IN.
Posted by Rambo on Sunday, January 21, 2018 3:42 PM
Looking good Bish. Nice to know about the masks too.

Clint

  • Member since
    December 2002
  • From: Bury St Edmunds, Suffolk, England
Posted by Bish on Sunday, January 21, 2018 1:57 PM

Just a short one from me this week. I had hoped to have the top camo done and be adding the RLM 65 today. But after adding the 02 on Wed i had to do some re touching on Fri so only got it masked and the 71 on today, so its drying in the shed. But here is how it look with the 02 on.

So with the aircraft and winch together, i was able to measure out the dio and get working on the base.

A bit of old furniture with a couple of thin pieces on either side, i like the bases to be between 2.5 and 3cm thick.

And then added some balsa edging.

So i just need to get that cleaned up around the edges and can stain it. Thats all for now.

must say i am not to keen on these Montex masks. they don't handle curves very well. It keeps coming up along the edges. I have been pressing it down before i paint so i am hoping nothing has got underneath. Never had this problem with Eduard.

I have also assemebled the main part of the winch. The steps were a bit tricky, each one being 2 parts one to go on each side, which was not helped by me putting them on after putting the rest together.


I am a Norfolk man and i glory in being so


On the bench: Airfix 1/72nd Harrier GR.3/Fujimi 1/72nd Ju 87D-3

  • Member since
    August 2012
  • From: Parker City, IN.
Posted by Rambo on Tuesday, January 16, 2018 2:45 AM
Only the first two are in the book at the bottom the rest came out of the book on the right I posted yesterday. Hope they helped some the photo with the engine off was odd also they didn't have the tail up for it either

Clint

  • Member since
    December 2002
  • From: Bury St Edmunds, Suffolk, England
Posted by Bish on Tuesday, January 16, 2018 2:20 AM

Thanks Clint, some great pics there. Seems the Germans used just about anything to lift up the tails. That pic on the right bottom row is interesting, can't figure out what they are useing there. The one in the row above on the left, i have a set of those jack stands from Airmodel, they show them being used like that on their site. The one to the right of that is a curious one, taking the whole nose off including the spinner and covers underneath.

Are those pics in that book at the bottom. I havethat but didn't go through it as its not about the E. It has deffinetly answered one question, that the cable which runs back and is secured into the ground is attached to the bar which runs through the fuselage. Perfect.

I think i know how i will do this now, thanks a lot for those.

I am a Norfolk man and i glory in being so


On the bench: Airfix 1/72nd Harrier GR.3/Fujimi 1/72nd Ju 87D-3

  • Member since
    August 2012
  • From: Parker City, IN.
Posted by Rambo on Monday, January 15, 2018 8:00 PM
Ok so my phone don't like to post photos (it's a windows phone) so here is the link to the album. The first two photos came from the book pictured at the end of the album and the other three are from the book on the right I posted earlier https://www.flickr.com/photos/160124388@N08/albums/72157668519996719

Clint

  • Member since
    December 2002
  • From: Bury St Edmunds, Suffolk, England
Posted by Bish on Monday, January 15, 2018 2:06 PM

Thanks mm.

I am a Norfolk man and i glory in being so


On the bench: Airfix 1/72nd Harrier GR.3/Fujimi 1/72nd Ju 87D-3

  • Member since
    December 2017
  • From: Plano (Dallas), Texas
Posted by mmthrax on Monday, January 15, 2018 2:03 PM

Really neat idea Bish.  Watching this space.....

Just keep picking away at it...

  • Member since
    December 2002
  • From: Bury St Edmunds, Suffolk, England
Posted by Bish on Monday, January 15, 2018 9:26 AM

Thanks BK, the more the merrier.

I am a Norfolk man and i glory in being so


On the bench: Airfix 1/72nd Harrier GR.3/Fujimi 1/72nd Ju 87D-3

  • Member since
    June 2014
Posted by BrandonK on Monday, January 15, 2018 9:23 AM

This one looks pretty darn cool. I like your dio idea here. When I'm not working I will be checking in.

BK

On the bench:

A lot !! And I mean A LOT!!

2024 Kits on deck / in process / completed   

                         14 / 5 / 2  

                              Tongue Tied

  • Member since
    December 2002
  • From: Bury St Edmunds, Suffolk, England
Posted by Bish on Monday, January 15, 2018 9:20 AM

No worries Clint, i'll still pick up that life book anyway. I don't have many books on the earely 109's, only really the Sqadron walk around, so i'll try and pick up that book on the right as well.

Which book are those other pics in, the ones from behind. What i am interested in look at are the cables which seem to run from the bar which goes through the fuselage. I think the cables are to stop the tail tipping up.

I am a Norfolk man and i glory in being so


On the bench: Airfix 1/72nd Harrier GR.3/Fujimi 1/72nd Ju 87D-3

  • Member since
    August 2012
  • From: Parker City, IN.
Posted by Rambo on Monday, January 15, 2018 7:48 AM

Well I was wrong it's not in that book but I did find a very close one in another book

BF 109 booksBoth of these have hundreds of photos including markings of other air forces even a few photos of a 109 in Japanese markings.

 EDIT: BTW also has a few photos of the 109 on the stand takin from behind I've tried to take a photo of the pages with my phone, but it gets whited out to bad to see anything 

Clint

  • Member since
    December 2002
  • From: Bury St Edmunds, Suffolk, England
Posted by Bish on Monday, January 15, 2018 4:27 AM

To bloody right, sounds like you got a good deal there.

I am a Norfolk man and i glory in being so


On the bench: Airfix 1/72nd Harrier GR.3/Fujimi 1/72nd Ju 87D-3

JOIN OUR COMMUNITY!

Our community is FREE to join. To participate you must either login or register for an account.

SEARCH FORUMS
FREE NEWSLETTER
By signing up you may also receive reader surveys and occasional special offers. We do not sell, rent or trade our email lists. View our Privacy Policy.