SEARCH FINESCALE.COM

Enter keywords or a search phrase below:

Promodler 1/48 JU 88 A4

4374 views
50 replies
1 rating 2 rating 3 rating 4 rating 5 rating
  • Member since
    April 2010
Promodler 1/48 JU 88 A4
Posted by Theuns on Sunday, February 11, 2018 12:54 AM

I am not really impressed with this kit sofar, fit is tricky and there are no locator pins to help.

Cockpit detail is nice, I just added wire harnasses.

I think the detail will not be as sharp under the glass so I used decals for seatbelts. 

Pannel lines on the fuselage do not match up, I had to sand them down and re-scribe.

 1/48 JU 88 A4 by Theunis van Vuuren, on Flickr

 1/48 JU 88 A4 by Theunis van Vuuren, on Flickr

 1/48 JU 88 A4 by Theunis van Vuuren, on Flickr

I hope the fit of the front fuselage to rear will be good....

Theuns

  • Member since
    December 2013
  • From: Orlando Florida
Posted by route62 on Sunday, February 11, 2018 4:05 AM

I am building this kit too and agree it is quirky.  It's a reboxed Dragon kit and Dragon was trying to save money by creating molds where they could swap a couple of parts trees in the kits to sell the different versions of ju-88s.

This creates weird assembly steps, extra seams to fill and alignment issues.  Also the instructions are full of errors so use good reference picks.  Don't you love the lack of alignment pins.  

The instructions are very poor when it comes to the canopy. The three piece top canopy can be difficult to line up during install.  Do lots of dry fitting.  I ended up gluing the two rear halves together first and installing as one unit.

Also how about that weird textured plastic and no, the cockpit half does not line up well to the fuselage.  Also the goofy wing tips that Dragon decided to mold separate do not line up well either.  I had to thin in some places and add shims in others.  Lots of dry fitting.

  • Member since
    March 2012
  • From: Corpus Christi, Tx
Posted by mustang1989 on Sunday, February 11, 2018 4:13 AM

Glad to have a heads up on this kit. I think I actually have it in true Dragon form as a Mistel kit. Detail work looks sharp so far Theuns.


 Forum | Modelers Social Club Forum (proboards.com) 

  • Member since
    April 2010
Posted by Theuns on Sunday, February 11, 2018 4:17 AM

Also for some odd reason the rear upper part of the cockpit section is not complete all the way to the top, there is clearly a reccessed area in the rear fuse what I can only think a seperate bulkhead has to go but none on the trees...

I made a bulkhead from plastic card as the gaping hope just looks wrong.

The same I think will be needed in the wheelwells.


Theuns

  • Member since
    November 2003
  • From: Naples, FL
Posted by tempestjohnny on Sunday, February 11, 2018 4:57 AM
I built the G version from Dragon a couple of years ago. I attached the nose half to each side and then glued the fuselage together as one. Do the same for the wingtips. It does make into a nice kit just take some modelling to build it


  • Member since
    December 2013
  • From: Orlando Florida
Posted by route62 on Monday, February 12, 2018 7:25 AM

There is a small part that will cover that hole in the rear upper part of the cockpit.  Yet another weird part so dragon could do the part mix and match thing.  That little part creates more weird seams.  Do a lot of test fitting before committing to glue on this build, it will save you a lot of filling and sanding.

  • Member since
    April 2010
Posted by Theuns on Wednesday, February 14, 2018 12:56 AM

Here are the big parts ready for filling and sandin.....allot of it :-(

 IMG_20180214_084410 by Theunis van Vuuren, on Flickr


Theuns

  • Member since
    March 2015
  • From: Streetsboro, Ohio
Posted by Toshi on Wednesday, February 14, 2018 2:16 AM

A great modeler can make a bad model look fantastic.  

Your friend, Toshi

On The Bench: Revell 1/48 B-25 Mitchell


Married to the most caring, loving, understanding, and beautiful wife in the world.  Mrs. Toshi


  • Member since
    April 2010
Posted by Theuns on Monday, February 19, 2018 12:02 AM

I managed to stuff up the canopy when trying to join the 2 halves :-(


Theuns

  • Member since
    February 2012
  • From: Olmsted Township, Ohio
Posted by lawdog114 on Monday, February 19, 2018 2:26 AM
I wasn't crazy about this one either. I thought it was forgettable .I remember having issues with the canopy glass as well.

 "Can you fly this plane and land it?...Surely you can't be serious....I am serious, and don't call me Shirley"


  • Member since
    April 2013
  • From: Eleva, Wisconsin
Posted by Greatmaker on Monday, February 19, 2018 10:10 AM

Man that brings back memories...or more likely nightmares.  I had the night figther version and I wanted to make a bomber version.  Only problem was the night fighter had only one rear canopy gun so I had to use a melted clear sprue to fabricate one of those clear gunports. 


  • Member since
    April 2010
Posted by Theuns on Saturday, March 10, 2018 11:42 PM

I am not really liking this build sofar, sanding is one of my most hated jobs!

Maybe when it comes to painting I will like it again LOL

 1/48 JU 88A4 by Theunis van Vuuren, on Flickr

 1/48 JU 88 A4 by Theunis van Vuuren, on Flickr


I still cant figure out what the 2 small holes in the RH top if the rear fuse is, the plans are vague here.


Theuns

  • Member since
    February 2012
  • From: Olmsted Township, Ohio
Posted by lawdog114 on Saturday, March 17, 2018 3:15 AM
It's getting there. I didn't know what those holes were for either. .

 "Can you fly this plane and land it?...Surely you can't be serious....I am serious, and don't call me Shirley"


  • Member since
    March 2012
  • From: Corpus Christi, Tx
Posted by mustang1989 on Saturday, March 17, 2018 6:24 AM

Looks like you're beating this one into submission there Thuens.   Progress is looking good buddy.


 Forum | Modelers Social Club Forum (proboards.com) 

  • Member since
    October 2004
  • From: Northern Virginia
Posted by ygmodeler4 on Saturday, March 17, 2018 2:14 PM
I hate sanding too. Hang in there, looks like it’s starting to come together

-Josiah

  • Member since
    May 2013
  • From: Indiana, USA
Posted by Greg on Saturday, March 17, 2018 6:04 PM

Interesting so many folk have experience with this kit.

You don't seem to be letting it get the best of you, Theuns. No surprise there.

  • Member since
    April 2010
Posted by Theuns on Saturday, March 17, 2018 11:24 PM

Well, it surely is taking allot of "beating" to get it into shape LOL

I like the sa\haoe of the 88 and dont have another in the collection so I need to get it done.


Theuns

  • Member since
    April 2015
Posted by Mopar Madness on Sunday, March 18, 2018 11:29 AM

Yeah, I’ve heard mixed results as far as kit reviews go.  Slow and steady is the way to go.  Yours looks great thus far!

Chad

God, Family, Models...

At the plate: 1/48 Airfix Bf109 & 1/35 Tamiya Famo

On deck: Who knows!

  • Member since
    July 2016
  • From: Malvern, PA
Posted by WillysMB on Sunday, March 18, 2018 12:20 PM

The two small holes are about where the tail support rod and triggering mechanism would be on a Mistel lower component...

  • Member since
    April 2010
Posted by Theuns on Sunday, March 25, 2018 7:26 AM

I HATE masking canopies  :-(

 IMG_20180325_132511 by Theunis van Vuuren, on Flickr


Theuns

  • Member since
    March 2015
  • From: Streetsboro, Ohio
Posted by Toshi on Sunday, March 25, 2018 8:00 AM

You hate doing canopy masking, but you did a fantastic job on it!  Is that free hand or pre-cut Eduard mask’s?  Thank you in advance.

Your friend, Toshi

On The Bench: Revell 1/48 B-25 Mitchell


Married to the most caring, loving, understanding, and beautiful wife in the world.  Mrs. Toshi


  • Member since
    August 2015
  • From: the redlands Fl
Posted by crown r n7 on Sunday, March 25, 2018 8:50 AM

Looking good. you definitely need the right mind Set for masking it's like use ing BMF.


 Nick.

  • Member since
    April 2010
Posted by Theuns on Sunday, March 25, 2018 11:23 AM

Toshi I used tamiya tape and a sharp exacto blade ;-)


Theuns

  • Member since
    April 2010
Posted by Theuns on Sunday, March 25, 2018 12:17 PM

After a coat of primer and a light sanding I see hope for this model yet...

 IMG_20180325_184652 by Theunis van Vuuren, on Flickr

 IMG_20180325_184726 by Theunis van Vuuren, on Flickr

 IMG_20180325_185641 by Theunis van Vuuren, on Flickr


I am still not sure what scheme to go with, there are a few splinter ones, a mottle desert one and a splinter with meander lines....


Theuns

  • Member since
    February 2011
  • From: Bent River, IA
Posted by Reasoned on Sunday, March 25, 2018 2:52 PM
Looking good so far Theuns, glad to see you do a WIP on this turkey. I've got this kit in the stash (although it's been so long since I've built anything), bought it because the last I knew there's no A-1 version in 1/48. So I spent a bunch more on a conversion kit (think it had something to do with engine nacelles etc.) please keep posting for future reference.

Science is the pursiut of knowledge, faith is the pursuit of wisdom.  Peace be with you.

On the Tarmac: 1/48 Revell P-38

In the Hanger: A bunch of kits

  • Member since
    April 2013
  • From: Eleva, Wisconsin
Posted by Greatmaker on Sunday, March 25, 2018 8:50 PM

Wow you might hate it but you did a fantastic job on the masking. To me it looked like precut masks


  • Member since
    December 2002
  • From: Northern California
Posted by jeaton01 on Sunday, March 25, 2018 11:09 PM

I think it's going to work out juuusssst Fiiine!

John

To see build logs for my models:  http://goldeneramodel.com/mymodels/mymodels.html


  • Member since
    April 2010
Posted by Theuns on Monday, March 26, 2018 11:30 PM

Bob Seger sings when he was younger "my hands were strong and steady, my eyes were clear and bright" 

After yesterday , looking at my preshading efforts I think at 47 I dont poses either of these trates anymore  LOL!

Maybe because I was cleaning and prepping 2 C-47 elevators for a re-cover yesterday my hands were a little more shaky than usual.

The bottom has a lighter shading than on the top, the blue tends to take the shading quite well and on top the dark camo covers it fast so you need to  be carefull with painting it on.
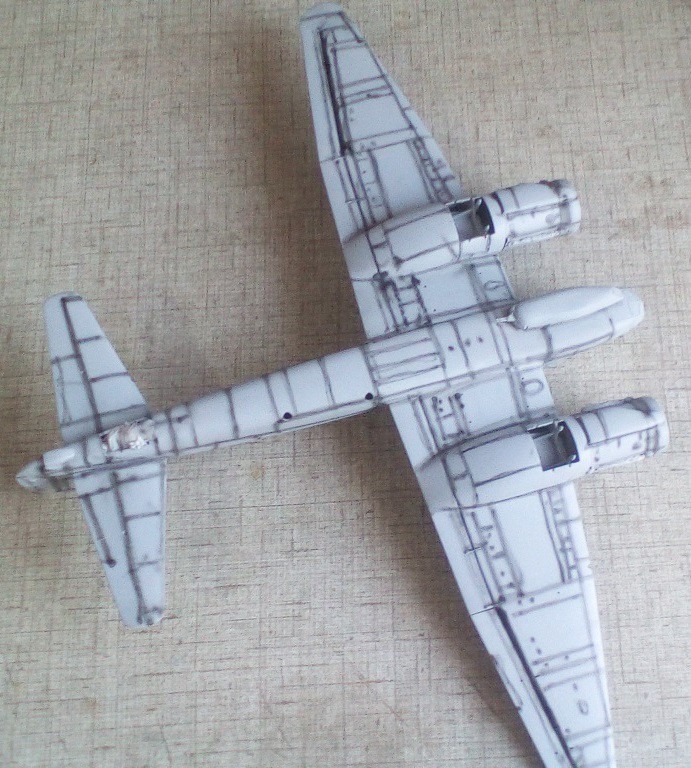
 IMG_20180326_171807 by Theunis van Vuuren, on Flickr
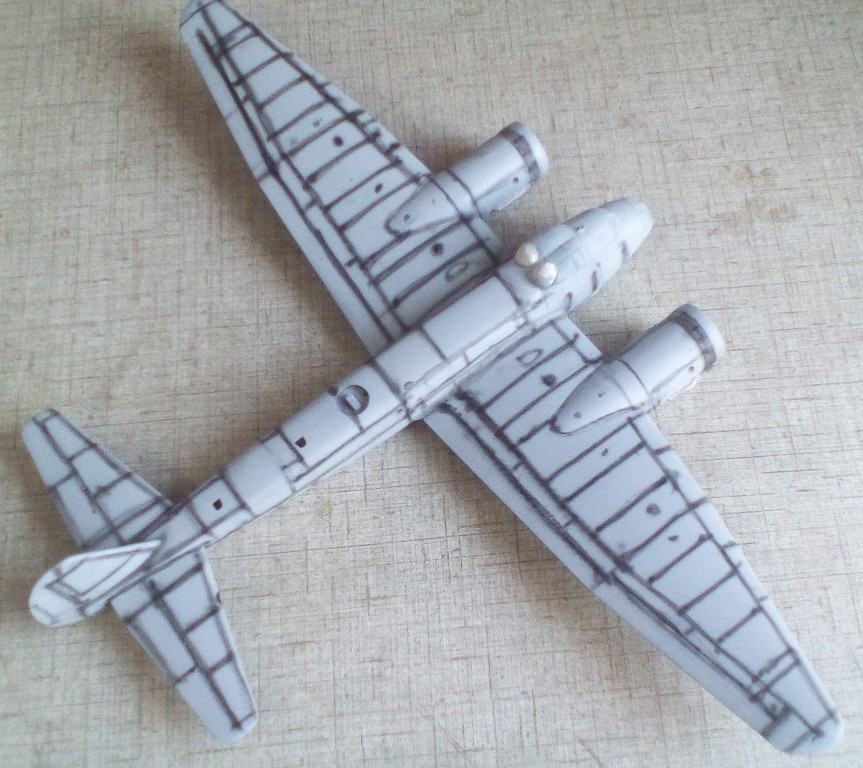
 IMG_20180326_171754 by Theunis van Vuuren, on Flickr

My cell pix dont show the color well but this is HU 65 with the shading just showing through to the naked eye so I am happy woith that
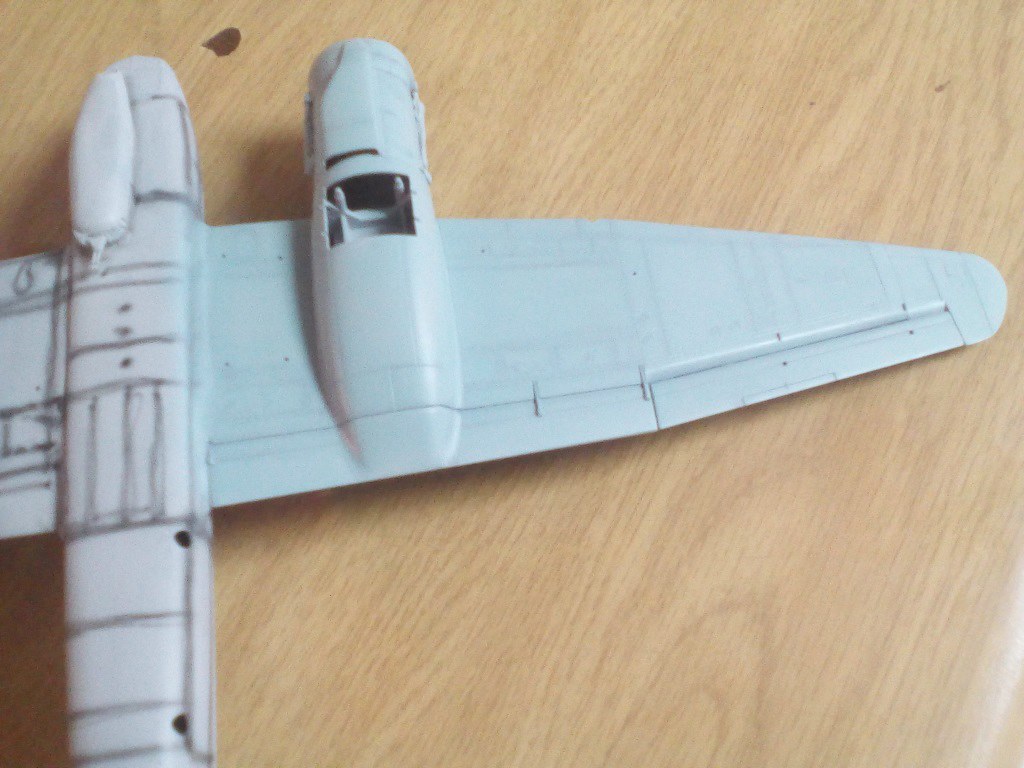
 IMG_20180326_173519 by Theunis van Vuuren, on Flickr

I decided to rather paint on the fuse ID band as I have not had allot of luck using them in decal form.
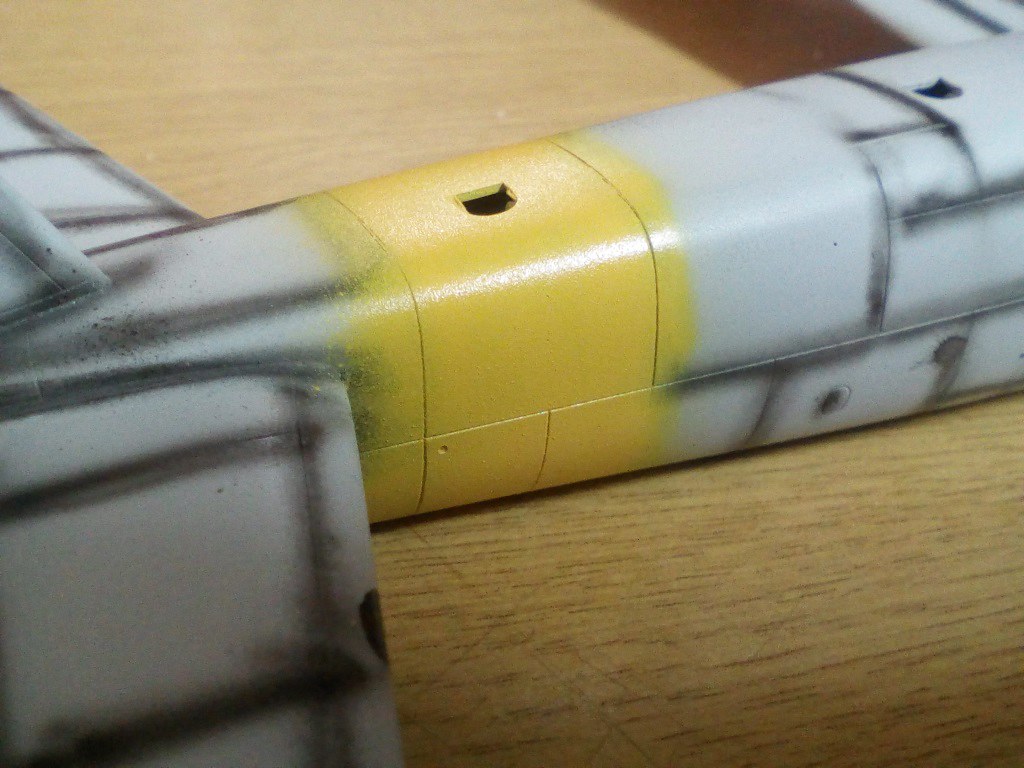
 IMG_20180326_190932 by Theunis van Vuuren, on Flickr


Hoping the weather is hot so I can get the painting done asap, I dont like leaving masking on clear bits to long.


Theuns


  • Member since
    February 2012
  • From: Olmsted Township, Ohio
Posted by lawdog114 on Tuesday, March 27, 2018 12:32 AM
Your walk has purpose though...it looks great! Good choice on fuselage band paint. Much easier than a decal. I look forward to the paint.

 "Can you fly this plane and land it?...Surely you can't be serious....I am serious, and don't call me Shirley"


  • Member since
    April 2010
Posted by Theuns on Tuesday, March 27, 2018 10:13 AM

This pic shows the colour and bottom detail a bit better.

 IMG_20180327_165441 by Theunis van Vuuren, on Flickr


Theuns

JOIN OUR COMMUNITY!

Our community is FREE to join. To participate you must either login or register for an account.

SEARCH FORUMS
FREE NEWSLETTER
By signing up you may also receive reader surveys and occasional special offers. We do not sell, rent or trade our email lists. View our Privacy Policy.