SEARCH FINESCALE.COM

Enter keywords or a search phrase below:

B-17 G 1:48 scale, 351st Bomb Group, 510th Squadron, AC# 43-37862, Fearless Fosdick

22591 views
149 replies
1 rating 2 rating 3 rating 4 rating 5 rating
  • Member since
    August 2019
B-17 G 1:48 scale, 351st Bomb Group, 510th Squadron, AC# 43-37862, Fearless Fosdick
Posted by Night Fighter on Saturday, February 22, 2020 3:15 PM

Greetings all.  I know that I am not of the same caliber of modeller as some I've seen but I don't think I'm too bad.  This plane I am building for a neighbor of mine whose father flew this very aircraft. It is already in progress but I took photos along the way.  Any ideas for improvements would be nice and should there be any actual ww2 B17G bomber folks, I would love to hear from you.

I  don't know the rules for picture submission so I hope mine are not too large.  Once I figure out how to upload photos. 


  • Member since
    August 2019
Posted by Night Fighter on Wednesday, February 26, 2020 6:24 AM
Can someone please tell me how to put pictures into a thread? I have no clue.thanks.
  • Member since
    December 2002
  • From: Bury St Edmunds, Suffolk, England
Posted by Bish on Wednesday, February 26, 2020 6:41 AM

You need a photo hosting site. There are a few out there, i use Flickr, but there are otehrs. Just avoid Photobucket.

I am a Norfolk man and i glory in being so


On the bench: Airfix 1/72nd Harrier GR.3/Fujimi 1/72nd Ju 87D-3

  • Member since
    August 2019
Posted by Night Fighter on Wednesday, February 26, 2020 8:15 PM

Great thanks mate.


  • Member since
    February 2012
  • From: Olmsted Township, Ohio
Posted by lawdog114 on Thursday, February 27, 2020 1:11 AM
I use Shutterfly. You can just copy and paste.

 "Can you fly this plane and land it?...Surely you can't be serious....I am serious, and don't call me Shirley"


  • Member since
    August 2019
Posted by Night Fighter on Wednesday, March 11, 2020 5:55 PM
Well guys I'm going to build something other than a night fighter this time and I'll be building this for a neighbor of mine.  This is from a post I have on another website that specializes in WW2 aircraft.  I just wanted to share with Fine Scale Modeller so that others might gain something from the struggles I go through.

The kit will be Monograms "The Visible B-17G Flying Fortress" 1:48 scale
Accessories will be photo etch detail for each compartment that I can get a hold of as well as a bit of scratch building.
Decals will be generic with some home made decals to add.

There are no photographs that I know of for this particular plane; however, through extensive research through the 351st.org, web page, americanairmuseum.com, b17flyingfortress.de, and lots of photograph searches on line, I've been able to figure out with a 95% certainty what the plane looked like and what all its markings were.

To begin with:
Aircraft B-17G-70-BO built in Seattle Washington, was delivered to Cheyenne 30/5/44; Kearney 8/6/44; Grenier 1/7/44; Assigned 510BS/351BG (Side markings TU-G.) Polebrook 17/7/44; {81m} Returned to the USA Bradley 9/6/45; 4168 Base Unit, South Plains, Texas 18/6/45; Reconstruction Finance Corporation (sold for scrap metal in USA) Kingman 1/12/45. AC name Fearless Fosdick. -Source: Dave Osborne, B-17 Fortress Master Log : From b17flyingfortress,de

The aircraft will be in painted in unit colors as of 23 Feb 1945
Crew:
P 1st Lt. Brooks, Robert W.
CP 2nd Lt. Garner, Joseph P.
N 2nd Lt. Ciraulo Samuel J.
NG Sgt Marrek, Frank
TT Sgt Barclay, Lester D.
RO S/Sgt Engles, Irving C.
LWG S/Sgt Johnson, Carl E.
BT Sgt Patterson, Walter W.
TG T/Sgt Collins, Wallace E.
:Source 351st.org

The plane would have been natural metal with a red diagonal strip across the tail vertical stabilizer running from top rear to bottom forward, in front of the horizontal stabilizers. Near the top of the tail would be a black triangle with a white "J" on it and tail number 337862 written half way down and the letter "G" at the bottom. There would also be a black triangle with white "J" on top of the right wing out near the wing tip. Fearless Fosdick would be written on the lower part of the nose below the windows.

As a side note, the 351st Bomb Group was also the unit 1st Lt. Clark Gable flew with. There are a videos on Youtube of this unit and some of Clark Gable flying with them.
 
Kit
  • Member since
    August 2019
Posted by Night Fighter on Wednesday, March 11, 2020 6:07 PM

Here is the kit as I started washing all the parts and preping for work.

Since the side is clear I have a lot of detailing to do.  Now here is the crew and an extra for the pilot, my neighbor's dad.


  • Member since
    May 2006
  • From: Chapin, South Carolina
Posted by Shipwreck on Wednesday, March 11, 2020 6:47 PM
Night Fighter, You have done your homework on this B-17. If I do not runout of time, I will build my visible kit out of the box with generic markings! Good luck with your build; I will be watching.

On the Bench:

Revell 1/96 USS Constitution - rigging

Kinetic 1/48 YF-104A 5-2957

Trumpeter 1/350 USS Hornet CV-8

Revell 1/48 B-1B Lancer Prep & Reasearch


  • Member since
    August 2013
Posted by Jay Jay on Thursday, March 12, 2020 9:42 AM
I am also watching this thread with great interest as I too am building the Visable B-17 and am about halfway through. I intended to to build it in flight but I don't think anyone makes the figures for it . sigh . I endeavor to super detail this puppy by scratching much of the detail and I have gotten the radio room mostly finished .


 I'm finally retired. Now time I got, money I don't.

  • Member since
    August 2019
Posted by Night Fighter on Thursday, March 12, 2020 7:11 PM

I think that what I do will keep your attention...

Okay, time to do some updates. I've been researching and studying interior colors for this aircraft. 

One of the things I came across was an article written by Martin Waligorski called, "Interior Colours of US Aircraft, 1941-45." This can be found on (www.ipmsstockholm.org/magazine/2004/02/stuff_eng_interior_colours_us_part2.htm). 

The section for B-17's says that the early B-17s had overall Zinc Chromate Yellow interiors, Bronze Green cockpits and navigator's stations, and Aluminium lacquer bomb bays. The general rule for F and G models was Bronze Green in the nose section containing the bombardier and navigator, the cockpit area including the pilots, top gunner/engineer, and radio room. Anti-glare was Olive Drab. 

The inner fuselage sides in the nose, cockpit and radio room were covered with green canvas padding. The green in the photos I've seen look to be a kind of olive drab almost gray green colour. The Cabin floor was made of varnished plywood and high traffic areas were covered with black rubber mats for anti-skid purposes in the waist gun, radio room and top turret areas. The floor in the pilot/navigator cabin was left in natural metal. Pilot and navigator seats were most likely bronze green.

Aft of the radio room, early production aircraft were painted Zinc Chromate Yellow but later versions were often bare metal with Zinc Chromate Yellow or Zinc Chromate Green bulkheads and longerons. In photos presented in the article, I noted that both longerons and stringers were painted Zinc Chromate Green. Other items noted from the photo provided was the supports for walk areas and brackets for supporting equipment were also Zinc Chromate Green. 

Prevailing Colour inside the gun turrets appears to be a Dull Dark Green with later models also using flat black.

Bomb bays and bomb bay doors were unpainted. Wheel wells are believed to be interior green.

Started working on the plane to try and improve the visible wall. Added strips of styrene to enhance the rather flat ribs. Filled in wing root area also with styrene just in areas that may be seen. Also did some priming of the wings.

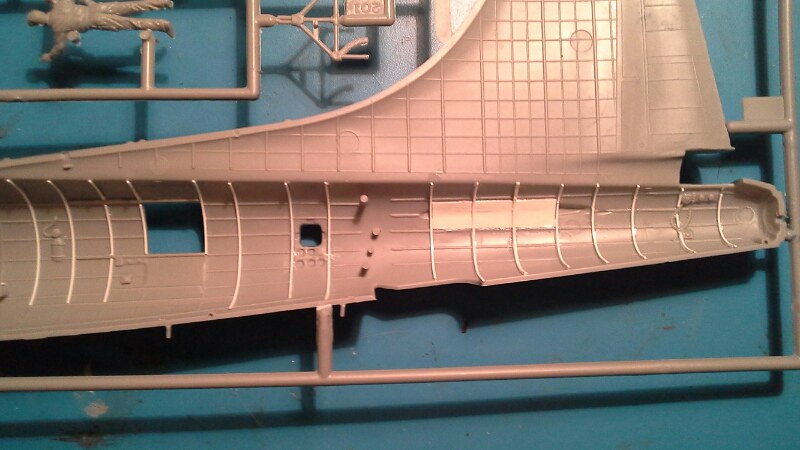
Well it looks like I need to do some minor surgery here. The waist gunner positions were staggered on this construction block of B-17G's. It shouldn't be too bad since I found it early. The hole is straight forward and the steps I can make but the air deflector will be tricky. Thank goodness its not on the clear side as that would be not possible. Oh well, let the surgery begin. Thank goodness for photo etched razor saws. 

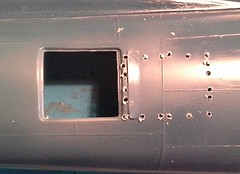
I marked out and drilled the location of the new window, correct location. Then I did some minor cuts. Before removing anything though, I needed to cover over the old window. Used 0.020 styrene cut and shaped to the old window and fitted it to the outside. I'll fit a second sheet to the inside so that the inner surface looks even. Here are photos to record my progress.

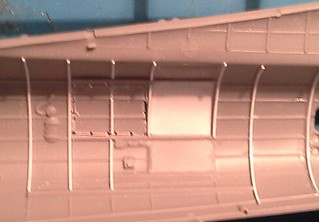
Side note, the ribbing addons are .02x.02 styrene square strip. 


  • Member since
    August 2019
Posted by Night Fighter on Thursday, March 12, 2020 7:25 PM

First off I've finally gotten in all the photo etch parts I ordered and a sheet of generic bomber decals.

20190414_004611(1).jpg

 
The rest of the decals I'll have to make myself. Next, after more research of interior photographs I've worked more around the right waist gunner's position. Of course now I finally get to use the set of dental bits I've had for just such an occasion. 

20190413_235652(1).jpg

 
The one bit not shown was the one currently in my Dremel. The end looks like a wad cutter pellet but rough for grinding. That one I was using to remove surface detail that was incorrect for what needed to be shown

20190414_122254(1).jpg

 The stringers were well represented but not the longerons or stations. These I'm making more defined. 

For those who do not know about what different parts of planes are called, those lines you see running horizontally from nose to tail are called longerons and stringers. The difference is in the size and purpose. Longerons are the larger of the two and are used for structural integrity... to help the plane keep its basic form. Stringers are smaller and add strength to the shape of the aircraft. Stations are the ribs of the plane and bulkheads are, for lack of a better word, walls that divide the different sections. All of this is part of an aircraft construction technique call semimonocoque. Say that ten times fast.


  • Member since
    March 2008
  • From: Ohio
Posted by B-17 Guy on Friday, March 13, 2020 8:53 AM
Nice work so far. I’ll add that the interior colors should mostly natural metal from nose to tail, with the exception of the cockpit. The cockpit had the quilted sound deadening padding. But interior of the nose (bombardier and navigator), bomb bay, radio room and waist sections were natural metal for the bulkheads and inside of the skin. The stamps for the alclad aluminum would even be visible. Google image WWII era B-17 pics, not the restored museum examples that exist now.
  • Member since
    March 2008
  • From: Ohio
Posted by B-17 Guy on Friday, March 13, 2020 8:57 AM

https://imgur.com/a/ivVfY

Look through here, these pics are from the modification center in Cheyenne. The added the pumpkin tail, bulged cheek windows and various other things. These pics are gold!!!

  • Member since
    August 2019
Posted by Night Fighter on Friday, March 13, 2020 9:00 PM

Thank you for the pictures B17guy.  There is a lot that I don't know about the plane but my studies confirm that the padding was not just in the pilots office but in the nose as well and I believe there was one photo that showed it, but like you mentioned it could have been added later.  The reference I provided was from a fellow with IPMS and was throughly researched.  I tend to lean in that direction.  To my mind it would make sense to have the forward area padded since it was near the engines and of course they needed to hear.  The padding I did see for the forward area was of a type that was in small pieces and fit inbetween the ribbing and stringers.  The colors I'm sure are accurate for the time period because they are based, on what I understand to be, on standing orders.  They did change those inside colors from time to time.  At the end of the war, again as I understand it, a lot of painting was not done because it added weight to the plane.  The  plane I'm doing is based at a specific time and at a specific place.  Yeah I know you know that.  Thanks though.  I really appreciate the information.  It will help during the build.  Also, this is at the moment my moving a thread I've already done to this forum.  I have not completed the plane yet but I am further along than the thread currently suggests.  My purpose is to show how I got to where I'm at now.

This picture is clearly from a restored aircraft and does not necessarily reflect actual history.


  • Member since
    August 2019
Posted by Night Fighter on Friday, March 13, 2020 9:22 PM

Time for more updates. In preparation for the photo etch additions, I went over the different sections and modified the necessary parts. 

The seats are not what I have seen in dozens of photographs.

The wheels I decided were'nt too bad, so I used a razor saw to help with the tread.


  • Member since
    August 2019
Posted by Night Fighter on Friday, March 13, 2020 9:30 PM

It has been a little difficult finding photos of specific areas, much less any technical drawings. The rear area between the tail wheel retraction gear and the tail gunner area is not a popular place and usually not worth modeling since no one ever sees it. Still I did find some clues through photos posted around the internet. I plan to just generally model this area with what little I know about this plane and paint over this section just enough to hint its there without going overboard. Here are some photos I've found from around the web.

Then there is the front section. Like the waist gun area, there are ribs and longerons that are very pronounced. I plan to strip down the molded on equipment, build up the framing in the appropriate places, then scratch build and add photo etch parts to as close as it should be. 

16690552293_ebd4636d4c.jpg

The other nice thing about this photo is it shows the bronze green color that was purportedly used on bombers of this time period although it would be close. The date of manufacture of this aircraft shows that it was built in Seattle Washington just a couple months before the color specification changed... again. 

The cockpit area is one of the very few I've found that shows the bronze green color.

cockpit.jpg


  • Member since
    August 2019
Posted by Night Fighter on Friday, March 13, 2020 9:35 PM

Finishing up the day with more rib work. I added the armor plating by the waist position and the upper portion of a couple or ribs where the flight cables will go through. I also figured out the tail wheel situation. I need to make a half shell for the tail wheel to retract into and a canvas cover for the forward part. Then I can make the retracting piston and other mechanisms to be shown outside the covers and still retain the strength I need to hold up the plane.

Here is where I finished.


  • Member since
    June 2018
  • From: Ohio (USA)
Posted by DRUMS01 on Friday, March 13, 2020 10:53 PM

Wow I really like your vision and what you are doing.

I will watching this one to the end...

Eats


Ben

"Everyones the normal until you get to know them" (Unknown)

LAST COMPLETED:

1/35 Churchill Mk IV AVRE with bridge - DONE

NEXT PROJECT:

1/35 CH-54A Tarhe Helicopter


  • Member since
    March 2008
  • From: Ohio
Posted by B-17 Guy on Saturday, March 14, 2020 11:42 AM
I know where you got your research from with IPMS, I’ve seen that article referenced numerous times. And while I’m not saying that he is flat out wrong, with regards to his color call outs, I’m saying I’ve never seen proof of them being correct in pictures. I’ve studied the B-17 specifically for a good 20 years or so myself. I don’t call myself B-17 guy on here just for fun. I mean, the pics in the link I posted, were taken, during the war..... so I’m pretty sure they are accurate. Just trying to help. Take the advise or don’t. It’s your model.
  • Member since
    August 2019
Posted by Night Fighter on Saturday, March 14, 2020 4:02 PM

B17guy, I'm sorry, I meant no offense.  I'll take any advice you send my way. Thanks

  • Member since
    August 2019
Posted by Night Fighter on Sunday, March 15, 2020 2:05 PM

So on with the project.

I noticed that the tailwheel distance wasn't right during a fit check when compared to photos so I made a few modifications.  Also that whole area just didn't look right to me...  so I went to work.

I cut off stuff that wasn't needed and strengthened what I had with a paperclip.

fitted it in and started recreating the tail landing gear mechanisims. 

Looking a little better now.

For awhile I wasn't sure how this area looked so this is what I had done.  Later I made some corrections to better match a maintenance manual I came across.

Then there was the dog house that was part of the wheel well.  I used a water bottle, yogurt stick, and wine cork to make it.

I later found the holes on one part were incorrect so I filled them in.  I will change things as needed to try to get it right.

Then I needed the canvas part so I used tissue and Elmers to create the material.

I couldn't quite get the sag I saw but I figured it doesn't look too bad.

  • Member since
    August 2019
Posted by Night Fighter on Thursday, March 26, 2020 8:17 PM

Doing more research into the tail section and realized my worm gear motor is slightly off. Easy enough to fix. I intend to finish building up the internal structures today... fingers crossed. 

Here is what I've been able to do in the little time I had. The worm gear drive was too far to the rear and gear motor not present. That's corrected. I also got futher on the forward section. 

20190504_174926-1(1).jpg

20190504_200116(1).jpg

This front area is very tricky. I may need to put a couple of windows in before I frame them correctly around them. There are also several stringers missing. These will have to be added with stretched sprue. 

6050658827_7df0be9dbb_b(1).jpg

B-17G_Flying_Fortress_00014_(1).jpg

I think I will put the windows in and tape them up good. Then put a little clear acrylic varnish around the edges to prevent paint and fumes from getting under the tape and attacking the clear plastic.

I've added the windows and built up the framework around one thus far. Rounded the inside corners and will sand round the outside corners. Looks promising.

20190505_135431(1).jpg

I finally got the forward windows looking better and added stringers I saw in photos but not the kit.

20190511_155010(1).jpg


  • Member since
    August 2019
Posted by Night Fighter on Thursday, March 26, 2020 8:24 PM

Did some sleuthing as to the name and possible artwork on the aircraft. Fearless Fosdick was represented one of three ways. It depended on first, if there was a unit artist or not. Then it depended on advertising flyers that were seen by the crew during painting. With this in mind, I researched Fearless Fosdick and here is an ad that were circulated during that time for this aircraft.

28430840_426483564451214_8028766714999078912_n.jpg

...Along with the comic cover. 

14448185_1356715377686026_2120593364565884928_n.jpg

Now I'll show photos of bombers named Fearless Fosdick and see if you can find some similarities.

FEARLESSFOSDICK-V3.JPG

b3253e7fea6ab1e2c341ab93bcc4d220.jpg

I'm seeing a trend aren't you?

42-102957-600x463.jpg

If there were no unit artists, or the commander was against art work, then the name was just written on the side.

43-37838-1200px-600x472.jpg

I just need to look at other planes of that unit and look at the quality or absence of art work on their planes. If there are several examples of art work then I'll add a picture, if not then just letters will do.


  • Member since
    August 2019
Posted by Night Fighter on Friday, April 3, 2020 6:52 PM

Well after going through every photo available for the 351st Bomb Group, I have found that they did not have a regular artist. About 80% of the photos available did not have art work from what I could find. What they did have was a colligrapher. Most of those that did have art work were done around the beginning of the war. I am very certain that this plane only had its name written on it and I would bet that it would have been in the style or font of the comic book and odds are that it was written on the lower left side of the nose if not both sides.

Started airbrushing area I've worked on. I will airbush this area again to build up the color.
20190511_191559(1).jpg
20190511_191609(1).jpg
 
So far so good. :)


  • Member since
    August 2019
Posted by Night Fighter on Friday, April 3, 2020 6:54 PM

Doing dry fittings to check for any hangups and for corrections I will need to make. Also painting but that will be later today.

First the seats are different. B17's I've looked at didn't have the high backs as the kit has.  The high backs I have seen were in the movies.  I think I will go with the low backs that I have seen more photos of.

20190518_161703(1).jpg
Seat assembly.jpg

 
Next, I saw the great gap where the wing attaches but I already knew about it.

20190518_162025(1).jpg


But there are also these great alignment pins that will need to be addressed.

20190518_164332(1).jpg
 
20190518_164354(1).jpg
20190518_164341(1).jpg

 
Not to mention that the bomb bay has really no detail to it. Not even a door from either side as can be viewed above.

 
B-17G_Flying_Fortress_00008_.jpg


Then there are the rudder pedals that are too close together.

20190518_165817(1).jpg
b-17-flying-fortress-sentimental-journey-C3JYDX(2).jpg

 
I've got my work cut out for me.


  • Member since
    August 2019
Posted by Night Fighter on Friday, April 3, 2020 6:58 PM
Started the two chairs. I added .020 styrine sheet to the back of the chair then cut and ground the chairs into proper shape. 
20190518_191324(1).jpg
 
20190518_191341(2).jpg
 
20190518_230203(1).jpg
 
20190518_230218(1).jpg
 
20190518_230939(1).jpg
 
I have test fitted the chairs in place and they seem ok. Just needed to add the extra cross pieces.
Also cut out extra room for the pedals but decided not to try moving them yet.


  • Member since
    January 2015
Posted by TheMongoose on Saturday, April 4, 2020 8:30 PM

This has been a good read so far. Looks like you're doing a great job. Probably going to be one of the best visible B-17's.

In the pattern: Scale Shipyard's 1/48 Balao Class Sub! leaning out the list...NOT! Ha, added to it again - Viper MkVii, 1/32 THUD & F-15J plus a weekend madness build!

  • Member since
    August 2019
Posted by Night Fighter on Sunday, April 5, 2020 10:49 AM

Thank you very much.  Your comment is much appreciated.

  • Member since
    August 2019
Posted by Night Fighter on Monday, April 6, 2020 7:52 PM

After modifing one of the chairs, I started on the second one.

20190519_113408(1).jpg


20190519_113435(1).jpg


The chairs as they now appear.
20190519_130130(1).jpg
 
20190519_125844(1).jpg
 
 
Just figured out how to fix the pedals so did a quick fix...
20190519_134631(1).jpg
20190519_134656(1).jpg
20190519_134830(1).jpg
 
Fit tested...
20190519_135723(1).jpg


  • Member since
    August 2019
Posted by Night Fighter on Monday, April 6, 2020 8:02 PM

Just posting pictures at the moment. Will go into more detail as time permits.

20190602_113106(1).jpg
20190602_113119(1).jpg
20190602_113133(1).jpg
20190602_113145(1).jpg
20190602_113209(1).jpg
20190602_113246(1).jpg
20190602_114943(1).jpg
20190602_115623(1).jpg
20190602_121556(1).jpg
20190602_135757(1).jpg
20190602_140248(1).jpg


20190602_135817(1).jpgAfter studying photos of old planes and reading what the floor material was, I decided to go ahead and add the section going from the pilot's station through to the navigator's station.


Since I decided to use real wood for the plywood floor covering, I drilled holes where the table legs should be and where the navigator's stool would sit. Place holders if you will. I also added styrene to build up the edges of the one entrance and extend the bulkhead to the lower part of the aircraft. I attached the turret pin and plate and made them movable for later. I also drilled lightning holes in the vertical section between the floors as all photos I've seen of this area have them. 

The plywood is 1/32nds thick balsa that was cut to fit within the area intended and sanded to near construction paper thin. I used CA glue to attach the wood then cut and sand to shape. The colored chalk was used to stain the wood to the appropriate color. A kind of orange-ish stain due to the varnish used on the wood. I rubbed orange and a touch of red chalk powder into the wood then put a bit of liquid floor polish on it to seal it. Once the wood dried, with the pigment still in the wood, I sanded it a little more to remove the rough areas caused by the wood being wet. The final sanding was with a high grit (1K) paper that polished the wood smooth. I really liked the way it came out. The upper deck was done the same way, just cut and sanded carefully to allow for the two protrusions to show while I fitted it. The only thing that bothers me at the moment on this area is the circular portion of the upper deck. I'm not sure if that was on all of them or some. If I need to I will recreate this. 

The chairs were then added along with a shot of Bronze to set the under color. I'll dry brush the final green, slightly lighter in color, to get the details to pop. Under the flight deck will be painted aluminum and a aluminum floor runner going between the two openings will be added along with the detail I've been able to find for this area. 

I plan to use tissue paper stretched with water and white glue to make the canvas cover for the back side of the instrument panel.
maxresdefault (1).jpg
 
My next problem will be where to put the several oxygen tanks that allowed the plane to fly at such high altitudes. There are two areas in question. I've seen them located behind the pilots seats and I've seen them located beneath the floor under the pilot seats. I'm not definite about which one is correct. Looking for internal diagrams to be sure before I commit to them. Hope you enjoyed.


JOIN OUR COMMUNITY!

Our community is FREE to join. To participate you must either login or register for an account.

SEARCH FORUMS
FREE NEWSLETTER
By signing up you may also receive reader surveys and occasional special offers. We do not sell, rent or trade our email lists. View our Privacy Policy.