SEARCH FINESCALE.COM

Enter keywords or a search phrase below:

Huckbein- AmTech's sweet little birdie, she's done!

9262 views
44 replies
1 rating 2 rating 3 rating 4 rating 5 rating
  • Member since
    December 2002
  • From: Whidbey Island, Washington
Huckbein- AmTech's sweet little birdie, she's done!
Posted by chukw on Saturday, November 25, 2006 8:31 PM
Let's build a model airplane, shall we? :D Here are some in-progress shots of my AmTech Ta-183 in glorious 1/48 scale. Here's the back of the IP, plumbed with various bits of wire and solder. Out-of-the-Bx? What's all that about? :D Man, this seemed a lot easier when I was 15! Danged reading glasses combined with a magnifying glass nowadays... :8 Can any late-war enthusiasts tell me what kind of glass goes on this gunsight? Thanks! I drilled out an opening for the belts, dinged up and creased the cushions and added the grab handles on the seat. Here it is after and before. Ach, der shtick! Mit der Wire beadden-onnen... Here's the tub with base color enhanced by dark and light shading. Here it is after Future, a dark oil wash, flat coat, drybrushing with pale tan and details barbarically hacked in with a housepainting brush. Black makes nice paint chips, dontcha think? Silver is too harsh, and unpainted metal oxidizes and darkens quickly. I'll hit it with some pencil graphite later, tho... I've got the RLM 02 parts mostly ready to go as well. Those colorful bottles in the gear bays need some love, and here and there colors and various touches need to be worked in. I'll keep you posted.
jwb
  • Member since
    February 2006
  • From: Parkton, NC
Posted by jwb on Saturday, November 25, 2006 8:38 PM
That's gonna be an awesome looking office. Looks great! Interesting subject too.

Jon Bius

AgapeModels.com- Modeling with a Higher purpose

"For I know the plans I have for you," declares the Lord, "plans to prosper you and not to harm you, plans to give you hope and a future." ~ Jeremiah 29:11

  • Member since
    February 2005
  • From: Cleveland, OH
Posted by RadMax8 on Saturday, November 25, 2006 10:54 PM
Wow you're off to a fantastic start!! Please keep us posted with how this goes... The huckbein is a VERY interesting aircraft.
  • Member since
    July 2003
  • From: Bicester, England
Posted by KJ200 on Sunday, November 26, 2006 4:06 AM

Great work!

That is going to be a stunning pit by the time you've finished.

Karl 

Currently on the bench: AZ Models 1/72 Mig 17PF

  • Member since
    May 2006
  • From: UK
Posted by David Harris on Sunday, November 26, 2006 6:52 AM

It is looking nice & am looking forward to seeing more on the build progress.

After picking up the Huma Triebflugel, this kit tops the wanted list for my Luftwaffe 46 stash.

  • Member since
    March 2006
  • From: Boyertown, PA, USA
Posted by Dubau on Sunday, November 26, 2006 7:51 AM

WOW Great work so for. The DB and Weathering look GREAT !

More More More I want more pics....

Bud

" You've experienced a set back, and without set backs and learning how to fix them you'll never make the leap from kit builder to modeler "
  • Member since
    April 2005
  • From: Piscataway, NJ!
Posted by wing_nut on Sunday, November 26, 2006 8:59 AM

Excellent work so far.  Looking forward to the final product.


 Dubau wrote:

More More More I want more pics....

Bud

The photo junkies are hereWink [;)].... we should be hearing form Ed any ol' time nowBig Smile [:D]

Marc  

  • Member since
    February 2003
  • From: A Spartan in the Wolverine State
Posted by rjkplasticmod on Sunday, November 26, 2006 9:26 AM

Great looking pit.  Very nice detail work.

Regards,  Rick

RICK At My Age, I've Seen It All, Done It All, But I Don't Remember It All...
  • Member since
    March 2004
  • From: Placerville, CA USA
Posted by Mark Joyce on Sunday, November 26, 2006 9:48 AM

Obviously well on your way to an outstanding build.  Hopefully all that beautiful work will be visible when you're done.  Looking forward to the completed project!

Too bad AMtech appears to have gone the way of the Dodo bird, though.

Mark

Ignorance is bliss
  • Member since
    July 2004
  • From: Northern KY
Posted by mucker on Sunday, November 26, 2006 10:13 AM
Awesome job so far, chuk. I can't wait to see more of your progress

  • Member since
    December 2002
  • From: Whidbey Island, Washington
Posted by chukw on Monday, November 27, 2006 10:00 AM
Thanks, guys- your encouragement means a lot.  I'll post more when I've got 'em!
  • Member since
    November 2006
  • From: Castro Valley.CA
Posted by TheLastPriest on Monday, November 27, 2006 3:35 PM
I gotta say that is beautiful, im working on my first model that I have ever tried to get a good amount of detail onto and its stuff like this that gives me something to strive for

It is only the intellect that keeps me sane; perhaps this makes me overvalue intellect against feeling

  • Member since
    December 2002
  • From: NYC, USA
Posted by waikong on Monday, November 27, 2006 4:01 PM

Its looking real nice. That kit was one of the top kits I've built, while it doesn't have too many parts, the fit is just great and lots of room to detail.

  • Member since
    December 2002
  • From: Whidbey Island, Washington
Posted by chukw on Saturday, December 23, 2006 7:44 PM
Life and work have been keeping me pretty busy as of late, but I've been able to sneak in some modeling here and there. It feels like it's been forever since I've glued two pieces together! 
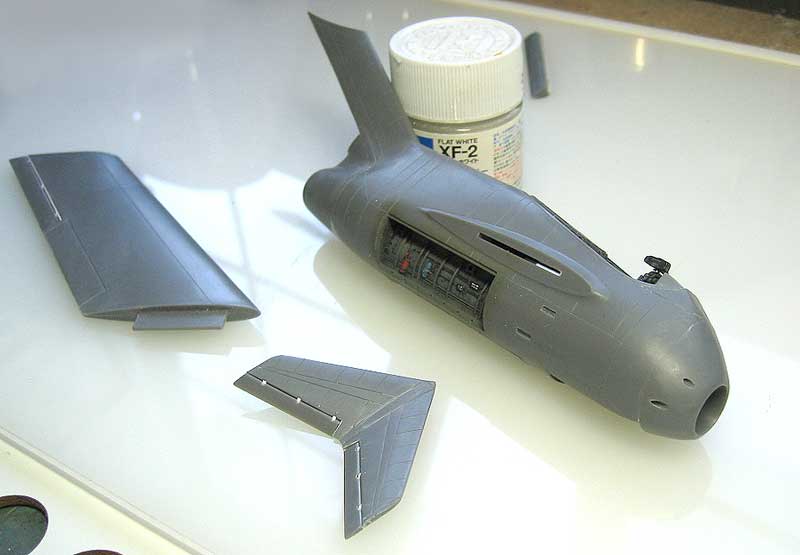
I was kind of surprised at the niumber of subtle sink marks on this particular pressing of the kit- guess I'm just lucky. I don't mind, though- there's something theraputic about filling, sanding and enjoying the satisfaction of a nice, smooth fuselage. 
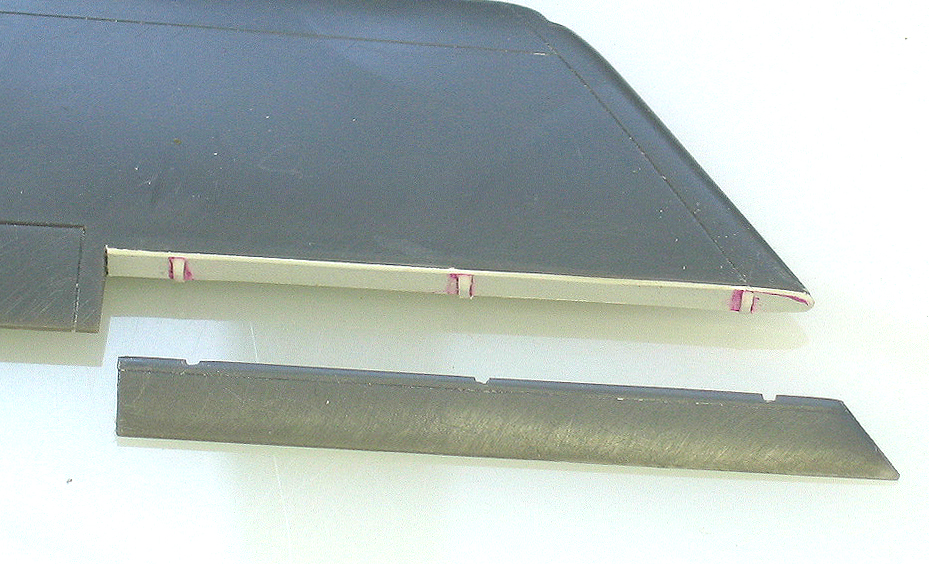
It was an easy job to separtate the ailerons and such- cover the gaps, some bits of styrene for hinges... 
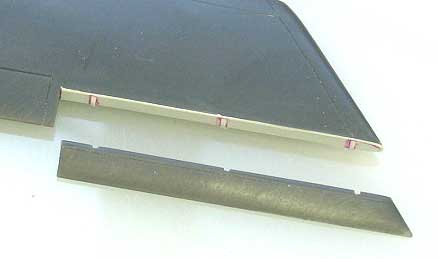
... and voila! Nicely animated flying surfaces. The Ta-183 was intended to be flown by the rudder and ailerons, with the elevators being used mostly as trim surfaces- fascinating! That said... 
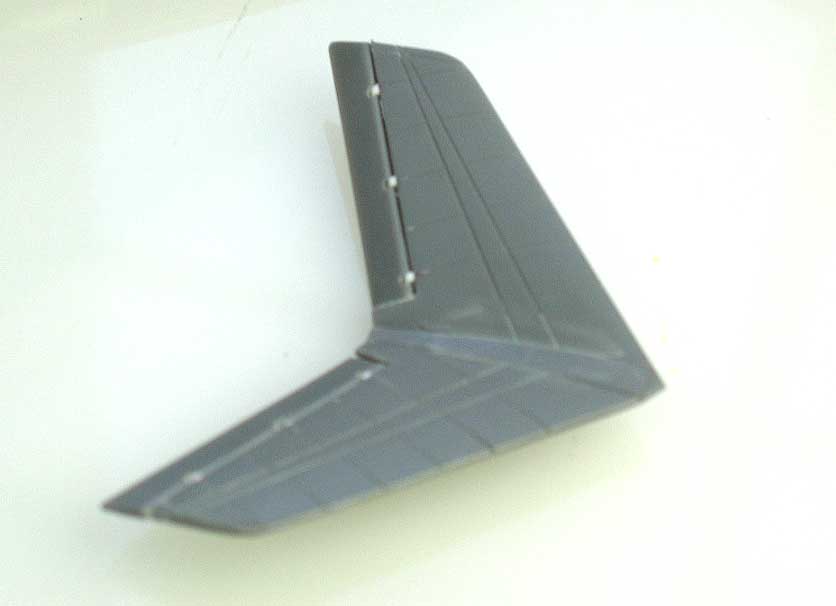
...I dropped the elevators a bit as well. I sanded the elevators and wings to have sharper trailing edges. 
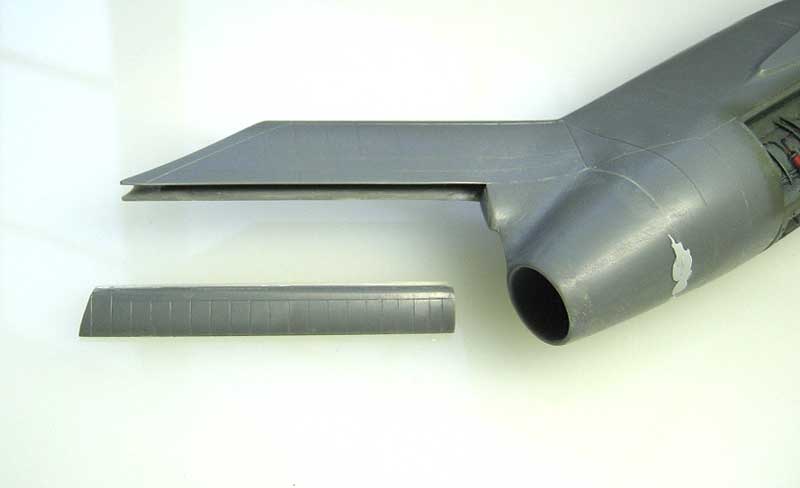
That big, fat rudder got the treatment as well. I glued a length of styrene rod to it's leading edge and faired it in with putty, and thinned the vertical fin inners to fit. On a side note, I've been using Tamiya Light-Curing Putty- it works pretty well. Apply putty (quickly, mind you) and put it in direct sunight or right up close to a good fluorescent tube. Hardens up in two minutes max, just a swipe of laquer thinner and you're good to sand. 
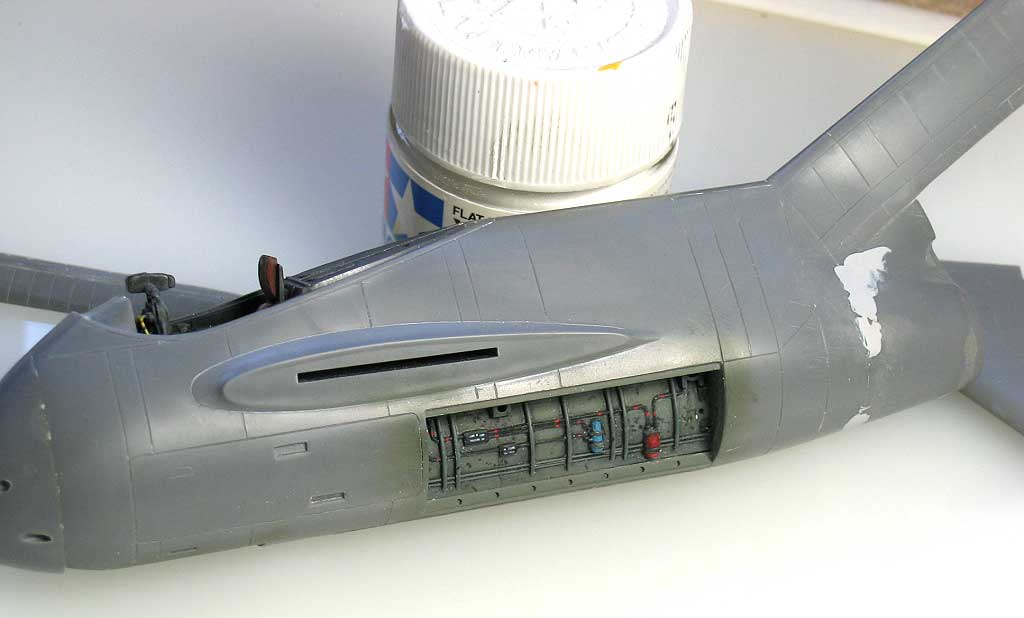
Here's the port gear bay in place, with some Mr. Surfacer 500 yet to be smoothed in back on the butt end of things. 
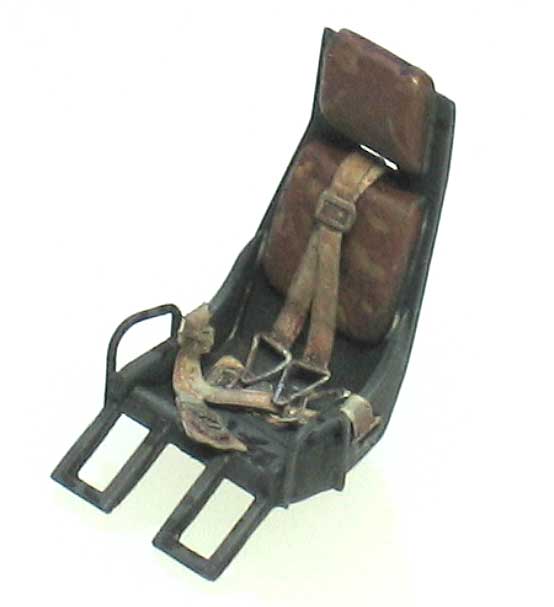
I had some old fashioned, unpainted Eduard seat belts left over so I screwed up my nerve and painted them myself. :whistle: 
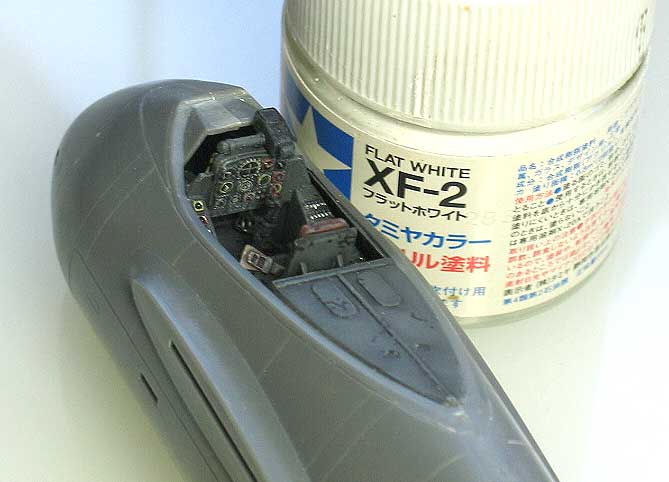
Here's how it looks in place. 
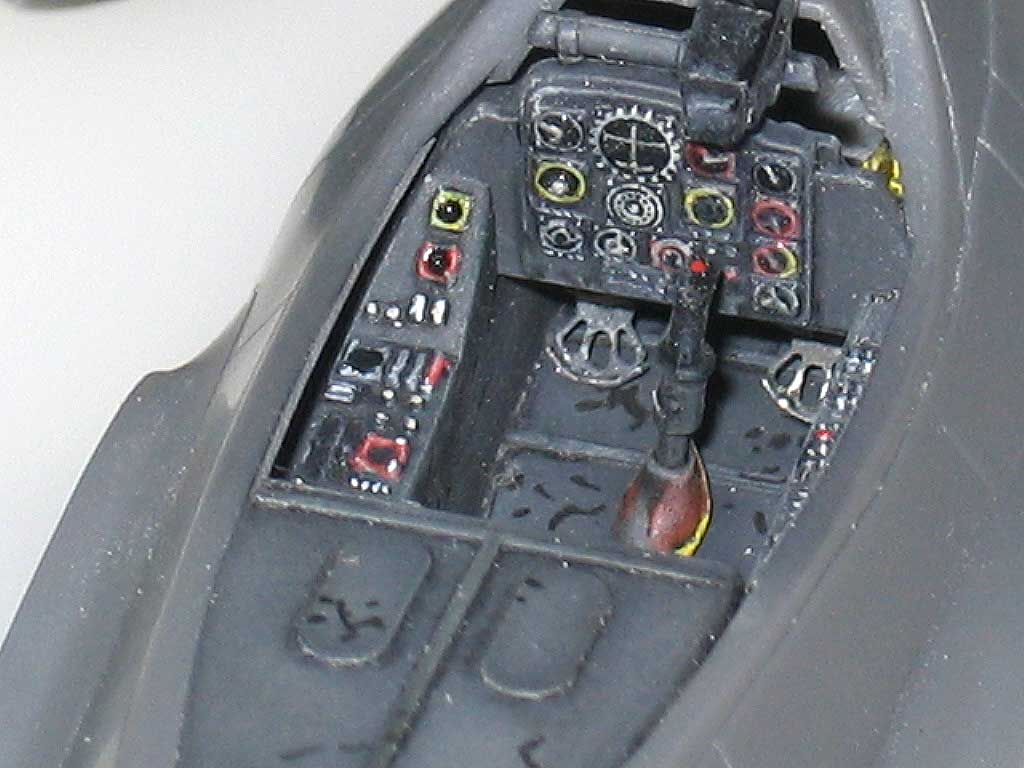
I had some rudder pedals left over as well- you can just see 'em in in finished 'pit. 
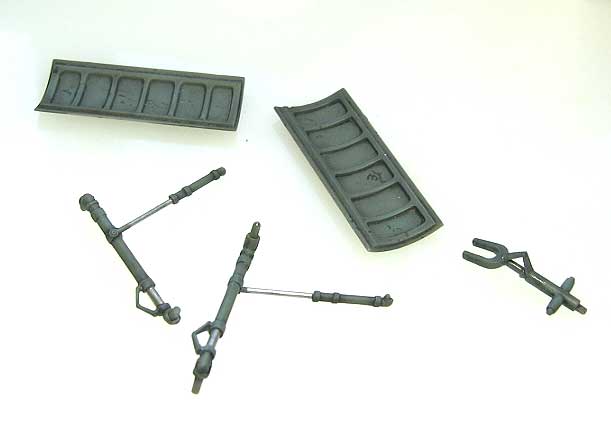
The landing gear are coming along- I added a torque link to the front strut, and may add a sway brace as well. The main gear still need brake lines, but they'll get 'em. Tomorrow's Christmas Eve- if I get my wish I'll have some more modeling time. I hope you all enjoy peaceful and joyous holidays, wherever you be!
  • Member since
    February 2005
  • From: Cleveland, OH
Posted by RadMax8 on Saturday, December 23, 2006 11:22 PM
Wow. Looks really really god from where I'm sitting. You're doing a great job on that chubby little bird. I especially like your easy method of "animating" the control surfaces!
  • Member since
    March 2006
  • From: Boyertown, PA, USA
Posted by Dubau on Sunday, December 24, 2006 10:37 AM

Your doing a SWEET Job on that. WOW !

Bud 

" You've experienced a set back, and without set backs and learning how to fix them you'll never make the leap from kit builder to modeler "
  • Member since
    December 2002
  • From: Whidbey Island, Washington
Posted by chukw on Sunday, January 14, 2007 2:30 PM

Progress! Assembly went well, and I got the basic camo laid down in an afternoon. The camo colors are the old PollyS range with the eagle on the bottle. New PollyS airbrush thinner caused an amusing chemical reaction with the paint, resulting in an expanded. clotty mass gunking up the airbrush. Yuck [yuck] Tamiya thinner worked perfectly, allowing for a nice, smooth application. Since it's a Focke Wulf, I'm painting it much like an FW 190 with a late war 76/75/83 scheme. I haven't done mottling in twenty years! I've got a tip for my fellow airbrushers who are sick of paint building up on the needle: apply a little Rain-X. Rain-X id the US brand name for a silicone windshield treatment that makes rain roll right off the glass, and darned if it doesn't make paint roll right off the needle! I applied the grauviolet mottle with an untreated needle and had to constantly unscrew the tip and clean it with a damp cotton swab. I pulled the needle and added a tiny bit of Rain-X, wiped it dry and reassembled to apply the 83 lichtgrun. There was a marked improvement, and no ill effects with the paint. You'll want to try this one- trust me!

Here's a shot of the rudder- I scribed some new inspection panels here and there to try out my new Mission Models scribers. I can report that they worked beautifully. Another tip- I shaved off the raised ridges around newly-scribed lines with an old-fashioned double-edged razor- the blue-steel kind- snapped in two down the middle. This allowed for a lot less sanding and rescribing. The flexibity of the blade allows it to conform to curved surfaces without digging into the model. A yellow beak (Tamiya Flat Yellow)seemed appropriate, although black might be better for a raven... I opted for only two external stores racks. The mottling was applied with very thin paint sprayed at low pressure with an Iwata Custom Micron B. The Defence of the Reich ID bad was masked off and sprayed with Tamiya Flat Blue, lightened a bit with white. Next comes weathering- this bird will have seen some action by the time I'm through it! I'll probably give it a coat of Future later this afternoon to protect the finish so far. Stay tuned!

  • Member since
    February 2003
  • From: Sandusky Ohio, USA
Posted by Swanny on Sunday, January 14, 2007 2:39 PM
That's looking nice!
  • Member since
    December 2002
  • From: A secret workshop somewhere in England
Posted by TANGO 1 on Sunday, January 14, 2007 4:30 PM
Very impressive! Thats just superb work you have done on the ''pit. This is looking like a winner to me. Thanks for sharing this one with us.
Regards, Darren. C.A.G. FAA/USNFAW GB
  • Member since
    December 2002
  • From: Whidbey Island, Washington
Posted by chukw on Monday, January 15, 2007 11:29 PM
Thanks, guys- I'll keep you posted on the build.  She's got her coat of Future and will cure for the week.  I had a small area of alligatoring in the RLM 76 on the bottom of the stabilizer- I'll have to patch that over, cure, Future, cure... patience- the modeler's virtue!  I'll work up the landing gear and wheels as all that's going on-paint the missiles as well!  
  • Member since
    February 2003
  • From: Melbourne, Australia
Posted by darson on Tuesday, January 16, 2007 5:38 AM

That's some awesome work there, please post some more pics when you have them.

Also, when I built this kit a couple of years ago the one thing that disappointed me was the air intake (or lack thereof) in the nose.  Sorry if I missed this in your post but how are you going to deal with it?

Cheers 

  • Member since
    December 2002
  • From: Whidbey Island, Washington
Posted by chukw on Wednesday, January 17, 2007 10:22 AM
Hey, darson- what are FOD covers for, anyway?   I'll make a nice little styrene cover with a grab handle, paint it red and hopefully find an appropriate stencil for it.  Problem solved!
  • Member since
    October 2003
  • From: Everett, WA
Posted by gwaihir on Wednesday, January 17, 2007 11:49 AM

Looks really nice. I really like the weathering you have done.

Leon

Click the banner to see my builds.
  • Member since
    December 2002
  • From: Whidbey Island, Washington
Posted by chukw on Sunday, July 22, 2007 12:24 PM
Back in gear! I put her aside while I built my B-25H for review on Modeling Madness. I decided to go all-out with the decals- this is just for fun, right? I also decided to try a bunch of new things- like really cutting away all the clear film on a decal. Here's how crazy people do it: I used Microset and Microsol, followed by a hit of Solvaset to get the decal down into the panel lines. That gooey look is just a little damage to the Future coat and will disappear after another coat. For the lower wing crosses I thought I'd try cutting my own masks. A quick spray... ...and viola! Air Superiority Grey, 1946 style! Here's an overall shot- all are kit decals (very nice) except for the 8's. These were from the Tamiya FW190 A-8/R2 kit. I was worried thate checkers would be difficult, but when on quite easily. They really "snuggled down" under the Solvaset- but shrunk a bit in the process. nothing I can't touch up easily... Next: weathering begins! Stay tuned... 
  • Member since
    December 2002
  • From: Whidbey Island, Washington
Posted by chukw on Sunday, August 5, 2007 7:48 PM
I did some subtle post-shading and took off the masking. 


The two-part swastika decals were a bear to fit after I'd trimmed away most of the clear film.


The kit main gear doors fit so well they acted as perfect masks- held on a blob of blue-tack each.  


Here's a captivating bit of modern sculpture....  Bits and pieces!


On to more weathering!
  • Member since
    December 2002
  • From: Whidbey Island, Washington
Posted by chukw on Saturday, August 11, 2007 8:45 PM
Thanks, blackcollar!

I've had a chance to do a bit more work on this sweet little jet:  I applied a quick oil wash of black burnt sienna to all of the panel lines.  

I wipe the excess wash away with a q-tip dampened with Humbrol thinners, drawing the color along the slipstream.


Now on to the filters.  There's no better way to break up the uniform nature of the model's colors, imparting a greater sense of scale and dirtyness.  Dabs of oil piant, straight from the tube, are spotted here and ther long the fuse and rudder- don't forget the gear doors!


Take wide brush, again merely moistened with thinner and work the dabs of paint out over the surface of the model.  The ideea is not to make a wash, but a thin film of paint to modify the base coat.  Clena your brush often, so as to keep the effect from becoming a monochrome.


On the fuselage and its components, draw the film of paint down in vertical strokes.


The tailcone was painted black, the given a thinned coat of bright silver.  Bands of transparent brown, blue and yellow were sprayed in rings to simulate the effects of jet blast.
  • Member since
    August 2007
Posted by ben1227 on Saturday, August 11, 2007 9:08 PM
Nice work on an interesting subject! :D What is your stand that the 183 is sitting in? I'm gonna get one of those!
.:On the Bench:. Tamiya 1/72 M6A1-K
  • Member since
    January 2003
  • From: 40 klicks east of the Gateway
Posted by yardbird78 on Saturday, August 11, 2007 9:10 PM

That is some beautiful work on the little bird.  Your detailed description of the weathering is really neat and helpful.

Darwin, O.F.  Alien [alien]

 ,,

The B-52 and me, we have grown old, gray and overweight together.

  • Member since
    February 2003
  • From: A Spartan in the Wolverine State
Posted by rjkplasticmod on Saturday, August 11, 2007 9:27 PM

Excellent work Thumbs Up [tup].  The painting/weathering is first rate.

Regards,  Rick

RICK At My Age, I've Seen It All, Done It All, But I Don't Remember It All...
  • Member since
    September 2003
  • From: South Central Wisconsin
Posted by Daywalker on Saturday, August 11, 2007 11:03 PM

Awesome detail work!  Love your photos and explanation of the weathering, really helps to have a visual!

Frank 


JOIN OUR COMMUNITY!

Our community is FREE to join. To participate you must either login or register for an account.

SEARCH FORUMS
FREE NEWSLETTER
By signing up you may also receive reader surveys and occasional special offers. We do not sell, rent or trade our email lists. View our Privacy Policy.