SEARCH FINESCALE.COM

Enter keywords or a search phrase below:

Steel Cats (Sept. 2012-Aug. 2013)

322067 views
3330 replies
1 rating 2 rating 3 rating 4 rating 5 rating
  • Member since
    May 2010
Posted by Shawker on Tuesday, April 9, 2013 7:55 PM

Work on my Tiger II definitely slowed the last few days but got the zimm on the side, front and turret just need to do the rear end, put it all together, finish painting and weathering.  Wow after reading this seems like I just got started on the kit lol.

  • Member since
    July 2006
  • From: San Francisco Bay Area
Posted by bufflehead on Tuesday, April 9, 2013 11:24 PM

Mike - Sorry to hear about your missing sprues, hopefully they turn up soon! 

Shawker - Looking forward to seeing the T II! 

Need some expert help guys!  I'm going to replace the Kugelblende on the Panther F with one of the extras from the Dragon Jagdpanther Early Kit.  I'm just not sure which one is the most appropriate for the Panther F.  I've narrowed it down to these two choices:

Kit part on the left.  The one in the middle has a flange running around the bottom, but the one on the right doesn't...??  The one on the right also has a wider lower lip.  I couldn't find any real clear pictures of an F to indicate which is correct, but for some reason I feel the one on the right is a better choice.  Both fit the glacis plate fine. 

While researching this I came across a forum discussion on building this older Dragon Panther F kit and one of the members gave a quick account of the discrepancies with this kit, one being that the hatches on the hull are wrong.  The Panther F didn't have hatches with hinges that folded out and down like the Panther G.  Instead it had new style hatches that lifted up and slid out on rails...no external hinges at all!  I took a look at some online photos of the new Dragon Panther F kit  and sure enough it has the sliding hatches.  Seems the way to correct this is to simply remove all the hinges from the hatch and hull, along with the molded on hatch stop, and then add a couple of plastic angles to represent the outer rails for the hatches. 


Shouldn't be too hard to make the alterations to the hatches.  I've got some plastic angles on hand that might do the trick, or I might find some leftover PE that could work:

Ernest

Last Armor Build - 1/35 Dragon M-26A1, 1/35 Emhar Mk.IV Female


Last Aircraft Builds - Hobby Boss 1/72 F4F Wildcat & FW-190A8


  • Member since
    March 2003
  • From: Rain USA, Vancouver WA
Posted by tigerman on Wednesday, April 10, 2013 1:03 AM

Seems like a lot of work Ernest. It does seem like you have it under control.

   http://i7.photobucket.com/albums/y269/wing_nut_5o/PANZERJAGERGB.jpg

 Eric 

  • Member since
    May 2011
  • From: Illinois
Posted by armor86 on Wednesday, April 10, 2013 11:13 PM

Update - Tiger I DAK - Tunisia Tiger - Reviewing b/w photos, references, and a lot of thinking  - Bang Head - I came up on paint camo on German Tiger Tanks in Tunisia - the Bison Decals No. 35161 - Tigers in Africa #1 and No. 35162 #2 provide the best suggested camo paint schemes. The illustrated instructions in color are available at - http://picasaweb.google.com.th/bisondecals

Recommended website - Tiger im Fokus: http://www.tiif.de/
 
Dungel Grau base over sprayed - 
Base coat - Braun RAL 8020 and Grau RAL 7008 later should cover about 1/3 of the tank. 
Used a couple steps with a dark shade and then base coat of Braun 8000 before finishing with 8020 and 7008 
Photos below. Welcome any suggestions or comments - next up rubber on the road wheels and the track. Armor86 


Dan

  • Member since
    November 2009
  • From: SW Virginia
Posted by Gamera on Thursday, April 11, 2013 8:05 AM

Mike: Good luck, been there before. Hopefully the sprues are still around somewhere.

Ernest: Nice work, wish I could help but I don't know much about German paper panzers...

Dan: Looks good, I really like the subtle camo pattern.

"I dream in fire but work in clay." -Arthur Machen


  • Member since
    April 2005
Posted by Thunderbolt379 on Thursday, April 11, 2013 8:26 AM

Thanks Gamera... I'm so browned off I'm finishing a wingie thingie instead -- the Corsair I started for the GB about four years back...

M/TB379

http://worldinminiature.blogspot.com/

  • Member since
    July 2012
Posted by Hasenpfeffer on Friday, April 12, 2013 2:09 PM

Hey Dupes, great work! That Flakpanther turned out sweet. Yes If it were me, I think I'd weather up the tools just a touch, particularly the super bright red fire extinguisher... they just seem a touch out of place on that weathered, streaked up kitty. Just a suggestion...

Ernest - Man, that sux about the steel rod running thru the length of the barrel. Yeah, it keeps it straight... but makes your life miserable when trying to actually add an inner diameter to the barrel. For an AM part it's hard to believe it was solid! I don't know which kugelblende is correct for the F. I think the flange on the middle one is supposed to represent a weld seam where it meets the glacis.

Mike - I feel your pain... Just lost a part that I can't readily manufacture due to a shortage of right-sized PE fret... This hobby can be so amazingly frustrating sometimes. Bang Head

Dan - the camo job looks awesome. I love looking at all the detail you put into her. Cool

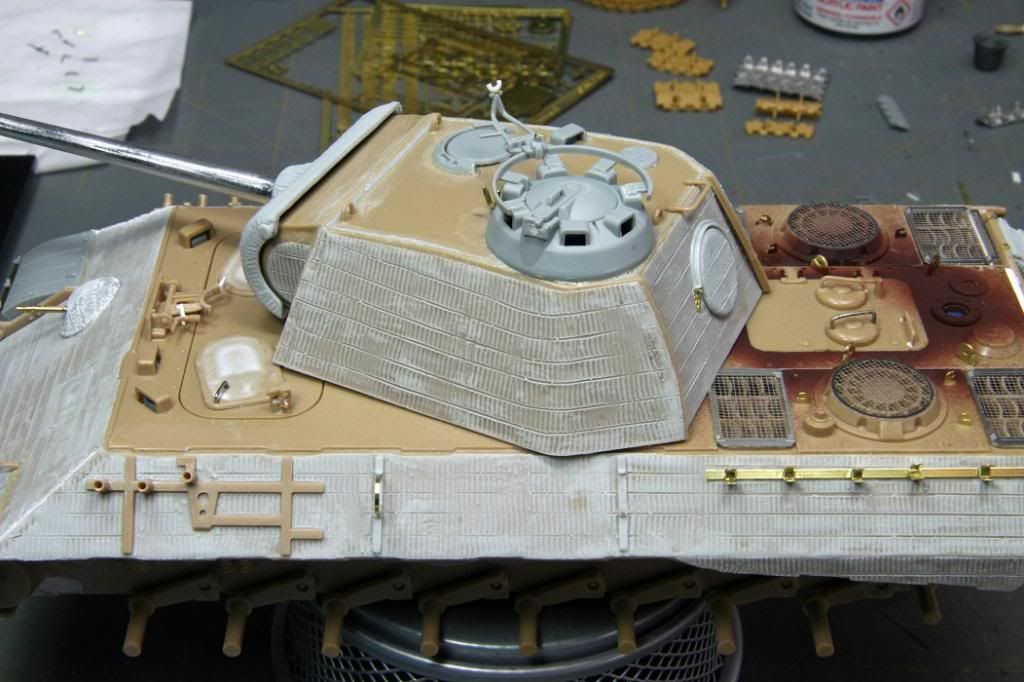
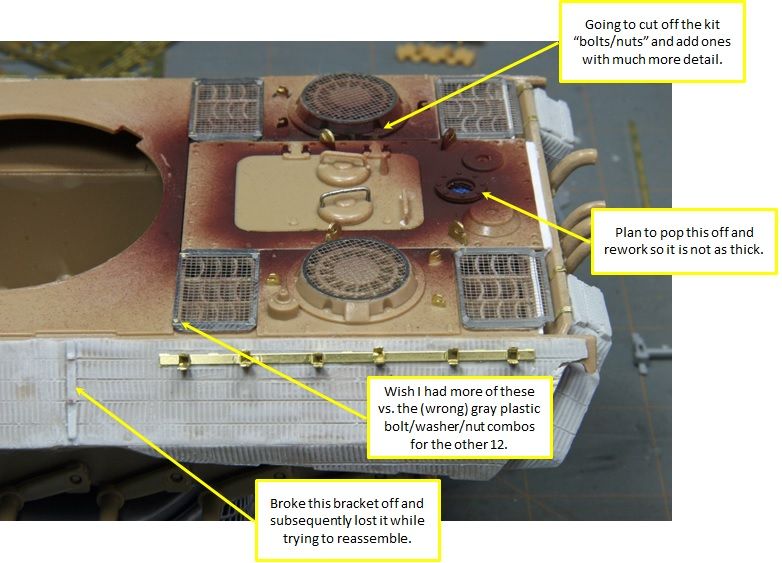
Well, I was sort of on a roll last weekend until Sunday. That's when everything seemed to be heading in a negative direction. I first broke off and then proceeded to lose the rear bracket for the cleaning rod stowage tube. (This after telling myself to be extra careful of said occurrence...)  So I decided to start painting the wheels the base rubber color. That didn't go as planned either as I couldn't get the airbrush to perform as desired. So I walked away before any more damage was done...

Here's what I was able to accomplish before that. I did manage to finish up the grilles. The rectangular ones are two parts - the grille/frame and a frame (I guess that adds a little dimension). In the rear gaps I added a little extra material so the bolts didn't look like they attached to nothing. It also closed up the overall gap a little to make it more true to the real thing. I unfortunately only had 4 PE hex bolt heads I used on the front edges of the front grilles. The other attachments are nuts/bolts combos. They will look pretty good I think even if they are not the correct attachment. I plan on adding a little more detail back here before calling it quits...

Again, the overall view of where she stands.

  • Member since
    March 2003
  • From: Rain USA, Vancouver WA
Posted by tigerman on Saturday, April 13, 2013 1:57 AM

Dan, good to see the cat with some color. Sure love all of the detailing you've put into her.

Looking good there Dave.

Hope to get it done this weekend, but pictures might have to wait until the next. Weather is supposed to suck.

Then......I still have time to possible complete my Tiger. haha, don't count on it. The wheels are done though on it.

   http://i7.photobucket.com/albums/y269/wing_nut_5o/PANZERJAGERGB.jpg

 Eric 

  • Member since
    July 2006
  • From: San Francisco Bay Area
Posted by bufflehead on Saturday, April 13, 2013 10:34 AM

Dan - Paint job looking good!  Didn't know that Africa Tigers sported any camo schemes....looking forward to seeing it all done!

Dave - wow, all of the detail work is amazing!  Keep it up, I' m loving it!

Eric - Hang in there buddy, at least you're close to the end!  This darn old Panther F is taking more work than I anticipated....I should have picked a better kit! Black Eye

Ernest

Last Armor Build - 1/35 Dragon M-26A1, 1/35 Emhar Mk.IV Female


Last Aircraft Builds - Hobby Boss 1/72 F4F Wildcat & FW-190A8


  • Member since
    March 2003
  • From: Rain USA, Vancouver WA
Posted by tigerman on Saturday, April 13, 2013 2:15 PM

Thanks Ernest. The reason it will get done is that I've never been a heavy weatherer. This guy will not be beat up.

   http://i7.photobucket.com/albums/y269/wing_nut_5o/PANZERJAGERGB.jpg

 Eric 

  • Member since
    November 2009
  • From: SW Virginia
Posted by Gamera on Saturday, April 13, 2013 7:53 PM

Dave: Those screens look great!

Eric: Keep on keeping at it! Looking forward to seeing how she comes out.

I'm the slowest modeler ever, if I can do it anyone can!

"I dream in fire but work in clay." -Arthur Machen


  • Member since
    July 2012
Posted by Hasenpfeffer on Saturday, April 13, 2013 10:26 PM

Thanks for the words of encouragement fellas! Stick out tongue

Another small update as I was able to swing some bench time today...

As promised, I cut off the little "dots" around the exhaust grilles and replaced them with much better looking attachment bolts/nuts. I also attempted and completed my very first soldering attempt. The spare track rack here has the U-shaped brackets soldered on! With a little practice I could really grow to enjoy this. It won't take me 1.5 hrs to do 6 small joints... Embarrassed and it's o'so much stronger than CA. It's a start at least. You can also see about half of the vent screen cover I made thinner. A little messy with the liquid glue so a couple spots of it melted a bit... but I think I can make it work.

I also added the main gun elevation stop block on the top of the turret. It might be a touch big, but looks o.k. to me.

  • Member since
    March 2003
  • From: Rain USA, Vancouver WA
Posted by tigerman on Sunday, April 14, 2013 12:30 PM

That's some great work Dave.

   http://i7.photobucket.com/albums/y269/wing_nut_5o/PANZERJAGERGB.jpg

 Eric 

  • Member since
    May 2010
Posted by Shawker on Sunday, April 14, 2013 6:43 PM

Here are some update pics, the Kitty should be done tonight or tomorrow with the dio in about two weeks.

You will see a bent rear skirt and some of the wear/scratch marks.  Hope you guys like her.

  • Member since
    May 2010
Posted by Shawker on Sunday, April 14, 2013 7:37 PM

Now that i have seen some of the pics I noticed several gaps I didn't see before so it will be a few more days on the work table.

  • Member since
    March 2003
  • From: Rain USA, Vancouver WA
Posted by tigerman on Sunday, April 14, 2013 8:52 PM

Cool camo Shawker. What colors are you using?

Not sure the fender would bend as such.

What happened to the track on that last photo. It's kind of bent funny. Stiff tracks?

   http://i7.photobucket.com/albums/y269/wing_nut_5o/PANZERJAGERGB.jpg

 Eric 

  • Member since
    May 2010
Posted by Shawker on Monday, April 15, 2013 11:36 AM

Mixed them my self but they started off with Terracotta, dark tan, desert yellow, dark yellow, Sandgelb for the darker redder color and a mix of the yellows and sandgelb for the lighter.  I have a knack for desert colors don't know why but when I due a grey/green tank I almost always paint it desert afterwards.

I just have not figure out how to mix the green yet it is either too dark and looks almost black or to light and looks wrong.  One day maybe.

  • Member since
    April 2011
  • From: imperial beach, ca
Posted by malone duke on Monday, April 15, 2013 3:23 PM

  • Member since
    May 2010
Posted by Shawker on Monday, April 15, 2013 7:12 PM

What is that coming out of the MG turret?  Sorry wont let me zoom in.  She looks great also.  I like the extra armored turret came out great.

Shawker

  • Member since
    May 2010
Posted by Shawker on Monday, April 15, 2013 7:15 PM

Oh and Eric yes they are real stiff I tried soaking the tracks in warm water with dawn, a tip from way way back when, as it will sometimes loosen the rubber/mold agents that will cause older kits to get stiff but it did not work but then again that part is going to be up against a tree so you wont see it lol  Love Dioramas.

Sarge

  • Member since
    April 2011
  • From: imperial beach, ca
Posted by malone duke on Monday, April 15, 2013 10:57 PM

Shawker it's only a cover for the mg hole. I couldn't get a barrel to come out right so I used it instead  

Dupes. Your panther came out great man. That scheme is awesome.

Everyone else great work. I finally got my tracks together so tonight I can crack open the actual kit and get started. The tracks were a pain. But in the end I'm satisfied with my first set of workables. At this point I have more time than money but I do see fruils in my future.

 Oh. And sorry for using nail polish as a size reference but as I live in a house full of girls it was the only thing within reach. But I think y'all get the point.

  • Member since
    March 2003
  • From: Rain USA, Vancouver WA
Posted by tigerman on Tuesday, April 16, 2013 1:37 AM

Looks great malone. pretty small kitty, which makes all the work even more impressive.

   http://i7.photobucket.com/albums/y269/wing_nut_5o/PANZERJAGERGB.jpg

 Eric 

  • Member since
    May 2010
Posted by Shawker on Tuesday, April 16, 2013 5:03 PM

ah that makes sense and I would only say can you really pull that color of nail polish off or is it to bold lol.

Sarge

  • Member since
    November 2006
  • From: Coastal Maine
Posted by dupes on Tuesday, April 16, 2013 10:20 PM

Thanks Hassenpfeffer and Malone Duke! Yeah, I need to dirty up those tools some more.

Malone - I think the only way you can tell it's 1/72 is the spare tracks...molding isn't so hot in that size. The rest of it? Ridiculous! Individual schurtzen in braille scale? Hah!

  • Member since
    November 2009
  • From: SW Virginia
Posted by Gamera on Wednesday, April 17, 2013 7:42 AM

MD: Super job! I took the polish bottle to remind me she's 1/72nd. You put enough detail in there I keep thinking she's bigger!

"I dream in fire but work in clay." -Arthur Machen


  • Member since
    March 2006
  • From: Right Side of a Left State
Posted by Shellback on Wednesday, April 17, 2013 11:11 PM

Yes..................Toast

  • Member since
    April 2011
  • From: imperial beach, ca
Posted by malone duke on Thursday, April 18, 2013 12:04 AM

Thanks guys. Dupes don't sweat the tools too much. Maybe she just got hosed off?  And my 2 cents on the extinguisher. One I posted a pic way back with suggested colors. Two these guys would get beat up for about a thousand miles then get pulled from the line get stripped and get fully maintained. Then go back to supply and draw tools from whatever stock was at hand. So variations are numerous. Also your eyes don't pick up red at long distances .  That's why we put the red filter on our flashlights.

  So. Getting to this beast. Ill admit its super nice so far but everything feels so big and clunky. All the details are razor sharp, but there has been flash on everything so far. Should have pics of the first steps soon.  

   Tiger man. Those pics are as good as I can get. Until I get enough saved to upgrade to a camera from my cell it's hit or miss.

  • Member since
    March 2003
  • From: Rain USA, Vancouver WA
Posted by tigerman on Thursday, April 18, 2013 12:46 AM

Okay Malone, I'll post one of them. I might be able to tweak it a bit.

   http://i7.photobucket.com/albums/y269/wing_nut_5o/PANZERJAGERGB.jpg

 Eric 

  • Member since
    April 2011
  • From: imperial beach, ca
Posted by malone duke on Thursday, April 18, 2013 2:21 PM

  • Member since
    March 2006
  • From: Right Side of a Left State
Posted by Shellback on Friday, April 19, 2013 10:39 PM

Very long running GB thread Eric . Congratulations on having it last this long .

I finished the DML  Porsche JagdTiger. I used Friul tracks and an RB barrel . It was painted with Tamiya paints . I did a little chipping using the hairspray method . The weathering that I did with artist oils andMig pigments hides most of the chipping .

The theme of this build is a JagdTiger that has been abandoned and a passing allied tank has used it for target practice .

JOIN OUR COMMUNITY!

Our community is FREE to join. To participate you must either login or register for an account.

SEARCH FORUMS
FREE NEWSLETTER
By signing up you may also receive reader surveys and occasional special offers. We do not sell, rent or trade our email lists. View our Privacy Policy.