SEARCH FINESCALE.COM

Enter keywords or a search phrase below:

FineScale Modeler WWI Aeroplane Group Build 2013

139645 views
1262 replies
1 rating 2 rating 3 rating 4 rating 5 rating
  • Member since
    November 2009
  • From: SW Virginia
Posted by Gamera on Saturday, April 6, 2013 6:22 PM

Wow guys those look great! I'm getting a bit of cockpit envy here since the 1/48th Eduard kit I'm building has a wood floor, a seat, a control stick and a throttle...

"I dream in fire but work in clay." -Arthur Machen


  • Member since
    December 2002
  • From: Northern California
Posted by jeaton01 on Saturday, April 6, 2013 8:55 PM

Tim, I decided a long time ago that the Mike and Marc show is just something to aspire to.  To expect to achieve the same is just too daunting a task for me to take on.

I think your D.VII looks real good.

John

To see build logs for my models:  http://goldeneramodel.com/mymodels/mymodels.html


  • Member since
    October 2011
  • From: Lake Villa, Illinois
Posted by Chuck Davis on Saturday, April 6, 2013 10:38 PM

Mike - beautiful cockpit on the E.III, sir!

Tim - D.VII is lookin' fine - I like the wash on the engine.  Enjoy the party, too!..

Minor setback tonight...finally glued all the resin cylinders to the case, trying to keep them all aligned and straight.  Managed OK, but then I decided to check the fit of the rest of the components.  The exhaust manifold is too tall - meaning I went brain dead (common occurrence, despite my best efforts) and trimmed the cylinders to sit too low.  That's what I get for going nuts with the tiny drill bit.  Sigh.  Oh well...the kit injected engine is actually pretty good - and yes, the exhaust seems to fit it just fine.  Back to square one.  I did manage to get all the wood areas prepped, so I should be oiling and graining soon.

Hope everyone is having a fun, safe, and productive weekend!

Chuck Davis

  • Member since
    April 2005
  • From: Piscataway, NJ!
Posted by wing_nut on Sunday, April 7, 2013 7:49 AM

Tim, look at your photos again... you have no reason to hideWink

jeaton01

Tim, I decided a long time ago that the Mike and Marc show is just something to aspire to.  To expect to achieve the same is just too daunting a task for me to take on.

I think your D.VII looks real good.

John, nice of you to say.  But nowt go sell that show idea to some network as the latest reality show and make us all rich.  Won't be worse than any of that other realty crap that's on.  Oh wait... we would be up against shows like profession beard growing.  So never mind.   

Hmmm, now where is that sarcasm smilie.  I guess this will do... Whistling

Marc  

Moderator
  • Member since
    September 2011
Posted by Tim Kidwell on Sunday, April 7, 2013 9:17 AM

Quick post before pre-party prep:

First: Thanks for the support, guys. A bit of hyperbole there to give Mike a thumbs up. I'm pretty happy with mine, but I definitely see where I can make some improvements the next time around.  

Second: I think I figured out the fuselage problem and should be able to add the side rigging after all.

Third: I found some wire to make suitable spark plugs, so before I close everything up, I'll finish wiring the engine. This week's vlog should be full of goodies!

Chuck - OUCH! 

Marc -  Here's the title of the new show: "Extreme Glue." Synopsis: Things get nasty in the world of competitive model building. We follow six die-hard scale modelers as they navigate personal relationships, contest intrigue, shady third-party vendors, and models that just won't go together, all on their way to a best of show at the IPMS Nationals!

Finally, Aaron and I have been going back and forth about the number of turnbuckles we'll need for our D.VIIs. We're poring over images, and it looks like there are two for the rigging between the wheels and then two on the control lines just outside the cockpit for a total of four. Does that sound right?

Also, we're going back and forth between Gaspatch and Bob's Buckles. If we went with Gaspatch, which turnbuckles would be the appropriate ones to purchase? We're thinking C.

Thanks!

--

Timothy Kidwell
Editor
Scale Model Brands
Kalmbach Media


  • Member since
    April 2005
  • From: Piscataway, NJ!
Posted by wing_nut on Sunday, April 7, 2013 3:13 PM

Oh Chuck, sorry man I missed your post somehow.  That's to bad but the good news when it comes to things like... ya got a lot of company.  (This is where I recall gluing fuselage halves together leaving out the cockpit tub... TWICE!)

Tim the synopsis is perfect.  And if the titles for these shows are not some sort of "Extreme" they play with the words.  We could go with, "Plastic ModHellers!"

BTW... how ya fleeing?  I'm still cough my brains out.  In fact, so hard I nearly blacked out while driving.  Decided maybe another trip to the doc was in order.  Developed bronchitisSad.

Marc  

  • Member since
    February 2006
  • From: Smithers, BC, Canada
Posted by ruddratt on Sunday, April 7, 2013 3:42 PM

Yikes, sorry to hear what some of you fellas are going through. Marc, bronchitis!? That's nasty stuff. Hope you guys get on the mend soon. I hate being sick in any way - drives me nuts! Aside from the obvious discomfort, the worst part is the boredom that accompanies it.

Tim, I'm digging that D.VII. Looks great, and the weathering on the engine looks spot on! Regarding the turnbuckles, I received my Gaspatch order last week. They are gorgeous, they're shipped fast, and are the one's I'd recommend for yours and Aaron's Fokkers. The "C" buckles should work fine for both of you.

Chuck, bummed to hear about your engine woes. Those resin pieces really looked sweet and I was stoked to see the finished product. Nice that you have the kit engine as a backup.

Mike

 "We have our own ammunition. It's filled with paint. When we fire it, it makes pretty pictures....scares the hell outta people."


  • Member since
    December 2002
  • From: Northern California
Posted by jeaton01 on Sunday, April 7, 2013 4:13 PM

Chuck, why don't you see if you can pop the cylinders off of the crankcase and shim them up some?  I've been able to do that with other resin ports, even with CA the bonds aren't that strong.  If you can't use the engine otherwise, there doesn't seem to be much of a downside.

John

To see build logs for my models:  http://goldeneramodel.com/mymodels/mymodels.html


  • Member since
    April 2005
  • From: Piscataway, NJ!
Posted by wing_nut on Sunday, April 7, 2013 6:05 PM

I agree with John.  they should pop off no prbelm

Marc  

  • Member since
    February 2006
  • From: Smithers, BC, Canada
Posted by ruddratt on Sunday, April 7, 2013 11:23 PM

Gamera

Wow guys those look great! I'm getting a bit of cockpit envy here since the 1/48th Eduard kit I'm building has a wood floor, a seat, a control stick and a throttle...

Cliff, I wouldn't worry too much about that. Many of the 'pit openings on these birds are so small anyway, especially in 1/48, that much of it is not even visible once everything gets closed up (trust me - I know Wink I knocked myself out detailing the snot out of many of my 1/48 WWI 'pits, only to wonder where it all went once they were buttoned up).

How's the build going so far? Have you decided on how you plan to do that aluminum doped finish so common to the Nieuports?

Mike

 "We have our own ammunition. It's filled with paint. When we fire it, it makes pretty pictures....scares the hell outta people."


  • Member since
    December 2002
  • From: Northern California
Posted by jeaton01 on Monday, April 8, 2013 1:30 AM

Well, I decided I couldn't settle for no grain or shading on the woodwork, so I drybrushed on some umber oil paint with a stiff brush and then tried an overcoat with Tamiya Clear Yellow on a few spots.  It didn't look quite like varnish to me so I went with Clear Orange as a final coat and I like that better.  See what you think.

I got all excited tonight because I had used up all the parts for the fuselage and realized it was time to assemble the side frames with the cockpit parts.  There is some control rigging for the throttles that I might have been better off to put in before the assembling, but I wasn't sure if I could route it correctly that way so wish me luck.  There is rigging in the sideframes and x-bracing to do as well.  Got to get some of those Gaspatch things.

Lots of decals are already applied, you can actually read the open and closed placards next to the throttles.  I like how the pilot's wicker seat came out.  I preshaded with a thin flat black, wiped a lot of it off, then did some thinned coats of clear doped linen (Humbrol, have a bunch of that), then the Clear Orange.  The leather areas are Model Master Leather.  For steel I am using Model Master Non-Buffing Metalizer, it has a very nice fine grain.  Aluminum is Floquil.  There is a grease pump for the interruptor gear and I dipped it in SNJ Bronze until it had a nice color, it is by the pilot's right foot.

John

To see build logs for my models:  http://goldeneramodel.com/mymodels/mymodels.html


  • Member since
    December 2002
  • From: Bury St Edmunds, Suffolk, England
Posted by Bish on Monday, April 8, 2013 4:26 AM

John, that looks awsome. The amoint of detail going into these buyilds is stunning.

I am a Norfolk man and i glory in being so


On the bench: Airfix 1/72nd Harrier GR.3/Fujimi 1/72nd Ju 87D-3

  • Member since
    December 2002
  • From: Bury St Edmunds, Suffolk, England
Posted by Bish on Monday, April 8, 2013 4:28 AM

wing_nut

John, very nice start there indeed.
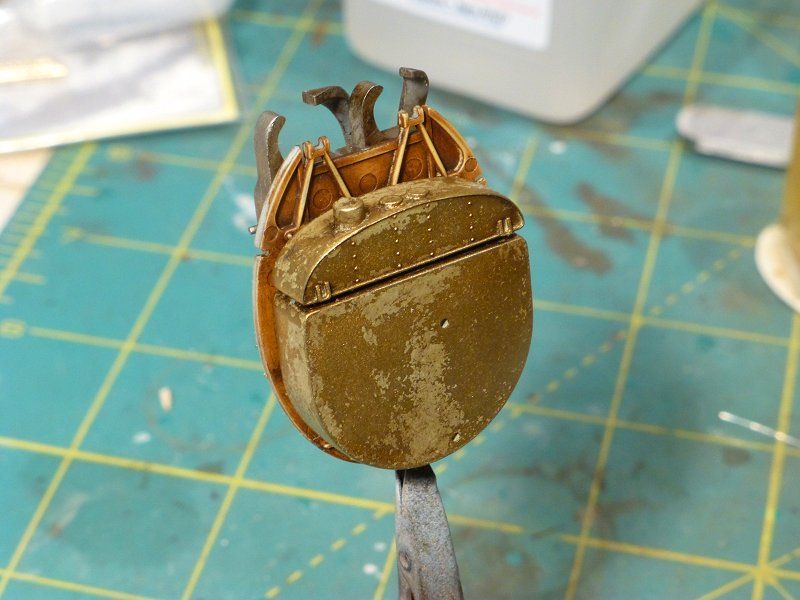
Oh yes... the tolerancesIndifferent  I remembered from the 1st Albatros I built the fuselage halves needed a good squeeze to close up.  Not masked though Mike.  This time I scraped 'em out with a micro chisel.

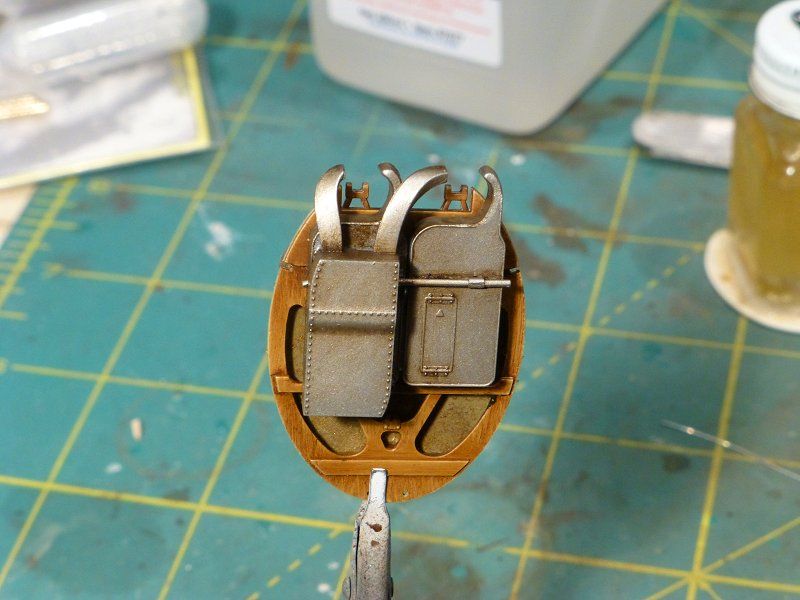
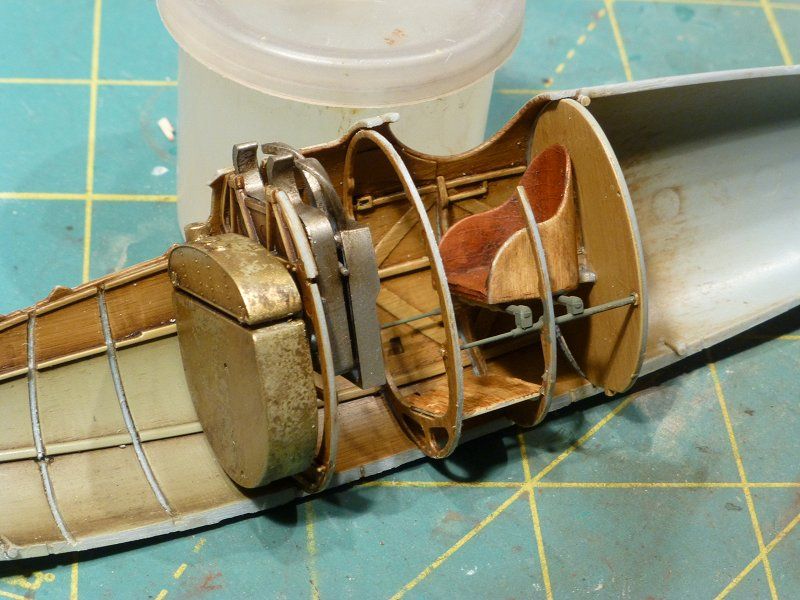
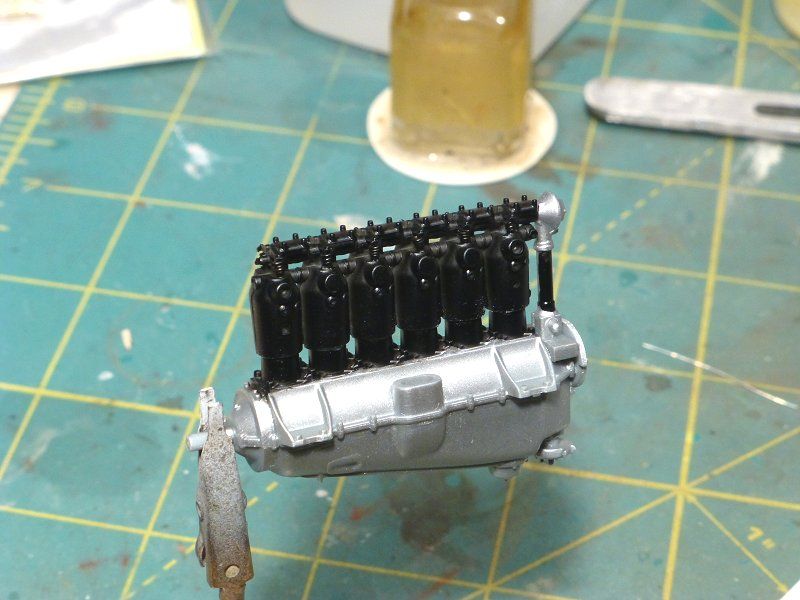
Moving forward in the fuselage I got the next bulkhead  done with he fuel tank and magazines.  Are they called bulkheads or formers inside a fuselage?  Started in on the engine too.  hard to see in the pic but the valve rockers arm springs that are nothing more than tiny pegs on the cylinders where replaced with springs made from copper wire.  A little dry brush will make them visible down the road.

Before you all jump on me about the ejector pin marksWhistling i am adjusting my philosophy from, "I fix them because I know they are there." to, "If they won't be seen they won't be fixed."Stick out tongue

Lovely work. I love the look of the wood.

I am a Norfolk man and i glory in being so


On the bench: Airfix 1/72nd Harrier GR.3/Fujimi 1/72nd Ju 87D-3

  • Member since
    December 2002
  • From: Bury St Edmunds, Suffolk, England
Posted by Bish on Monday, April 8, 2013 4:55 AM

I think its time i got round to an up date. This is an OOB build of a rather old Airfix kit, so theres nothing like the detail you guys are putting in. Its been slow going but i think the thought of doing the rigging has put me off a bit. But decided to just bit the bullet and get it done.

This is the kit.

Thanks for the help with the fabric colours, i used the tamiya deck tan and it worked great.

Then got the fuselage together and tail on.

Just got one more wing section to get on before painting, so hopefully another up date soon.

I am a Norfolk man and i glory in being so


On the bench: Airfix 1/72nd Harrier GR.3/Fujimi 1/72nd Ju 87D-3

  • Member since
    March 2013
Posted by Ssasho0 on Monday, April 8, 2013 5:16 AM

Hi Bish,

this old Airfix kit of your is going great. Reagarding the rigging, many modellers fear it, but it is all a matter of very carefull planning! Also I don't know how much experience do you have with rigging biplanes, but do all the holes and glue all the eyelets (if you use such things) before glueing/painting the wings! If my comment is not relevant please excuse me.

Keeping my eye on all the wonderfull builds going on around here. Keep up the good work guys!

Reagrds,

Sasho

  • Member since
    December 2002
  • From: Bury St Edmunds, Suffolk, England
Posted by Bish on Monday, April 8, 2013 5:28 AM

Sasho, thanks for the advice. No, i have never rigged a bi plane, so this is a new one. I am not useing any eyeleys. The kit wings do have holes for the rigging, but they have missed a lot out. I think i have a plan for doing it, i am just not entirely sure how the rigging should go. Some images seem to suggest two line of wires along the front of the wing and two along the back.

I am a Norfolk man and i glory in being so


On the bench: Airfix 1/72nd Harrier GR.3/Fujimi 1/72nd Ju 87D-3

  • Member since
    March 2013
Posted by Ssasho0 on Monday, April 8, 2013 5:40 AM

this old kit have holes for the rigging? Strange, are you sure those are not the holes for the struts? I confess that I haven't build this particular kit, but it sounds strange to have predrilled holes. Anyway you should be sure where all the cables start and end, drill the missing holes and just then start continue with the wings. I know that this can be a challenge. Between I'm not sure if it is ok to post some links with rigging tutorials, but if you need help, I'm sure that here are a lot of people that will have usefull advices

Reagdrs,

Sasho

  • Member since
    December 2002
  • From: Bury St Edmunds, Suffolk, England
Posted by Bish on Monday, April 8, 2013 5:47 AM

Yep, it deffinatly has holes for the rigging. All the struts are in. The instructions have you doing the rigging in one big section. I'll get some photos tonight before i star painting. I think it would be ok to post a link to a rigging tut, that would be much appreciated.

I am a Norfolk man and i glory in being so


On the bench: Airfix 1/72nd Harrier GR.3/Fujimi 1/72nd Ju 87D-3

  • Member since
    March 2013
Posted by Ssasho0 on Monday, April 8, 2013 6:08 AM

here are few usefull links:

this post sums it up very nicely

www.austinsms.org/Rigging-Scale-Mode-Biplanes.pdf

Des's site have not just rigging tutorials but many many other usefull hints and if I have to recommend a single WWI site this is it:

ww1aircraftmodels.com/page8.html

I generally always use eyelets for rigging as they allow easier tensioning (is there such a verb in English) of the wires and if you brake a wire its fairly easy to replace it. Turnbuckles I use only for 1/48 or 1/32 scales. I tried the technique with drilling a hole thru the whole wing, but it requires to paint the wing after it is glued to the rest of the plane and this turned out quite messy. So I don't recommend it.

regards,

Sasho

  • Member since
    April 2005
  • From: Piscataway, NJ!
Posted by wing_nut on Monday, April 8, 2013 6:12 AM

Thanks Bish.  Yours is coming along real well too.  But I have to add, you've got a big set of walnuts to do that aircraft in that scale for your 1st stab at rigging.

John that is one nice interior.  The control panel looks great.

Marc  

  • Member since
    December 2002
  • From: Bury St Edmunds, Suffolk, England
Posted by Bish on Monday, April 8, 2013 7:15 AM

Thanks Marc, not my aidea though. My other half thought it would be something different.Bang Head

I am a Norfolk man and i glory in being so


On the bench: Airfix 1/72nd Harrier GR.3/Fujimi 1/72nd Ju 87D-3

  • Member since
    November 2009
  • From: SW Virginia
Posted by Gamera on Monday, April 8, 2013 7:42 AM

Jeaton: That cockpit looks fantastic, I love the IP and the leather seats!

Marc: Don't think I commented but yeah I too love that awesome gas (guess I should say petrol here) tank. And the wooden seat looks great.

Bish: Neat aircraft! Nice to see a big bomber make her way into here. Now we need a friggin' Zeppelin!!!

Mike and guys: I glued the Nieuport together this weekend. Just need to add the top wing and the struts to it. I'm trying to make sure everything is straight and aligned.  I don't think the aluminum dope should really super shiny like Alclad right? So I've been thinking I'll use Polly-S aluminum paint instead. We'll see how it goes. I've got some E-Z Line I intend to use for rigging, first time for me so it will be a little intense.

"I dream in fire but work in clay." -Arthur Machen


  • Member since
    September 2011
  • From: Milaca, Minnesota
Posted by falconmod on Monday, April 8, 2013 7:48 AM

I thought I'd post my latest build updates,  I still have the struts to paint then I can gloss coat the entire model to even out the paint,  and then I can start rigging!!!Surprise  This will be my first time at this,  I do have all the holes pre-drilled, so hopefully it goes good.

John

On the Bench: 1/72 Ki-67, 1/48 T-38

1/144 AC-130, 1/72 AV-8A Harrier

  • Member since
    December 2002
  • From: Bury St Edmunds, Suffolk, England
Posted by Bish on Monday, April 8, 2013 8:08 AM

Sasho, thanks for those links, will have a good read through those. I am not sure if there are any eyelets in 72nd scale are there. Might be a bit small threading those lol.

I am a Norfolk man and i glory in being so


On the bench: Airfix 1/72nd Harrier GR.3/Fujimi 1/72nd Ju 87D-3

Moderator
  • Member since
    September 2011
Posted by Tim Kidwell on Monday, April 8, 2013 11:44 AM

Jeaton01 - I like it. The wicker turned out very nice. That is a monster plane. And speaking of monsters ...

Bish - Wow! I'm with Marc on his assessment: you definitely took the go big or go home approach.

Falconmod - The D.III is almost there. Love the green camo effect.

Gamera - Can't wait to see some photos.

GOOD JOB EVERYONE!

OK, gotta dash.

--

Timothy Kidwell
Editor
Scale Model Brands
Kalmbach Media


  • Member since
    March 2013
Posted by Ssasho0 on Monday, April 8, 2013 11:56 AM

here is my update, the cockpit is ready for closure and then it is going to be easier...at least I hope so.

Bets reagdrs,
Sasho 

  • Member since
    December 2002
  • From: Bury St Edmunds, Suffolk, England
Posted by Bish on Monday, April 8, 2013 1:07 PM

Thanks Tim. You guys are giving me some real confidance about this.

Sasho, looking good.

I am a Norfolk man and i glory in being so


On the bench: Airfix 1/72nd Harrier GR.3/Fujimi 1/72nd Ju 87D-3

  • Member since
    September 2012
Posted by GMorrison on Monday, April 8, 2013 1:40 PM

Greetings:

I finished the engines this weekend and started on the hull.

First, the two Rolls Royce Eagle Mk. VIIIs.

As you can see, I replaced quite a bit of the kit's crude plastic piping with wire and solder.

The bottom of the hull is made from 6" wide mahogany planking, by boat builders.

 Modeling is an excuse to buy books.


  • Member since
    December 2002
  • From: Bury St Edmunds, Suffolk, England
Posted by Bish on Monday, April 8, 2013 1:50 PM

Nice work GM. And i am going to show my ignorance here. When i saw the hull/fuselage, i had to check what byou were building then had to have a look at what it was. I am guessing by this

The bottom of the hull is made from 6" wide mahogany planking, by boat builders.

your not reffering to the model. How did you do that.

I am a Norfolk man and i glory in being so


On the bench: Airfix 1/72nd Harrier GR.3/Fujimi 1/72nd Ju 87D-3

  • Member since
    April 2006
  • From: ON, Canada
Posted by jgeratic on Monday, April 8, 2013 6:18 PM

Sweet looking work by all Yes

I finally cut some sprue and have the engine together, about 17 pieces and three hours later.  There are 3 coloured PE pieces that look to be nameplates of some sorts that I did leave off.  I think though it be easier to add them now before painting and just place some masking tape over them. 

No progress pics worth posting yet, but I did find this decent shot of the Daimler 200hp engine.  More pics and other museum photos here: http://www.mincbergr.net/index.php?page=en-ad6-200-hp

regards,

Jack

JOIN OUR COMMUNITY!

Our community is FREE to join. To participate you must either login or register for an account.

SEARCH FORUMS
FREE NEWSLETTER
By signing up you may also receive reader surveys and occasional special offers. We do not sell, rent or trade our email lists. View our Privacy Policy.