SEARCH FINESCALE.COM

Enter keywords or a search phrase below:

FineScale Modeler WWI Aeroplane Group Build 2013

139643 views
1262 replies
1 rating 2 rating 3 rating 4 rating 5 rating
  • Member since
    March 2003
  • From: Towson MD
Posted by gregbale on Thursday, June 27, 2013 3:34 PM

Tim Kidwell

YES!

Hey guys, Greg's taking requests ...

Yes, but to (slightly) paraphrase the old joke, it's usually just "to leave the room...."

Thumbs up Yes for the lozenge work, Aaron. Hope to see photos (or video, your choice) soon.

Greg

George Lewis:

"Every time you correct me on my grammar I love you a little fewer."
 
Moderator
  • Member since
    April 2006
  • From: my keyboard dreaming of being at the workbench
Posted by Aaron Skinner on Thursday, June 27, 2013 3:37 PM

gregbale

Tim Kidwell

YES!

Hey guys, Greg's taking requests ...

Yes, but to (slightly) paraphrase the old joke, it's usually just "to leave the room...."

Thumbs up Yes for the lozenge work, Aaron. Hope to see photos (or video, your choice) soon.

Hopefully I'll shoot some tonight or tomorrow and post them.Propeller

Aaron Skinner

Editor

FineScale Modeler

Moderator
  • Member since
    April 2006
  • From: my keyboard dreaming of being at the workbench
Posted by Aaron Skinner on Friday, June 28, 2013 11:56 AM

Aaron Skinner

gregbale

Tim Kidwell

YES!

Hey guys, Greg's taking requests ...

Yes, but to (slightly) paraphrase the old joke, it's usually just "to leave the room...."

Thumbs up Yes for the lozenge work, Aaron. Hope to see photos (or video, your choice) soon.

Hopefully I'll shoot some tonight or tomorrow and post them.Propeller

As promised here are a couple of photos of my progress. Have started the rib-tape decals on the wings and am preparing to paint the fuselage. Should be a busy weekend at the workbench.

Cheers, Aaron


Aaron Skinner

Editor

FineScale Modeler

  • Member since
    October 2011
  • From: Lake Villa, Illinois
Posted by Chuck Davis on Friday, June 28, 2013 1:51 PM

Greg - beautiful CDL and shading on the Morane.  Love it!

Aaron - looking great!  Doncha just love rib tapes? Indifferent

Chuck Davis

  • Member since
    November 2009
  • From: SW Virginia
Posted by Gamera on Friday, June 28, 2013 2:08 PM

Yeah, that looks great guys!

"I dream in fire but work in clay." -Arthur Machen


  • Member since
    February 2006
  • From: Smithers, BC, Canada
Posted by ruddratt on Friday, June 28, 2013 2:17 PM

Aaron - that's some good stuff you have goin' on there - easily one of the more tedious steps in building a D.VII. Looks great!

Greg - amazing CDL! I'm going to have to remember that recipe, as I've re-commenced work on an older project - a 1/48 SPAD XIII (a kit bash using the Dragon and Eduard kits) and there's a fair share of it present. You said you used oils for the post shading. I'm guessing the consistency was that of a wash, but the color looks spot on - what color did you use?

Mike

 "We have our own ammunition. It's filled with paint. When we fire it, it makes pretty pictures....scares the hell outta people."


  • Member since
    March 2003
  • From: Towson MD
Posted by gregbale on Friday, June 28, 2013 2:56 PM

ruddratt

Greg - amazing CDL! I'm going to have to remember that recipe, as I've re-commenced work on an older project - a 1/48 SPAD XIII (a kit bash using the Dragon and Eduard kits) and there's a fair share of it present. You said you used oils for the post shading. I'm guessing the consistency was that of a wash, but the color looks spot on - what color did you use?

Thanks, Mike. The CDL is dead-simple; white with just a touch of yellow is great for new or unweathered fabric, whereas for older or more hard-used versions a touch of brown or gray gives it a bit more character.

The oil post-shading is my alternative to preshading, which I've never found all that effective in my own applications. It's actually a drybrush rather than a wash---which is why I used gloss white in the basecoat rather than flat.

With the glossy acrylic base I can drybrush the shading color on without having to worry too much about technique or precision of application. Once it's to my liking, I go back with a dry cotton swab and remove and/or blend out the color until it's as subtle or obvious as seems necessary. It wipes off very easily from the glossy base, can even be removed entirely when it's fresh. And by using such minimal amount of the oil color, it also dries pretty fast---nicely set in just a few hours, and safe for overcoating (if required) in about a day.

Color of the oil shading was burnt sienna, which seems to work well for shadow or grime or both on CDL. There again, a little white or black/gray can be added to change the effect a bit. It's a real simple method to play around and experiment with.

Greg

George Lewis:

"Every time you correct me on my grammar I love you a little fewer."
 
Moderator
  • Member since
    September 2011
Posted by Tim Kidwell on Friday, June 28, 2013 4:00 PM

Aaron Skinner


Well, it seems Aaron's long-awaited debut worked against my brilliant unveiling, making it spectacularly un-brilliant.

The backstory

Once we had you guys on board, Aaron and I thought it would be cool to give you something to remember the build by. We hit upon the idea of mugs from Cafe Press. Initially, we were going to buy them and send them out at the end of the build. However, once we looked into it, the price was a bit steep for us to foot.

That bummed us out. But we still thought mugs would be cool.

So, what we did is have our art department come up with the logo and a list of all of the World War I Aeroplane Group Build's participants (regardless of finishing--you all joined in good faith) and format it for use with the Cafe Press "design your own" mug. We figured we would do a test run and see how they looked. If they were awful, we wouldn't say anything. If they were cool, we'd see who wanted one and then send you the art so you could get one for yourselves. I know it's not as cool as just getting one from us, but it's still something, right?

Aaron and I ordered our mugs on Tuesday, and they arrived this morning. They were cool--a little soft (I'll have the art department run a final tweak on the resolution)--but neat. Mine has become my official office mug.

The upshot

If you're interested in having your very own WWI Aeroplane GB mug, email me  (tkidwell@finescale.com) and I'll send you the image file, so long as you don't share it with anyone else: It's for you guys.

It's one more way we're saying thanks for coming along on this group build with us.

Have a great weekend!

--

Timothy Kidwell
Editor
Scale Model Brands
Kalmbach Media


  • Member since
    October 2011
  • From: Lake Villa, Illinois
Posted by Chuck Davis on Friday, June 28, 2013 4:56 PM

Guys, how cool is that!  Thank you so much...a great looking mug to put my productivity juice in.  Perfect!  Already signed up for this version.  When can we get a mug with with our choice of "Group Build Leader" mug shots, courtesy of Photoshop?

Chuck Davis

  • Member since
    April 2006
  • From: ON, Canada
Posted by jgeratic on Friday, June 28, 2013 4:59 PM

Greg - nice work with the CDL, your technique adds both depth and staining at the same time.

Aaron - lozenge application looks right on.  I noticed that, just like Tim, the wing surfaces were primed black - is this done to dull the colours on the decals?

Cool idea with the coffee mug ...  I'll think about it.  I have a suspicion though, that those outfits that provide the online service of creating custom mugs are simply using decals for the artwork, and the image is not directly printed on the mug?

regards,

Jack

  • Member since
    April 2003
Posted by shivinigh on Friday, June 28, 2013 7:32 PM

Aaron-looking good there. And they said that you were just a myth.

Love the idea for the mugs I definitely would love to get one.


  • Member since
    November 2003
  • From: Nashville, TN area
Posted by bobbaily on Friday, June 28, 2013 8:48 PM

Greg & Aaron-nice work guys.  You both are making great progress

No pics yet but I have painted the wood surfaces (prop, seat, floor & interior) with Tamiya Deck Tan followed with a Burnt Umber oil wash....not quite as realistic as the work I've seen here, but close enough at this point.  I'm going to give it a coat of Tamiya Clear Yellow later this weekend and then I should be able to start on the cockpit of the Fokker.

Question for the group-E-Z line-where can it be purchased?

Thanks

Bob


  • Member since
    October 2011
  • From: Lake Villa, Illinois
Posted by Chuck Davis on Friday, June 28, 2013 9:21 PM

Hi Bob - I know of two sources...there may be others.  Here are the ones I know:


Bobe’s Hobby House http://www.bobeshobbyhouse.com/ezl.html

WingNut Wings http://www.wingnutwings.com/ww/product?productid=3046


I'm not sure if WnW "free shipping" applies to orders of just accessories, but hey...while you're there pick up a kit too!  I actually got mine from Bobe's Hobby House.  It's marketed on the site for model railroaders as lines high-tension towers, since it's very forgiving of accidental "large scale people collisions" on a  model railroad.


Good luck - it sounds like you're making great progress.  Hope to see some pics soon

Chuck Davis

  • Member since
    February 2006
  • From: Smithers, BC, Canada
Posted by ruddratt on Saturday, June 29, 2013 1:24 AM

Greg - thanks for getting back to me on that. I was quite relieved when you mentioned it was drybrushed on instead of airbrushed. The ribs on the SPAD are so close together that spraying would have been almost impossible in achieving the same effect.

Tim & Aaron - that mug idea is very cool. You guys have gone way above and beyond to make this GB an enjoyable experience for all, and with tremendous success! Thank you!

Mike

 "We have our own ammunition. It's filled with paint. When we fire it, it makes pretty pictures....scares the hell outta people."


  • Member since
    December 2002
  • From: Bury St Edmunds, Suffolk, England
Posted by Bish on Saturday, June 29, 2013 3:57 PM

Those 32nd Gotha's must be some site in the flesh. Marc, did he have to get a truck to bring that in.

Greg, that's looking really nice.

Aaron, that's looking great. That German scheme has got to be one of the most colourful ever put on an aircraft. I love the idea of the mug, defiantly got to add one of those to my collection.

I am a Norfolk man and i glory in being so


On the bench: Airfix 1/72nd Harrier GR.3/Fujimi 1/72nd Ju 87D-3

  • Member since
    March 2003
  • From: Towson MD
Posted by gregbale on Saturday, June 29, 2013 5:39 PM

ruddratt

Greg - thanks for getting back to me on that. I was quite relieved when you mentioned it was drybrushed on instead of airbrushed. The ribs on the SPAD are so close together that spraying would have been almost impossible in achieving the same effect.

Just to be clear, Mike, I was talking about artists oils for the drybrushing, not regular oil-based enamels. {Maybe that was clear, I just couldn't think how one would airbrush with oil paintsWink.) A similar effect could be achieved with enamels, I'm sure, but not nearly as easily.

Kudos on the mug idea, Aaron and Tim. That's a really cool idea, and a nice memento of an exceptional GB.

Aaron, the lozenge looks spectacular. (I'm somewhat abashed to say I was so fixated on the decal work, I didn't even notice the mugs until about the third look. Tunnel vision, I guess.)

Greg

George Lewis:

"Every time you correct me on my grammar I love you a little fewer."
 
  • Member since
    October 2008
  • From: England
Posted by P mitch on Sunday, June 30, 2013 4:38 AM

Gentlemen

Quick link to my latest update on the WIP. I can see the light at the end of the tunnel!

[View:http://cs.finescale.com/fsm/modeling_subjects/f/2/p/153188/1667145.aspx#1667145:600:0]

Phil

"If anybody ever tells you anything about an aeroplane which is so bloody complicated you can't understand it, take it from me: it's all balls." R J Mitchell


  • Member since
    February 2006
  • From: Smithers, BC, Canada
Posted by ruddratt on Sunday, June 30, 2013 1:34 PM

Greg - no worries buddy. I knew you were referring to artist oils. I'll drybrush with 'em a lot, and on the odd occasion have thinned 'em down to wash consistency and airbrushed 'em as well.

Mike

 "We have our own ammunition. It's filled with paint. When we fire it, it makes pretty pictures....scares the hell outta people."


  • Member since
    March 2003
  • From: Towson MD
Posted by gregbale on Sunday, June 30, 2013 3:13 PM

ruddratt

Greg - no worries buddy. I knew you were referring to artist oils. I'll drybrush with 'em a lot, and on the odd occasion have thinned 'em down to wash consistency and airbrushed 'em as well.

I stand corrected, and happily learn something new.

Is there some particular usage to which such an airbrushed oil paint wash would lend itself, or some effect it works best for? Sounds like something that might be fun to play with.

Greg

George Lewis:

"Every time you correct me on my grammar I love you a little fewer."
 
  • Member since
    November 2003
  • From: Nashville, TN area
Posted by bobbaily on Sunday, June 30, 2013 5:28 PM

Thanks for the link Chuck-I'll have to order some E-Z wire  to give it a try....and yes, I would like to order a kit from WnW-I've really enjoyed everyone's build of WnW's kits here-the detail is incredible....maybe next time...

Bob


  • Member since
    October 2011
  • From: Lake Villa, Illinois
Posted by Chuck Davis on Monday, July 1, 2013 7:57 AM

Bob - no problem.  Good luck - looking forward to the pics

Mike - I'm embarrassed to admit, I've never thought of airbrushing oils.  I use turpenoid as thinner for oil washes - any idea if that would suffice for airbrushing?  Have you used this technique for simulating castor oil staining by any chance?

Chuck Davis

  • Member since
    February 2006
  • From: Smithers, BC, Canada
Posted by ruddratt on Monday, July 1, 2013 4:53 PM

Greg, Chuck - I'm a big fan of Tamiya smoke for post shading and simulating grime, but there are times when I need to vary the hues depending on the base coat color or the type of grime, and that's where the oils come into play. I cut 'em with mineral spirits to a consistency thinner than a standard wash, as translucent as possible, and spray at a low pressure with a narrow spray pattern.

Mike

 "We have our own ammunition. It's filled with paint. When we fire it, it makes pretty pictures....scares the hell outta people."


  • Member since
    March 2003
  • From: Towson MD
Posted by gregbale on Monday, July 1, 2013 7:14 PM

ruddratt

Greg, Chuck - I'm a big fan of Tamiya smoke for post shading and simulating grime, but there are times when I need to vary the hues depending on the base coat color or the type of grime, and that's where the oils come into play. I cut 'em with mineral spirits to a consistency thinner than a standard wash, as translucent as possible, and spray at a low pressure with a narrow spray pattern.

Verrrrrrry interesting.....!

Greg

George Lewis:

"Every time you correct me on my grammar I love you a little fewer."
 
Moderator
  • Member since
    September 2011
Posted by Tim Kidwell on Wednesday, July 3, 2013 11:02 PM

Gentlemen! We have progress!

Up next, a thin clear coat and then the balkenkreuz on the wings.

For those of you in the states, have a happy Independence Day! Everyone else, have a great July 4th. 

--

Timothy Kidwell
Editor
Scale Model Brands
Kalmbach Media


  • Member since
    March 2003
  • From: Towson MD
Posted by gregbale on Wednesday, July 3, 2013 11:16 PM

Looking über-sharp there, Tim. Really shaping up nicely.

Happy Fourth to all.

Greg

George Lewis:

"Every time you correct me on my grammar I love you a little fewer."
 
  • Member since
    November 2009
  • From: SW Virginia
Posted by Gamera on Thursday, July 4, 2013 9:25 AM

Yes, great job there Tim, the red and white is very eye-catching!

"I dream in fire but work in clay." -Arthur Machen


  • Member since
    October 2011
  • From: Lake Villa, Illinois
Posted by Chuck Davis on Thursday, July 4, 2013 12:40 PM

Yes, Tim - I agree with the rest.  Very nice.

I do feel compelled to comment on how neat your workbench is, though....you put me to shame.  Or did you tidy up before the picture?...

Chuck Davis

  • Member since
    December 2002
  • From: Bury St Edmunds, Suffolk, England
Posted by Bish on Thursday, July 4, 2013 1:26 PM

bob, I would defiantly recommend trying E-Z line. I didn't use it on this build, but its really good stuff. And I have actually found myself thinking about getting a WnW kit a few times since this GB started. I think I need to see a doctor.

Tim, that's looking great, and other interesting scheme. Red and White seem to be popular.

I am a Norfolk man and i glory in being so


On the bench: Airfix 1/72nd Harrier GR.3/Fujimi 1/72nd Ju 87D-3

Moderator
  • Member since
    September 2011
Posted by Tim Kidwell on Thursday, July 4, 2013 2:18 PM

Greg, Gamera, Bish, and Chuck -  Thanks! I can't tell you how good it feels to be at this stage. I test-fitted the lower wing last night . . . Actually, I had popped back on the Forum just before bed and was looking at the pics and thought, "Oh no, the pitchforks are too far forward!" I thought the trailing edge of the wings would obscure them. Down to the bench I raced, and pushed the wing into place: No problem. They're right where they're supposed to be.

About the bench: Naw, that's typically how I keep this one. I think I have a pic of it from the beginning of the GB. Let me see ...

I have two eight-foot-long benches: one runs on the south wall in the basement, the other opposite along an interior wall. My dad built both, and my mom gave them to me when he died. This is the one I use for building; as you can see, I have the Bluenose under construction down at the east end. And if you look carefully, you might catch a glimpse of the Budweiser beer wagon kit underneath. The other bench is the one I call the sad bench. That's the one that has all of the Dremel tools bolted to it and the box I use for a spray booth and is in constant need of straightening.

Sorry ... more than you guys wanted to know. Off to dig more post holes!

--

Timothy Kidwell
Editor
Scale Model Brands
Kalmbach Media


  • Member since
    December 2002
  • From: Northern California
Posted by jeaton01 on Friday, July 5, 2013 7:14 PM

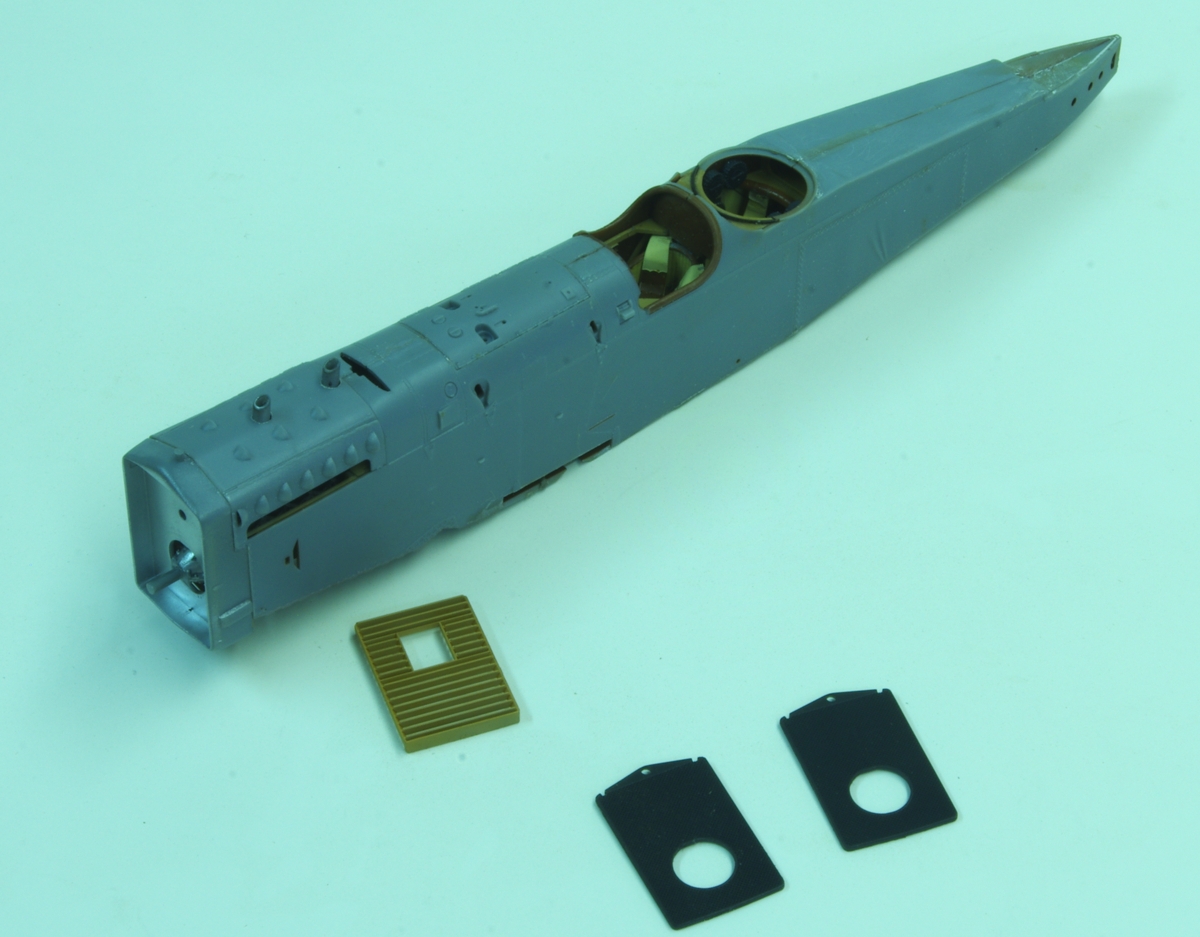
I've been able to find my way to the bench a little this week, so here is a progress report.  I have put the fuselage skin on the interior details, and it is a tight fit as you might expect.  I was unable to get the bottom skin to fit tightly to the sides although it is flush in the horizontal plane, probably because of the bracing wires being on the outside of  the interior framing.  I made up the difference with Aves Epoxysculpt and the gaps won't be bad to make disappear since it is  a hard corner along that area.  What is going to take more time is getting rid of the seams on the middle of the aft top fuselage, and the bottom behind that bottom insert.  I always have trouble with seams in the middle of flat surfaces, and in the past have found them to be the most likely seams to show up or crack after painting, so they are going to get lots of attention.

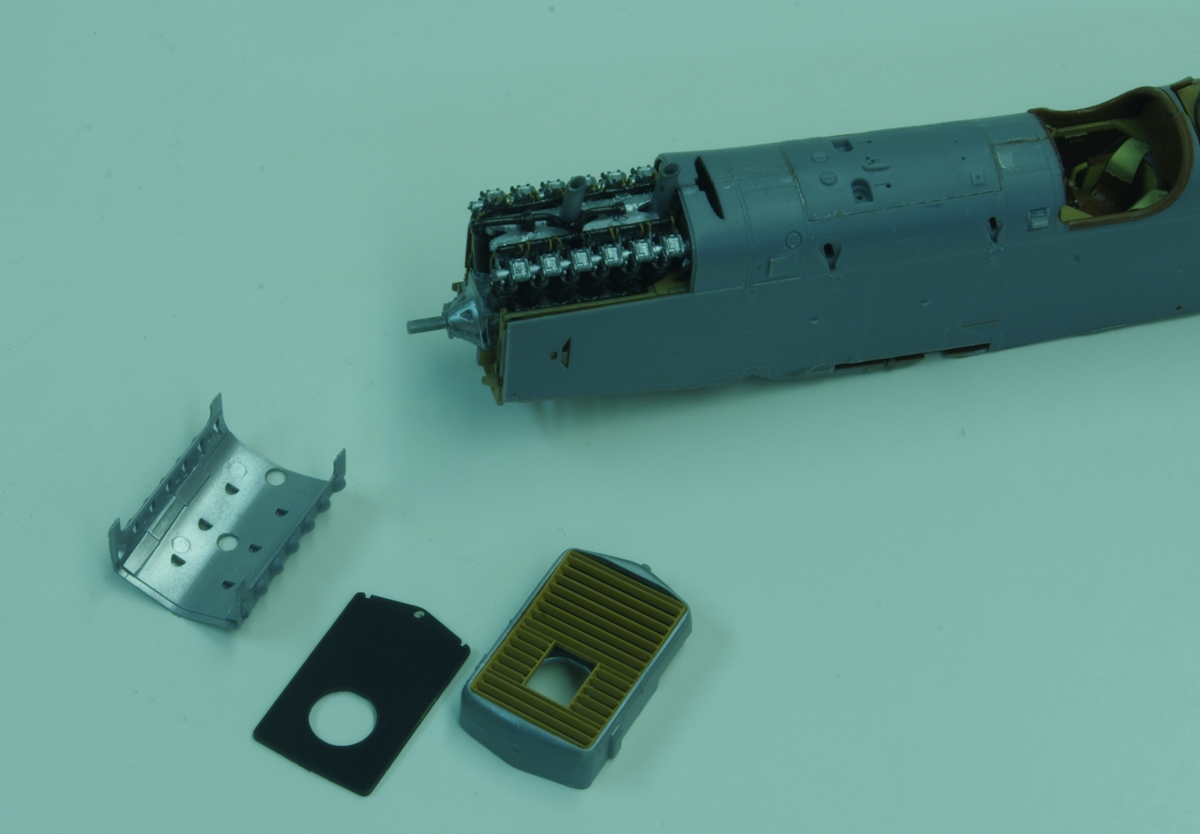
The radiator cowl and the top cowling (removable to show the Liberty) fit perfectly.  In order to get everything painted neatly I am not quite following the order of the instructions.  As you can see the shutters and front and back radiator faces are separate parts from the radiator cowl, and the radiator cowl is aluminum on the inside and exterior color on the outside, so I am painting the radiator cowl inside and out before installing the radiator faces and the shutters.  The shutters were wood according to WNW, so I painted them the same as the fuselage interior framing, with an overcoat of thinned Tamiya Clear Orange.

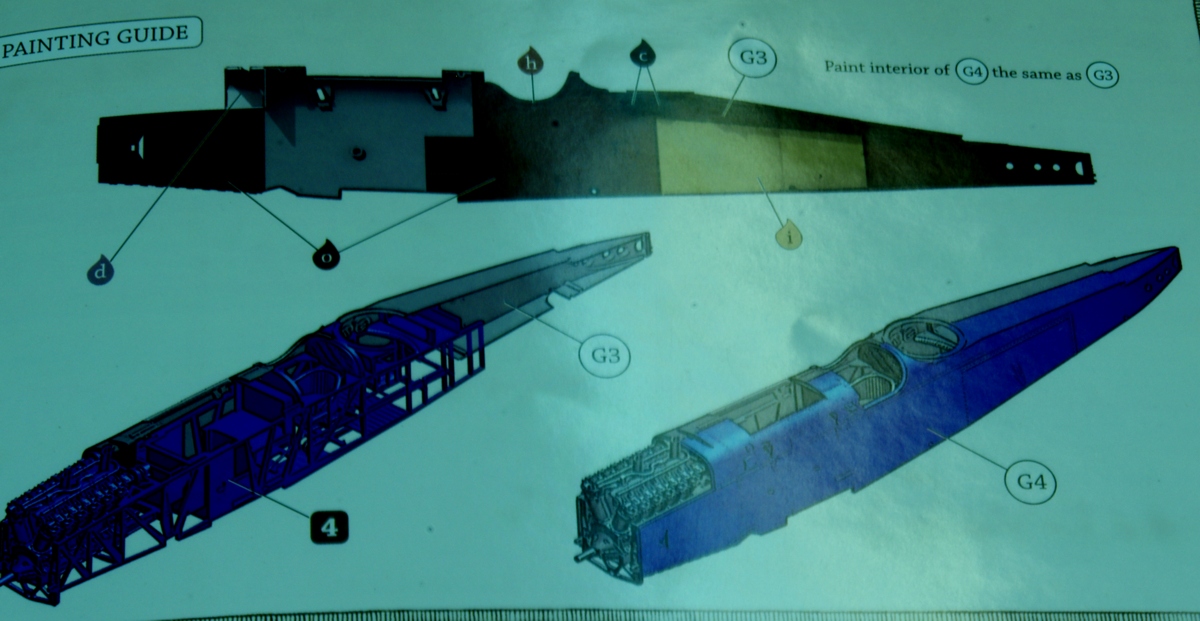
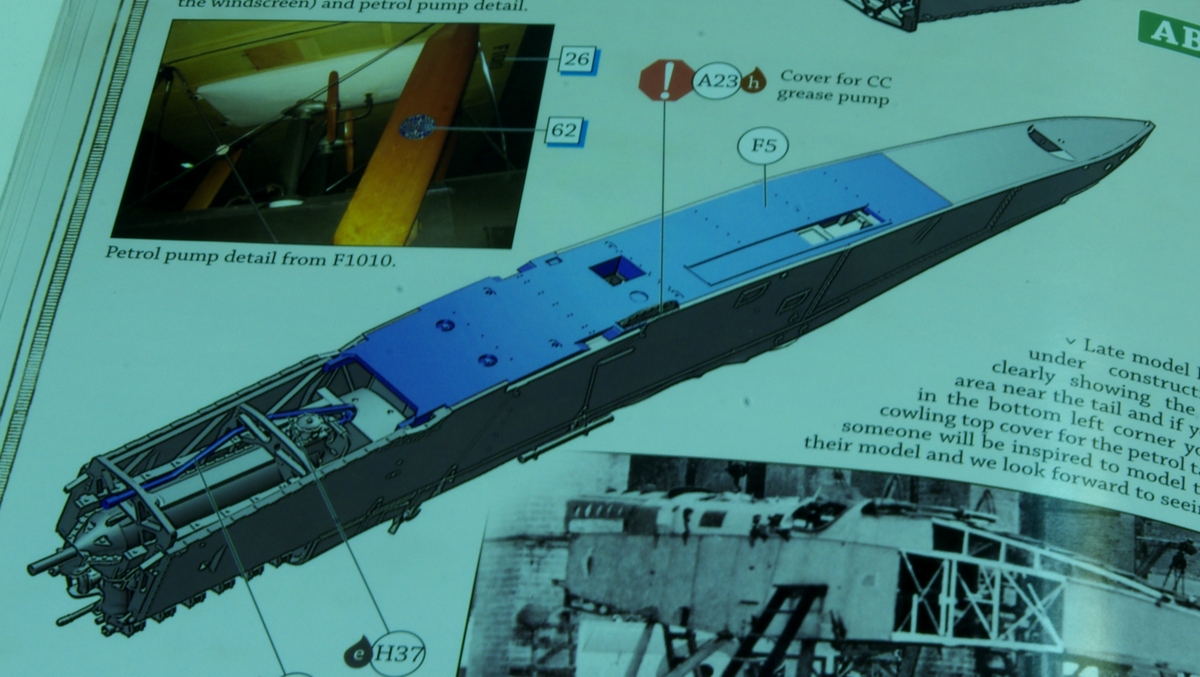
First off some excerpts from the instructions to make more clear how the parts fit together:

Then the parts as they are now.  Still some work to do to bring out the detail on the radiator faces. The bottom seams.

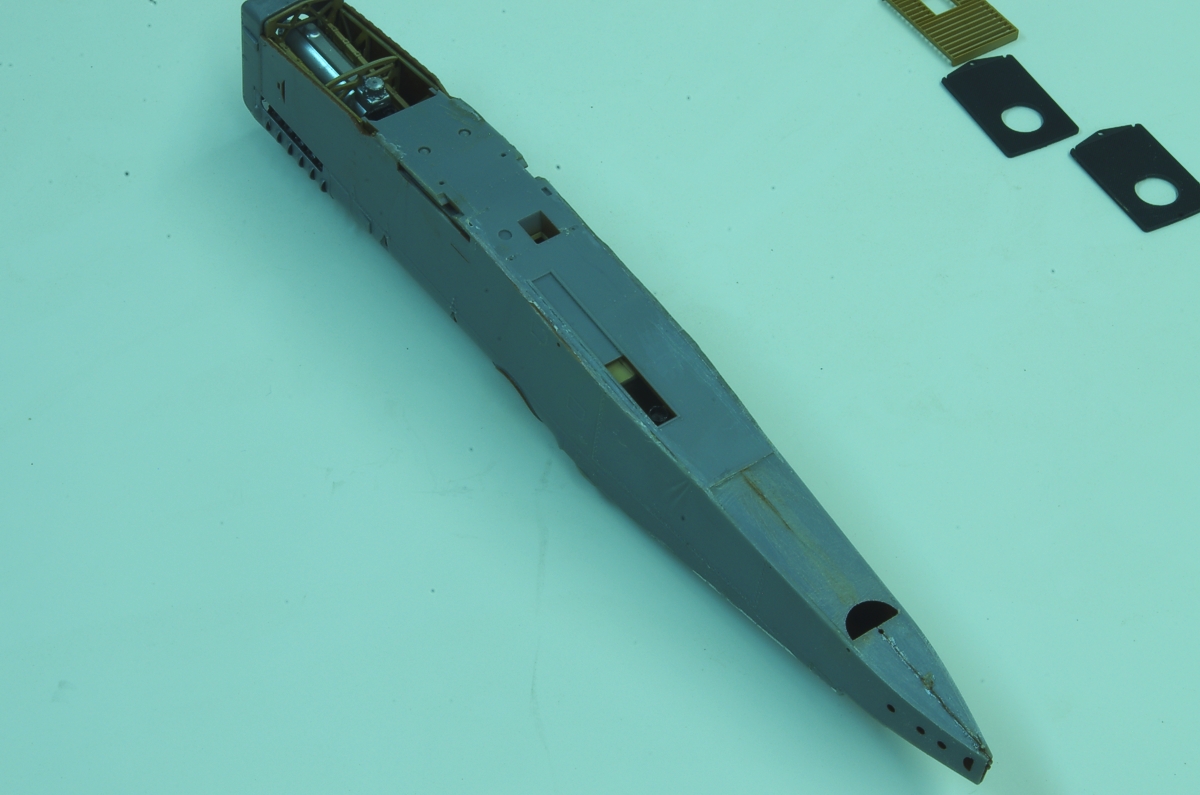
The top seams.  My main strategy on getting the sides on was to use the gun ring as a first focus.  It looked like a miss-fit there would be a real spoiler.  Next time I might wait to install the front part of the gun ring base until after the sides are assembled to the interior framing.

The fuselage with the radiator and upper cowl setting in place, and the radiator and shutters.  I had to file the holes for the intake pipes just slightly to get a perfect fit.  A 1941 Peterbilt I worked on and drove as a lad of fourteen had shutters like that, except no hole for the prop shaft. 

Apart and together:

And the current state of the workshop project.  I am seriously thinking about putting my plastic model bench in here.  And the deck is not only done, but the granddaughters have claimed it for their personal sleeping porch.

John

To see build logs for my models:  http://goldeneramodel.com/mymodels/mymodels.html


JOIN OUR COMMUNITY!

Our community is FREE to join. To participate you must either login or register for an account.

SEARCH FORUMS
FREE NEWSLETTER
By signing up you may also receive reader surveys and occasional special offers. We do not sell, rent or trade our email lists. View our Privacy Policy.