SEARCH FINESCALE.COM

Enter keywords or a search phrase below:

Lend-Lease GB (1/1/09-7/1/09)

67987 views
570 replies
1 rating 2 rating 3 rating 4 rating 5 rating
  • Member since
    December 2007
  • From: Bridgeview, Illinois
Posted by mg.mikael on Friday, June 5, 2009 9:08 PM
Sorry about the lack of updates on my end.Disapprove [V] I've been working on my scratch build(making the wheels) for another GB. Luckily the work on those parts is about done, and I'll be getting some updates on my scout car up soon. So far since my last update I've masked the winshield(for weathering) and finally got it inserted.

"A good plan executed now is better than a perfect plan next week." - George S. Patton

  Photobucket 

  • Member since
    November 2003
  • From: Nashville, TN area
Posted by bobbaily on Friday, June 5, 2009 9:26 PM
Unfortunatly, my lack of updates is due to my lack of progress.  However, I did decide to modify the resin side panels & IP for the Monogram P-40B.  After some sanding, the side panels have been installed.  I will be using the kit cockpit floor due to fit issues, but I've tried to dress it up a bit with some spruce. It has been primed and hopefully will get a coat of interior green tomorrow...or Sunday.  The resin seat will be used.  I hope to have some 'Before & After' pictures afterwards.  With a little luck, I may have the fuselage together before the start of the week.

Bob


  • Member since
    November 2006
  • From: Coastal Maine
Posted by dupes on Saturday, June 6, 2009 4:11 PM
Mikael - finally got some time to access some "real" internet...piles of photos on dialup just don't happen anymore. Your build is looking sweet! The 251's GB is ending next week, so that means I'm back on my Russkie Sherman right after that. Really looking forward to it, actually. Will be a nice change of pace, and I think it's going to be a pretty cool build! Cool [8D]
  • Member since
    October 2007
Posted by White_R34 on Monday, June 8, 2009 4:59 PM

 My BM-13 KATUSHA on a US-60 6X6 Studibaker Late version Done!

Building the Impossible Is my main goal!!
  • Member since
    October 2007
Posted by White_R34 on Monday, June 8, 2009 5:01 PM

More:

Building the Impossible Is my main goal!!
  • Member since
    October 2007
Posted by White_R34 on Monday, June 8, 2009 5:03 PM

Last two:

Building the Impossible Is my main goal!!
  • Member since
    September 2007
  • From: Relocating
Posted by Mobious on Monday, June 8, 2009 5:54 PM

 Hey White_R34, Outstanding! Congrats on a fine looking Studebaker. The weathering looks great. I really like the mirror, very cool. I have to tell ya, I haven't seen many Katyusha's built up, and fewer yet with all the excellent scratched effort you've put into this one. The battle damage is just awesome. Any plans for a base? Figures?

"It's a problem of applied physics" Roy Brown

  • Member since
    December 2007
  • From: Bridgeview, Illinois
Posted by mg.mikael on Monday, June 8, 2009 8:13 PM

Now that's a stunning build, White_R34!!Bow [bow] All the extra time you put into modifying and scratching parts really paid off. Especially love the bullet holes running up the side of the hood, along with the chains you added to the front & back. So how exactly did you weather those chains? (gotta ask since they look great.Cool [8D])


 *First page has been updated.*

"A good plan executed now is better than a perfect plan next week." - George S. Patton

  Photobucket 

  • Member since
    October 2007
Posted by White_R34 on Tuesday, June 9, 2009 3:07 AM

Thanks Mobious & MG.Mikael it was a lot of fun to work on.

 Mobious asked: Any plans for a base? Figures? Why yes I'm working on two figures right now one male co. driver and one female driver. The landscape will look some thing like this:

Half stone street and half mud or just mud.

So how exactly did you weather those chains? (gotta ask since they look great.Cool [8D]) I'm glad you asked First I taped the two chains to my clip bord, so they would lay flat. Then I mixed Tamiya XF-1 FL-Black with a little XF-9 Hull Red (50-30)for the first layer. It starts off a little (off black) to keeps that faded tarnished steel look. (the darker base color helps the rust stand out)! Then I mixed Testors Rust 1185 with Fl-Black about (70-20) just to make the rust color a little darked for stage two. Stage three I needed to mix in more rust 1185 to brighten up the rust color a bit. Oh and you must roll the chain from back and forth (side to side) so you cover the hole thing. Now for the last stage I hand brushed on #1 Rust stain from a Rustall kit. Let it dry for 1hr or less. Ha Ha Ha now here's the good part to make your chain look even more real, rub a #2 pencil across the chain; to give the chain a rubbed off tarnish look. Any one that has ever used old rusted chains can tell you once you start using them and they rub against any othere matel you get that look. Now if you move your chains around a lot befor you get them in the right place on your model just hold on to them wile on your model an rub them once again. [#2 pencil across the chain]

Building the Impossible Is my main goal!!
  • Member since
    November 2003
  • From: Nashville, TN area
Posted by bobbaily on Tuesday, June 9, 2009 6:07 AM
White_R34-that is one FANTASTIC build.  Very nicely done.  Great attention to detail.  Bow [bow]

Bob


  • Member since
    November 2006
  • From: Coastal Maine
Posted by dupes on Tuesday, June 9, 2009 9:12 AM

Holy smokes, White...your build is pretty freakin' spectacular! Shock [:O]

Not knowing the kit you used as the base, I can't comment on the extent of your scratchbuilding, but your weathering all around is seriously top notch. Great stuff. Thumbs Up [tup]Thumbs Up [tup]

  • Member since
    October 2007
Posted by White_R34 on Tuesday, June 9, 2009 1:02 PM
Thanks guys I'm trying to live up to a top level of work in my scratchbuilding that is. The kit I used and the projects started on page 4 of this GB is a 1/35 Italeri BM 13 "Katyusha" 1950s version, changed to a late 1944 war version.

Oh and one more thing about the painting of those chains don't (Airbrush) your rust color on the hole length of the chains; paint it heavy in spots and light in otheres. Now Like I said hand brush on the rust stain on the full length of the chains.

Building the Impossible Is my main goal!!
  • Member since
    December 2007
  • From: Bridgeview, Illinois
Posted by mg.mikael on Tuesday, June 9, 2009 2:35 PM
White_R34- Thanks so much for tips/explanation. I so gotta try out that technique next time I have some chains that need weathering.Thumbs Up [tup]

"A good plan executed now is better than a perfect plan next week." - George S. Patton

  Photobucket 

  • Member since
    December 2007
  • From: Bridgeview, Illinois
Posted by mg.mikael on Tuesday, June 9, 2009 3:26 PM

Might as well get up my next update(got some work done), so here it is.

About ninety-five percent of all the hull portions are completely on, by that I mean sanded, modified, and painted. Thus soon my work will be moving into the more detailed parts like the guns, gun mounts, tools, tarps, and other random accesories. However here's whats done with the main hull parts. The windshield is in(terrible fit by that I mean too gaps left over.Disapprove [V]) So I used Testor's Clear parts glue to put the winshield in and to slightly fill in the gaps the best I could on the sides. I also masked off the wiper area(that's why their's some blue-ish tape on the winshield) for weathering that will happen at a future time(will be too hard to mask properly later, so be sure to do it beforehand.)

The upper armor plate on the passenger side is also in place with the scratched hinges also in place. As for the drivers side I be leaving the armor plate in the down position. (NOTE: I had to leave the driver's side armor plate down since it wouldn't fit properly in the up-armored position due to the skate rail. However the passenger side did fit properly up-armored so that's why that side is up. I know strange fit issues.Alien [alien])

As for other parts, I've glued the two gun mounts for the skate rail together. However their fit just isn't bad its non-existent! The pieces look like Censored [censored], so I'm gonna have to putty, sand, and slice till they look presentable. As for the tools they have all had the seams removed and the shovels handle area was drilled out(for some reason it was a solid piece of plastic with the opening.Dunce [D)])

Thanks for looking!


"A good plan executed now is better than a perfect plan next week." - George S. Patton

  Photobucket 

  • Member since
    September 2007
  • From: Relocating
Posted by Mobious on Tuesday, June 9, 2009 3:38 PM

 Hey White_R34, I like the idea of the mud with the 2 figures, Lot's of possibilities. Also illustrating that the Soviet Union was one of the first Nations to utilize women in a modern combat role. I believe that I'd read somewhere, that Russian women also served as fighter/bomber pilots in WWII with some attaining ace status. 

 mg mikael, Nice job on cleaning up the OBT's. I wonder why the shovel handle was molded solid? Hmm. The gas cans really look great and worth the extra effort you've put into them. The mg mounts and tool/holders will be worth it too. Looking forward to updates on the M3.

"It's a problem of applied physics" Roy Brown

  • Member since
    December 2007
  • From: Bridgeview, Illinois
Posted by mg.mikael on Tuesday, June 9, 2009 8:42 PM

 Mobious wrote:

mg mikael, Nice job on cleaning up the OBT's. I wonder why the shovel handle was molded solid? Hmm. The gas cans really look great and worth the extra effort you've put into them. The mg mounts and tool/holders will be worth it too. Looking forward to updates on the M3.

Thanks for the comments. I'm assuming the shovel handle was molded solid because it's a 40 year-old mold(thus probably didn't have the tech or know-how at that time to do it correctly.)

"A good plan executed now is better than a perfect plan next week." - George S. Patton

  Photobucket 

  • Member since
    October 2007
Posted by White_R34 on Wednesday, June 10, 2009 5:50 AM

Hay Mobious your right that is fact and I remember reading about it back in grade schools World History class. An even now I see show or Documentaries on the history channel and otheres.

http://www.elknet.pl/acestory/raskov/raskov.htm

http://en.wikipedia.org/wiki/Women_in_the_Russian_and_Soviet_military

The Soviet armed forces employed Women as pilots, mechanics, truck drivers, gunnery instructorssniper and electricians passed the end or the war. So seeing that I live in a house full of young and older weman and when I started working on the female figure for this truck the house was a buzz with talk. I'm getting a lot of Big Smile [:D] latey mmmmm..... I'm just doing it because I always see guys doing Soviet armor with men. So I said Why not?  Try something different an I do have some soviet female solders any way.

An mg.mikael I wanted to get that model your doing an I'm gladd to see you doing it and it's making me want one even more!Thumbs Up [tup]Thumbs Up [tup]Thumbs Up [tup]

Building the Impossible Is my main goal!!
  • Member since
    February 2008
  • From: ladner BC Canada
Posted by stick man on Wednesday, June 10, 2009 10:44 AM

White your build looks realy good great work!

MG your builds comeing along nicely I hope to see more soon!

As for me all modleing is on hold for the time being because of school exams but I should be back to it in a week.

Smile [:)]

I'm 15 and I model I sk8board and I drum what could be better.
  • Member since
    December 2007
  • From: Bridgeview, Illinois
Posted by mg.mikael on Wednesday, June 10, 2009 9:02 PM

White_R34- Thanks for the comments. I'm glad that my WIP makes you want to go out and get the scout car even more.Wink [;)]

stick man- Thanks for the comments, lookin' forward to seeing your Achilles!Smile [:)]

"A good plan executed now is better than a perfect plan next week." - George S. Patton

  Photobucket 

  • Member since
    December 2007
  • From: Bridgeview, Illinois
Posted by mg.mikael on Monday, June 15, 2009 10:11 PM
So where is everyone? Yeah, I had to ask. This GB will be wrapping up before you know it and their hasn't been anyone posting their work lately(myself included.Wink [;)]) That said, let's see some progress pics and get those workbenches busy.

"A good plan executed now is better than a perfect plan next week." - George S. Patton

  Photobucket 

  • Member since
    November 2003
  • From: Nashville, TN area
Posted by bobbaily on Tuesday, June 16, 2009 7:49 AM
"Where is everybody" he asks...well, the Bailey's are at Ocean Isle Beach, NC for our annual vacation...meaning no plastic time.  However, the interior is together & painted (for the most part) on the P-40 and I hope to get it glued together & the fuselage together before the weekend ends....we'll be getting home late Friday night.  Hopefully I'll be close to complete by 7/1.

Bob


  • Member since
    December 2007
  • From: Bridgeview, Illinois
Posted by mg.mikael on Tuesday, June 16, 2009 10:07 AM

Hope you and your family has a great, fun-filled vacation!!Propeller [8-](at least you have an excuse for not posting your workBig Smile [:D].........now where the heck is everyone else?)

"A good plan executed now is better than a perfect plan next week." - George S. Patton

  Photobucket 

  • Member since
    November 2006
  • From: Coastal Maine
Posted by dupes on Tuesday, June 16, 2009 10:32 AM

I'm at work...lucky if I even get to READ the stuff in "My Forums" much less REPLY to anything. Business got busy a bit early this year.

Been plugging away on the Sherman, still on the bench - hoping I can make the July 1st end date. Still optimistic, although most of this weekend is already taken with a crazy attempt at a 200 mile ride on my bike (yes, in one day). Ellsworth Maine to Van Buren Maine. Look it up on Google Earth or something. Wink [;)]

  • Member since
    February 2008
  • From: ladner BC Canada
Posted by stick man on Tuesday, June 16, 2009 11:22 AM

I'm back to building now I have'nt had any time for modeling in the last month because of school but I finished my last exam for grade 9 yesterday!!!! YAAAAY!!! so now I can get back to building.

Most of the limited building time I've had recently has been spent on my build for this GB but I haven't made much progress.


The hulls haven't been atached together yet I just did that for the photo.


Smile [:)]

I'm 15 and I model I sk8board and I drum what could be better.
  • Member since
    December 2007
  • From: Bridgeview, Illinois
Posted by mg.mikael on Tuesday, June 16, 2009 2:35 PM

dupes- Dang, 200 miles in one sitting, I gotta give you respect for that.Thumbs Up [tup] The most I've done at one time on my bike was 15 miles and I thought that was tiring.

As for the deadline of the GB, don't worry about it. It's more of a thing to pressure modelers to finish their builds, but if you still finish your build in a resonable time after the end-date, I'll still include you in the official list of finished builds.

stick man- Congrats on the end of your freshman year!Cool [8D] You're Achilles looks like its comin' along nicely. Same goes for you too, stick man, if you still finish your build in a resonable time after the end-date, I'll still include you in the official list of finished builds. So don't feel rushed to build it in a specific time.

"A good plan executed now is better than a perfect plan next week." - George S. Patton

  Photobucket 

  • Member since
    June 2008
Posted by lewbud on Wednesday, June 17, 2009 3:17 AM

I probably won't make the 1st either.  Will try to get it done ASAP.

Buddy- Those who say there are no stupid questions have never worked in customer service.

  • Member since
    December 2007
  • From: Bridgeview, Illinois
Posted by mg.mikael on Wednesday, June 17, 2009 8:47 AM
 lewbud wrote:

I probably won't make the 1st either.  Will try to get it done ASAP.

A okay, just remember to still finish your build in a resonable time.Smile [:)]

"A good plan executed now is better than a perfect plan next week." - George S. Patton

  Photobucket 

  • Member since
    November 2006
  • From: Coastal Maine
Posted by dupes on Wednesday, June 17, 2009 9:31 AM

It should be a fun ride. Wink [;)] Looks like it's going to be a solo attempt most likely, so if I have to bail around 130-150 I doubt I would be too disappointed.

Will definitely get this guy finished up in a "reasonable" amount of time. Still hoping I can get it on the shelf by the end of the month! 

  • Member since
    December 2007
  • From: Bridgeview, Illinois
Posted by mg.mikael on Wednesday, June 17, 2009 2:34 PM

Here's my next update.....haven't had that much time on the bench lately, so not alot of work done. I also unfortunatley, won't be home the next two days so I won't get any bench time till Saturday. Along with no computer access till Friday night at the earliest(so I'll be absent from the forums.Boohoo [BH])

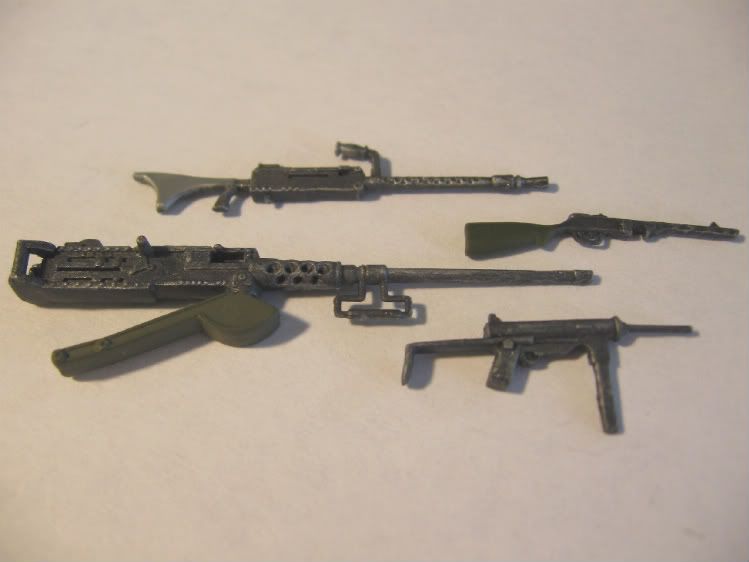
Anyways here's the work, all the accesories are comin' along. Base coats and some dry-brushing done. The two helmets are from a Revell kit, along with one of the guns, a PPSh-41.

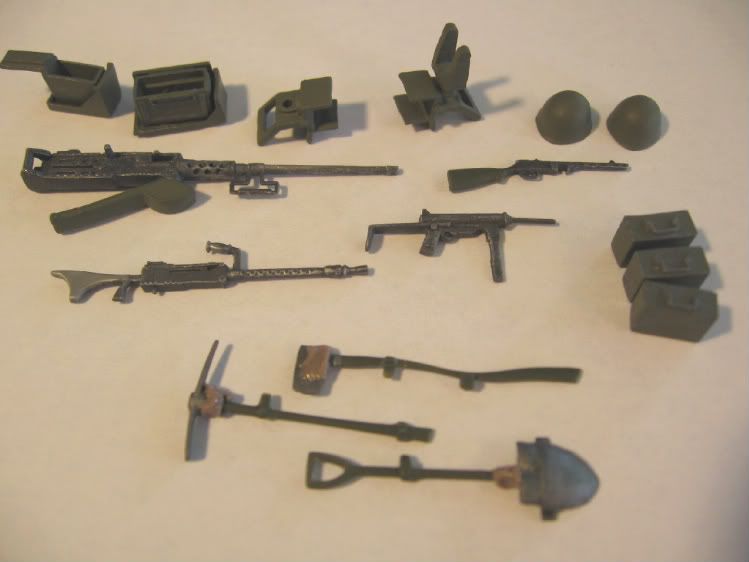
The SMG "grease gun" is the only kit supplied gun I'm using. The .30 cal and .50 cal are from Tamiya's US Infantry Weapons Set. These Tamiya molds are pretty old too, but their a hundred times better then the Zvezda ones. The .50 cal mount was scavenged from the kit supplied .50 cal. (It's mount is pre-attached to the Zvezda gun, but a little bit of snipping can take it off.)

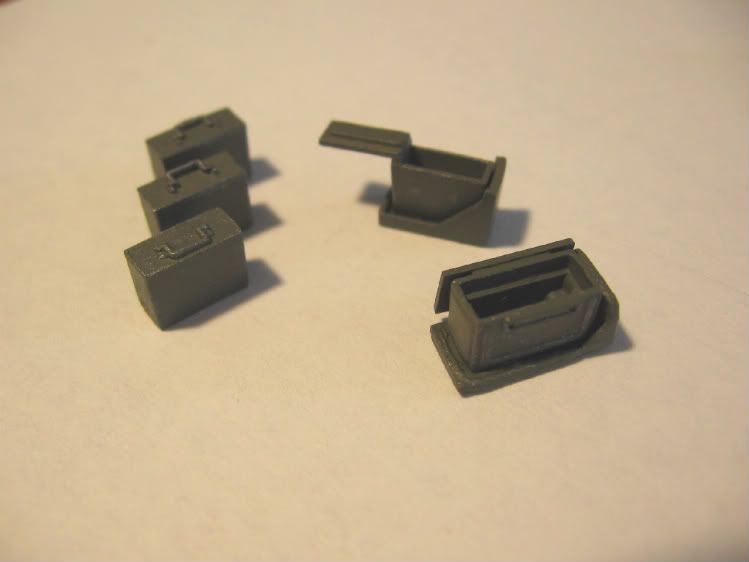
The kit supplied ammo cans lack detail, so I decided to use those just as stowage in the cabin. I replaced them with a .30 cal ammo box and .50 cal ammo box from Tamiya's US Infantry Weapons Set. The .50 cal ammo tray had to be replaced though,  since the kit supplied ammo tray is too small for a correct .50 cal ammo box, so I had too scratch the tray for the new ammo box I was using. The .30 cal ammo box fit the kit supplied tray without a hitch.

Yes the ammo boxes are open, but I'll be putting an ammo belt in their that feeds to the gun.

Thanks for looking.Smile [:)]

"A good plan executed now is better than a perfect plan next week." - George S. Patton

  Photobucket 

  • Member since
    November 2003
  • From: Nashville, TN area
Posted by bobbaily on Saturday, June 20, 2009 5:45 PM

Mg-nice work on all the accessories-you have more accessories than I think are in my entire kit!  Your attention to detail is going to pay off.

Got back from vacation yesterday evening-spent today doing things around the house.  However, I did manage to transfer some pics of work done before we left town.  Here's the Before:

Actually, the floor section had some spruce strips & a couple of little "spruce circles" added that appeard on the resin floor section that I used as a model.

After adding the resin side panels and some painting:

I've still got some detail painting, a wash and some dry brushing to do tomorrow.  Also, the fit of the seat is going to be challenging.  The kit seat is a major disappointment, so I'll attempt to get the resin seat in at the right height.  Tomorrow is a busy day-church, lunch, send out some resumes and then some modeling.  I hope to have the interior complete and the fuselage buttoned up & primed by mid week, depending on how things go.  At this pace, the 7/1 date is a "maybe" but it should be done shortly afterwards....

Bob


JOIN OUR COMMUNITY!

Our community is FREE to join. To participate you must either login or register for an account.

SEARCH FORUMS
FREE NEWSLETTER
By signing up you may also receive reader surveys and occasional special offers. We do not sell, rent or trade our email lists. View our Privacy Policy.