SEARCH FINESCALE.COM

Enter keywords or a search phrase below:

1,000 Roadwheels - 2009

154805 views
1823 replies
1 rating 2 rating 3 rating 4 rating 5 rating
  • Member since
    January 2003
  • From: Hancock, Me USA
Posted by p38jl on Thursday, November 19, 2009 8:02 AM
depending on where your lifted spots are, you can try picking off the bubbles with a pointed knife blade, scuff the edges with a sanding stick or scotch brite pad. Then either touch up the color with a brush, or airbrush.. reaply the future with 3-5 dry dusting coats, once this is good n dry, hit a nice smooth coat of Future.

[Photobucket]

  • Member since
    December 2002
  • From: Bury St Edmunds, Suffolk, England
Posted by Bish on Thursday, November 19, 2009 7:01 AM
I first painted the model in Enamels then gave a coat of future. This was left fro 24 hours before i applied the wash. I did the same thing that i have done twice before. I can only assume that i missed some areas when putting on the future. The apperance is the same as you get when you put paint stripper onto paint. It isn't all over, just in certain areas. Its the actual paint thats lifting not the furure. I could remove those areas that have lifted and respray, its just if i can get a good colour match, but that might be my best option and hope that when i wash a second time the wash will blend everything in.

I am a Norfolk man and i glory in being so


On the bench: Airfix 1/72nd Harrier GR.3/Fujimi 1/72nd Ju 87D-3

  • Member since
    September 2006
  • From: Central Texas
Posted by NucMedTech on Thursday, November 19, 2009 6:46 AM

Bish- If the paint under the future is enamel, then you can use Windex or any other amonia based window cleaner to remove the future. Then you can just re-apply the Future and start from there. If you used acryllic paint then obviously that won't work. 

-StephenCowboy [C):-)] 

-edit: If your filter is enamel over the future and you just need to get rid of the filter wash, you should be able to use enamel thinner to remove the filter without damaging the future coat.

DisclaimerWink [;)]: I've never tried these methods, just passing advice from others that I read here before.


Most barriers to your successes are man made. And most often you are the man who made them. -Frank Tyger

  • Member since
    January 2003
  • From: Hancock, Me USA
Posted by p38jl on Wednesday, November 18, 2009 10:03 PM

Confused [%-)]hummm. I might have some ideas..

first, are the bubbles in the future? or under the future, as in the first coat?

And how big are the bubbles? Are the bubbles more of a color discoloration or an actual lifted bubble like a zit?.

Can you post a pic?

[Photobucket]

  • Member since
    December 2002
  • From: Bury St Edmunds, Suffolk, England
Posted by Bish on Wednesday, November 18, 2009 4:37 PM

HELP looking for some advice. Last night i put on a coat of future to seal the enamel paint. Then tonight i applied a light filter wash. But it seems my future coat may not have been as complete as i thought. I now have bobbles of paint on various parts of the hull. Some i can get away with, but a few are in very obvious places. So, apart from stripping the whole thing and starting the paint job again, is there anything i can do to repair this error.

I bloody hope so.

I am a Norfolk man and i glory in being so


On the bench: Airfix 1/72nd Harrier GR.3/Fujimi 1/72nd Ju 87D-3

  • Member since
    August 2003
  • From: Connecticut, USA
Posted by Nachtflieger on Wednesday, November 18, 2009 3:29 AM

Thanks p38jl!Smile [:)]

Nate


  • Member since
    January 2003
  • From: Hancock, Me USA
Posted by p38jl on Tuesday, November 17, 2009 9:03 PM
Bow [bow] Very Nice job!

[Photobucket]

  • Member since
    August 2003
  • From: Connecticut, USA
Posted by Nachtflieger on Tuesday, November 17, 2009 3:20 PM

Hi Stephen,

Thanks for the comment!Smile [:)] I actually am starting to fill my displays up! The decals went on with no problems at all. I sprayed some Future in the spots where the decals would go and let it dry. Next, I applied the decals and added Solvaset. After that dried, I sprayed Testors clear flat over the model.

I think that's a good idea about concentrating on one build at a time. It will allow you to finish one, and that's always a good feeling. Sometimes when you work on more than one, it seems like you're working all the time, and getting nothing done. At least, that's how it is with me.Wink [;)]

Nate

PS Thanks Dupes.........that's the guy I was refering to!Thumbs Up [tup]


  • Member since
    November 2006
  • From: Coastal Maine
Posted by dupes on Tuesday, November 17, 2009 1:42 PM
 Nachtflieger wrote:

Second, I mixed weathering powders with Vallejo Matt Medium for a permanent finish for the muffler, and spare tracks. I got the idea from a guy at AMPSEast who put on a seminar for diorama building. I appologise for not remembering his name.

Finally, and this I also credit to the above individual, I misted Tamiya Buff, over the model.......heavy at the bottom, tapering to light at the top.

Nate

That would be Dan Capuano you're referring to. I.E., this cat:

http://www.armorama.com/modules.php?op=modload&name=Sections&file=index&req=viewarticle&artid=2150


  • Member since
    September 2006
  • From: Central Texas
Posted by NucMedTech on Tuesday, November 17, 2009 6:37 AM

Nate- Nice job, another one for the display shelf. Must be getting pretty full. The decals look great, did you have any problem getting them to settle down? Kudos for trying new techniques, the chipping looks great and I like the fade you used.

As for me still working on the E's upper hull. I think once I'm done with this step I'm going to concentrate and get one model done. Working on all three is getting overwhelming and I think slowing me down.( Not that I'm a fast builder anywayWink [;)])

-StephenCowboy [C):-)]  

Most barriers to your successes are man made. And most often you are the man who made them. -Frank Tyger

  • Member since
    August 2003
  • From: Connecticut, USA
Posted by Nachtflieger on Tuesday, November 17, 2009 2:17 AM

satch_ip, and Boyd: Thank you for the compliments....I appreciate them!Big Smile [:D]

Nate


  • Member since
    April 2003
  • From: 41 Degrees 52.4 minutes North; 72 Degrees 7.3 minutes West
Posted by bbrowniii on Monday, November 16, 2009 9:11 PM

Nate

WOW!   That Brummbar looks great.  The finish you put on is superb!  Kudos to you man!

'All that is necessary for the triumph of evil is for good men to do nothing' - Edmund Burke (1770 ??)


  • Member since
    September 2009
  • From: Spring Branch, TX
Posted by satch_ip on Monday, November 16, 2009 7:12 PM

Nice Bar you got there! (spoken an a Daniel Boone accent).

So Dupes, when this GB done, will you be doing a 750 road wheels one?  Maybe Swiss Cheese road wheels?

  • Member since
    August 2003
  • From: Connecticut, USA
Posted by Nachtflieger on Monday, November 16, 2009 5:39 PM

Thank you very much Mike.Blush [:I]Smile [:)] I'm glad you like it! For the chipping, I used Valejo German Camo Black Brown. Cut a very small piece of the Scotch pad....about 1/4 inch square, and dip the pad in the paint, blot off most of the excess, and then tap it on the model. Try it on a practice model, or piece of styrene to get the feel of it.

Thanks again,

Nate


  • Member since
    April 2005
Posted by Thunderbolt379 on Monday, November 16, 2009 5:31 PM

Nate -- stunning work! That Brummbar is competition stuff, it deserves to be in the magazine! The scotchbrite trick worked very well, I have one here and will be trying it myself one day. Also using a buff overspray as a dust coat worked very well! If I can get one to come out half as good I'll be well pleased.

I can't wait to see your Puma on the 8x8 build! Speaking of which, I have those turret assembly refs you wanted, PM me with your email and I'll get them to you.

Cheers,

Mike/TB379

http://worldinminiature.blogspot.com/

  • Member since
    August 2003
  • From: Connecticut, USA
Posted by Nachtflieger on Monday, November 16, 2009 5:19 PM

Hi Steve,

Thanks for the comments!Big Smile [:D] I agree, a few skirts looks better. Plus, you can see all that excellent zimmerit detail that's molded in!Smile [:)]

Nate


  • Member since
    August 2003
  • From: Connecticut, USA
Posted by Nachtflieger on Monday, November 16, 2009 4:35 PM
Thanks Marc!Big Smile [:D]


  • Member since
    July 2003
  • From: waynesboro va, via Ireland
Posted by sidure on Monday, November 16, 2009 4:34 PM

Nate, just an outstanding build overall, its very impressive. Great job. I like it with a few skirts on.

Steve

  • Member since
    November 2006
  • From: Coastal Maine
Posted by dupes on Monday, November 16, 2009 4:30 PM
Nate - this earns another stripe on your GB badge, as well as the EVER-coveted "Thumbs Up [tup]Thumbs Up [tup]"!!! Nice work! Big Smile [:D]
  • Member since
    August 2003
  • From: Connecticut, USA
Posted by Nachtflieger on Monday, November 16, 2009 4:13 PM

Hi guys,

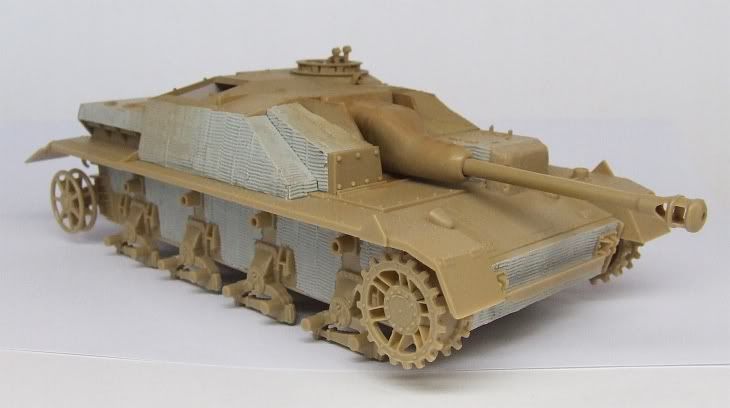
I'm calling this one done. It was a fun kit to build, but when it came to the schurzen, they were pretty fiddly! I don't know how many of the brackets I broke off while building it.Banged Head [banghead] It actually had a full set of skirts when I painted it, but it came down to what I ended up useing.

I tried a couple of new techniques out on this one, and I think I'll continue to use them. One, I used a Scotch brite pad for the paint chipping this time, and I like the results. I'll have to practice  a bit, but it looks pretty good. (IMHO)

Second, I mixed weathering powders with Vallejo Matt Medium for a permanent finish for the muffler, and spare tracks. I got the idea from a guy at AMPSEast who put on a seminar for diorama building. I appologise for not remembering his name.

Finally, and this I also credit to the above individual, I misted Tamiya Buff, over the model.......heavy at the bottom, tapering to light at the top.

Next, I'll concentrate on my SdKfz 234/2 Puma for the Achtraden group build. I need to work on something with a LOT less wheels!Smile,Wink, & Grin [swg] Thanks for looking, and comments are welcome.Big Smile [:D]

Nate


  • Member since
    April 2005
Posted by Thunderbolt379 on Sunday, November 15, 2009 4:40 PM

Thanks Nate -- it's Cavalier's Generic Standard Pattern set, with each piece custom shaped and trimmed into place. I like this method very much, and the job used barely a quarter of the supplied sheets!

Not much to do externally now, then I can tackle the paint,

Cheers, Mike/TB379

http://worldinminiature.blogspot.com/

  • Member since
    December 2007
  • From: Bridgeview, Illinois
Posted by mg.mikael on Sunday, November 15, 2009 11:45 AM

Hey Dupes, I'm sorry to say this but I'm gonna have to drop out of this GB. Never really had any time to start my Cyber-Hobby Raketenwerfer and starting this kit now would be crazy(with all the PE in the kit.)

PS: I may join your Winter Warriors GB, depending apon wether or not I can find a good technique for white-wash camo.

"A good plan executed now is better than a perfect plan next week." - George S. Patton

  Photobucket 

  • Member since
    August 2003
  • From: Connecticut, USA
Posted by Nachtflieger on Sunday, November 15, 2009 8:27 AM

Looks really good Mike!Thumbs Up [tup] What did you use for the zimmerit? Is that the Cavalier set? Can't wait to see it with some paint.Big Smile [:D]

Nate


  • Member since
    April 2005
Posted by Thunderbolt379 on Sunday, November 15, 2009 5:25 AM

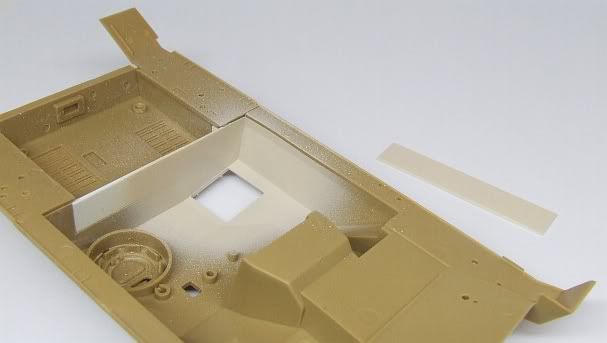
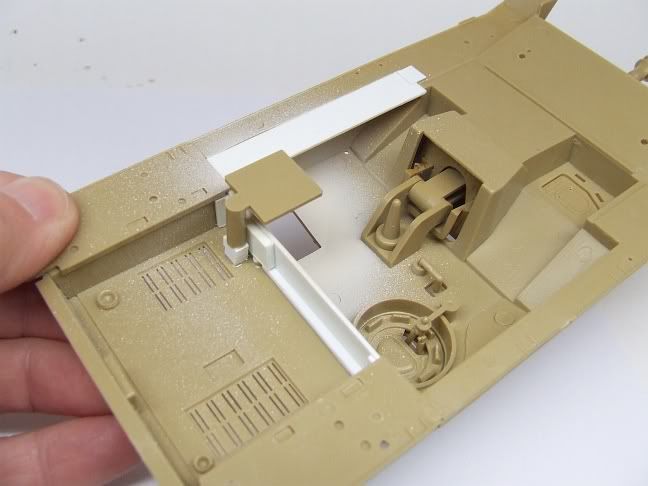
Hi guys, I made some progress on the Tamiya StuG IV today. As the hatch will be open I needed to box in the sponson and provide the suggestion of an interior -- not a proper one, I'm not reaady to do that, mounting radio boxes inside the flank hull and such -- with a rear fighting compartment wall and such blown into Panzer Beige. I mixed the shade in Tamiya Acrylics, glosss white and flat buff 1:1 and sprayed it on. Here the locator for the strip of plastic which will close the sponson is unmasked:

Photobucket" border="0" />

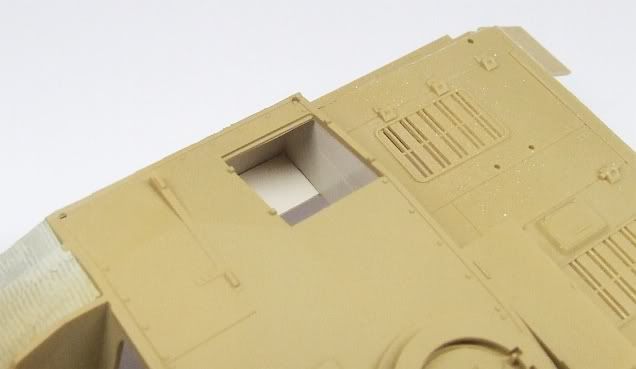
I masked the interior of the hatch area and touched up the outside with some dark yellow to create a clean demarkation between interior and exterior colours on the rear wall. Next I mounted the strip to close the sponson, and this is what's visible through the hatch:

Photobucket" border="0" />

Then I went on to mount the sighting systems and the gun. Before I could mount the gun I gave a quick oil wash to the area into which the mantlet sits (plus the mantlet itself) as it's hard to get to after gun installation and main painting. This is just a rough job as it'll be barely visible -- it's absence would be more visible.

Photobucket" border="0" />

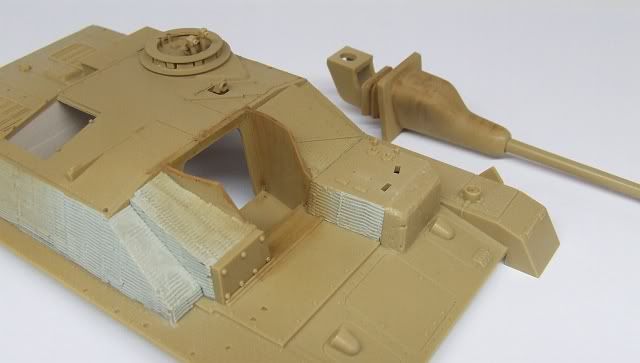
The next step was to mount the gun:

Photobucket" border="0" />

The underside of the fighting compartment is pretty busy now. I added the pedastal for the figure, recreating the correct height with styrene as the new arrangement meant the platform had to mount under the new rear wall:

Photobucket" border="0" />

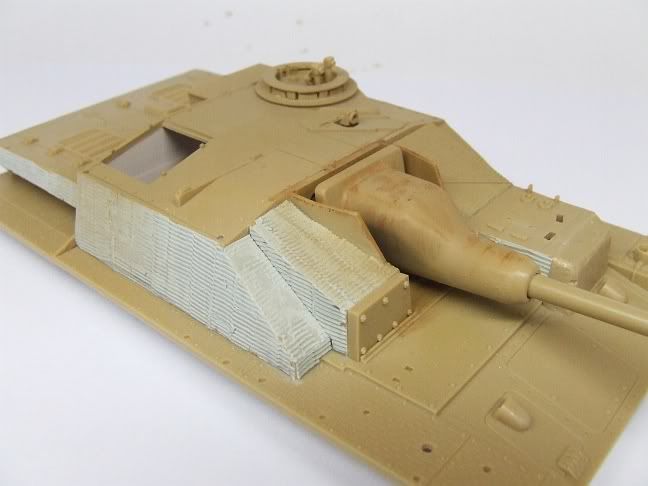
At last! Clear to close the hull! I proceeded at once and this is the stage she's at tonight:

Photobucket" border="0" />

A few externals now, the spare wheel holder, the driver's periscope protectors, the schkurtzen hangers, and she'll be ready for the paintshop. With luck I'll be getting some paint on her in a few days, though this heat down in Aus means acrylics tip-dry awful fast. And I need a run to a hobby store for acrylic thinner, liquid cement and some paints for other projects, so we'll see what I can do and how soon.

Cheers, Mike/TB379

http://worldinminiature.blogspot.com/

  • Member since
    April 2005
Posted by Thunderbolt379 on Saturday, November 14, 2009 5:31 AM

Hi guys,

I'm finally back to the Tamiya StuG! I sprayed the interior Panzer Beige, including the sheet stock I'll be using to box in the sponson, so my next job is install that sheet, then mask the interior and touch up the edges of the hatch with dark yellow. Then I can get the job rolling again by doing the fiddly jobs necessary before closing up the hull.

It's been a long time, but I can see this one moving along now. That Tamiya Brummbar will probably be arriving in a couple of weeks, and I'm hoping Lucky Model will be able to obtain the decals I ordered last week for that late H or J. There might yet be an extra stripe on the badge -- we'll see. In the meantime, this one will be brought up to paint-readiness then go through the spray booth at the same time as my 8x8 for the Achtraden GB, as they share the same base color.

Pics soon!

Cheers,

Mike/TB379

http://worldinminiature.blogspot.com/

  • Member since
    December 2006
  • From: t.r.f. mn.
Posted by detailfreak on Wednesday, November 11, 2009 6:11 PM
Great stuff guys,hope to update what i've got on the bench shortly.Most of the work has been directed to the hornisse.

[View:http://s172.photobucket.com/albums/w1/g-earl828/]  http://i158.photobucket.com/albums/t104/cycledupes/1000Roadwheels4BuildBadge.jpg

  • Member since
    August 2003
  • From: Connecticut, USA
Posted by Nachtflieger on Wednesday, November 11, 2009 2:58 PM

Thanks Marc! I got the roadwheels on, and a wash of burnt umber this morning. I'm thinking I might have this finished over this coming weekend.Smile [:)]

As for the markings, this kit has the same markings for two Stupa in Italy that the Mid Production Brummbar without zim has.  There are two others also, but I'm planning on marking this as a command tank in Italy, so there is only going to be the number one, and the Balkenzreuz on both sides. I believe the decals will be able to conform to the zim with no problems. The zim on this kit seems very restrained in my opinion.

Nate


  • Member since
    November 2006
  • From: Coastal Maine
Posted by dupes on Wednesday, November 11, 2009 8:26 AM
Nate - that looks great! You going to try to get the decals to lay down over the zim? Or is some hand painting in order? Looking at the markings in the mid version, there doesn't seem to be much too them.
  • Member since
    August 2003
  • From: Connecticut, USA
Posted by Nachtflieger on Tuesday, November 10, 2009 3:31 PM

Thanks for the encouragement guys!Big Smile [:D]

I have a few more progress pics of the paint job. The main camo is done, and the first filter has been applied. Next step will be installing the roadwheels, and adding a wash around the running gear.

Nate


  • Member since
    April 2003
  • From: 41 Degrees 52.4 minutes North; 72 Degrees 7.3 minutes West
Posted by bbrowniii on Tuesday, November 10, 2009 2:51 PM

Nate

Suh-WEEEEEET paint job!  I wanna see that baby in person!

'All that is necessary for the triumph of evil is for good men to do nothing' - Edmund Burke (1770 ??)


JOIN OUR COMMUNITY!

Our community is FREE to join. To participate you must either login or register for an account.

SEARCH FORUMS
FREE NEWSLETTER
By signing up you may also receive reader surveys and occasional special offers. We do not sell, rent or trade our email lists. View our Privacy Policy.