SEARCH FINESCALE.COM

Enter keywords or a search phrase below:

Bf-109: Reich Defender GB The End

186213 views
1406 replies
1 rating 2 rating 3 rating 4 rating 5 rating
  • Member since
    October 2004
  • From: League City, Texas
Posted by sfcmac on Friday, December 26, 2008 1:40 AM

 Throw that man a spong! Anyways with Christmas behind us it is back to the grind stone! Really a pita to get these PE and resin bits to fit into a kit they weren't really made for, but I keep telling myself it will be worth it when I get to my more expensive kits. Better to mess up now than practice on those!

 Even so they are making a huge diff allthough time consuming. Look at the Gear bay detail compaired to the stock kit. Even the shape of the stock kit's bay was wrong with the flat floor. I figure this was a good comparison shot! Still working on the wing radiators. Major surgery there as well.

Thought I was ready to close up the fuselage but .... I added new exhaust and shields. Cut apart the radiator and added PE parts and a floor to hide the ensuing hole as this was all molded detail on the fuselage.

I have done all I can do to the fuselage with what I have so I'll close it up tomorrow and finish the wing radiators.  I have detail to add to the gear and am replacing the wheels with the Hasegawa ones which have in turn been replaced by resin ones.

I am hoping it picks up after this and I can focus on painting soon.  Still if anyone has suggestions or see's an error please holler as this is my training tub!  Thanks!

  • Member since
    February 2007
  • From: Bournemouth UK
Posted by Luftwoller on Friday, December 26, 2008 3:48 AM
 Daywalker wrote:

Stan- Welcome back!  No more of these extended absenses from you, 'cuz when you're gone Aaron is the one handing out the advice! Shock [:O]

What are you talking about, Thank Heavens for Aaron, without him id never had known about the Me 109 J-12. Now theres a kit i need badly.

As for the Work so far Nut bar I mean Aaron, its looking real sweet mate. Those wheel bay inserts really make a difference. Its just the bending of the suckers that i find difficult. The radiator, will be very noticable when buttoned up. Dont forget to put the actuating bar in front of it. Its easier when the fuz sides are still apart.

...Guy

..'Your an embarrassment to the human genus, makes me ashamed to call myself Homo'.
  • Member since
    February 2007
  • From: Bournemouth UK
Posted by Luftwoller on Friday, December 26, 2008 5:57 AM

Hey ho, the GF has gone out to the sales (YES ALREADY) and what on earth could i do while she's gone? Tidy up? Walk the dogs? Go back to bed? NO!!! Do some modelling Yey.

I buttoned up the pit and tacked the vacform canopy on ready for paint. Also glued the wing on and radiator. Oooh paint is getting close.

While i was watching the glue dry i turned my attentions to the glorious QB exhausts. These recieved a coat of Alclad Burnt iron which in my eye looked a little yellowish, so i gave them another coat of Alclad Steel which darkened them a fair bit. Then i gave them a light dusting of Rust pigments and finished off by painting the exhaust outlets black.

more soon.

...Guy

..'Your an embarrassment to the human genus, makes me ashamed to call myself Homo'.
  • Member since
    April 2005
Posted by Thunderbolt379 on Friday, December 26, 2008 6:29 AM

Hi Luftwoller -- I this the Hasegawa 1:48? The parts breakdown looks awfully familiar! The QB exhausts look exquisite... I hadn't meant to go with AMs but if I end up having to order the paints from Luckymodel in Hong Kong, well, they carry QB and don't even charge postage on the line. Who's PE set was that? The fret looks a lot like Eduard... Were there seat belts in that set?

Yeah, I know, I said OOB, but the 109 bug is insidious... And if I can move forward until I et the paints, well... Smile [:)]

Cheers,

Mike/TB379

http://worldinminiature.blogspot.com/

  • Member since
    February 2007
  • From: Bournemouth UK
Posted by Luftwoller on Friday, December 26, 2008 7:49 AM

Yes Mike, it is the Hasa Kit. And its a goodun. Ive built a fair few Hasa 109's and they are as good as it gets in 1/48. The interior set is the new Aries resin set No 4248 and comes with PE. I havent looked but it might be Eduards that they use, but its very good

As for the Quick Boost zausts, they are just honeys. They have the weld seams down the middle and hollowed ends, what more could a man want.

...Guy

..'Your an embarrassment to the human genus, makes me ashamed to call myself Homo'.
  • Member since
    October 2004
  • From: League City, Texas
Posted by sfcmac on Friday, December 26, 2008 5:59 PM

 Hello again!  Still working on the slow brutal stuff. I started digging in this kit and am only stopping when there is nothing else on hand to add or replace. I am using an older slightly less detailed PE set. I have a newer one but am saving it for the actual Hasegawa model.  Not a big diff but things that show under magnification and the wheel wells include details for the side walls extc.

To get the PE to fit this kit I have has to use te dremel to thin and cut away much molded on parts and details. You can see how I thinned the wheel well from the topside so I can cut it out and clean it up. Then using the right sized paint brush handle as a shaper curved the PE gear well part to it's proper curved shape and size. No more flat smooth Wheel and gear wells ! Tongue [:P]

The wing radiators are a nightmare. No detail so a bit of rescribing and cutting  I made one solid part into 3 ready to receive the PE details.

Joined the fuselage as planned and started on the wings. Trim and sand rescribe is the order of the day there. I completely and carfully cut away all the control surfaces so the can be replaced by PE or repositioned for the cool factor.

 I can't zoom in close enough with my cheapo camera to show the detail in the replacements.

Little bitty support braces with little bitty lightening holes. Pretty maddening to get those glued on straight and at right angles. I just took my time and did them one at a time.

In between steps here I am now trying to create a reasonable gunsite, and once I find where my son put my pinvise I am going to drill out those vent holes in the cowling.  What fun!


  • Member since
    September 2003
  • From: South Central Wisconsin
Posted by Daywalker on Friday, December 26, 2008 6:57 PM

 sfcmac wrote:
 And the Me- 109 J-12 that was made by a Junkers contract made use of the Stuka Spatted landing gear and recovered Props from French Aircraft. The Camo scheme was a bit more chartruse than magenta but tamiya Stop Light red will work if you can't find that color nail polish at the drug store...... (what? I read all about it in cosmo!)

ACK!  Now I gotta get one of those too.  Anyone have any idea where to find one? Propeller [8-]

Excellent work Mac, you're turning into a regular 109 experten. Approve [^]

Guy- I see you're not giving those poor elves any time off!  I am amazed by your speed and accuracy, very impressive!  I suspect you your elves shall have paint on this one by the time I finish typing this! Shock [:O]


Frank 


  • Member since
    April 2005
Posted by Thunderbolt379 on Friday, December 26, 2008 7:36 PM

Hu Lufty --

And the QBs are made to slot right in? Weeellll, how can I go by those? Big Smile [:D] I'll get them from Hong Kong in the New Year, and throw in some other stuff too...

Mike/TB379

http://worldinminiature.blogspot.com/

  • Member since
    December 2005
  • From: back seat of your car with duct tape streched out
Posted by soulcrusher on Friday, December 26, 2008 10:13 PM

Guy it looks like you are well on your way to another beautifulll build.

Aaron you are making some good progress there.

As for me I am going to pretend as if the the whole Fujimi incident never happened. I am going to plan B and start on the Academy 1/48 G-14 tomorrow. I have'nt decided on which markings to use. The kit comes with one intersting option pictured below. I also have a sheet of Eagle Strike decals "In the Defense of the Reich Pt4" The middle option is a G-14 and also has some history with it. None of the options are clear as to what stores either plane carried. I believe standard fighter interceptor would probally just have been the centerline drop tank so that is what I am going with. here are the decal options.

                                                                            SoulcrusherPirate [oX)]


  • Member since
    September 2003
  • From: South Central Wisconsin
Posted by Daywalker on Friday, December 26, 2008 10:23 PM

Sc- What Fujimi incident?  I have no idea what you're talking about. Wink [;)]  I updated page one to reflect the Academy kit. Thumbs Up [tup]

I like those kit markings, though I would be wary of using them from past Academy decal experience.  The Eagle Strike choice is a good one, can't wait to see some WIP pics! Big Smile [:D]

Frank 


  • Member since
    December 2003
  • From: Indiana
Posted by hkshooter on Friday, December 26, 2008 10:54 PM

Wow, soulcrusher. We'll have twin a/c if you build that one. Could be interesting.


  • Member since
    July 2003
  • From: waynesboro va, via Ireland
Posted by sidure on Saturday, December 27, 2008 1:40 AM

Very nice work Guy and Aaron, yous guys are really moving now. I did a little spray painting tonight and hope to have a few pics soon. I have another colour question for the experten. What colour are the wheel wells in these late war birds. Of course mine are G-10 and I dont know if that makes a difference. I saw some posted 109's yesterday and they were in the underside colours but for some reason I thought they would be RLM 02. Any advise appreciated.

Steve

  • Member since
    February 2007
  • From: Bournemouth UK
Posted by Luftwoller on Saturday, December 27, 2008 3:39 AM

Your correct Steve, the UC bays would be 02. The germans had a fair bit of the stuff and its bloody hardwearing. They are still digging german aircraft up from various holes in the ground and the RLM 02 still seems in fairly good nick. Cockpits went dark (RLM66) later on but 02 stayed on the insides.

Aaron, WOW, so much PE. Are you crazy? Your like a man possessed. Great work too. Thats the way with PE, slow and steady. Just remember to attach the flaps last, as i garauntee youll knock them off hundreds of times LOL.

Frank, after this post im going up to spray the 76 LOL.

...Guy

..'Your an embarrassment to the human genus, makes me ashamed to call myself Homo'.
  • Member since
    February 2007
  • From: Bournemouth UK
Posted by Luftwoller on Saturday, December 27, 2008 6:21 AM

Well, the RLM76 is all done. I know it seems quick but i had preshaded the undersides yesty. Im using Xtracrylics and, to be honest, im not a fan. They dont seem to have the adherance of Tamiya paints. (My usuall Paint of choice) When they go, i think thats going to be the last i see of them. Hope you like my Homage to the Frank myster Bow [bow]

Anyhoo while the paint was drying i decided to cut out the masks for the Hard? edged camo on the sides. For this i used some great Frisket film. Its semi transparent so it can be held over the Eagal cal decal sheet, 


which appears to be 1/48 and simply copied.

It looks good to me. So that will be my next update. Im off to my bro's for a meal this afternoon with the rest of the family. Could be a nightmare as hes never cooked for anyone but himself before and now he has to cook for about a dozen. Ooh this should be fun LOL.

...Guy

..'Your an embarrassment to the human genus, makes me ashamed to call myself Homo'.
  • Member since
    October 2004
  • From: League City, Texas
Posted by sfcmac on Saturday, December 27, 2008 7:06 AM

 Let me back up a moment as I am getting ahead of myself.

 Thunderbolt (Mike # 703)  That is a great looing pit for out the box! Great paint work!

 SC That stinks I feel almost as bad as when the Hurricane paint clouded up but then you recovered from that as well.

Sidure in Stans continued absence let me assure you that the underside wells, and most internal surfaces short of the pit were indeed RLM 02 as were the undersides of the flaps. Be warned though that there were exceptions in certain cases such as night fighters where the entire underside was painted black. In the absence of info RLM 02 is always a good guess that should pass the accuracy police.  So yeah I agree with Guy!

Stan and Mike and Greg and all the other pros better show up soon! I'm running outta questions! Still got plenty of wrong answers! Dunce [D)]

Guy  I like that masking technique have you ever used that para film stuff before?  Just wondering how difficult it is to manage.  Hahahahaa! I put mine on foam and sticks now as well whats the chances?  That Frank! He is such a bad influence! Evil [}:)]

 Seems like Imissed somebody. Sorry if I did I am sleepy and it is past my nap time.

  • Member since
    February 2007
  • From: Bournemouth UK
Posted by Luftwoller on Saturday, December 27, 2008 7:20 AM

Yey, Aarons arrived, i was starting to feel i was all on my own here. As for the parafilm? Is that the same stuff i have? I dont know, probably. Ive never used it before. I found it in my shed so decided id try it out to save on tamiya tape LOL. It seems pretty good. Not excessively sticky but should be ok.

Ill let you know.

...Guy

P.S Didnt get anymore kits. Boooo.

..'Your an embarrassment to the human genus, makes me ashamed to call myself Homo'.
  • Member since
    September 2003
  • From: South Central Wisconsin
Posted by Daywalker on Saturday, December 27, 2008 8:48 AM

Guy- Love that paint stand, you are OK in my book!  LOL  I have some of that frisket paper, but never used it.  How are you liking it?  Love those hard-edged schemes on the Karls, very cool looking. Approve [^]

Frank 


  • Member since
    January 2003
  • From: Washington DC
Posted by Gumiflex on Saturday, December 27, 2008 9:00 AM

Here I'm finally, got a new camera from Santa so here is my progress on Academy G14.


Gumiflex

  • Member since
    February 2007
  • From: Bournemouth UK
Posted by Luftwoller on Saturday, December 27, 2008 9:06 AM

Great work Gummy. Great photos as well. Never done an Academy 109 kit before. Parts breakdown looks Wierd. Keep it up big boy.

..Guy

..'Your an embarrassment to the human genus, makes me ashamed to call myself Homo'.
  • Member since
    December 2003
  • From: Indiana
Posted by hkshooter on Saturday, December 27, 2008 9:07 AM

Starting to get exciting. Lots of profress all around, paint going on. Cool.

There are still a number of people we have not heard from yet though.

  • Member since
    December 2004
  • From: Yokosuka, Japan
Posted by luftwaffle on Saturday, December 27, 2008 10:03 AM
Guy, Aaron, Gumiflex- Looks great!

aka Mike, The Mikester My Website

"He has all the virtues I dislike and none of the vices I admire."   -Winston Churchill

  • Member since
    April 2005
  • From: Piscataway, NJ!
Posted by wing_nut on Saturday, December 27, 2008 11:53 AM
WOW you guys are producing some really great work.  With the 'Cobras finished I started my Pegasus 109G-6 last night.  I am about half way done tooWhistling [:-^].  Since it is a snap toghter kit, builind is...we... a snapWink [;)].  Also since is also being built for a club GB comprised of all snap toghter kits and strict IMPS OOB rules, there is not much in the way of adding details.  I will get some pic up later.  Camera battery is dead.

Marc  

  • Member since
    April 2005
  • From: Piscataway, NJ!
Posted by wing_nut on Saturday, December 27, 2008 2:18 PM

Here are a few progress pics.

The prop blades are molded to the back plate, which doesn't fit so great.  The sinners is also a bit too bulbous so I cut off the blades, drilled a bigger hole in the spinner and mounted it on the Dremel with the cut off disc mandrel.  It was spun and sanded to a better shape.  Several failed attempts at rescribing the line around the spinner can be seen with the filler.  Since it will be black am going to leave it that way.


The kit comes with LG legs  that can be positioned down or with covers to do the LG retracted.  You can see how thick the doors were and how thick the LG leg is being molded to the door.  I decided to do the gear retracted.  The bottom of the door was reshaped and sanded thin to leave clearance for the tires.


The wing root is part on the wing assembly and if the top of the joint is sanded flat it fits nice and tight so a line of Tenax and zero filler for the wings.


Marc  

  • Member since
    September 2003
  • From: South Central Wisconsin
Posted by Daywalker on Saturday, December 27, 2008 2:49 PM

Looking good Gumi!  Any idea which markings you are gonna use?

Marc- Cool looking little kit!  I picked up one of their Hurricanes when they came out, but never did anything with it.  Ended up giving it to someone.

Thad and Karl:

Any idea which kit you would like to build here?  Just thought I would check in with you guys. Thumbs Up [tup]

Frank 


  • Member since
    February 2007
  • From: Bournemouth UK
Posted by Luftwoller on Saturday, December 27, 2008 5:04 PM

Hey Marc, thats coming along great, and for a cheapo snap together, it actually looks like a messerschmitt. Fantastic work thinning the wheel covers. Whats the cocpit glass like? And what markings are you going to use? Kit supplied or aftermarket?

...Guy

..'Your an embarrassment to the human genus, makes me ashamed to call myself Homo'.
  • Member since
    July 2003
  • From: waynesboro va, via Ireland
Posted by sidure on Saturday, December 27, 2008 7:56 PM

Thanks for confirming the colours. I knew it was but have seen some recently that were fuselage colour and had me secongussing myself. On top of that the Monogram instructions are useless.

Steve

  • Member since
    January 2003
  • From: Washington DC
Posted by Gumiflex on Saturday, December 27, 2008 8:31 PM
 Daywalker wrote:

Looking good Gumi!  Any idea which markings you are gonna use?

Marc- Cool looking little kit!  I picked up one of their Hurricanes when they came out, but never did anything with it.  Ended up giving it to someone.

Thad and Karl:

Any idea which kit you would like to build here?  Just thought I would check in with you guys. Thumbs Up [tup]

Thanks all,

Daywalker----plan is Croatian "Black 4"


Gumiflex 


  • Member since
    October 2004
  • From: League City, Texas
Posted by sfcmac on Saturday, December 27, 2008 9:39 PM

Hey Marc! I built the Pegasus Spitfire during the BOB GB. Was very impressed with the fit and external details on a snap together. I have not seen the 109 version but it doesn't look too bad either. I was really surprised as if you did an after market pit with the spit it could be a real contender with some love. Think I threw it together in 8 hours paint and all and was very pleased with it.

Cool choice of markings Gumiflex!

I am betting Guy will be done by morming! Looks spectaculoso! Ditto on the amazement in the speed but fine quality that you can turn these out!

As far as I go spent a good 3 or 4 hours researching the markings I want to do my 109 G in. Narrowed it down to about 3 but want to find my 109 books before finalizing the decision. Too many choices but I want one that has a DOR band to fit in with the late theme of this GB so trying for no earlier than circa 1944.  At that stage to where I need to make a choice before proceeding to get the details right.

 I do have another question that I am having trouble answering. The forward wing flaps or moving leading edge thingie? I have the flaps on the back wing all apart ready to pose but am concerned that the forward ones may have automatically opened as well. This could be an issue as I do not think there is an awful lot I can do with them without destroying the wing. The Plastic is very thick and the shape would not be accurate after chopping it of. So I think I am stuck with leaving them intact and alone.

Will this be an issue with the position of the flaps on the rear of the wing?

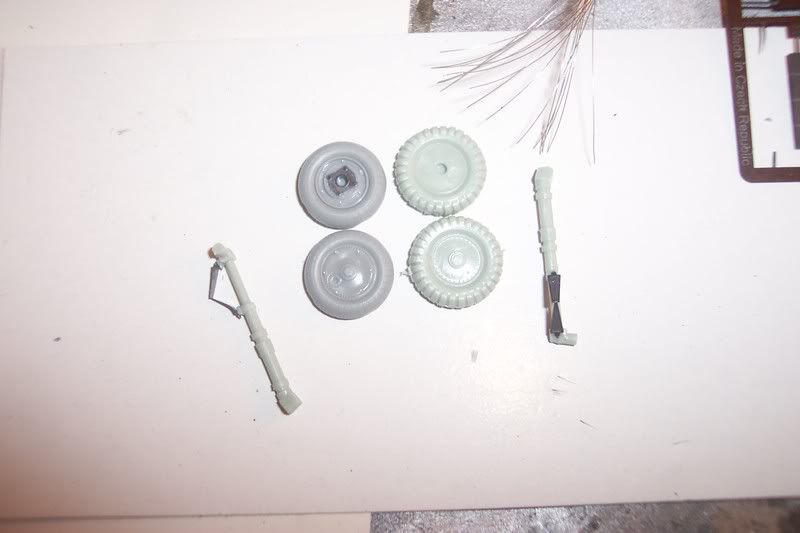
In the mean time I am working on the gear legs and wheels. I used wheels labled G from the hasegawa sprue. There are also another set labled K.  I used the G wheels as I have some resin replacements for the Hasegawa kit.  Addind the PE parts that I have available. The newer G-10 PE set comes with PE Brake lines which look really cool and hook into a PE inside hub. This older kit does not have them so I am shaping wire using the PE set for the Hasegawa G-10 as a ref. Confused yet? I only eneded up with 5 diff kits and a box full of am goodies thanks to catching this bug! I am getting anxious to try out my new found knowledge on a newer nicer kit!

Here is a comparison of the wheels original and the new ones.

 Hope someone knows the answer to the flap/ control surfaces question. I may be able to get away with positioning the rear ones open just a little if that is the case?  Thanks!

  • Member since
    April 2005
Posted by Thunderbolt379 on Saturday, December 27, 2008 10:03 PM

Hi Aaron,

Re your flap and slat question -- good point! I think the wing design, including the aerodynamics of flaps and slats, dates right back to the Bf 108 Taifun sport plane, and was only minimally changed all the way through.

I did some looking during BoB as I wanted to do flaps-open on my Emil but wasn't sure if the kit instructions to open the slats if the flaps were down were entirely accurate. I went through my references and in them all only found one pic of a 109 (G, I think) with both open at the same time -- but heaps of shots of parked aircraft with the flaps lowered but the leading edge slats closed. I'm assuming they deployed together during approach, but the slats closed mechanically as soon as she was on the ground.

Does anyone know if the 109 had the same situaion as the Mustang, in which the flaps would 'bleed down' after engine-stop, when the engine-driven hydrauliuc pump was inoperative???

Cheers,

Mike/TB379

http://worldinminiature.blogspot.com/

  • Member since
    September 2003
  • From: South Central Wisconsin
Posted by Daywalker on Saturday, December 27, 2008 10:17 PM

Sign - Ditto [#ditto] on the marking choice Gumi!  I like that one. Approve [^]

Aaron- Have you listened to yourself lately?  You're turning into a regular 109ophile.  Your assimilation is complete my friend!  Now, about your "leading edge thingies"...

Those opened to help manuevering, but the radiator flaps had no impact on them.  You could pose the radiator flaps up or down, and the L/E slats extended or retracted- either way.  Good news for you! Thumbs Up [tup]  Those Hasegawa wheels look MUCH better than the others, good choice! Big Smile [:D]

Frank 


JOIN OUR COMMUNITY!

Our community is FREE to join. To participate you must either login or register for an account.

SEARCH FORUMS
FREE NEWSLETTER
By signing up you may also receive reader surveys and occasional special offers. We do not sell, rent or trade our email lists. View our Privacy Policy.