SEARCH FINESCALE.COM

Enter keywords or a search phrase below:

Adversary & Aggressor GB (3/15/09-12/31/09)

36811 views
68 replies
1 rating 2 rating 3 rating 4 rating 5 rating
  • Member since
    May 2009
  • From: Hobart, Tasmania
Posted by Konigwolf13 on Tuesday, December 8, 2009 11:13 PM

Thanks Tony, might not of been able to see it in the photos, bit it was there.
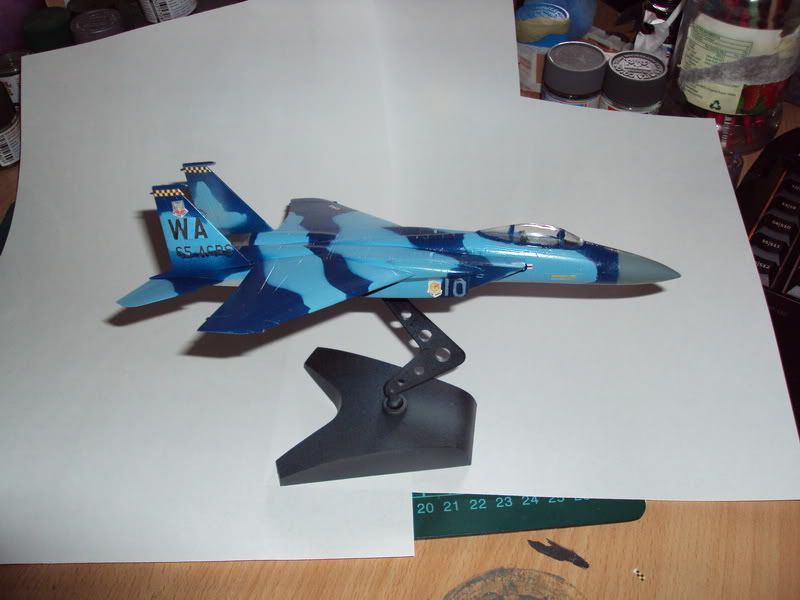
FINISHED

As it turns out without using an enamel based paint as a primer, just using crud quality tape, and handytak at masks  it was taking paint off down to the model. In fact just pouring metho over to make a bath to strip the paint took 99% of the paint off.

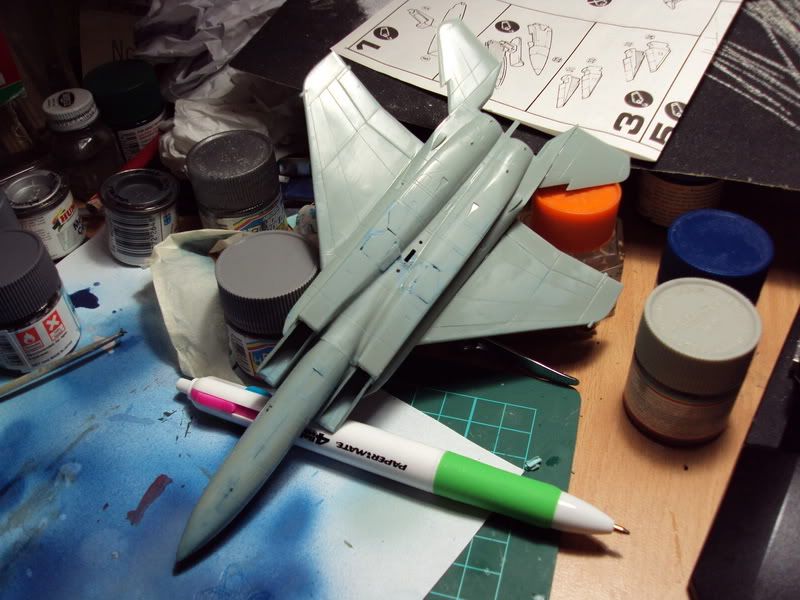
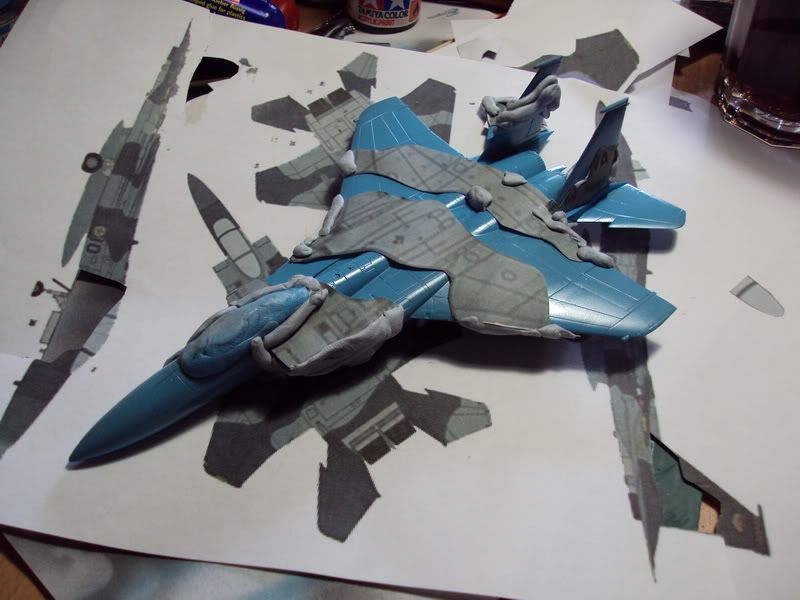
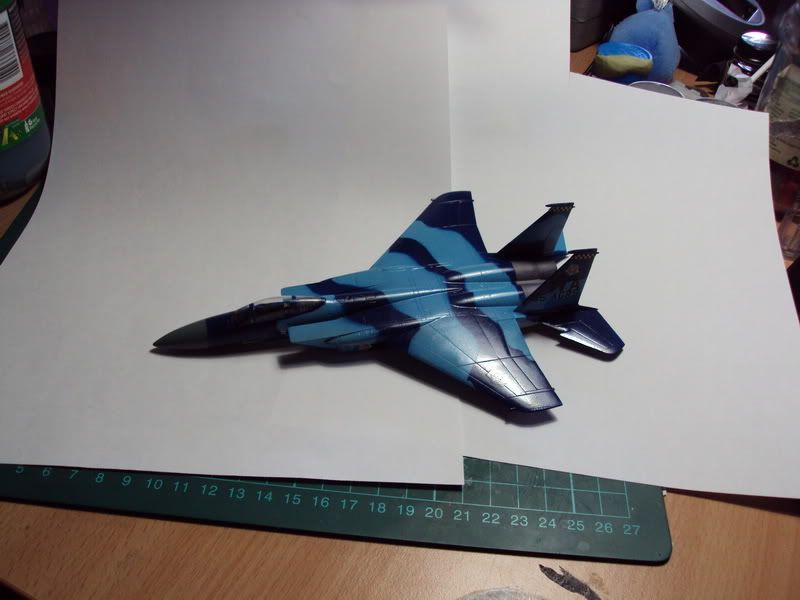
 I gave a grey enamel primer, then coated in light blue. I then made some masks by printing out the paint guide at the approx size, taped it on, and handytaked the in between bits.I then pained remaining areas.

Decals are mostle printed normal paper glued to aircraft with hand painting over white areas to small to cut out. I used the decals that came with the model, though not full black I think on this scheme they actually look better, I also used the kit formation strips. Only problem was the 'decals' printed at wrong size so the are slighty to large.

Andrew

  • Member since
    November 2008
  • From: Long Island, NY
Posted by Hot-Pb on Tuesday, December 1, 2009 1:10 PM
 Konigwolf13 wrote:

OK Painting stage. She comes with a stand so I went with the wheels up configeration, and discovered she was not ment for that look, the gear doors needed alot of sanding to sit flush. Also needed some putty and sanding around the air intakes as well.

Did the base layer of Gunze sangyo light blue, then dusted with tamiya xf-23 light blue to get the right colour. Then I 've done GS 322 for the camo. I got part way through this coat and realized I still had the large flow nozzle in the airbrush which accounted over spray, So I need to redo the light blue again, hope it looks fine, cause I dontreally want to strip the paint and start again, lol.

 Andrew

Thumbs Up [tup] Looking great to me Andrew, paint looks nice and smooth, if there's any overspray I can't tell. Looking forward to seeing it all decaled up.

Tony

  • Member since
    May 2009
  • From: Hobart, Tasmania
Posted by Konigwolf13 on Sunday, November 29, 2009 11:16 PM

OK Painting stage. She comes with a stand so I went with the wheels up configeration, and discovered she was not ment for that look, the gear doors needed alot of sanding to sit flush. Also needed some putty and sanding around the air intakes as well.

Did the base layer of Gunze sangyo light blue, then dusted with tamiya xf-23 light blue to get the right colour. Then I 've done GS 322 for the camo. I got part way through this coat and realized I still had the large flow nozzle in the airbrush which accounted over spray, So I need to redo the light blue again, hope it looks fine, cause I dontreally want to strip the paint and start again, lol.


 Andrew

  • Member since
    December 2002
Posted by Bossman on Monday, October 26, 2009 11:55 AM

Thanks for the kind comments guys, and good to see that this GB hasn't faded away yet.  Looking forward to seeing more.   That F-5 looks like a nicely detailed kit.

Chris

  • Member since
    November 2008
  • From: Long Island, NY
Posted by Hot-Pb on Saturday, October 24, 2009 9:23 AM
 Konigwolf13 wrote:

I have more accurate details than above, but not looking fwd to doing the 1/100th marking by hand LOL

Konigwolf13,

I have got to admit, the extra digit in 1/100 sounds small but hey, if it was easy everybody would be doing it! Do you have decals for the bird at that scale?


Tony

  • Member since
    May 2009
  • From: Hobart, Tasmania
Posted by Konigwolf13 on Saturday, October 24, 2009 7:42 AM
 Hot-Pb wrote:

Truly spectacular Chris. Thumbs Up [tup]Thumbs Up [tup] And equally impressive, if I recall right, the splinter camo was hand painted? She really came out nicely and I'm sure it will spur the masses! In fact we have a new participant, Konigwolf13. You made them salivate Chris, LOL. Thanks for posting!


Tony


Yes certainly made me sit up and take notice.

Anyways was picking up an expensive amount of paints yesturday and had enough money to pick up this bird from shops cheapo bin, being a scale I've never working in before I figured, hell why not. Got her home, looked at the instructions and as expected rather short on information (well it is an acedemy kit, looks not bad in general lines though). The only info paint wise given was "light grey with medium grey patches" . I figured if I had to google more accurate paint info I might as well make it exciting, after a while I found some images of birds from the 65 Aggressor squadron, figured looks like a good idea, see this thread today, and was sold.

heres what it should be

 This is what I plan to do with her

I have more accurate details than above, but not looking fwd to doing the 1/100th marking by hand LOL

  • Member since
    November 2008
  • From: Long Island, NY
Posted by Hot-Pb on Saturday, October 24, 2009 6:42 AM
 lewbud wrote:

Chris,

Nice work.  Haven't forgotten about this build, just haven't gotten around to it yet.

Hi lewbud, I know you wouldn't forget us! These builds always get livelier as the deadline approaches and I'm certainly looking forward to your funky green Skyhawk!

Just for everyone's info, I had mentioned a while ago that AFV Club has been working on a new tooling for a 1/48 F-5E Tiger II, a real mainstay of aggressor squadrons, particlulary for the US Navy and Marines. They've posted some test shots over at Aeroscale and it looks sweet, I think one of the really anticipated releases of the year and if we're lucky it will be out before the holidays...which would unfortunately force me (and my dwindling wallet) to do a second bird for this GB! Anyhow, I thought folks here would be interested in seeing some of these test shots Dinner [dinner].

  • Member since
    November 2008
  • From: Long Island, NY
Posted by Hot-Pb on Saturday, October 24, 2009 6:24 AM

Truly spectacular Chris. Thumbs Up [tup]Thumbs Up [tup] And equally impressive, if I recall right, the splinter camo was hand painted? She really came out nicely and I'm sure it will spur the masses! In fact we have a new participant, Konigwolf13. You made them salivate Chris, LOL. Thanks for posting!


Tony

  • Member since
    June 2008
Posted by lewbud on Saturday, October 24, 2009 3:18 AM

Chris,

Nice work.  Haven't forgotten about this build, just haven't gotten around to it yet.

Buddy- Those who say there are no stupid questions have never worked in customer service.

  • Member since
    December 2002
Posted by Bossman on Friday, October 23, 2009 8:08 PM

OK - I'm calling this one done for now.  If I can find some appropriate number decals for the tail and nose (a small # 42) I might apply them later.  But for the most part she'll stay as she is.

No weathering on this one.  I added a bit of scratchbuilt detail to the cockpit and I added detail to the inside diameter of the exhaust nozzle with some 0.010" styrene card stock.  I just trim a cone to fit inside, then I pull it out and scribe the feathered detail on it, run a black wash over it to pick out the lines, detail it with a little pencil work, glue it in place and - Voila !  It's not a resin detail piece - but it looks way better than just a blank, smooth surface.

Here's the pics:


Still looking forward to seeing some other aggressive birds.  Hope you guys haven't forgotten about this GBSad [:(]

Chris


  • Member since
    November 2008
  • From: Long Island, NY
Posted by Hot-Pb on Friday, October 2, 2009 11:20 PM

Woohoo Chris. Sweet! That has got to be one of my fav schemes for the Marine bird. Can' wait to see it completely done. Thumbs Up [tup] Looks good to me, no need to step feet away mate.

Your decal text touch-up truly impressive, and in 1/72 no less. Geeze.


Tony

  • Member since
    December 2002
Posted by Bossman on Friday, October 2, 2009 10:16 PM

Well, I'm finally getting back to this build after taking a break for a few months.  The main body painting is nearly done.  I've just started application of the decals. 


I'll have to do some touch up painting because of the method I'm using on the decals.  I'll try to condense the story...

I saw shots of this Marine Aggressor F16-N a while ago when someone posted pics on the A/C forum.  I found out that a company had produced decals for this - but they have been out of production for a while.  So I'm thinking I'm going to have to do some pretty fancy paint work in order to pull it off.  Then one day while perusing the spare decal folder I noticed some leftover decals from a 1/48 A4-M.  The "MARINES" text is almost a perfect fit for this 1/72 aggressor.  The only problem is that they're all grey - and the text I need is Dk Green and Lt. Camo Grey.  No problem.. lay down the grey decals and use them as a painting guide for the appropriate colors using a teeny tiny brush.  I'm about halfway done - some touchup is still required.  Not all the decals will get this treatment.

  I'm kinda goin for the general feel of the camo scheme and not even attempting an exact duplication.  It's definitely not a show winner.  But it'll look pretty good from a few feet away. Should progress a little more quickly from here.

Chris

  • Member since
    November 2008
  • From: Long Island, NY
Posted by Hot-Pb on Tuesday, July 28, 2009 5:49 AM
 Bossman wrote:

Tony,

Thats...                Stunning !

Beautiful job man.

Chris

Thanks Chris,

the aggressors always do have a bit of a pop and this one was quite a bit of fun. The Tamiya kits are often so nice (and generally painless) to put together... it makes me cringe looking at the Classic Airframes kit I have staring at me next!


Tony

  • Member since
    December 2002
Posted by Bossman on Monday, July 27, 2009 7:42 PM

Tony,

Thats...                Stunning !

Beautiful job man.

Chris

  • Member since
    November 2008
  • From: Long Island, NY
Posted by Hot-Pb on Monday, July 27, 2009 10:57 AM

Hey everyone, so I think I'm all done. Some minor boofoos, but overall I'm pretty pleased with how it came out. It's a splendid kit, I really recommend it and the Afterburner decals are great. If AFVClub actually comes out with their 1/48 F-5E soon I may do one more for this build! Thanks for looking, here are some pics:

 Tony


  • Member since
    November 2008
  • From: Long Island, NY
Posted by Hot-Pb on Friday, July 10, 2009 6:38 AM

Hey all, there was a very interesting posting at the Aeroscale site today with some test photos of AFV Club's upcoming F-5E Tiger II release:

http://aeroscale.kitmaker.net/modules.php?op=modload&name=News&file=article&sid=5504

it looks very nice and if it comes out before our little GB is over I think I see that I may be doing another build before this is over, love thsoe VFC-111 Sundowners!


Hot-Pb

  • Member since
    November 2008
  • From: Long Island, NY
Posted by Hot-Pb on Friday, July 3, 2009 6:29 AM

Finally some paint. I'm primed with tamiya white spray as I assembled and then I did some pre-shading. For the three tone white/grey/black camo I'm using pollyscale IJA light gray, tamiya xf-54dark sea grey, and xf-69 nato black. For the nose I used xf-24 dark grey. I'm going to work up the landing gear next.

 Tony


  • Member since
    November 2008
  • From: Long Island, NY
Posted by Hot-Pb on Wednesday, June 24, 2009 6:42 AM

Hey agressors!

You know, I haven't done a newish Tamiya kit in some time and I'd forgotten how much of a pleasure they can be to assemble. This one is just falling together and the fit is just wonderful. I can tell this won't need much filler at all. There is one seam where the front and rear top panels meet that may require a little attention, they don't meet quite flush. But once painted in agressor camo I don't think it will be too noticable. So here's some updates. I'm priming everything white as I go since the undercolor for the arctic camo scheme will be light gray. The exhaust can is the Aries set painted with Alclad metallics. I had intended to also add the Aries ACES-II resin seat but it's a little too wide to fit in at this point. Since I'm intending to go canopy closed, I'm happing just sticking to the kit seat. So I painted it up, added some Eduard photoetch and finished off the cockpit, and closed her up for paint. The stiffener plates are from Crossdelta.


Hot-Pb

  • Member since
    December 2002
Posted by Bossman on Wednesday, June 17, 2009 11:34 AM

Nice detail work !  Looking great so far.

Chris

  • Member since
    November 2008
  • From: Long Island, NY
Posted by Hot-Pb on Tuesday, June 16, 2009 7:26 AM

I'm finally rolling on this build in earnest!. So this is Tamiya's 1/48 F-16C that will be done up in an Arctic Agressor scheme. So far I'm very impressed with the engineering of this kit, they put alot of thought into how the parts fit together. Anyhow, here's some pics to try and get this GB a bit more lively. The cockpit I'm enhancing with Eduard's PE set, my first try with their self-adhesive line...still not sure if I like this better than having to apply my own glue or not. I also have the undercarriage PE set...the Tamiya instructions have you start the undercarriage rather early in the build. Anyhow...actual progress! YAY!  Party [party]


Hot-Pb


  • Member since
    November 2008
  • From: Long Island, NY
Posted by Hot-Pb on Sunday, May 10, 2009 7:12 AM
 Hot-Pb wrote:

But I keep hearing rumours "someone" is tooling up to release an F-5E this year in 1/48.


Hot-Pb

For those interested I found some information on the rumored 1/48 F-5E Tiger II release from Academy on ARC's forum:

http://www.arcforums.com/forums/air/index.php?showtopic=177349&hl=Academy%20F-5&st=60

I'd love to see it released before this GB is over! I'm dying to do a half way decent Adversary F-5E from VFC-111.


Hot-Pb

  • Member since
    April 2006
  • From: Navan, Ontario
Posted by Jagdwolf on Wednesday, May 6, 2009 10:50 PM
Yes, Belcher Bits does the same set in 1/48. The owner is one of our IPMS Ottawa members, and I can easily get the decal set. Aggressor "05" is CF-5A/CF-116A, s/n 116705, and mounted the refueling probe as a semi-permanent attachment. Mind you, CF-5D/CF-116D, s/n 116805,  was also an Aggressor "05." Probably was really confusing when both were participating in Maple Flag during the same sortie. Smile,Wink, & Grin [swg]
  • Member since
    November 2008
  • From: Long Island, NY
Posted by Hot-Pb on Wednesday, May 6, 2009 10:50 AM

 Jagdwolf wrote:
Hey Hot-Pb, if you get wind of someone else wanting to do a Canadian Aggressor CF-5D/CF-116D, I picked up the Belcher Bits 1/72nd scale "Canadian Forces CF-5 Aggressors" decal set recently. If they need Bort numbers, please let them know I have extras. Thanks.

Hey Jagdwolf,

Absolutely!  Great to see folks sharing. Do you know if Belcher makes these decals in 1/48 scale as well? Of course in 1/48 scale I still think from what I've read the Monogram kit seems to be the best available in an E model (Classic Airframes makes an A). But I keep hearing rumours "someone" is tooling up to release an F-5E this year in 1/48.


Hot-Pb

  • Member since
    April 2006
  • From: Navan, Ontario
Posted by Jagdwolf on Tuesday, May 5, 2009 10:18 PM
Hey Hot-Pb, if you get wind of someone else wanting to do a Canadian Aggressor CF-5D/CF-116D, I picked up the Belcher Bits 1/72nd scale "Canadian Forces CF-5 Aggressors" decal set recently. If they need Bort numbers, please let them know I have extras. Thanks.
  • Member since
    November 2008
  • From: Long Island, NY
Posted by Hot-Pb on Thursday, April 30, 2009 7:22 PM

Hey fellow aggressors! I was surveying some Red Flag schemes and came accross this Viper. Does anyone have any idea what it's carrying on the center pylon?

Tony

  • Member since
    November 2008
  • From: Long Island, NY
Posted by Hot-Pb on Tuesday, April 28, 2009 8:56 AM
 vetteman42 wrote:

Hi just want to keep an eye on this GB and might jump in a bit later


Great Vetteman42...you're always welcome! Give a hollar if you feel aggressive!


Tony

  • Member since
    July 2008
  • From: USA California
Posted by vetteman42 on Monday, April 27, 2009 10:54 PM

Hi just want to keep an eye on this GB and might jump in a bit later


Randy So many to build.......So little time

  • Member since
    December 2002
Posted by Bossman on Sunday, April 26, 2009 12:07 AM

Tony,

That looks like quite a set up !  All the makings for a beauty.

Late tonight I finished painting the first coat of the wrap around paint scheme.  Whew !  That was ...  how should I say ...    laborious.

Chris 


  • Member since
    November 2008
  • From: Long Island, NY
Posted by Hot-Pb on Saturday, April 25, 2009 6:15 PM
 Bossman wrote:

This GB needs a little boost - so here's a few progress shots.

NOW she's starting to look like an Aggressor !

I'm working from a few photo references and a rather blurry copy of a discontinued decal sheet that I was able to find on Two Bobs Decals' website.   So I decided I'm not gonna get really picky about duplicating the scheme exactly.  After laying down the first coat of the green - I think I'm gonna have to scale down the color a bit.  It looks too dark compared to my photo references. 

The brush painting looks terrible after just the first coat - but it always looks that way.  It'll get better.

So - how are all you guys doin' ?

Chris

Hey Bossman!

She's looking sweet. First one in the build to actually look aggressive!  You just painted the camo pattern demarcations by hand? Impressive. Myself, I'm just getting started. I finally have everything I want together and have just cut my first sprue!


Tony


JOIN OUR COMMUNITY!

Our community is FREE to join. To participate you must either login or register for an account.

SEARCH FORUMS
FREE NEWSLETTER
By signing up you may also receive reader surveys and occasional special offers. We do not sell, rent or trade our email lists. View our Privacy Policy.