SEARCH FINESCALE.COM

Enter keywords or a search phrase below:

Official Natural Metal Finish Group Build

144525 views
1007 replies
1 rating 2 rating 3 rating 4 rating 5 rating
  • Member since
    December 2002
  • From: Bury St Edmunds, Suffolk, England
Posted by Bish on Friday, January 22, 2010 11:04 AM

Richard Thanks very much, i use enamls alot, i use it on all of my aircraft and most of my armour kits, usually xtraclolour. So i am used to the long drying times, and it allows me to get on with other things. So i will use enamel for this, hopefully i can use the time to catch up on a dio or two.

I am a Norfolk man and i glory in being so


On the bench: Airfix 1/72nd Harrier GR.3/Fujimi 1/72nd Ju 87D-3

  • Member since
    June 2009
  • From: Netherlands
Posted by kermit on Friday, January 22, 2010 11:09 AM

Might i suggest using some kind of inbetween coat like future inbetween? it will protect the black layer from the next coat eating away at it. Also it is asvisable to use acrylics over enamels and vice versaSmile

Richard

"Success is the ability to go from one failure to another with no loss of enthusiasm." - Sir Winston Churchill

  • Member since
    December 2002
  • From: Bury St Edmunds, Suffolk, England
Posted by Bish on Friday, January 22, 2010 11:24 AM

Do you mean in between the enamel gloss black coat and the Alchlad

I am a Norfolk man and i glory in being so


On the bench: Airfix 1/72nd Harrier GR.3/Fujimi 1/72nd Ju 87D-3

  • Member since
    June 2009
  • From: Netherlands
Posted by kermit on Friday, January 22, 2010 11:51 AM

exactly my friend. It  protects the layer underneath and provides for a smooth layer to work with

Richard

"Success is the ability to go from one failure to another with no loss of enthusiasm." - Sir Winston Churchill

  • Member since
    June 2009
  • From: Netherlands
Posted by kermit on Saturday, January 23, 2010 8:55 AM

EmbarrassedUmmmm.... Vetteman....Embarrassed

This is a bit embarassing but could i pleaaase maybe change the build i announced? Today i went to a hobby store in another town and got my greedy dutch hands on Tamiya's 1:48 Mig15Bis...

Would be kinda nice for me as i prefer 1:48 over 1:72 and it would look good next to the F86F i did earlierAngel

Pretty pretty please?

Richard

"Success is the ability to go from one failure to another with no loss of enthusiasm." - Sir Winston Churchill

  • Member since
    July 2008
  • From: USA California
Posted by vetteman42 on Saturday, January 23, 2010 9:36 AM

Ahhhhhh young Skywatcher ( AKA Kermit ) I see you have been tempted by the large side Stick out tongue After consulting with counsel of plastic, that Styrene guy can be quite persuasive ya know, your request will be granted. Now go forth and model on. And may the farce be with you.

Randy So many to build.......So little time

  • Member since
    June 2009
  • From: Netherlands
Posted by kermit on Saturday, January 23, 2010 1:17 PM

Thanks Randy, much appreciate it. I actually had a promodeler Mig in my hands but the Tamiya won out in the end even though it was twice as expenxsive.  Eversince i built the F86 i wanted to do a NMF Mig15 as a sort of counterpart to hang from my ceiling in a sort of dogfight setting (the F86 ofcourse being on the six of the mig...)

But let me show some pics to show you guys:

Boxart:

Sprues, clearparts and ballast (first kit i ever bought that actually provides you with the needed ballast):

(excuse me please for the yellowish pics as they are taken in artificial lighting conditions...)

Reading about the subject was quite fun as developing the Mig15 involved some cold war spying stuff... Appearantly the Mig 15's engine is based on british designs and to obtain the plans for it the russians engaged the british Rolls Royce people into a billiard betting game during a visit. The russian delegation won so they obtained the engine. Subsequently the russian delegation visited the Rolls Royce plant on a tour where one of the russians wore boots with sticky soles. Walking through the plant the metal shavings on the floor accumulated on the russian's boots so they could ascertain what alloy was used for the engine when they got back home.... crafty buggers you have to admitBig Smile

Hope to start on this cute baby soon...

Richard


"Success is the ability to go from one failure to another with no loss of enthusiasm." - Sir Winston Churchill

  • Member since
    April 2005
Posted by Thunderbolt379 on Saturday, January 23, 2010 7:16 PM

Hi Kermit -- interesting story about the spy stuff but I'd have to wonder if a story is all it is. The one I heard was a bit different and much more easily checked in records. The Klimov engine bueau had been given the job of duplicating the technology and were having a very hard slog of it trying to build the Rolls-Royce Nene from photographs (probably clandestinely taken!)

Then shortly after the end of the war the British government made a thankyou gesture to the Soviet Union, and presented them with fifteen brand new Nene turbojets as a gift -- Klimov tore up their work to date, dismantled a Nene and back-engineered it in no time, providing the engines for the entire first generation of Soviet jet planes.

At least that's the one I read years ago! And, of course, it doesn't preclude the other stuff taking place in the period before the gift.

Looking forward to seeing her built, I have that one on my shelf and was thinking about a paired combo with Academy's Sabre as a historical display.

Cheers, Mike

http://worldinminiature.blogspot.com/

  • Member since
    October 2009
  • From: Santa Fe, NM
Posted by stenscience on Sunday, January 24, 2010 5:46 PM

Hi Randy and all,

Finished the first NMF model ever Friday and took some pictures. Model is Revell 1/72 P-51D Mustang with AM decal set from Eagle Strike (Blue Nose Birds of Bodney-Option 3).The model was 4 bucks-decal setr was 5. I described the process in previous posts: cut off the Snaptite pegs and glued it with no putty or filler.I used MrSurfacer1000 as primer, then a mix of Testors gloss black and aluminum rattle can enamel undercoat. Then,Future on body and canopy,masked off parts of the body and painted areas needed with Tamiya acrylic blue,red, and black as shown here:
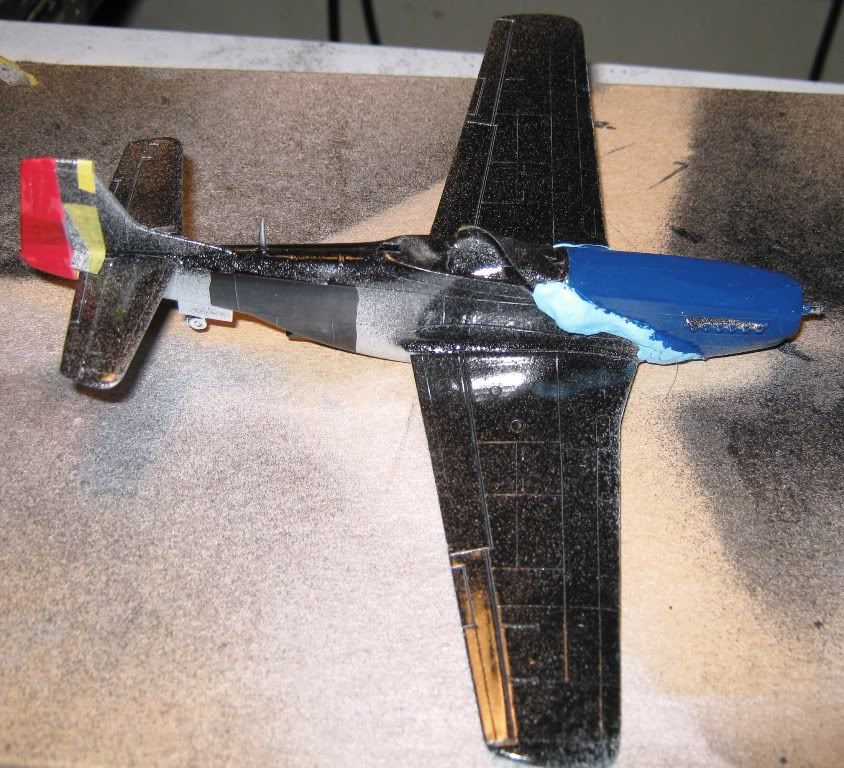
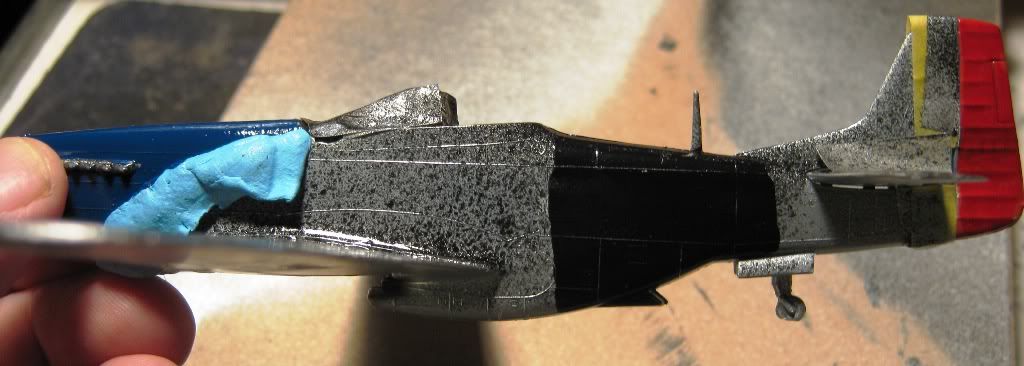
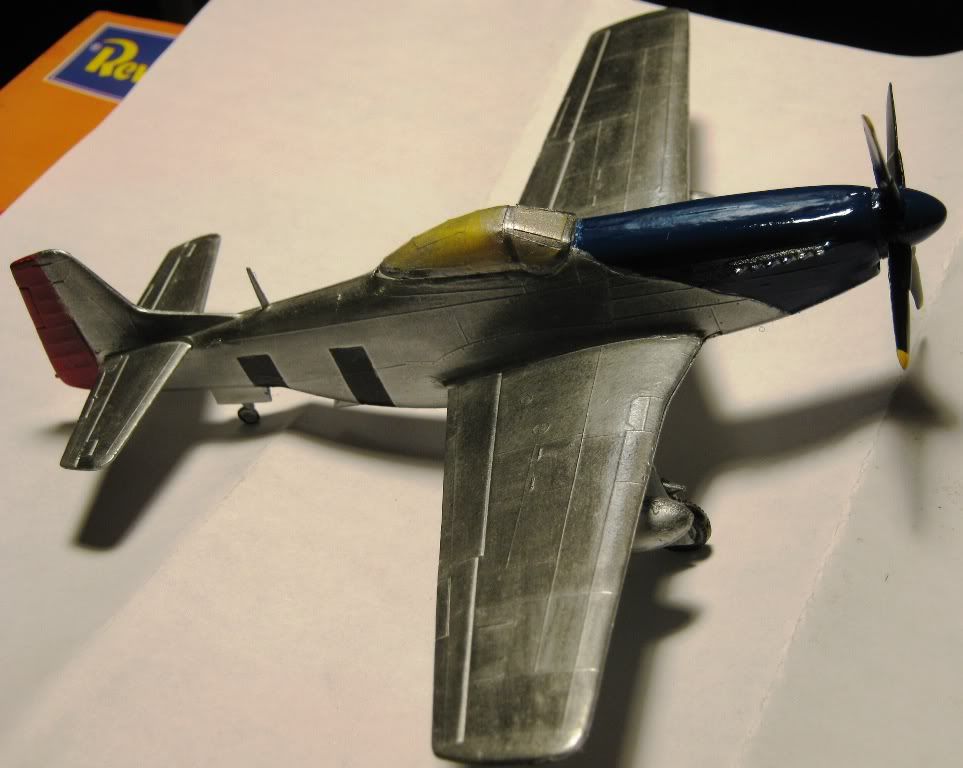
Then, after that dried, I reverse masked the nose,tail,and 2 fuselage stripes with Tamiya tape and sprayed with Glosscote.While that was tacky, I worked Hawkeyes SnJ Aluminum polishing powders onto the body with a cotton swab. Then, I buffed on with a cotton rag, going in different directions on adjacent panels:
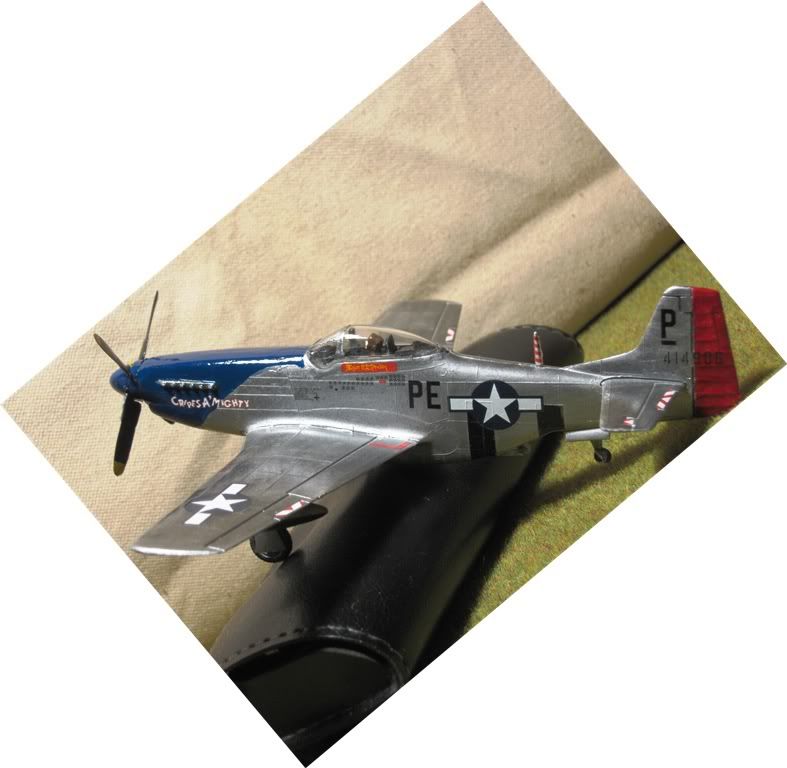
I then waited a while, and sprayed another 2 coats of Glosscote.Let that cure, then put on all the decals and fixed a few details.I think it turned out pretty well given it was my first effort and it was a cheap model:
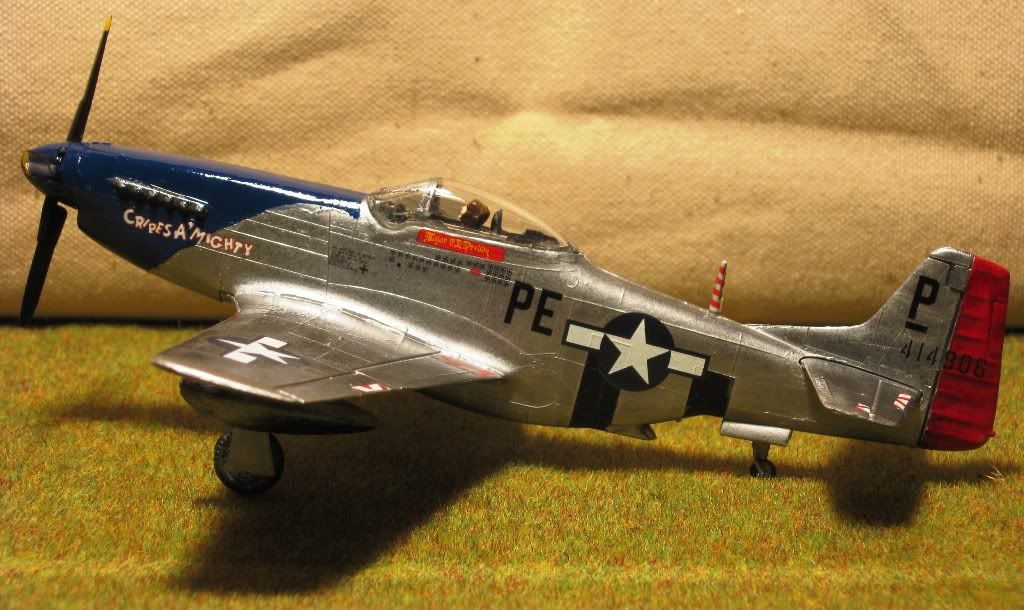
Thanks for the invite to participate in the group.I enjoyed it a lot and will grab the badge soon if you approve.

Best regards,

Stenscience

  • Member since
    April 2005
Posted by Thunderbolt379 on Sunday, January 24, 2010 6:17 PM

Hi all,

Just a slight oopsie to report -- I set up today to spray the darker of two shades of metallic on the F-84, and all went well except I made a basic mistake... I last sprayed acrylic, weeks ago, and even after all this time in an Aussie summer there remained some water inside the AB. I should have sprayed some thinner first to clear it for enamels to follow, but forgot that step, and the moisture contaminated the paint. I now have an F-84 with bubbly paint on it!

I'll wait 24 hours for it to harden off, then remove it with 2000-grit paper lubricated with liquid soap, which should hopefully leave things nice and smooth, then I can start again. Pity, it was going to be a nice finish, 5% gloss black added to chrome silver to create the contrasting panels, which would then be masked off.

I'll keep you posted,

Cheers, Mike/starhawk379

http://worldinminiature.blogspot.com/

  • Member since
    September 2008
  • From: Ancaster, Ontario
Posted by maxfax on Sunday, January 24, 2010 9:22 PM

Here's my contribution- Tamiya 1/48 P-51D. I have just finished the cockpit, and snapped a couple of pics before I closed  the fuselage. I was going to add PE,  but I bought the set for a different kit by accident- oh well-I can always use it later.


Rob

On the bench:  Revell 1/72 HCMS Snowberry


  • Member since
    June 2009
  • From: Netherlands
Posted by kermit on Monday, January 25, 2010 3:52 AM

Stenscience,

Great work there buddy. Imho turning the el cheapo kits into something nice takes much more skill than the average tamigawa kit, especially in 1:72. Very impressive workWink

Thunderbolt,

Sorry to hear about your mishap... hope you will be able to save your model without loosing quality or detail

Maxfax,

Beautiful pit to see there. Really like the detail and weathering. Great work!

My pit isn't nearly as well done since i decided to not lose two weeks on detailing miniscule parts and knobs since i have other stuff going on too. My pit only has the basic stuff: interior light blue..black paneling.. some colored accents and a white drybrushing. Finished up with the trademark Kermie watercolor black washWink

Next up will be adding ballast and closing up the front part of the fuselageSmile

Richard

"Success is the ability to go from one failure to another with no loss of enthusiasm." - Sir Winston Churchill

  • Member since
    October 2009
  • From: Santa Fe, NM
Posted by stenscience on Monday, January 25, 2010 2:22 PM

Thanks kermit, I appreciate the compliments. I was surprised at how well it turned out. The main reason I picked the kit was that the cockpit and figure were already painted (really no detail at all, but it was going to be closed up anyway). As a recent returnee, my skills are still developing and my original intention, a 1/48 Fokker DXII, had a very complex pit that would have taken me over a month just to finish the pit. So I picked the P51 cheapo so I could focus on the NMF aspect. The Eagle Strike decals really 'pop' and were very easy to use. I also really like the polishing powder-but I need to warn folks to try it out first on scrap or a trash model. I tried out the powders (Hawkeyes SnJ) on a Revell F4 Phantom that did not work too well in the assembly stage-now it kind of looks like a dusty grey sausage. What I found was that, as some have recommended, you really really really need as clean a surface as possible to apply the powder to. I did not have much success with the steel powder-it really goes on thick and is hard to burnish down flat. The copper polishing powder (did not use on the Mustang) looks great, but does not hold very well with regard to buffing-I plan to use both steel and copper for details on an upcoming model.

I have only good things to say about the aluminum polishing powder-it goes on well, adheres to Glosscote well, and buffs really nicely. A little goes a long way. Just watch out for drafts and breezes-it will get everywhere if you are not careful.

Regards,

Stenscience

  • Member since
    June 2009
  • From: Netherlands
Posted by kermit on Monday, January 25, 2010 2:53 PM

You're welcome StenscienceWink

Ok, todays progress entailed finishing up the fuselage and attaching the wings and undercarriage assembly:

(Notice the 2 23 mm cannons and the 37 mm cannon underneath)

I VERY carefully started on the figure and hoping it will be my first actually finished up one... sofar it's looking quite ok...

Next up will be my favorite part of this otherwise beautiful fitting and fun to build kit: the nicely detailed engine

Kermit


"Success is the ability to go from one failure to another with no loss of enthusiasm." - Sir Winston Churchill

  • Member since
    July 2008
  • From: USA California
Posted by vetteman42 on Monday, January 25, 2010 8:38 PM

Wow nice to see so much going on here !!

Kermit You have a nice start going there. I have always like the MiG 15 airframe as it looks tough as nails and just plain fast. It sure looks tiny for being a 1/48 scale though, at first look I thought it was in 1/72 scale. Or is that a large pen next to it. Anyway glad to have you back here and look forward to seeing your progress. I am still waiting to see some Kermit nose art on one of your builds LOL, or maybe Miss Piggy.

Stenscience You betcha I approve of your build so please by all means take your badge. I cant even build in 1/72 scale so my hat goes off to you for that and I like the way your finish came out. As Kermit said it does take skill to take a cheapo kit and make it look good. I have been including methods of creating the NMF on the builds here on the front page, so may I ask did you use Tamiya silver and black in the rattle cans ? I wish to thank you for joining us here in the shiney group and look forward to seeing more of your builds on the forum. Your build will be on the front page shortly.

Thunderbolt Aweman ! Sorry to hear, err read, about your misfortune. I am however confident you will win out in the end.

Maxfax A very nice office indeed, i am always amazed by the detail that can be brought out with a bit of extra work. I have been building the Revell P-51's and can see from your build I really gotta build at least one Tamiya 51.

Randy So many to build.......So little time

  • Member since
    June 2009
  • From: Netherlands
Posted by kermit on Tuesday, January 26, 2010 11:19 AM

Vetteman,

I share your appreciation of the Mig 15's lines. Agressive, fast and basic. Once i finish her up i will take a pic or two with her standing next to my sabreWink Some airframes attract you instantly the moment you take a look at it and the Mig is one of them for me.

But now for something else...

Behold..... my very first pilot figure everBig Smile There's always a first time for everything LOL. Hope you guys like him:

Paints are revell acrylics. Added a black watercolor wash to accentuate the facial lines, hands and uniform wrinkles and finished off with lighter brown and white drybrushes. It's not a stellar work of art but for a first time i am not dissapointedSmile Oh and i added a drop of future on the goggles to make it appear like glass.

Richard

"Success is the ability to go from one failure to another with no loss of enthusiasm." - Sir Winston Churchill

  • Member since
    July 2008
  • From: USA California
Posted by vetteman42 on Tuesday, January 26, 2010 11:28 AM

Kermit Your figure looks pretty darn good there buddy, well done. Oh yeah I would like to see a picture of your Mig's together. I must have a dozen or so figures in my spares box may have to try painting one or two of them one day for giggles.

Randy So many to build.......So little time

  • Member since
    June 2009
  • From: Netherlands
Posted by kermit on Wednesday, January 27, 2010 1:13 PM

Wanted to show you guys the final pics of the finished up fuselage before i start building the part of this kit i am looking forward to: the engine. GREAT oob detail on there, you'll seeWink

I have chosen to depict it with opened up flaps:

See you guys back soonSmile

Richard

"Success is the ability to go from one failure to another with no loss of enthusiasm." - Sir Winston Churchill

  • Member since
    December 2002
  • From: Bury St Edmunds, Suffolk, England
Posted by Bish on Wednesday, January 27, 2010 3:42 PM

Been trying to get on here the last two days to give an update. My connection when i am in camp is really doing my head in .

Anyway. managed to get the nose section smoothed out until i was happy. Got the wings on last night then spent the rest of it filling and sanding. There are no tabs on the wings to insert into the fuselage, just two flat services to glue together and make sure i have the angle right. I have been really spoilt over the years with the kits i have built, even the dragon aircraft are a brease compeared to this.

I will get some photos up at the weekend and check out everyone else's build's, will just take to long from here. I am hopeing to be at the paint stage by Monday night, but how this is going, might well be next thurs.

I am a Norfolk man and i glory in being so


On the bench: Airfix 1/72nd Harrier GR.3/Fujimi 1/72nd Ju 87D-3

  • Member since
    December 2002
  • From: Bury St Edmunds, Suffolk, England
Posted by Bish on Saturday, January 30, 2010 11:50 AM


As you can see, wasn't able to get that much done this week. Most of it was spent spent filling and sanding. Next stage is to get the rear section finished. Hopefully i can get some paint on by the end of the week.


I am a Norfolk man and i glory in being so


On the bench: Airfix 1/72nd Harrier GR.3/Fujimi 1/72nd Ju 87D-3

  • Member since
    July 2008
  • From: USA California
Posted by vetteman42 on Saturday, January 30, 2010 11:50 PM

Bish hey bud you got more done in 2 days than I have gotten done in a month Toast Lookin good there buddy.

Randy So many to build.......So little time

  • Member since
    September 2009
  • From: Frisco, TX
Posted by B17Pilot on Sunday, January 31, 2010 8:49 PM

I got some painting in when the weather decided to play nice.  I was able to get the flaps on and the other doors painted.

Here's pics of the flaps installed:


  • Member since
    July 2008
  • From: USA California
Posted by vetteman42 on Tuesday, February 2, 2010 12:04 AM

B17pilot oh I like seeing this build progress. The flaps came out very well, I think it adds a bunch to the look and feel of your B-17. She is looking really good.

Well finally got to sit down and get some work done on the Starfighter, got the wingtip tanks glued on filled and sanded then finished up the foil work. Got the foil burnished with 0000 steelwool and even got a coat of future on it. Tomorrow I hope to get most of the painting done and post a few pictures. Now for the decission do I go ahead and detail the landing gear legs or just finish it up I dunno. This Testers kit is killin me LOL

Randy So many to build.......So little time

  • Member since
    July 2008
  • From: USA California
Posted by vetteman42 on Thursday, February 4, 2010 12:29 AM

Finally got back to the F-104 today and got it ready for decals and some final work to finish it up. I am still trying to decide if I want to detail the main gear legs or not, I do have to admit I am leaning toward going ahead and doing a bit of work on them as the legs do look rather plain as they are. Anyway here are a few pictures for ya, hope you like it.

Feels good to be modeling again I must admit.

Randy So many to build.......So little time

  • Member since
    September 2007
  • From: Truro Nova Scotia, Canada
Posted by SuppressionFire on Thursday, February 4, 2010 5:16 AM

vetteman42 Excellent work on the Starfighter! The heat discoloration on the exaust looks like real stainless steel thats been heated. Always liked the sleek streamlined look of that jet fighter. All engine and cockpit, kind of like the P-38 on steroids 20 years later. Can't wait for decals and finished pictures!Cool

Oh now OCC & mini Me are finished I can devote my time on the Mustang I started long ago in a land far away... WIP's to follow.

http://i6.photobucket.com/albums/y211/razordws/GB%20Badges/WMIIIGBsmall.jpg


  • Member since
    September 2006
  • From: From Vernal UT OH YEA!!
Posted by raptordriver on Thursday, February 4, 2010 8:13 AM

 Great work Vetteman. How are you likeing the Testors kit? The afterburner area looks great.

I have started my Mig-21 WIP soon.

Andrew


  • Member since
    July 2008
  • From: USA California
Posted by vetteman42 on Thursday, February 4, 2010 9:32 PM

Thanks Raptordriver and Supressionfire for your compliments. The after burner is real stainless steel foil that I burned with a micro torch. It is a bit on the bright side and I am trying to figure out how to tone it down a bit. I did try on a sample piece, some clear flat and semigloss both turned an opique white, the semigloss less so than the flat. So at this point I am at a bit of a loss as to what to do to tone it down some, any ideas ?

Randy So many to build.......So little time

  • Member since
    June 2009
  • From: Netherlands
Posted by kermit on Thursday, February 4, 2010 10:49 PM

Randy, Looking great there buddy! Really like the clear canopy you managed to put on; makes your pit stand out nicely;) Already told you that the exhaust looks very lifelike tooBig Smile

Maybe you could future it, let it dry overnight and then apply a very thin black wash to "age" the shiny metal look a bit?

Richard

"Success is the ability to go from one failure to another with no loss of enthusiasm." - Sir Winston Churchill

  • Member since
    September 2007
  • From: Truro Nova Scotia, Canada
Posted by SuppressionFire on Friday, February 5, 2010 6:06 AM

vetteman42 Ahh yes.. it will all sort out in the wash, er flat clear coat. That should tame the flame stain. Cool Perhapse a different brand of flat clear? It should just remove the shine and not turn opique white. Try Testor's enamel flat clear straight out of the can. Avoid arcylic washes over it thinned with isoprople as that sometimes stains and tints colors...back to the 'stang to earn this GB badge. 

http://i6.photobucket.com/albums/y211/razordws/GB%20Badges/WMIIIGBsmall.jpg


  • Member since
    September 2007
  • From: Truro Nova Scotia, Canada
Posted by SuppressionFire on Friday, February 5, 2010 2:33 PM

'Back in the saddle' ~ well back up on the buckin' bronc that is my NMF Mustang. Spent way to long getting the firewall dry fit so bolt hole detail for the removed engine panels can be modeled. Bainted the interior halves of the cockpit and was plagued by fuzzy contaminants? Will wet sand them off and touch it up next session.

Added detail thats more assumption than accuracy to the .50's One will be in 'open' position for re-loading. It gets special barrel with brass band and tiny bolt with spring for internal parts. Probally will just scratch the ammo trays and make .50 shells out of brass rod. Anyhow more WIP's this weekend.Cool

http://i6.photobucket.com/albums/y211/razordws/GB%20Badges/WMIIIGBsmall.jpg


JOIN OUR COMMUNITY!

Our community is FREE to join. To participate you must either login or register for an account.

SEARCH FORUMS
FREE NEWSLETTER
By signing up you may also receive reader surveys and occasional special offers. We do not sell, rent or trade our email lists. View our Privacy Policy.