SEARCH FINESCALE.COM

Enter keywords or a search phrase below:

Achtraden! 8x8 Group Build '09-'10

45450 views
373 replies
1 rating 2 rating 3 rating 4 rating 5 rating
  • Member since
    April 2005
Posted by Thunderbolt379 on Friday, February 26, 2010 5:19 AM

I got some NATO Green on the Stryker today, it took a lot and I'll need to mix some more tomorrow to catch spots I missed, before going on to the shade and fade coats. Next to the Stryker, you can really see the S-tank for a grey rather than a green, but without the richer green to compare it to the other mix looked really green.

I'm thinking I'll need to mix a tyre black, the vinyl is too shiny and perfect, so that's another round of spraying. There's a fair bit in getting round even a monocolour project.

I'm hoping to have this one done in a week, along with the S and to get the F-84 on the bench around the same time, as there are lots of new projects beckoning. I launched the Phantom GB seven weeks ago and have hardly made a start on mine!

Cheers, Mike/TB379

http://worldinminiature.blogspot.com/

  • Member since
    April 2009
  • From: Carmel, IN
Posted by deafpanzer on Friday, February 26, 2010 10:18 AM

Mike- Can't wait to see your Stryker... I want pictures! LOL 

Andrew- Your ASLAV looks awesome especially its PE... I think you did GREAT! 

I think I have a problem at home... my wife thinks I am crazy... played with silly putty for more than two hours last night.  Following the silly putty tip I learned from the forums, I am using it for the camo painting... NO I am not painting it PINK... dream on!


The color of MM Afrika Grunbraun  under the silly putty... I painted first set of camo using MM Brown but I had it lighted it up a bit with very little white paint.  Tonight if I have time I will apply second set of silly putty to protect brown before I paint dark green.  Hope this technique really works...

Andy

  • Member since
    November 2006
  • From: Coastal Maine
Posted by dupes on Friday, February 26, 2010 4:29 PM

deafpanzer

Dupes, don't be shy... come and join us!  I have been watching your last build... that Japanese tank with winter camo using white spots only was freakin' awesome!  

Why don't you build Sd.Kfz.234/4?  I don't think anybody has done it for our GB as we have one or two 234/1, several PUMAs 234/2 and one 234/3 which was signed up but not built yet if I am correct.  It would be cool to hit all four bases... home run we can say!

Hey, thanks man! Big Smile

A 234/4 to complete the cycle, eh? I don't see why I couldn't. Turns out the only things in the stash that qualify anyway are DML 234/1-4's and a Trumpeter LAV-AD variant (which is really cool, but only has a plain OD scheme? Need to see how else that thing was done up). Let me give it a once-over and see how long it'll take me to build up. Yes

Of course, I still reaaaaaaly want to put together an F-4 for T-Bolt's other GB. And of course, finish up that Type 90. Sigh.

  • Member since
    April 2009
  • From: Carmel, IN
Posted by deafpanzer on Sunday, February 28, 2010 10:15 PM

Guys,

I have been fighting cold for last two days but managed to do work... ENJOY the pictures! Ick!

Yikes! What is happening to my work?  Actually I applied another set of silly putty to cover the brown-red paint.  Final step of camo painting... it really looks like a blob!

Here's the result...

My objective was to paint it like the drawing of 234/1 that I found in one of my referrence books... fell in love with its hard lined camo (not sure if I said it correctly... not soft toned camo). 

I have to figure it out to tone down the camo... will spray tan paint 12 inches away from the kit or you have a better suggestion? 

This week I plan to work inside the gun turret and weatherize the body... but not too much... because the picture of actualy 23/41 I have didn't show much of damage or dirty. 

Andy

  • Member since
    May 2009
  • From: Hobart, Tasmania
Posted by Konigwolf13 on Monday, March 1, 2010 5:25 AM

Ok cammo is on, needs some touch up, then redo the parts that came off when I took the blue tac off. Then to add parts that had to wait until after the main job then a light weathering.

Pic two shows some quick experimental weathering applied using tamiya rust powder

Andrew

  • Member since
    April 2005
Posted by Thunderbolt379 on Wednesday, March 3, 2010 6:39 AM

Looking GOOD, KW! Top stuff! What are the antennas made from? It'll be great to have some extra moderns hardware on this lineup, to go with all the fab period vehicles!

My Stryker has it's full paintjob on now, base, fade and shade coats around NATO Green, and is awaiting weathering -- pics as soon as I can remember to get them uploaded!

Cheers, great work guys,

Mike/TB379

http://worldinminiature.blogspot.com/

  • Member since
    May 2005
  • From: Dublin Rep Of Ireland
Posted by terry35 on Wednesday, March 3, 2010 5:48 PM

Mike Looking forward to seeing the stryker with a coat of paint. K/W great progress on the ASLAV looks brilliant, looking forward to seeing it weathered.

Andy that 234/1 is really comming along well. Nice and sharp.

Well got some small update only the chains on the smoke dischargers. Narrow gauge wire and the twisty twisty method.

Regards,

Terry.

  • Member since
    May 2009
  • From: Hobart, Tasmania
Posted by Konigwolf13 on Thursday, March 4, 2010 8:03 AM

Mike, the antenna's are guitar strings, an steel one on top of a e-string. Read about it before thought I might try it, Worked fine on one, need to redo e-string on the other two as a little much glue has made the deatil dissapear.

Terry, nice smoke grenade canisters, I left the PE chains off mine to use as spares next build.


Well all decaled up, need to do tiny bits here and there paint wise, u-bolts, ammo chute etc, otherwise shes ready for weathering.


Andrew

  • Member since
    April 2009
  • From: Carmel, IN
Posted by deafpanzer on Thursday, March 4, 2010 1:42 PM

Terry- Don't tell me you made the chains?  If so, how did you do it?  I really think the chains are GREAT.  Beats spending big bucks on AM/PE chains.

Andrew-Looking great as usual! Yes  You are almost there...

Guys- Last night I was able to tone down the camo using wBill's method spraying mist of base paint MM Grunbraun all over and it worked out pretty good.  Then I applied two coats of Future.  Like Andrew, it will be ready for weathering after final assembly such as adding tools and stuff to the hull.  Unfortunately, I broke two wheels...dropped it onto the floor in the garage but it can be fixed.  AAARRRRGGGHHHHH!!!!!!!!! Angry

Andy

  • Member since
    May 2009
  • From: Hobart, Tasmania
Posted by Konigwolf13 on Friday, March 5, 2010 5:22 AM

WOOT! Done

Ok ASLAV is done, but I thought It looked shocking without a base so I cooked one up. Still needs a couple of things but since I can't get them till next Friday at the earliest I'll call it quits for this GB. Thanks for having me aboard seen some great builds :)

OK First Two shots are finished build, no (real) weathering.

You may of noticed a different flag, I dropped the turret while painting the periscopes. The flag tore and broke the end off the 25mm.Yeah I was ticked. I replaced the flag by photocoping the one out of my other ASLAV, the barrel end was a little piece of sprue.

Next are the final weathered shots of the beast on base. I need some sand for the side of road, paint lines and put a red reflector on the roadside marker. An yes for all you aussies out there its not a standard warning sign, I didnt have a roo decal big enough so I adlibbed.


Andrew Beer

  • Member since
    April 2005
Posted by Thunderbolt379 on Friday, March 5, 2010 5:31 AM

Andrew -- that is one beautiful ASLAV! A credit to this GB, I reckon, and a subject I must add to my own collection in due course. I photographed the Aussie version many years ago but never in the detail I would have prefered. I'm sorry to hear about the turret mis-hap, but you pulled off a neat save with repairs that are invisible to the observer. Very well done!Yes I'll get one of your photos up on the leader page with a completion date of March 5th.

Okay, finally, here are some WIP shots of the Stryker!

I masked the wheel locators with rolls of paper, held in place simply by their own tendancy to unroll:
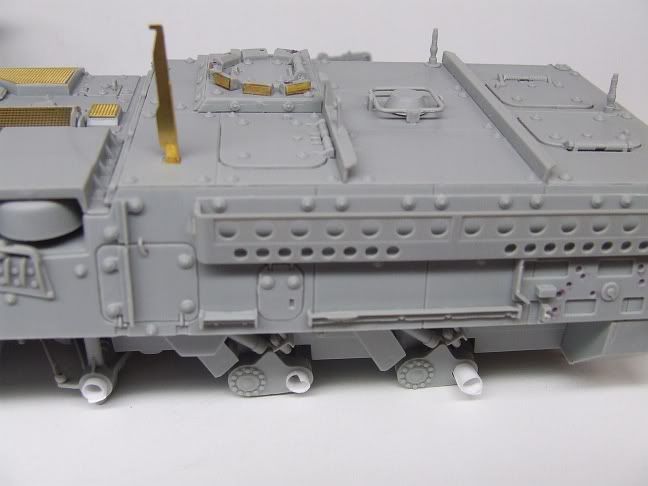
 

The overall scheme is NATO Green, Tamiya XF-67, and it took a lot of paint to cover this animal. There are so many twists and turns, so much three dimensional detail, that you have to hit every part of it from every angle, and I ended up mixing three or four batches of paint to get a solid coat onto everything, including the wheels and the weapon station, painted seperately. Here it is fully basecoated:
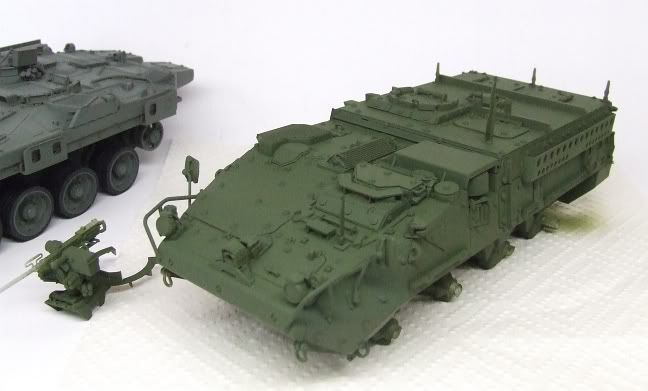


That's Trumpeter's S-tank in the background, see how grey the colour mix looks by comparison (yet it looked so green when I first mixed it...!) Anyway, the next job was to fade'n'shade. I mixed 20% white with the base colour to do the centers of panels, then 20% black to hit all shadow areas and outline panels, divisions and hatches. Here she is with the contrasting highlights:
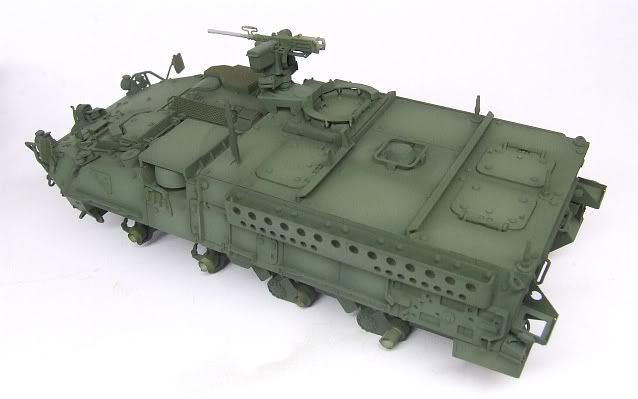


It looks quite subtle in the photo, it's rather more stark in the flesh. Next up, wash and drybrushing, then decals and pigments, and add some anentennas. I'm thinking of spraying a mixed tire-black also, the shiny vinyl is just too factory-fresh and I can't be sure pigments will stick well enough to tone it down.

If I could get a few hours to invest in it, this project would finish up pretty quick!

Cheers, all comments welcome,

Mike/TB379

http://worldinminiature.blogspot.com/

  • Member since
    May 2009
  • From: Hobart, Tasmania
Posted by Konigwolf13 on Friday, March 5, 2010 5:44 AM

Thanks Mike. I realized looking at those shots I need to add alot more weather to the wheel well areas.

Andrew

  • Member since
    April 2005
Posted by Thunderbolt379 on Friday, March 5, 2010 6:01 AM

No probs, do you want to do that and post a finished-finished shot or two before I add a pic to the leaderboard?

Cheers, M

http://worldinminiature.blogspot.com/

  • Member since
    May 2009
  • From: Hobart, Tasmania
Posted by Konigwolf13 on Friday, March 5, 2010 6:37 AM

Mike feel free to use one already posted or wait a week or two and I add a shot with finished base.


Andrew

PS Maybe I should add some road kill.


PPS OK bad joke


  • Member since
    August 2009
  • From: Cary, North Carolina
Posted by M1Carbine on Friday, March 5, 2010 10:18 AM

Looking great Gents


Bob

  • Member since
    May 2005
  • From: Dublin Rep Of Ireland
Posted by terry35 on Saturday, March 6, 2010 4:52 PM

Andrew the ASLAV is really taking on a new form, the weathering is cool and the flag is a really nice touch of extra colour. I like the splatter on the vehicle. Maybe it could use some touching up around the running gear. I always find finishing a hard part of the project, deciding how much is enough.

Mike nice STRYKER.. Comming along great.

Andy YES I did make the chains myself. The trick is getting a piece of wire as narrow as you can find. Double it in half and grip one end in a vise. Grab the other in a pliers or similar. Now twist until the twists are very tight.

Now the trick take a flat pliers, the kind jewelers use with flat jaws .

Flatten out the twisted wire and you will immediately get chain.

Hope that helps.

Terry.


  • Member since
    August 2012
Posted by Brett2501 on Saturday, March 13, 2010 9:02 AM

Gday lads. Nice work all around so far. Still working on my 232 \and should have some progrtess pics soon. Since we are talking all thing eight wheeled, can anyone explain abit more abou the machine in this pic I found while trawling for ideas?


 Looks like a 231 or 232 has lost a turret and someone has installed a pak 38 in its place. Anyone know anything more?


Cheers Berttt

  • Member since
    May 2009
  • From: Hobart, Tasmania
Posted by Konigwolf13 on Sunday, March 14, 2010 1:27 AM

Looks like Frankenstein on wheels, but thats as best I can help. Beastly

Andrew

  • Member since
    May 2005
  • From: Dublin Rep Of Ireland
Posted by terry35 on Sunday, March 14, 2010 6:49 PM

Mike I think I need to request an overrun on the time limit. I can probably get the Centauro done, but I've fallen in love with the stryker series and have ordered one, that I would lve to have included here.

Terry.

  • Member since
    May 2009
  • From: Hobart, Tasmania
Posted by Konigwolf13 on Sunday, March 14, 2010 7:13 PM

DONE, Yay!!!

  • Member since
    April 2009
  • From: Carmel, IN
Posted by deafpanzer on Monday, March 15, 2010 12:29 AM

Andrew- Congrats!  You have built a real good looking one! Yes

Guys- Having a great time with my kit...

- The damaged wheels have been fixed. 

- Airbrushed mist of base coat 12 inches from the kit... it really helped to tone it down and bring the camo together!  Thanks wBill for the tip!

- I applied first coat of Future before I added the decals.  Not many for this one...


- Painted the tools and accessories...

- Completed the PE for the grenade guard atop of the turret... you gonna Heart LOVE Heart this Dragon kit that came with nice amount of PE stuff.  I still need to paint those screens...

Tools and accessoires have been added... that will make my wife very happy as she never leaves the house without accessoires.  The jerry cans are next... they have been painted but needs to be banged up first. Stick out tongue

Can't wait to finish this... thanks for looking!

Andy

  • Member since
    April 2005
Posted by Thunderbolt379 on Friday, March 19, 2010 6:42 AM

Terry -- yes, an overrun is definitely possible, no great builds are gong to be stifled for little things like deadlines!

KW13 -- fantastic finish on the ASLAV, the leaderboard has been updated with your model. That's the 7th completed item in this GB and there are several more still in the works I believe.

DP -- looking great, I hope to be adding your 234/1 to the honour roll before long too!

Sorry I've been quiet lately, I'm a few days away from submitting a final completed draft of my PhD for the very last round of checks before it goes off to the examiners, and at the same time I've started having log-on problems at the FSM site. It doesn't recognise me when I log on from my own terminal, and I have to use another to get in, which is very frustrating.

I had hoped to have the Stryker done weeks ago but the workload has been too steep. I should be out from under the PhD in a matter of days now, and will finally be able to get back to the bench.

Cheers all, and great work,

Mike/TB379

http://worldinminiature.blogspot.com/

  • Member since
    August 2012
Posted by Brett2501 on Friday, March 19, 2010 6:51 AM

Here are a couple of progress pics of my 232. Feedback welcome :)


Cheers,


Berttt

  • Member since
    May 2009
  • From: Hobart, Tasmania
Posted by Konigwolf13 on Friday, March 19, 2010 6:06 PM

I think you need more red round the neck for that Christoper Walken/Headless Horseman look. OK bad joke, just the tree and general colouring and bleakness along with headless guy jumped out and said Sleepy Hollow. So yeah well done on gives me a cold bleak dark feeling.

Andrew

  • Member since
    May 2005
  • From: Dublin Rep Of Ireland
Posted by terry35 on Saturday, March 20, 2010 8:48 PM

Andrew great finish on the  ASLAV, looks great. Andrew the 234/1 is shaping up really well.

Mike its going to take a bit of research and gathering stuff but I will be starting in on the  stryker when it arrives.

PM inbuond.

Terry.

  • Member since
    May 2005
  • From: Dublin Rep Of Ireland
Posted by terry35 on Saturday, March 20, 2010 8:59 PM

Almost forgot, Bertt that is excellent progress on that 232 so far. Really looks brilliant in its winter scheme.

Terry.

  • Member since
    April 2009
  • From: Carmel, IN
Posted by deafpanzer on Monday, March 22, 2010 11:54 PM

Bertt- I REALLY LIKE your 232!!! Yes  Did you use a plant root as tree?  It really WORKS!

Guys- Update on my 234/1... I am almost there.  Added banged up jerry cans.  Scratched the hull.  Will apply second coat of Future tomorrow so I can try the dots oil-painting procedure.

My wife will be visiting her mother for 3 days starting tomorrow.  So it means I will have more time to work on this as soon as my boys are in the bed!  I hope to finish this before my boys spring break as we will be going far south where the warmer weather is! 

Andy

  • Member since
    August 2009
  • From: Cary, North Carolina
Posted by M1Carbine on Tuesday, March 23, 2010 12:57 AM

Bertt and Def...............SWEET MAN!


Bob

  • Member since
    April 2005
Posted by Thunderbolt379 on Saturday, March 27, 2010 12:00 AM

Terry -- No worries, I shall look forward to your Stryker with all the add-ons!

DP -- SWEET finish on this beast, it really looks the part! The PE screens make the turret, without them it wouldn't be half so convincing. Wonderful work on a top kit, can't wait to see her 100% done.

Apologies again for being a ghost around here, the PhD is in its final death throes, it won't be long now...

Cheers, M/TB379

http://worldinminiature.blogspot.com/

  • Member since
    April 2009
  • From: Carmel, IN
Posted by deafpanzer on Saturday, March 27, 2010 10:17 AM

TB- Completely understand how things can be while working for PhD.  Mind if I ask what's it for? 

Guys- ALMOST THERE! I'd say I about 95% completed... gonna work on the tires over the weekend. Remember I am married and have two little boys so I build at snail pace... I work 1-2 hours at late nights when they all are in bed.  But last night I was able to work on my baby kit for more than 4 hours finally.  My OCD doesn't help me as you can see how clean my hobby desk is!  Here's my update... enjoy!

Applied thinned MM Flat Clear Lacquer using airbrush... it really helped to tone down the gloss. Unfortunately with me being so clumsy I dropped the turret part in the garage and it broke into 4 pieces but I was able to put them all back in one piece fortunately.

Then I applied MIG Dark Wash and Light Wash that I bought at local IMPS show "Roscoe Turner" in Indy last weekend for $10 each and I LOVED IT!  It was alot easier to weatherize that way...

Light wash was applied to the whole kit.  Dark wash was applied to all outlines and corners where dirt would be trapped.  Alot of dark wash was applied under the hull too!

Before I did the washing, I applied MIG Light Rust pigment that I bought at the show too.  Not sure if I should tone it down or leave it that way...

 Wheels are next... last part I hope!  I will apply mixature of MIG sand pigment... have a great weekend guys!

Andy

JOIN OUR COMMUNITY!

Our community is FREE to join. To participate you must either login or register for an account.

SEARCH FORUMS
FREE NEWSLETTER
By signing up you may also receive reader surveys and occasional special offers. We do not sell, rent or trade our email lists. View our Privacy Policy.