SEARCH FINESCALE.COM

Enter keywords or a search phrase below:

Achtraden! 8x8 Group Build '09-'10

45450 views
373 replies
1 rating 2 rating 3 rating 4 rating 5 rating
  • Member since
    August 2012
Posted by Brett2501 on Saturday, March 27, 2010 10:38 AM

Thanks men! I apprecite the kudos. This is my first group build and I  must say it is quite the motivator.

I look forward to more pics of finished kits :)


Bertt


  • Member since
    April 2009
  • From: Carmel, IN
Posted by deafpanzer on Saturday, March 27, 2010 11:55 PM

Good news, I was able to finish my kit today... FINALLY... I know I work at slow pace but I am pleased with my work. 

Applied MIG pigment to the tires and space under the hull... mixature of Rubbel Dust, Industrial City Dirt and very little Vietnam Earth.


Down under...

Added the antennas... the main one broke!  I couldn't believe how many pieces I have broke during this build.  ARRRGGH!  It was a good thing DML kit came with a spare antenna unfortunately its thicker than the original.  I may have it replaced when I run into better spare part one day.

It only need one more little thing... that peel-and-stick mirror that wbill uses for his kits.  I am hoping that I can buy it at AMPS show in Auburn, IN next month.   Please feel free to let me know if you see any mistake I may have made another than several broken parts.

Tomorrow I will take more pictures using my camera (not my BlackBerry as I have been using).  So for now I say it will be treated as COMPLETED as soon as I send better pictures tomorrow!  Stick out tongue


Andy

  • Member since
    March 2007
  • From: Carmel, CA
Posted by bondoman on Sunday, March 28, 2010 12:16 AM

Wow you guys are great modelers. Really swell stuff deaf and bert! I'm no armor modeler, more aircraft and it sure shows! But I had fun with this little guy, a 1/72 Trumpeter BTR-80 that I didn't really do anything to except add an antenna.

"Bagram Airforce Base, Fall 1988"

Thanks for looking.

  • Member since
    April 2009
  • From: Carmel, IN
Posted by deafpanzer on Sunday, March 28, 2010 10:29 PM

VERY NICE WORK on your BTR!  Are you in process of building a diomara using a plane as shown in the background?  It looks great too! Yes

Andy

  • Member since
    April 2009
  • From: Carmel, IN
Posted by deafpanzer on Sunday, March 28, 2010 10:38 PM

I tried to take more pictures using my Sony camera but I don't think it came out that good.  I have to wait for the weather to clear so I can take more pictures outside using natural light.

I am going to build a diomara with this kit.  I have already started working on two figures... bought for only $5!  From Verlinden...

You can see that those idiots are smoking while handling gas... they will be holding jerry cans.  And I will have few gas barrels next to the figures with a post and sign saying 'No Smoking" in German.  Can't think of a good diomara name for this other than 'No Smoking, Idiots'...

I think I am done... off to start a new kit Stug III B for the Turretless GB.  Take care...

Andy

  • Member since
    May 2005
  • From: Dublin Rep Of Ireland
Posted by terry35 on Friday, April 2, 2010 4:33 PM

Hi guys, Bondoman nice BTR. Andy I like the 234/1 I can appreciate your wows waiting to get better photography conditions, but the finish so far is amazing the weathering is first class.


Terry.

  • Member since
    May 2005
  • From: Dublin Rep Of Ireland
Posted by terry35 on Saturday, April 3, 2010 6:56 PM

Well it's been a while since I posted an update on this one. Well I have made progress and am looking forward to the final leg of this project.

I got the kit primed about 2 weeks ago and left it to sit for a couple of days for the primer to cure/harden properly. I then decided to got back to Humbrol paints because they provided the closest match that was readly available in a hobby shop here in Dublin.

I have not used humbrol in a couple of years and decided to use their thinners as well. I used a very dilute mix and go for the several light coats as opposed to my usual heavier acrylic coats.

I finally finished getting the base coat down over a couple of sessions during the week and today decided to get the decals down and take some pic's of the progress.

So on with the pics.

This is an earlier shot of the turret showing some of my home made welds. I'm now glad I took the time to do all these on visible parts of the vehicle as in straight green it would be quite boring and these details washed and lightly drybrushed should add some eye candy to any blandness and break up any open spaces.

The same area with just a base coat.

This shot shows the anti slip plating on the roof armour.

this one shows the spacing.

More home made welds.

I think this shot gives a good impression of the turret, I know about the gloss, its just there for the decals, I'm going to give a nice coat of matt mixed slightly with satin if I get the weather tomorrow.

Just more Decals.

THese next two clearly show the spacing on the frontal armour.

I'm going to try and get all the detail painting done by next weekend.

I must just add that this is one classic kit te only problem was the side steps provided by trumpeter in etch that was useless, actually as I've stated elsewhere I think that trumpeter could easily have provided these parts in plastic.

It's not like they can't do it. a lot of there new releases have super fine moulded detail and I think they have simply jumped on a popularity wagon of providing etch parts.


Thanks for dropping by.

Reagrds.

Terry.


P.S. happy easter to everybody .

  • Member since
    April 2005
Posted by Thunderbolt379 on Monday, April 5, 2010 7:04 AM

Nice work, Terry -- this looks like another first rate offering from Trumpeter. You've done some good things with those weld seams -- is there any paritcular trick to it? It looks like super-thin lines of putty, textured with a knife. The only time I've done extra weld seams I used fine strip plastic and textured it with a hot knife point. I'm looking forward to adding this one to the leaderboard!

Andy -- I still need to add yours to the roll of honour too, don't worry, I haven't forgotten!

My own Stryker will be back on the bench before long for its weathering phase.

Cheers, Mike/TB379 (still recovering from submission of his PhD thesis on March 31st!)

http://worldinminiature.blogspot.com/

  • Member since
    May 2005
  • From: Dublin Rep Of Ireland
Posted by terry35 on Wednesday, April 7, 2010 7:51 AM

Thanks for the comments Mike, and to answer the question, stretched sprue for the welds with copious amounts of liquis poly applied with a fine brush.

Thanks again Mike,

Terry.

  • Member since
    May 2005
  • From: Dublin Rep Of Ireland
Posted by terry35 on Wednesday, April 7, 2010 5:57 PM

 I'm posting some progress shots of where I am at the moment. I've started the undercoats for the chipping. I want to keep it to a minimum, but have decidecd that in service the turret would get a fair bashing with crews climbing on and off. but on the upper parts of the hull I'm trying to get a balance.It's kinda hard to put into words so I'll just post pics and wait on opinions of my colleagues here, I will appreciate any advice.

I have done very little work on modern vehicles that have not been in battle so to say.

Well on wit the pics.

The front plate, I think maybe more here?

The welds can be seen on the back here.

The outer wheels. I'm happy with this and hope to finish the wheels at the weekend. Remember Thursday is beer night.

The inner wheels I painted the brake discs shiny because they are constantly in use.

The turret side the homemade chains are clear now and I'm looking forward to drybrushing these to see how they look.

The roof the two lifting lugs on the sight thingy are grandt line.

An idea of how big this monster is, its about teh sizr of a king Tiger.

Thanks for looking.

Terry.

  • Member since
    April 2009
  • From: Carmel, IN
Posted by deafpanzer on Sunday, April 11, 2010 8:07 PM

Terry- Loving your process so far! Yes  After being away for more than a week on a cruise, I was hoping to see more activity on our GB when I return and it is happening.  I look forward to see when it is done.

TB- Thanks!  Please use this photo for the hall of fame... I had FUN building this one.  That's what really counts...


Andy

  • Member since
    May 2005
  • From: Dublin Rep Of Ireland
Posted by terry35 on Wednesday, April 14, 2010 4:28 PM

Andy that out door shot is stunning excellent. Wall of fame for sure.

Well I got painting fever at the weekend and got the highlighting done and the wash in. I mixed the base humbrol colour with some oils to allow for blending as opposed to actual drybrushing which can be pretty harsh.

With the blending you can get more time to work the colours as opposed to just working with enamels straight.This allowed me to subdue any harshness from chipping. So after 2 days drying I was away with the first light wash. I have only got he first in so far and tonight done some mud. Its still drying and I need a while to decide my next move.

So on with the pic's.

Early wheel.

The wheel installed and mud etc added.  The harsh chips are almost gone but still visible.

Almost finished roof I think I need to get another wash in to bring out the anti-slip plating.

Just a quick line of pic's.

Thanks for looking,

Terry.

  • Member since
    April 2005
Posted by Thunderbolt379 on Thursday, April 15, 2010 8:14 AM

DP -- I'll use that shot for sure! Great piece of work and an honour to have hosted the GB that gave birth to it!

Terry -- stunning is the word! That Centauro is amazing! The detail level and the finishing techniques do justice to a spectacular vehicle, and I'm really feeling the urge to add one to my collection!

Talking to all members here, there's six weeks left in this GB's scheduled run, we have eight or nine completions at this point with two more very close -- do we have any more projects forthcoming?

Cheers, guys,

Mike/TB379

http://worldinminiature.blogspot.com/

  • Member since
    March 2007
  • From: Carmel, CA
Posted by bondoman on Thursday, April 15, 2010 9:48 AM

T-Bolt: don't forget to post my BTR when you getta moment...

  • Member since
    May 2005
  • From: Dublin Rep Of Ireland
Posted by terry35 on Saturday, April 17, 2010 6:50 PM

Hi, Mike thanks for the kind words, I'm nearly there and I must say its the most enjoyment I've had in a while. The kit is well worth having, I seen the vehicle for the first time in a magazine acouple of years ago and at the time it was only available as a resin kit. Trumpy have really done a great one with this one. I took delivery of their M1131 stryker and that is even better just stunning. I've never seen so much in a box for theh price.

Any way I want to finish one or two other projects before I touch another kit. I will do a stryker for this GB but won't be starting right away.


I will keep posting as I progress and will meet the deadline.

Terry.

  • Member since
    April 2005
Posted by Thunderbolt379 on Saturday, April 17, 2010 10:11 PM

Hi all,

The leaderboard is updated with Bondo's and Deafpanzer's builds, and copious appologies to Chris Hall whose fantastic 234 Puma with articulated steering was finished in February but somehow got missed off the hall of fame listing -- that is now rectified! There are now ten finished projects on the list, from a proposed 21 projects on the members' list, and there are a few more to come. I look forward to adding Terry's amazing Centauro, and I swear I'll finish my Stryker asap too! There may be one or two more in the works, I believe.

We're down to just under a fortnight to the scheduled close of this GB, however if anyone is still going then I'm more than happy to leave it open, the more fnished models the better!

I can promise an exciting new armour GB coming soon -- with the end of my PhD and working at one of the university labs I had not noticed time going by, and I need to field some new ideas as this build enters its final days!

Cheers, Mike/TB379

http://worldinminiature.blogspot.com/

  • Member since
    April 2005
Posted by Thunderbolt379 on Saturday, April 24, 2010 4:10 AM

Hi all,

I made some progress on the Stryker at last. When last heard from, the model was painted using Tamiya NATO Green, with fade and shade coats applied. Last night I managed to make a start on wash weathering, applying black artists' oils, but found something a little odd, the black doesn't seem to generate the all-important capillary action that the dark brown does... With some hesitation I switched to brown and completed the wash, but she came out looking a bit rustier than intended. Here she is:


I might ameliorate the "dirtiness" a bit, if I can, and the drybrushing in the next round will lighten things up, as will the dust coat. At the moment she's a well-used vehicle in a temperate climate, thus the NATO green.

The observant will note that the forward PE wire-cutter fell off as soon as it was breathed on, so superglue will have to save the day.

More soon, Cheers, Mike/TB379

http://worldinminiature.blogspot.com/

  • Member since
    May 2005
  • From: Dublin Rep Of Ireland
Posted by terry35 on Saturday, April 24, 2010 5:46 PM

That was well worth the wait Mike, she really is looking sharp. Well done with the progress, I don't think it's looking rusty at all.

Well heres my report.

Well I'm calling this one finished with the exception of just a little cleaning here and there.

I need to get some beauty shots in better lighting. I based the final weathering on the strykers I've seen in books in Iraq, very dusty vehicles. I think any vehicle on manouvers will end up in the same condition.

I will be doing a STRYKER soon and just took this shot of the STRYKER hull up against this beast to give a sense of scale.


Thanks for looking and as always all comments welcome.

I'm of to claim my badge, I'll post the shots for the leader board ASAP.


Terry.

  • Member since
    April 2005
Posted by Thunderbolt379 on Monday, April 26, 2010 1:57 AM

Superb work, Terry! You make me really want to add this one to my stash! When you get your beauty shots ready I'll add this build to the leaderboard.

I'm working on the Stryker at this time, the highlight and bare metal drybrushing rounds are on and I'm now decaling. Painting the lights and adding the dust coat come next.

Cheers, Mike/TB379

http://worldinminiature.blogspot.com/

  • Member since
    August 2009
  • From: Cary, North Carolina
Posted by M1Carbine on Monday, April 26, 2010 6:25 PM

Mike - looks just fine from where Im sitting.


Terry - looks awesome buddy.


Bob

  • Member since
    April 2005
Posted by Thunderbolt379 on Wednesday, April 28, 2010 12:08 AM

Thanks, Bob. I'm painting still and fiddling with the microscopic serial number decals Trumpeter featured -- they thought they were being clever providing separate letters and numbers so you can model any specific vehicle, but frankly they're a pain in the fender... Still, she'll be done soon!

M/TB379

http://worldinminiature.blogspot.com/

  • Member since
    April 2009
  • From: Carmel, IN
Posted by deafpanzer on Wednesday, April 28, 2010 10:12 PM

TB- Your Stryker is looking great especially its wash! Yes

Terry- Loved the picture where you placed your beast next to Stryker! Indifferent  I am not really into modern military but it is starting to catch up on me since I joined this GB.  Hope we get to do GB again one day. 

Andy

  • Member since
    August 2012
Posted by Brett2501 on Thursday, April 29, 2010 6:40 AM

I am done - thing is I have been busy with work and selling our house and need a couple of extra days to get a chance to take some pics and post em.

What are the chances?


Cheers,

Berttt

  • Member since
    April 2005
Posted by Thunderbolt379 on Thursday, April 29, 2010 7:34 AM

No problemo, Berttt -- take as long as you need, I understand how real life can mess up your hobby schedule!

As for myself, I'm finishing the Stryker right now, I just need to mount the antennae and touch up their bases, then I'll shoot the gallery images and upload them. Hopefully I'll have them up in an hour or two.

Cheers, Mike/TB379

http://worldinminiature.blogspot.com/

  • Member since
    April 2005
Posted by Thunderbolt379 on Thursday, April 29, 2010 8:56 AM

Okay, guys, as promised, here she is!

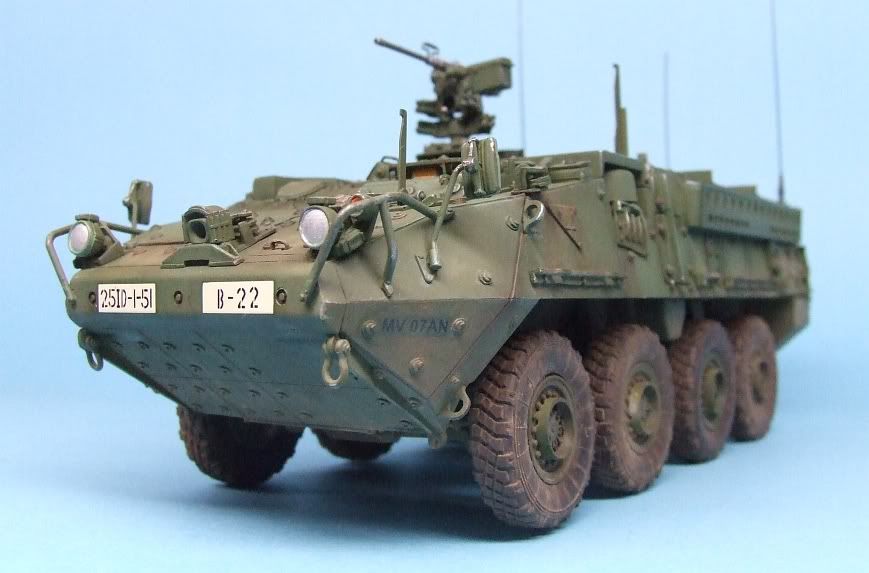
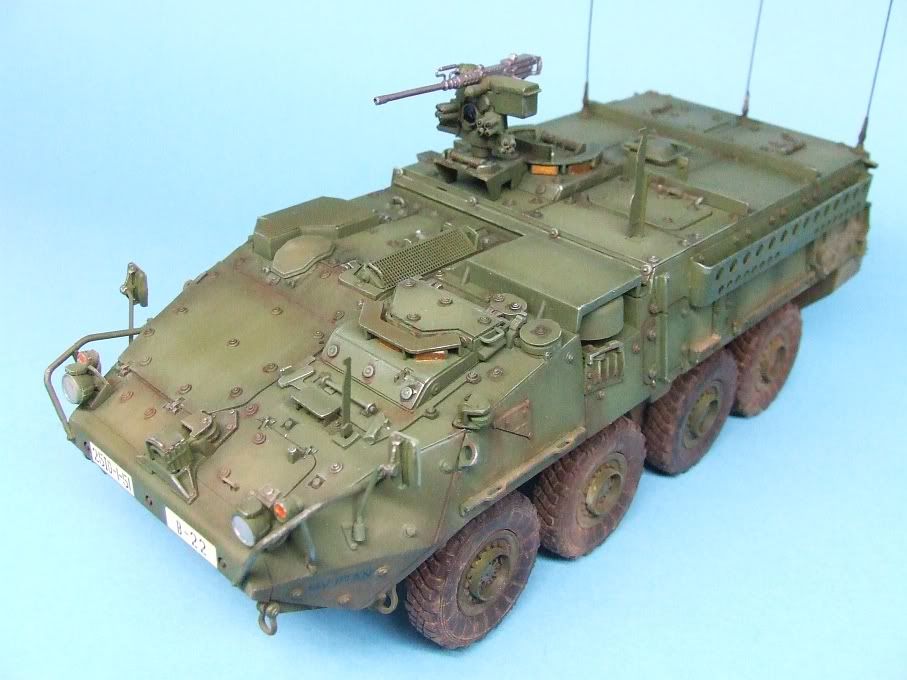
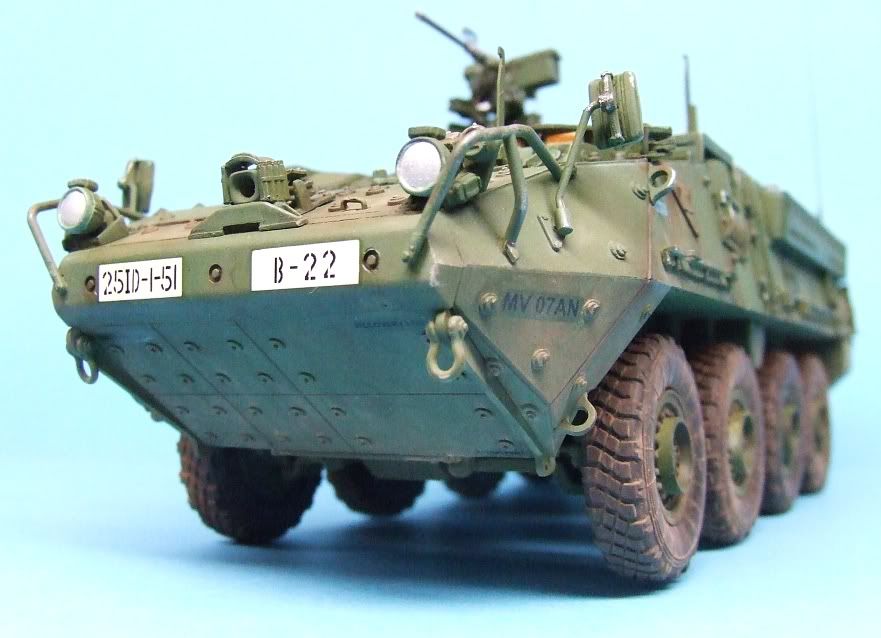
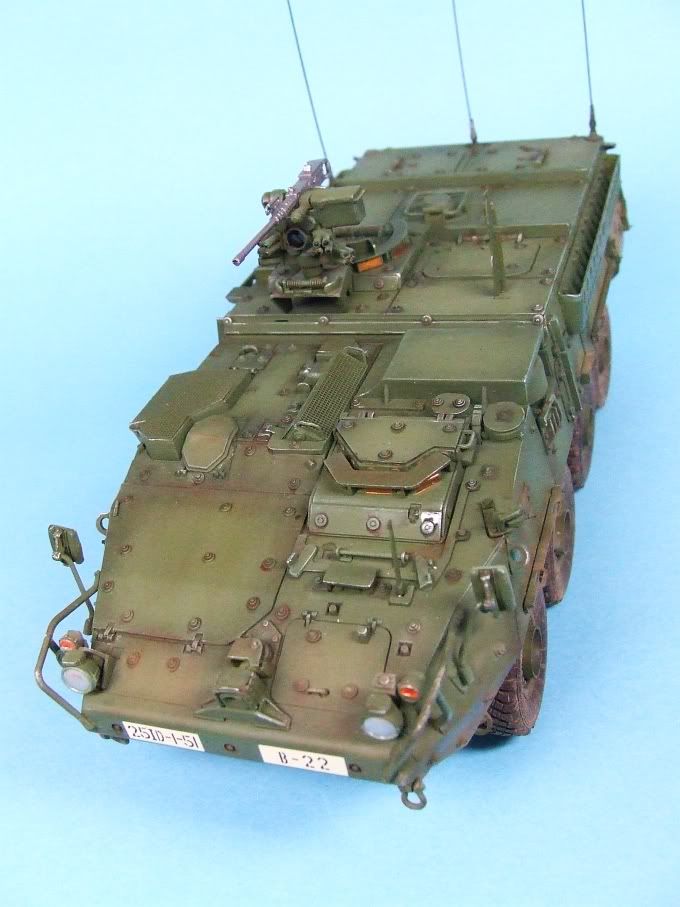
Trumpeter #00375, M1126 Stryker in 1:35th scale:
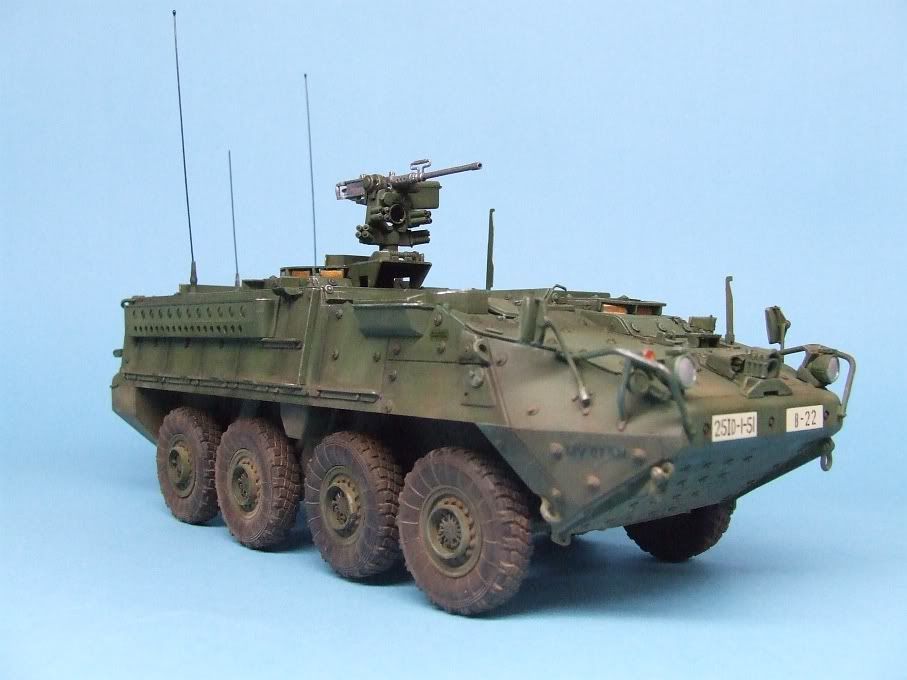


This has been a very enjoyable kit, it's well engineered and goes together well, my only criticisms would be of the very small parts such as grab handles which are particularly fragile, as are the photoetched parts (five parts simply fell off and had to be reattached at the end, including PE that snapped away), and the way-too-tiny decals. I can hardly credit that I struggled with 32 decals for the serial/ID stencils, when by all sane standards four were quite sufficient. I considered leaving them off and making some custom decals next time I was making a sheet. The lights went on a bit crooked, and were difficult to paint: separate lenses would be a nice touch in future.

The base paint is Tamiya acrylic, she's washed with oils, drybrushed with enamels and dusted with pigments (which, as you can see, adhered very nicely to the vinyl tires). I've left the jerrycans off at the moment, as the water cans need painting and it may be that Trumpeter mixed up their ID is to which is which, I'm certainly getting that impression from research photos. I'll sort that out at a later date, and maybe get some of those cool decals that Echelon makes for cans.

For the moment, I'm calling this one done and off the bench. I hope it meets with the approval of the very fine builders I've had the honour of working with on this most enjoyable GB!

The build officially closes at midnight, April 30th, but if anyone (Berttt included!) is still going, please take your time and finish your projects -- we'd love to see them, I'm sure!

I'll post a tie-up message as we cross the finishline.

Cheers, Mike/TB379

PS: Of course, I've just realised I forgot the pioneer tools... Ah well, there's an extra job to do!

http://worldinminiature.blogspot.com/

  • Member since
    April 2009
  • From: Carmel, IN
Posted by deafpanzer on Thursday, April 29, 2010 8:43 PM

TB- What a beauty! Yes  I am very glad that this was my first GB and I will definitely do it again.  Thanks for taking your time to do this for us glue sniffing addicts! 

Andy

  • Member since
    May 2005
  • From: Dublin Rep Of Ireland
Posted by terry35 on Saturday, May 1, 2010 7:47 PM

Andy Mike and Bob thanks for the kind comments. Yeah as I type I think I would like this GB to continue its been enjoyable and got me off my keester and building.

Mike Love what you have done with the Stryker, painting and finishing progress are superb but and its olny a comment but,

The .50cal machine guns on the Stryker RWS ( remote weapons station for those not familiar) dont normally have the handle on the barrel and the on on yours is upside down. The RWS on the Trumpeter kits are realy bad, maybe it would be worth considering the AFV club variant or if the budget permitted the Voyager one, I got theh voyager one and I crapped myself turned brass smoke dischargers and etch resin two types of weapon its expensive but stunning all the same it would really make a difference to this build.

Terry.

  • Member since
    April 2005
Posted by Thunderbolt379 on Saturday, May 1, 2010 7:59 PM

ARGH! You're right, of course, Terry -- why couldn't I spot that in my reference pics??? I kept trying to fit the 50 the other way up so the handle would be in the right place for other vehicles, but it shouldn't be there at all... The easiest solution is simply to clip it and touch up the stubs. I notice my gunmetal isn't dark enough either... I'd wash it with black, but the contrast detailing is Promodeler pigment, which would wash away. If it was still separate I'd fully rework it, but with it attached I can correct the handle and maybe contrast detail the rear grips. GRRR! Well, I needed to do the pioneer tools anyway, so this thing isn't quite finished!

By all means, keep going, we want to see builds!

Cheers, M/TB379

http://worldinminiature.blogspot.com/

  • Member since
    May 2005
  • From: Dublin Rep Of Ireland
Posted by terry35 on Sunday, May 2, 2010 5:38 PM

I still haven't got any photos taken yet but I will as soon as the weather picks up , hopefully during the week.


Terry.

  • Member since
    April 2005
Posted by Thunderbolt379 on Monday, May 3, 2010 9:12 AM

Hi all,

Has it really been six months? I can safely say it's been a fun and learning experience, and we've seen some great models built here. Of 21 proposed builds at the outset at least twelve have been completed, and that's a good return. Six are SdKfz 234s of various marks, mostly Pumas, and I think we ended up with a pretty good armoured recon group!

I'll make the final mods to the Stryker before taking a last few shots and choosing one of those for the honour wall; likewise we're just waiting on Terry's final shots of the Centauro, and of course anyone who wants to keep on going is more than welcome to post their build when it's ready and collect a badge.

I'd like to post a gallery collection to the Armor Forum -- does anyone have any particular shots they would like me to use, or are you happy to leave it to my discretion?

I guess it's pertinent to ask -- would Achtraden II be of interest at some point? There are plenty more vehicles to look at, BTRs and Pirhana and Stryker variants, and the SdKfz 234/4 didn't appear in this one. Let me know your thoughts and I'll keep another eight-leggers GB at the back of my mind.

For the second half of 2010 I'm kicking around ideas for fresh builds: would anybody be up for a Self-Propelled Artillery GB? "Have Gun, Will Travel!" I'd be in with either a Trumpeter AS-90 or the Revell-Germany Panzerhaubitzer 2000. Partial builds would be most welcome too, and that would give me a great opportunity to complete an Italeri M110 that's been hanging around unfinished for many years.

Once again, let me know what you think and if there's interest I'll float it on the armour forum with a preliminary thread, aiming for a start at midyear (or even June 1st if there's enthusiasm!)

Cheers, and many thanks all for being part of this most enjoyable process -- you guys have made my first group build as host a resounding success!

Mike/TB379

http://worldinminiature.blogspot.com/

JOIN OUR COMMUNITY!

Our community is FREE to join. To participate you must either login or register for an account.

SEARCH FORUMS
FREE NEWSLETTER
By signing up you may also receive reader surveys and occasional special offers. We do not sell, rent or trade our email lists. View our Privacy Policy.