SEARCH FINESCALE.COM

Enter keywords or a search phrase below:

Mighty 8th GB 1-Nov-2010 - 31-Oct-2011

142358 views
1358 replies
1 rating 2 rating 3 rating 4 rating 5 rating
  • Member since
    January 2010
  • From: Nebraska, USA
Posted by CallSignOWL on Sunday, September 25, 2011 7:58 PM

hmm! The image didnt work and it wont let me edit my post. The pic was suposed to be this.

(The Flying Scot is the middle plane)

------------------------

Now that I'm here, where am I??

  • Member since
    December 2002
  • From: Bury St Edmunds, Suffolk, England
Posted by Bish on Monday, September 26, 2011 2:57 PM
Check, ye, i have seen those with the twin guns as well. But looking at the ole puss, its deffinatly a single gun. Another thing i noticed is that some of these mounts seemed to be rounded at the top, other straight. I have gone for rounded, though i am not 100% sure thats right for my aircraft. But many of the pics are side on, or at a slight angle, not many are head on. But no, no need to slap your head, theres no AM set for this, at least i haven't found one. I spent all lunch time and all this evening scratching it. I cut a triangle hole in the front of the nose. Then i added a rim with lead foil and used the same for the gun mount. The framing is a bit thick, and i have scratched the clear plastic a bit. Also, because i the way i added the inside, i had to fill in the sides, but its bloody awkward to tidy it up. Now i have to sort out the support frames. I plan on useing wire, but have no idea where this attached to the fuselage as i have found no pics of the inside of one of these. So i will see what i can find at the weekend. This aircraft is going to be sat on a shelf for a while before i do a dio for it. I think i will get a couple of vac form noses and do it again, useing the lessons from this. Plus the thinner vac form plastic should make it easier. Waht i have now isn't perfect, but its not to bad for someone who doesn't scratch that much. I will post some pics when i get home on Thurs. OWL, your more than welcome. Afraid your pics ain't showing up for me at the moment, probably my conection. I will add you to the front page when i get home.

I am a Norfolk man and i glory in being so


On the bench: Airfix 1/72nd Harrier GR.3/Fujimi 1/72nd Ju 87D-3

  • Member since
    September 2003
  • From: AandF in the Badger State
Posted by checkmateking02 on Monday, September 26, 2011 6:33 PM

Bish, you have far more ambition than I!!  Go with it.  I had enough trouble just determining where the canopy center was in order to drill a hole to receive the gun.  Then I masked the canopy in the proper shape and painted it--no framing.

I also used Squadron clear pieces, since the kit parts are often too thick--and the Hasegawa's cone is predrilled for the Memphis Belle configuration--not useful at all for the single setup.

Now that you mention it, I don't know if I've ever seen clear pictures how the framework was attached to the fuselage.  I seen photos of crew looking out of the nose but the anchor points don't show.

When I did consider a project like you've undertaken (but quickly dismissed the whole idea!), I did think about drilling holes in the front of the fuselage and seating the frame into them, then gluing the other ends somewhere near the gun itself.  If carried through, I'd probably have used stretched sprue for its flexibility.  But the prospect of a clear nose and the visibility of glue when I smeared it all over caused me to retreat to the "painted-on-look."

I hope you have all kinds of success with this procedure.  I'm sure you'll pull it off well.

But maybe this has motivated me to do the repairs necessary to bring "Ole Puss" back up to speed.


  • Member since
    December 2002
  • From: Bury St Edmunds, Suffolk, England
Posted by Bish on Tuesday, September 27, 2011 2:06 PM

I was able to finish the gun mount part, i just have to add the braceing. I will do that when i get back next week and see what i can find online over the weekend. I am guessing that the supports would not got that far into the fuselage. I think if it was bolted the bolts would show on the outside, so my guess is they were welded. I guess its going to be all guess work.

Some good news, the decals arrived today, only took 8 days. They are very nice, the nose art isn't 100% accurate, the eyes are not very big and the white object on the left of the cats chest is missing, but in this scale, i its not taht notacable. I do have one question. As i understand it, when the 8th started putting BG letters on their aircrfat, they went on the tail and top of the right wing. The national insignia was on the bottom of the right wing and top of the left. The decal instructions say the national insignia is on top and bottom of the right wing, and has no BG letter for the wing. In fact, none of the 3 aircraft on the sheet have the 3rd BG letter. I can't find any evidence of this in any pics. What did your kit come with. I have a spare BG letter so that won't be a problem.

I am a Norfolk man and i glory in being so


On the bench: Airfix 1/72nd Harrier GR.3/Fujimi 1/72nd Ju 87D-3

  • Member since
    December 2002
  • From: Bury St Edmunds, Suffolk, England
Posted by Bish on Tuesday, September 27, 2011 2:56 PM

I was able to finish the gun mount part, i just have to add the braceing. I will do that when i get back next week and see what i can find online over the weekend. I am guessing that the supports would not got that far into the fuselage. I think if it was bolted the bolts would show on the outside, so my guess is they were welded. I guess its going to be all guess work.

Some good news, the decals arrived today, only took 8 days. They are very nice, the nose art isn't 100% accurate, the eyes are not very big and the white object on the left of the cats chest is missing, but in this scale, i its not taht notacable. I do have one question. As i understand it, when the 8th started putting BG letters on their aircrfat, they went on the tail and top of the right wing. The national insignia was on the bottom of the right wing and top of the left. The decal instructions say the national insignia is on top and bottom of the right wing, and has no BG letter for the wing. In fact, none of the 3 aircraft on the sheet have the 3rd BG letter. I can't find any evidence of this in any pics. What did your kit come with. I have a spare BG letter so that won't be a problem.

I am a Norfolk man and i glory in being so


On the bench: Airfix 1/72nd Harrier GR.3/Fujimi 1/72nd Ju 87D-3

  • Member since
    September 2003
  • From: AandF in the Badger State
Posted by checkmateking02 on Tuesday, September 27, 2011 5:39 PM

[View:/themes/fsm/utility/:550:0]

According to Roger Freeman, The Mighty Eighth:  Warpaint and Heraldry, VIII Bomber Command required Group markings from 20 June, 1943.  They were to be carried on the tail fins and wings of heavy bombers.  A geometric shape designated Bomb Wings (a 6 1/2 foot square for 4th Bomb Wing; the letter within indicates Bomb Group--in this case a "C").

Freeman also clearly shows the U.S. insignia carried on the top of the left wing.  The would put the underside insignia on the bottom of the right wing--just as you've said.  The instructions are incorrect in saying the U.S. AAF insignia goes on the top of the right wing. As Freeman notes, "the upper right wing surface" was to the wing/division and group designators.

Reading further, Freeman says that the Bomb Wings became Bomb Divisions in September, 1943, and while the designs stayed the same, new dimensions were issued:  the square became 4 feet high by 5 ft wide.  On the wing, the square was to be 4 3/4 ft chordwise and 6 ft spanwise.

In practice, he says, most times the square was 5 ft high by 4 ft wide, or even just "a true" 4 ft square.

So there you go; you're right; they're wrong.


  • Member since
    September 2003
  • From: AandF in the Badger State
Posted by checkmateking02 on Tuesday, September 27, 2011 5:44 PM

And, Bish, if you have use for one of the Hasegawa antique sheets, I'd be glad to send you one.  I have a couple with all decals complete, including not only "Ole Puss," but also "Miami Clipper," "Miss Ouachita," and "Stuff."  Unfortunately, they are not as thin and refined as aftermarket decals, being a little thick; still I think they applied all right, if I remember.  I built these "F's" back in the '90's, so the memory of each build is kind of vague now.

If interested, you can send me your address in a PM.


  • Member since
    December 2002
  • From: Bury St Edmunds, Suffolk, England
Posted by Bish on Wednesday, September 28, 2011 12:28 PM

Ok, that this is interesting. I asked the same thing on the Too many props GB and got a slightly different answer from B17pilot. I am sure superscale got the national insignia wrong, but not so sure about the wing BG code. I also found a pic in one of my books thats dated April 11th 44, 6 days before ole puss was lost. It shows 96th BG B-17G's with the code on the tail but not on the upper wing. The order being issued is one thing, being carried out is another.

Maybe the 96th just didn't get round to it, but its a long time from June 43 to April 44. A bit of a mistery. But i do like the BG code on the wing, doesn't look right without it. As i doubt anyone has a pic of ole puss from above, whos to say which is right. So i think i might just add it.

I am a Norfolk man and i glory in being so


On the bench: Airfix 1/72nd Harrier GR.3/Fujimi 1/72nd Ju 87D-3

  • Member since
    December 2002
  • From: Bury St Edmunds, Suffolk, England
Posted by Bish on Wednesday, September 28, 2011 12:31 PM

OWL, can see the pic now. I have 2 sets Eagle Strike decals of Bodney P-51's, both in 72nd scale, they do like nice sets. And DoogsATX used a set of their 1/48th decals as well, but i think it was a different set. Will look forward to see how you tackle the Blue nose.

I am a Norfolk man and i glory in being so


On the bench: Airfix 1/72nd Harrier GR.3/Fujimi 1/72nd Ju 87D-3

  • Member since
    September 2003
  • From: AandF in the Badger State
Posted by checkmateking02 on Wednesday, September 28, 2011 3:49 PM

I agree there's a world of difference between theory and practice.  After reading what B17pilot said, and checking both online and with Freeman's books, I haven't been able to find a single photo that shows the upper wing division/group insignia on any 96th aircraft.  It's more than possible the 96th just didn't follow the order.

I found a photo at this site, maybe you've seen it too.

http://www.nationalmuseum.af.mil/photos/media_search.asp?q=b-17&page=16

It shows a 96th Fort with the wing/division/group device on the tail, none on the wing, and the old style national insignia on fuselage and wing (the one without the white bar).

In my own defense, I built my "Ole Puss" before the internet caught on, back in the mid 1990's--so ignorance is my only excuse; that and the tender mercies of the decal instructions.  You at least have now the knowledge of the modern world to choose from!


  • Member since
    December 2002
  • From: Bury St Edmunds, Suffolk, England
Posted by Bish on Wednesday, September 28, 2011 6:15 PM

Well all we can do is our best with what we have to hand. I will think on it over the weekend as to if i put the BG code on the wing. Either way, whos to say its wrong given the evidence and what the referance material says.

I will have that photo of my nose cone up for you soon, see what you think.

I am a Norfolk man and i glory in being so


On the bench: Airfix 1/72nd Harrier GR.3/Fujimi 1/72nd Ju 87D-3

  • Member since
    December 2002
  • From: Bury St Edmunds, Suffolk, England
Posted by Bish on Thursday, September 29, 2011 3:32 AM

Heres a pic of the nose cone, afraid it is rather blurred. It ;looked ok on the camrea, but once i trimmed it, it turned pretty awful. But hopefully you can see what i have done with it. Will deffinatly be easier with a vacu formed piece.

I am a Norfolk man and i glory in being so


On the bench: Airfix 1/72nd Harrier GR.3/Fujimi 1/72nd Ju 87D-3

  • Member since
    September 2003
  • From: AandF in the Badger State
Posted by checkmateking02 on Thursday, September 29, 2011 8:28 AM

That's good work on something so small.  It's going to really enhance the look of the model.

Wouldn't you think with all the Fort models around, and as common as this modification was, that someonw would have made some aftermarket parts for this?  PE would probably be ideal, or a a vacuformed piece could have it incorporated already, and it would save us a lot of trouble.

Anyway, you've done a nice job here.


  • Member since
    December 2002
  • From: Bury St Edmunds, Suffolk, England
Posted by Bish on Thursday, September 29, 2011 9:59 AM

Ye, you would have, but maybe this piece on its own would be to small to warrant its own Am part. When it comes to the braceing, unless i can find a pic, which i haven't been able to do so far, i am just going to make the supports just long enough to go into the main fuselage. I can always alter it later when i replace the nose.

I am a Norfolk man and i glory in being so


On the bench: Airfix 1/72nd Harrier GR.3/Fujimi 1/72nd Ju 87D-3

  • Member since
    September 2003
  • From: Australia
Posted by Helo H-34 on Saturday, October 1, 2011 11:49 PM

Hi Bish and everyone else ;

My apoligize's for being a late starter with this great Group Build .... Embarrassed

I would still like to participate with Tamiya's 1/72 P-51D Mustang of the 8th A.F. Aces ;
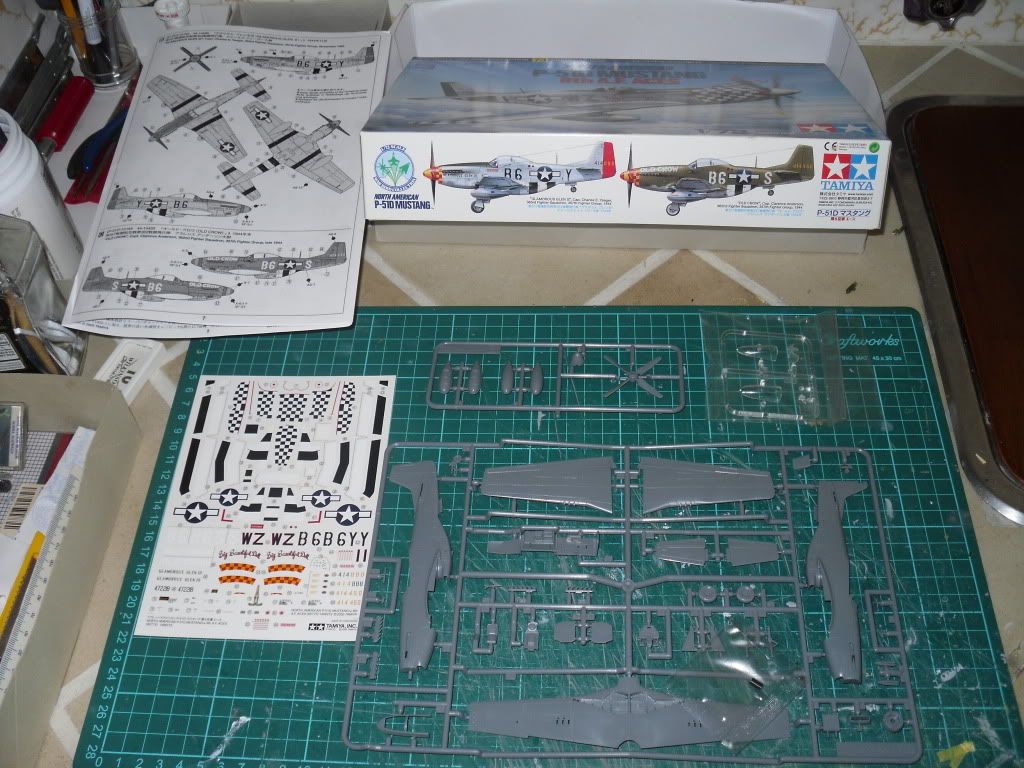
As for the paint scheme , I have decided to go with olive drab over neutral gray and the markings will be

"Old Crow" , Capt. Clarence Anderson , 362nd F.S. , 357th F.G. , late 1944 .

I have airbrushed all the interior pieces chromate ;
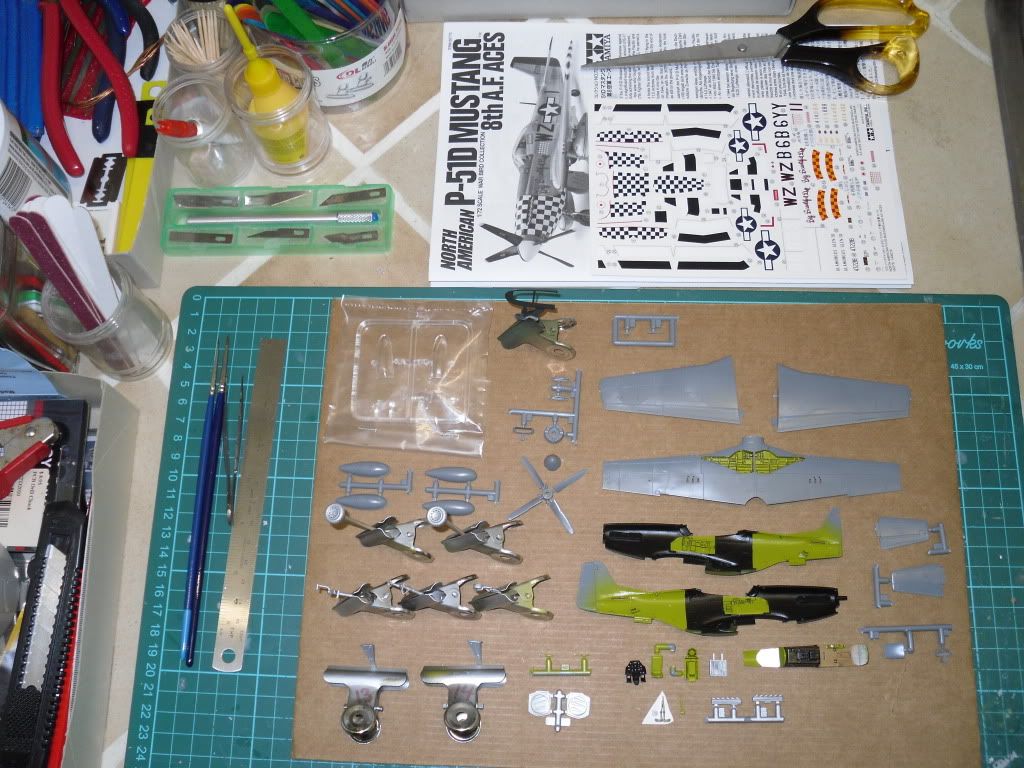
And I have added some black wash to the cockpit fuselage sides and main gear wells in the wing ;
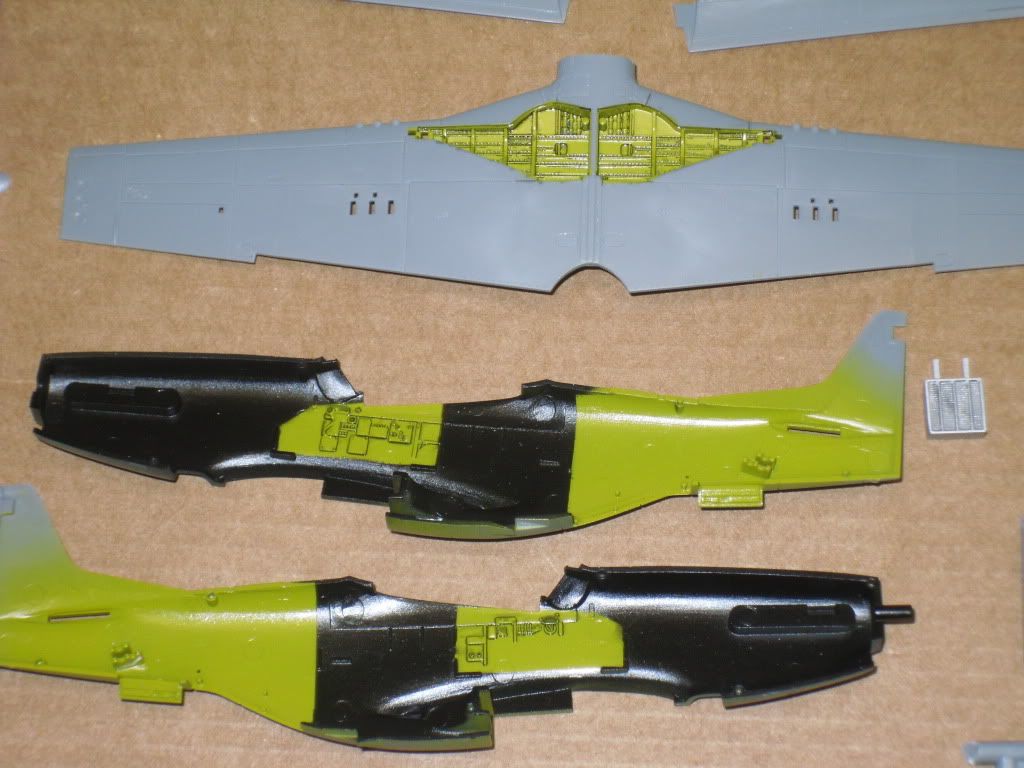
Next I'll glue the tub and cockpit pieces in place and close up the fuselage halves .

Unfortunatly Tamiya molded the wing flaps up , so I'll have a go at cutting them to pose them in the dropped position .

I did a little search on the net for info as to where abouts this aircraft was stationed and I found a site which stated that "Old Crow" of the 357th Fighter Group...." Yoxford Boys " , 8th Air Force , Leiston Field , United Kingdom . I not 100% sure if this was the P-51D or an early version of the Mustang ???

Anyway , hopfully in a couple of days I'll have the fuselage and wings all glued together .

                         John .

  • Member since
    December 2002
  • From: Bury St Edmunds, Suffolk, England
Posted by Bish on Sunday, October 2, 2011 3:32 AM

No need to apologiose, these still time for thsi build. I will add the unit details to your build on page 1. I just had a quick look on a couple of sites. The 357th were at leiston from Jan 44 to July 45. And there seems to have been at least 4 Ole Crow's, all with the code B6-S, and all flown by a Capt Anderson. But 2 of them were lost over Europe with other pilots at the controls.

This is coming along nicely Helo.

I am a Norfolk man and i glory in being so


On the bench: Airfix 1/72nd Harrier GR.3/Fujimi 1/72nd Ju 87D-3

  • Member since
    September 2003
  • From: AandF in the Badger State
Posted by checkmateking02 on Sunday, October 2, 2011 1:08 PM

Welcome to the 8th AAF, John.

I have to comment on the neatness and precision of your painting.  It is admirable.  Is that a wash you've put over the instruments in the cockpit?  If so, what did you use to accompish it?  When I've tried washes, they come out kind of messy.

Hope you enjoy the build as much as the rest of us have.  It's been a good experience.


  • Member since
    September 2003
  • From: Australia
Posted by Helo H-34 on Monday, October 3, 2011 6:58 AM

I used some thinned model master gloss black and carefully applied it to the side detail on the fuselage halves . There was a small decal for the instrument panel , which was just very small white circles ;

Tamiya also include what looks to be some type of radiator but I'm not sure how much of it is seen once the fuselage halves are glued together ;

Much to my supprise cutting the flaps was not difficult and I carefully scored with a No.11 blade in the hobby scalpel from both sides of the wing ;

Of late , I have been building a lot of 1/72 scale vehicles for the Korean War GB  and I've decided to add the 1/76 Airfix RAF Refuelling trucks in with the P-51D ;

I have the correct paint for both vehicles , so I will make a start on the Bedford Q.L and the larger AEC Matador tonight by cleaning up the chassie and suspension pieces . The AEC Matador was mostly used for refuelling the larger bomber type aircraft ; I'm not sure if any bombers were stationed at Leiston Field with the Mustang ???

Anyway a little more progress made today , more tomorrow .

                                  John .

  • Member since
    September 2003
  • From: Australia
Posted by Helo H-34 on Monday, October 3, 2011 5:44 PM

I just discovered that a LHS has kits listed on ebay and I saw the 1/72 Hasegawa B-24J Liberator for $44 ....

The price seemed quite good considering a lot of other on line stores were asking between $58 to $80 for the kit , so I just bought the Hasegawa B-24J .

I'm not sure if the Markings are suitable for the 8th USAAF , two decal options are provided , one for the 64BS ,43BG Philippines and the other markings for the 33BS , 22BG but no mention of where it was stationed ?

Anyway if the second decal option is not suitable does anyone know of an 1/72 B-24J aftermarket decal sheet for the 8th USAAF .

I did see the Airfix B-24 VI which comes with 8th USAAF markings but I think the kit might be a little ancient .

TIA ;

                        John .


  • Member since
    September 2003
  • From: Australia
Posted by Helo H-34 on Monday, October 3, 2011 7:21 PM

I was looking around at Hannants web site and saw a 1/72 Xtradecal decal sheet for the B-24J Liberator ...

http://www.hannants.co.uk/product/X72082

Two of the three marking options are for the 8th USAAF ,

# Kentucky Belle 446th BG

# Short Snorter 392nd BG

I ordered the sheet along with some Eduard paint masks .

Hopfully the Hasegawa kit will arrive in the next couple of days and I can make a start on her straight away .... Stick out tongue

                         John .

  • Member since
    December 2002
  • From: Bury St Edmunds, Suffolk, England
Posted by Bish on Tuesday, October 4, 2011 2:14 PM

Those hase kits are rather nice. I have built one of the J kits and have two more in the stash, though all have/will be backdated to H models. Though there is only 27 days left of the GB, you might be pushing it a bit.

On that, i know a couple of people are currently building, myself included. I think now is tha last chance to get started on a kit. Though the GB runs until the end of this month, i am going to leve it running until the end of Nov to allow any that have already started by the end of Oct to get finished. At that point, i plan on putting a build log onto the aircraft page. So hopefully everyone will be done by then.

I am a Norfolk man and i glory in being so


On the bench: Airfix 1/72nd Harrier GR.3/Fujimi 1/72nd Ju 87D-3

  • Member since
    September 2003
  • From: Australia
Posted by Helo H-34 on Wednesday, October 5, 2011 1:17 AM

Hi Bish ;

The extra month extension is grately appreciated Wink

I'm reasonably confident I can finish on time or at least be very close to finishing ; The 1/72 Hasegawa B-24 Liberator kit arrived today ...

I spent most of the day cutting and cleaning up the parts of the Bedford Q.L. Refueller ;

There's heaps of flash on a lot of the pieces , so lot's of sanding . I glued the suspension , axles and drive shafts to the chassie and everything is ready for the spraybooth .

The AEC Matador Refueller went through the same process of cleaning up all the pieces ;

And the suspension parts added to the chassie as well .

Airfix give no mention of what the cab interior colour should be , so I just went with some Gunze acrylic H-332  RAF light aircraft grey and I airbrushed those pieces this afternoon ;

So a little more progress today ....

                             John .

  • Member since
    December 2002
  • From: Bury St Edmunds, Suffolk, England
Posted by Bish on Wednesday, October 5, 2011 3:45 AM

Will be nice to see what you make of the B-24. The 3 J kits i got were all the ones with the Dragon and its tail markings. I did like the clear front section of the fuselage, but i found it didn't line up to well, both sides stuck out slightly where it joined the main fuselage. So will be inetrested to see if you have the same problem.

I am not sure on RAF interior colours for that period. Looks to be coming on well.

I am a Norfolk man and i glory in being so


On the bench: Airfix 1/72nd Harrier GR.3/Fujimi 1/72nd Ju 87D-3

  • Member since
    September 2003
  • From: Australia
Posted by Helo H-34 on Wednesday, October 5, 2011 5:21 AM

I found this photo of a Bedford Q.L refueller while browsing google images ...

Unfortunatly not an interior pic of the cab but it does look like the interior might be some type of light grey ???

                   John .


  • Member since
    December 2002
  • From: Bury St Edmunds, Suffolk, England
Posted by Bish on Wednesday, October 5, 2011 7:46 AM

It does look light grey on the inside. Any idea where that vehicle is. I assume its in a museum some where.

I am a Norfolk man and i glory in being so


On the bench: Airfix 1/72nd Harrier GR.3/Fujimi 1/72nd Ju 87D-3

  • Member since
    January 2010
  • From: Nebraska, USA
Posted by CallSignOWL on Thursday, October 6, 2011 8:08 AM

And Ive begun! I got the Mustang at the IPMS nationals this year, and discovered a nice little surprise inside: A resin cockpit set! This will be my first time doing a full replacement with resin parts, so hopefully I do it right!

Box shot:

I dont have a dremel sanding thing, so all the removal of the plastic was done with cutters, sanding sticks and a knife (much to the detriment of both my thumbs, ouch! Black Eye ) I was able to sand away the kit supplied detail and fit in the resin sidewalls. The new detail is much improved!

now, on to my most favorite step, painting the cockpit!!

------------------------

Now that I'm here, where am I??

  • Member since
    December 2002
  • From: Bury St Edmunds, Suffolk, England
Posted by Bish on Thursday, October 6, 2011 1:57 PM

Thanks OWl, sorry i missed you out. Which resin set are you useing. It doesn't look like you have thinned the cockpit walls, have you done some dry fitting

I am a Norfolk man and i glory in being so


On the bench: Airfix 1/72nd Harrier GR.3/Fujimi 1/72nd Ju 87D-3

  • Member since
    January 2010
  • From: Nebraska, USA
Posted by CallSignOWL on Thursday, October 6, 2011 2:29 PM

Bish

Thanks OWL, sorry i missed you out. Which resin set are you using. It doesn't look like you have thinned the cockpit walls, have you done some dry fitting


its a True Details set. The resin itself is really thin, and if you look closely at the kit's sidewalls you will see a ridge along where the canopy would be. After sanding down the kit details, the resin replacement lines up perfectly. Granted, I had to sand down the plastic quite a bit!

------------------------

Now that I'm here, where am I??

  • Member since
    December 2002
  • From: Bury St Edmunds, Suffolk, England
Posted by Bish on Thursday, October 6, 2011 4:55 PM

that sounds handy. I have not tried one of their sets yet, but got my eye on a P-47 one. The Aires sets i normally use need alot of sanding of the plastic, often to the point where i am close to going right through.

I am a Norfolk man and i glory in being so


On the bench: Airfix 1/72nd Harrier GR.3/Fujimi 1/72nd Ju 87D-3

  • Member since
    January 2010
  • From: Nebraska, USA
Posted by CallSignOWL on Thursday, October 6, 2011 5:03 PM

the plastic was thin, but I dont think I was in any danger of sanding through. I think that goes along way to the quality of the resin. In some places it was no thicker than card stock! I really like the looks of the resin additions....I might have to think about doing this aftermarket thing more often!! Surprise

------------------------

Now that I'm here, where am I??

JOIN OUR COMMUNITY!

Our community is FREE to join. To participate you must either login or register for an account.

SEARCH FORUMS
FREE NEWSLETTER
By signing up you may also receive reader surveys and occasional special offers. We do not sell, rent or trade our email lists. View our Privacy Policy.