SEARCH FINESCALE.COM

Enter keywords or a search phrase below:

Hunting After Dark, 2011-2012 Night Fighter Group Build

251853 views
1422 replies
1 rating 2 rating 3 rating 4 rating 5 rating
  • Member since
    June 2010
Posted by Night Fighter Nut on Sunday, August 5, 2012 3:21 PM

Excellent job there Trey.  :)

Greg, the Pe3 BIS was used mostly around Moscow during the war according to what I've read about it.  The radar unit was used on Pe2's also but this one was made more as a fighter than a converted bomber.

  • Member since
    August 2009
  • From: Borlando Fla home of the rat
Posted by TREYZX10R on Sunday, August 5, 2012 8:31 PM

Thanks NFN !

Masked and ready for some paint!

  • Member since
    August 2009
  • From: Borlando Fla home of the rat
Posted by TREYZX10R on Tuesday, August 7, 2012 9:28 PM

Cammo is fini,I used a ref pic for the rt side and went with a mix of the instruction and some geuss work for the top and port surface. Its not 100% accurate I'm sure, but it will do for my level of building.

  • Member since
    August 2009
  • From: Borlando Fla home of the rat
Posted by TREYZX10R on Friday, August 10, 2012 5:24 PM

Decals went down good after a couple of coats of future and sone micro-sol

  • Member since
    August 2009
  • From: Borlando Fla home of the rat
Posted by TREYZX10R on Saturday, August 11, 2012 3:11 PM

Wash time

I had to scratch the trim tab actuator the carpet monster got the stock one

Ready for some dull cote


  • Member since
    August 2009
  • From: Borlando Fla home of the rat
Posted by TREYZX10R on Sunday, August 12, 2012 7:07 PM

I'm calling it done,please feel free to critique

  • Member since
    January 2003
  • From: Hancock, Me USA
Posted by p38jl on Monday, August 13, 2012 8:19 AM

Nice Job !!Toast

[Photobucket]

  • Member since
    August 2009
  • From: Borlando Fla home of the rat
Posted by TREYZX10R on Monday, August 13, 2012 4:36 PM

Thank you kindly p38!

  • Member since
    October 2009
  • From: Texas
Posted by Gregbbear on Tuesday, August 21, 2012 12:43 PM

Looks great Trey!  Sorry it took me so long to update the front page. 

The engine detail is a really nice touch.  I used a picture that shows it, on the front page.  Another impressive build for sure.

Cheers,

Greg

- yat yas!


  • Member since
    August 2009
  • From: Borlando Fla home of the rat
Posted by TREYZX10R on Tuesday, August 21, 2012 8:29 PM

Thanks Greg,appreciate the kind words!

  • Member since
    March 2010
  • From: Democratic Peoples Republic of Illinois
Posted by Hercmech on Wednesday, August 22, 2012 9:30 AM

Trey...she came out fantastic. The colors really muted down and blended well in the end. Love it!!!


13151015

  • Member since
    August 2009
  • From: Borlando Fla home of the rat
Posted by TREYZX10R on Wednesday, August 22, 2012 6:41 PM

Thanks Herc!

  • Member since
    September 2003
  • From: Australia
Posted by Helo H-34 on Thursday, August 23, 2012 7:21 AM

AWESOME build Trey

  • Member since
    October 2009
  • From: Texas
Posted by Gregbbear on Thursday, August 30, 2012 7:33 PM

I finally sat down and finished my F4U-5N!  It has been drug out so long, so for reminders, it is the RoG release of the Italeri 1/72nd -5 Corsair.  It came with the NF parts, just no ordnance or decals.  No prob there.  Fuse lengthened by 1 cm, True Details seat and wheels, and a QB gunsight.  Not the greatest, but happy with it anyways.

I have finished a total of 3 whole models this year!  Dang I build slow.

Cheers,

Greg

- yat yas!


  • Member since
    December 2010
  • From: Memphis TN
Posted by Heavens Eagle on Thursday, August 30, 2012 8:05 PM

Hey Greg!

Don't feel bad about the models thing.  I have about 6 in process.  (5 started this year) and am not really close to finishing hardly any of them.  I am going to get a couple finished or at least close to, this weekend.  Unfortunately they are not even scale models.  The good thing is that I am 6 models in process this last year, the 22 years before that, Zip, Zero, Nada.

Definitely doing better, just not quite all the way there yet.

  • Member since
    August 2009
  • From: Borlando Fla home of the rat
Posted by TREYZX10R on Thursday, August 30, 2012 8:28 PM

Helo thanks!

Greg it was well worth the wait she is a beaut! I love the weathering,excellent build!

  • Member since
    August 2009
  • From: Borlando Fla home of the rat
Posted by TREYZX10R on Sunday, September 16, 2012 8:50 PM

Greg I've got a 1/48 Academy P38M Night Lightning to add next please.

The office is ready to instal,not a very detailed affair but much wo'nt be seen once its entombed in the fuse anyway

The booms are ready to mate up to the pod, the gear bay design does'nt fit well and leaves a super thick wall. I've sanded it down some but its still way thick. Also took the time to open the air scoops up and thin down the leading edges

  • Member since
    August 2009
  • From: Borlando Fla home of the rat
Posted by TREYZX10R on Friday, September 21, 2012 8:25 PM

Canopy masked and some final tweaks and its ready for some preshading

For the preshade a thinned blue followed by a really thinned red. This is really more of a tint job than preshading

Next I decided to experiment with a blue powdered pearl added over the blue/red 'preshade'. I'm hoping after a thinned application of black it will give some background deviation and prevent a monochromatic finish.

Thinned black

After wet sanding with 1500

I then went with a Urethane automotive clear thinned 20% with reducer and a few drops of black

  • Member since
    August 2009
  • From: Borlando Fla home of the rat
Posted by TREYZX10R on Sunday, September 23, 2012 5:34 PM

I've varied the sheen in the dullcote and streaked the finish,also used some pastel for the exhaust staining then dullcoted over it.


  • Member since
    June 2010
Posted by Night Fighter Nut on Sunday, September 23, 2012 8:42 PM

Well done Trey :)

  • Member since
    August 2009
  • From: Borlando Fla home of the rat
Posted by TREYZX10R on Wednesday, September 26, 2012 5:01 PM

Thanks NFN!

I'm calling this one finished,not a terrible kit but nothing to rave about either. My biggest complaint would be the gear bays and doors.Very poor fit and lack of positive location for the doors. I did scratch in a last minute landing light on the nose gear and decided to leave off the rockets and just have the bare rails. The variations in the black do'nt show well in the pics but it is there. Warts and all I'm actually pretty pleased with it,  cheers Trey

  • Member since
    October 2010
  • From: Hobart, Australia
Posted by Casper the Chihuahua on Wednesday, September 26, 2012 5:10 PM

Hey Greg, can I enter another one? I have bitten the bullet (or an AIM9) and gotten the new Trumpter F-1174A Nighthawk in 1/32. It's also cross over from the Gulf War GB.

Cheers

On the bench: A-4F 1/32 Hasegawa

Just deployed: F6F-5N Hellcat Nightfighter 1/48 Eduard

Up next: A6-E Intruder 1/48 Revell

  • Member since
    October 2009
  • From: Texas
Posted by Gregbbear on Thursday, September 27, 2012 9:30 PM

Casper, a 32nd scale nighthawk?  I'd love to see that!

Trey, great job on the Night Lightning!  Academy gives you more to work with than the old Revell it seems, but not much more!  Regardless, it came out great.  That auto clear made it look wet.  I need to try that stuff for my automotive builds.  Speaking of:  working on a SimilR Matech Ford GT from Lemans 2010 has been taking most of my time.  If you are into cars, it is a really neat kit.  A little rough around the edges, sort of like a limited run airplane, but a subject I am amazed to see in plastic. 

Here is a conglomerative pic of the state of my current NF builds:

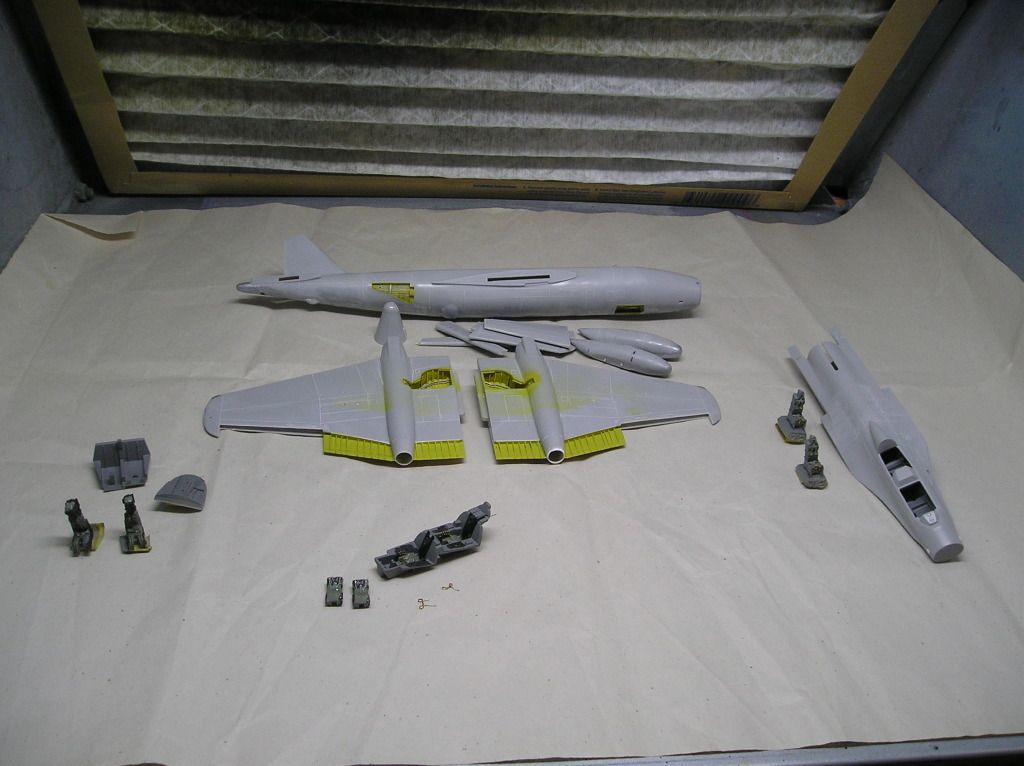
In the back is the old Airfix B-57.  It is and has been approaching final assembly.  Everytime I pick it up, I find more seam flaws etc though.

Clockwise is an Italeri F-16D "Night Falcon".  True Details seats.

Then the beginnings of a Monogram F-4D.  Casper did "Terrible Tyke" in 32nd, so here's mine for 72nd!  The markings are for a few years different, so it will be equipped somewhat different.  No loran towel rack, different load-out, but still a black bellied "Night Owl".

Last, is my conversion of a Fujimi A-6A to a A-6B Mod 1 "Iron Hand" Intruder.  After re-reading "Flight of the Intruder" last year, I have been wanting to build an "Iron Hand".  I still need to add handles and curtain to "bang seats" though.  The seats are from Super Bug.

My self imposed goal is to have all four of these across the finish line by October 31st, 2012.  Wish me luck.

Cheers,

Greg

ps- I will update the front page this weekend, and I need to come up with a "double ace" badge too.

- yat yas!


  • Member since
    October 2010
  • From: Hobart, Australia
Posted by Casper the Chihuahua on Friday, September 28, 2012 12:34 AM

Picked up my Nighthawk from my LHS today...

Box is enormous of course cos inside it's hiding.....LOLMG..........Cool

One of the biggest fuselages I've seen. Here it is next two my 1/32 Phantom II.

Great kit (despite the lack of harnesses supplied for the seat, lucky Tamiya kindly supplied spares with their F-116CJ kit) great details and a lot of pieces. Not to mention rubber tyres, metal landing gear and PE intake covers which look awesome.

I'm gonna build this one OOB, the cockpit is possibly one of the best I've seen from Trumpeter and may only need minimal scratch.

Cheers

On the bench: A-4F 1/32 Hasegawa

Just deployed: F6F-5N Hellcat Nightfighter 1/48 Eduard

Up next: A6-E Intruder 1/48 Revell

  • Member since
    June 2010
Posted by Night Fighter Nut on Saturday, September 29, 2012 10:56 AM

Very good Trey, and thanks for including the photo of the actual plane.  :)

Would like to see this nighthawk too...   Nice kit Casper.  :)

I hope to have something more up this weekend.  Job has been keeping me busier than a care to be combined with a honey do list.  Still I did complete some items.  I hope this thread continues on through next year.  Thinking of building another widow as well as a French night fighter, Potez 631.

  • Member since
    August 2009
  • From: Borlando Fla home of the rat
Posted by TREYZX10R on Sunday, September 30, 2012 5:28 PM

Greg thanks ,the GT is one of my favorites do you have a work in progress thread by chance?

Casper that thing is huge

NFN thanks!

  • Member since
    August 2009
  • From: Borlando Fla home of the rat
Posted by TREYZX10R on Monday, October 1, 2012 5:45 PM

Greg can you put me down for 2 P-61 Black Widows next please? They are the Revellogram offerings in 1/48 scale

I've built this kit before long ago as a youngster back in the 70's . I'de forgotten how aweful the kits were but its coming back real fast! Poor fit ,yep plenty of that. Flash  you want,yep a fair amout. Heat sinks? Ejector pin marks,Oh yea lots! In fact its got them a plenty and in some really bad places. Hideous rivets and raised panel lines ,oh you've opened the right box!

I've started just basically cleaning things up and straightening out the warps in the office floors. Also getting rid of the 'made in china' engraving on the bottom of the stab. The partial ejector pin marks on the fuselage seams are a nice touch,they are now filed smooth and the fit is decent now.

  • Member since
    June 2010
Posted by Night Fighter Nut on Wednesday, October 3, 2012 1:56 PM

Trey, if you need some guidance with these, let me know.  I've built a few of these kits and have learned some secrets that may help.

  • Member since
    June 2010
Posted by Night Fighter Nut on Wednesday, October 3, 2012 2:14 PM

Ok, finally found a smidgin of time to add a few photos.  The Russian night fighter is taking time but I will finish it.  I found out that I may be getting a present shortly of the Black Widow from Great Wall models.  :)

. . . . . .

The fit on this kit isn't great but I will have it fixed up.  More has been done, just don't have the photos yet.

  • Member since
    August 2009
  • From: Borlando Fla home of the rat
Posted by TREYZX10R on Wednesday, October 3, 2012 6:55 PM

NFN Thanks I watched the great job you did on yours and I'll take any help I can get! The office you're doing is looking great,the seat harness looks real sharp!

decided to trim out the inlets on the wings

doing it 4 times got a little old but I geuss I'de need to get used to that real fast with this build


Some screen added behind the inlet vanes

The set of wings ready for some finish sanding.

Test fit of the wings to the pods and it looks like some filling will be needed for sure


Booms are not looking too hateful

I'm going to need a fix for the seam going right through the mesh area. I'm thinking of cutting them out and replacing the area with some metal mesh

This area is going to need some tweaking as well

JOIN OUR COMMUNITY!

Our community is FREE to join. To participate you must either login or register for an account.

SEARCH FORUMS
FREE NEWSLETTER
By signing up you may also receive reader surveys and occasional special offers. We do not sell, rent or trade our email lists. View our Privacy Policy.