SEARCH FINESCALE.COM

Enter keywords or a search phrase below:

Automotive Group Build Nov 11, 2010 - June 10, 2011

25533 views
141 replies
1 rating 2 rating 3 rating 4 rating 5 rating
  • Member since
    September 2015
  • From: The Redwood Empire
Posted by Aaronw on Monday, November 8, 2010 1:21 AM

Participants

Aaronw - Lindberg 1/25 Dodge L-700

               - Hasegawa 1/24 1975 Lancia Stratos Safari 

taxtp - Heller 1/43 Williams FW-11B

        - Hasegawa 1/24 Porsche 962C in 'Blaupunkt' colours

       - Hasegawa 1/24 Sauber Mercedes C9 

bobbailey - TBA

MrSquid2U - 1/25 Model A roadster

Scorpiomikey - 1/25 Tamiya Tom's Toyota 84C

Gregbear - Revell 1/25 Roush Trans-Am Mustang

Suppressionfire - 1/24 AMT 55 'Mercury sedan

 acmodeler01 - 1/16 Lindberg 1910 Model T runabout

phoneguy - 1/25 Revell 1969 Pontiac GTO

cdclukey - 1/24 Revell-Monogram Bill Elliott McDonald's Ford Taurus

                - 1/24 Revell 2006 Dodge Magnum SRT

xradio81 - Revell 1/24 1964 Mustang pacecar convertable

  • Member since
    September 2015
  • From: The Redwood Empire
Posted by Aaronw on Monday, November 8, 2010 1:27 AM

Completed builds

Taxtp -  Heller 1/43 Williams FW-11B  (page 3) 

           - Hasegawa 1/24 Porsche 962C (page 5)

          - Hasegawa 1/24 Sauber Mercedes C9 (page 8)


Scorpiomikey - 1/25 Tamiya Tom's Toyota 84C (page 10)

  • Member since
    April 2005
  • From: Australia
Posted by taxtp on Monday, November 8, 2010 3:06 AM

Hi Aaron,

A big thank you for getting this GB under way.I'll support it as best I can.

I'm building a Heller 1/43 Williams FW-11B for the Weekend Madness GB this coming weekend, if you want to allow crossovers, please feel free to include it.

I also have a Hasegawa 1/24 Porsche 962C in 'Blaupunkt' colours. It's started, the body is sprayed and the decals are on. There is no clear coat/polishing, the inside of the body is not painted, the chassis is not painted, the cockpit details are not done, although basic colours are sprayed, the wheels are primed only, tyre markings not done, gearbox not done, assembly not done etc. I reckon there are several weeks, probably a month to go if I were to concentrate on it. It will take longer because I really need a kick in the pants to get it moving.

Once again, if you feel it meets the criteria, please feel free to include it.

I'll also commit to an unstarted build, but I have to think about the subject some more before naming it.

There you go, three entries already :)

Cheers

Tony

I'm just taking it one GB at a time.

  • Member since
    November 2003
  • From: Nashville, TN area
Posted by bobbaily on Monday, November 8, 2010 5:49 AM

Good morning Aaron.  I'm in-not sure what I'll be building and when I'll start, but I'm in......

One question-are you going to allow 'dual group build' participation?  Reason I ask is that I will probably do something automotive for the upcoming Weekend Madness III GB this weekend.  Either way, I'm good-I plan on building something for this GB too-too many kits in the stash.....

Bob


  • Member since
    March 2007
  • From: Atlanta, Ga.
Posted by MrSquid2U on Monday, November 8, 2010 6:12 AM

Aaron,

 Glad to see you pick this up and run with it! As I mentioned already I have a started project and had been waiting for the "stalled" GB to pick back up? Because of that I've completed a lot already but still have plenty of work to do.

For your consideration to allow entry:

/forums/t/132174.aspx


  • Member since
    September 2015
  • From: The Redwood Empire
Posted by Aaronw on Monday, November 8, 2010 10:18 AM

Crossovers are ok, just keep up with both sides.

Both of the started builds look ok, to me. I have a pair of Lancia Stratos rally cars in about the same place as the Porsche and know the body shell for many race cars can actually be a fairly minor piece as far as construction goes. With all the scratchbuilding being done the rat rod clearly has some good work to go before being done. 

If you are doing a started project and have WIP photos consider reposting some or all of them with a summary here to help people follow the project. That will also make you look like a really fast builder. Big Smile 

I like to tie the start and end of GBs to related historical dates, but as far as I am concerned these are soft dates. Anyone who really wants to get to work before the 11th can, and I won't release the flying monkeys on any slackers until at least June 16th. 

  • Member since
    March 2007
  • From: Atlanta, Ga.
Posted by MrSquid2U on Monday, November 8, 2010 10:34 AM

Aaron,

 Thank you (the Rat Rod) and now I just wanna make sure- post the WIP shots here in this very thread? I understand that in my case for instance you'd like to see a condensed version in one post for instance. So, is that correct?

Thanks again,

Don


  • Member since
    September 2015
  • From: The Redwood Empire
Posted by Aaronw on Monday, November 8, 2010 12:55 PM

Yes, show your work in this thread, but I think it would be fine for people to run a WIP thread (or in your case continue) in the auto section as well if they want to. You don't need to do a complete copy of your WIP but I think it would be nice to at least see a post with a good summary of your progress to this point, as if you havd done it as part of the GB.

  • Member since
    March 2007
  • From: Atlanta, Ga.
Posted by MrSquid2U on Monday, November 8, 2010 4:33 PM

29 Model A Roadster Pickup by Revell


Here's a summary of my WIP (see autos forum) so far:


Inspired by the current Rat Rod trend I realized that I was waxing nostalgic for the way Hot Rods used to be built. The way you'd see them before the billet accessories/wheels , total mail order process or ultra high dollar shop built projects that became prevalent from the 90's on. I had a 31 Model A  myself though it never went beyond total beater stage.

So work started by channeling the body down over the frame with new floors, a shortened bed and a modified optional 'track nose' up front.

An "Ardun" which is an OHV conversion for the venerable Ford Flathead V-8 was sourced from the Revell '50 Ford P/U kit and since I still wanted to use that engine for something else I set about to cast up a copy in resin.

Painted and detailed.

While a real wood bed floor was made.

And a "tuck-n-roll" interior fashioned from styrene with gauge bezels inset to the dash.

Up front since the car is now lowered and many things moved around the kit steerable suspension had some components remade.

To get an idea of where it's heading.


More details can be seen over in the autos forum where I'll post my lil baby step pictures. I'll update here as progress adds up.


Glad to be a part of the GB and I look forward to seeing others! Hope you've enjoyed this build so far and comments/critique are welcome.


Don


  • Member since
    April 2005
  • From: Australia
Posted by taxtp on Monday, November 8, 2010 6:12 PM

Don, that's looking like quite an involved project. I'll bet I learn a thing or two by the time you've got through it.

Having read that we can start early, I've detailed out the BBS wheels for my Porsche. I pinched these from another kit (Revell Jagermeister 956) as the car I am depicting raced with BBS wheels and Dunlop tyres at the Silverstone 1000 in 1988. All other photos of these Joest Porsches seem to show different wheels and Good Years. I've also had to get creative with a couple of decals to match the change in tyre usage.

Cheers

Tony

I'm just taking it one GB at a time.

  • Member since
    March 2010
  • From: New Zealand
Posted by Scorpiomikey on Monday, November 8, 2010 7:54 PM

ummm, hi guys, whats a good kit to start with? Ive been building aircraft for a while now, always brush painted them. I did build a motorbike once which was fun.

So yeah im just wondering what a good kit to start with would be.

Interests include.

20's-30's cards (art deco stuff)

late 50's early 60's muscle.

Modern AGM stuff.

"I am a leaf on the wind, watch how i soar"

Recite the litanies, fire up the Gellar field, a poo storm is coming Hmm 

My signature

Check out my blog here.

  • Member since
    October 2009
  • From: Texas
Posted by Gregbbear on Monday, November 8, 2010 9:09 PM

Aaron, here is my entry for this GB:

It is the Revell 1//25 Roush Trans-Am Mustang sponsored by Whistler Radar Detectors.  '89 season I think.

I havent' done much as you can see.  The pan and the cage were painted by a previous owner (parts actually came from a Camaro), without having removed mold lines, flash etc.  I plan on adding some AM parts, mainly just plumbing and wiring.

Mike, when you say, AGM, do you mean Australian General Motors?  Just a guess.  If so, too bad, I just got rid of a Pontiac GTO, essentially a Holden.  Seemed like a nice kit, I just knew I wasn't going to build it. 

Thanks Aaron.

Greg

- yat yas!


  • Member since
    September 2015
  • From: The Redwood Empire
Posted by Aaronw on Monday, November 8, 2010 9:21 PM

I'm more of a truck guy so I can recommend the following truck kits (most of these should be currently available)

AMT has a nice 1925 Model T (3 in 1) kit, it can be made into a pickup, or car, and has several hotrod options (says 3 in 1 but actually offers many more options). I've almost finished one as a pickup and it is a nice kit with very few problems.

Lindberg has a good 1934 Ford truck, it can be done as a pickup, flatbed / stake side, tow truck and includes several custom options. Again a nice trouble free kit.

Revell has a 1929 Ford truck, a 1937 Ford truck, a 1941 Chevy truck and a 1950 Ford truck. All of these are really nice kits that offer many options from stock to heavily customized.


If you do ebay Monogram did several 1930s luxury cars, Packards, Duesenbergs, Rolls Royce etc. I haven't built mine yet, but they look good and I have heard mostly positive things about them. They have been out of production for many years but they are not that expensive, I got mine for about $20 each.

Heller did some European cars from the same period, and as far as I know they are pretty good kits. I have a Heller Bentley 4.5 liter and it looks like a very nce but also complicated (lots of small bits), so it might not be the best first kit. I think Heller just re-issued the Bentley though, so it should be fairly easy to find if it appeals to you.

I don't have any personal experience with these but earlier this year I asked for some muscle car recommendations on the Model Cars Magazine forum and I got the following list:

Revell ’69 Camaro Z/28 (includes SS and RS options)

Revell ’67 Chevelle SS396

AMT ’69 Chevelle

AMT ’70 Camaro, Baldwin Motion or Z28

AMT ’66 Nova

AMT ’69 Oldsmobile 442

Lindberg ’66 Chevelle

Revell ’68 Firebird

Monogram ’68-69 GTO

Monogram ’70 Trans am

Revell ’68 Charger R/T


Brush painting may prove to be a problem, I use a brush for a lot of my aircraft, but almost always use a spray can on the cars / trucks. They generally have large flat surfaces that show off any imperfections. If you are going to use a brush, I'd really suggest sticking with an early auto since they are smaller and are a bit more brush friendly.

  • Member since
    March 2010
  • From: New Zealand
Posted by Scorpiomikey on Monday, November 8, 2010 9:48 PM

I was meaning this kinda car

AMG?

Ill keep those in mind, I know squadron has (had?) an auburn boattail roadster that i want. Never dealt with squadron though.

"I am a leaf on the wind, watch how i soar"

Recite the litanies, fire up the Gellar field, a poo storm is coming Hmm 

My signature

Check out my blog here.

  • Member since
    September 2015
  • From: The Redwood Empire
Posted by Aaronw on Monday, November 8, 2010 10:32 PM

Tamiya does quite a few race car kits, I've only built one, an Alpine Renault rally car but it was one of the nicest kits I've ever built. Of course that is Tamiya's reputation so kind of hard to go wrong there. 

  • Member since
    October 2009
  • From: Texas
Posted by Gregbbear on Tuesday, November 9, 2010 3:41 PM

AMG, not AGM... Ah ha.  Tamiya and Revell Germany for those.  If you don't want to paint the body, some cars still come in colored plastic.  If you polish it out, you can get good results.

Cheers,

Greg

- yat yas!


  • Member since
    March 2010
  • From: New Zealand
Posted by Scorpiomikey on Tuesday, November 9, 2010 3:46 PM

Cheers greg, the racing circuits called the DTM's? Or is that something different altogether?

"I am a leaf on the wind, watch how i soar"

Recite the litanies, fire up the Gellar field, a poo storm is coming Hmm 

My signature

Check out my blog here.

  • Member since
    April 2005
  • From: Australia
Posted by taxtp on Tuesday, November 9, 2010 5:09 PM

Hi Mike,

I think DTM is the German Touring Car Championship.

Cheers

Tony


I'm just taking it one GB at a time.

  • Member since
    April 2005
  • From: Australia
Posted by taxtp on Tuesday, November 9, 2010 5:11 PM

I haven't worked on the Porsche for months. Since joining the GB, I've done the wheels, and then yesterday sprayed the chassis. Maybe it's the foot in the pants that I needed.

Cheers

Tony

I'm just taking it one GB at a time.

  • Member since
    March 2007
  • From: Atlanta, Ga.
Posted by MrSquid2U on Tuesday, November 9, 2010 5:23 PM

taxtp

I haven't worked on the Porsche for months. Since joining the GB, I've done the wheels, and then yesterday sprayed the chassis. Maybe it's the foot in the pants that I needed.

Cheers

Tony


And those wheels look nice! Crisp and clean. How did you get the separation between colors? Masking, templates. what? I've handbrushed to do that but your finish looks sprayed?

You keep working or we'll start kicking again.Stick out tongue


  • Member since
    April 2005
  • From: Australia
Posted by taxtp on Tuesday, November 9, 2010 7:44 PM

I just sprayed them with Tamiya Bare Metal silver from the aerosol can. The gold colour is also a Tamiya spray can, but this decanted into a bottle lid and brush painted. There is a raised line on the wheels that makes the demarcation really simple, which is my good fortune. The reason I decanted the gold and used that rather than another brand of paint is that I know from experience that it doesn't show brush strokes, and has small metallic particle size.

Cheers

Tony

I'm just taking it one GB at a time.

  • Member since
    April 2005
  • From: Australia
Posted by taxtp on Wednesday, November 10, 2010 4:54 AM

Here's the painted chassis. I didn't bother to obliterate the Hasegawa logo, as it's completely inaccessible once the final assembly is done.

I think that keeps the kicking away for another day...

Cheers

Tony

I'm just taking it one GB at a time.

  • Member since
    March 2007
  • From: Atlanta, Ga.
Posted by MrSquid2U on Wednesday, November 10, 2010 5:16 AM

While the Satin Black looks nice I am not sure that will keep the kickers at bay? Either do more or watch your back side!Wink


  • Member since
    September 2007
  • From: Truro Nova Scotia, Canada
Posted by SuppressionFire on Wednesday, November 10, 2010 6:08 AM

Sounds like a fun GB!

I will post WIP's and enter my AMT 1/24 scale 55 'Mercury sedan. I will get them up on Nov. 11 (Rememberance day in Canada) Then there will be a delay in my start as I have current project to wrap up...Surprise 

Cool badge BTW~ Henry Ford said 'You can buy a car in any color...as long as it was black!'

http://i6.photobucket.com/albums/y211/razordws/GB%20Badges/WMIIIGBsmall.jpg


  • Member since
    April 2005
  • From: Australia
Posted by taxtp on Wednesday, November 10, 2010 6:47 AM

Anything that gives you a sore backside is bad...

so, I've bowed to the pressure.

Checking the one photo I have of this car, it doesn't show any tyre markings, although the photo was obviously taken with the car in motion, the wheel may have been rotating too quickly for the shutter speed of the camera. Anyway, based on this I've left them off. I've stuffed the brake rotors into the wheels and attached the wheels to the chassis. It's interesting to note that Hasegawa have done reasonable brake rotors, but there is no sign of a caliper anywhere. With these wheels, it's invisible anyway. I've also attached the rear tow away hook.

I was actually quite proud of the rotors. I used Studio 27 etched metal liners for them, and scored them in a rotary way to represent brake wear. A nice wash and it all came out well, but you can't see them now.

I've also done the headlight inserts tonight. When I joined this GB, they were just flat black. I've finished the detail work on them although you may still see the gleam of wet Superset around the Shell decals.

I've also primed some Studio 27 etched seat belts, as they would be obvious if missing. They're in the garage drying, so photos next time.

Welcome to the GB Suppressionfire !

Cheers

Tony

I'm just taking it one GB at a time.

  • Member since
    March 2007
  • From: Atlanta, Ga.
Posted by MrSquid2U on Wednesday, November 10, 2010 9:23 AM

Way to keep ahead of the kicks Tony!

I had to laugh when you said you were proud of the rotors which now don't show!Wink Hey, but the rest is looking good!


  • Member since
    April 2005
  • From: Australia
Posted by taxtp on Wednesday, November 10, 2010 6:49 PM

I actually test fitted the rotors before I did any work on them, and realised that they wouldn't show. However, I thought it would be a good opportunity to refine my technique on them.

The only feedback I could give is that the Studio 27 etched metal is very hard, and difficult to score (or bend). Brass would be easier. I'm sure that annealing it would make it easier to bend, I'm not so sure about scoring though. Maybe I should have tried that too !

After my last post, I went to work on the steering wheel and dashboard. Bitter experience tells me that the dash is very difficult to see once the car is 'closed up', so I've just gone as per the kit instructions, no additional effort expended !

I'll take some pics later on today.

I've also given the body a wash in preparation for giving it some clear coats tonight. I'll use the time I spend on the Weekend Madness GB this weekend to let it harden.

Cheers

Tony

I'm just taking it one GB at a time.

  • Member since
    September 2015
  • From: The Redwood Empire
Posted by Aaronw on Wednesday, November 10, 2010 7:23 PM

There is some nice work already going. I did get some primer on the L-700's cab yesterday, but tommorrow will be the first real day of working on the kit. I did take some photos before doing anything to the kit, I just haven't had the chance to download them yet. 

SuppressionFire

Sounds like a fun GB!

I will post WIP's and enter my AMT 1/24 scale 55 'Mercury sedan. I will get them up on Nov. 11 (Rememberance day in Canada) Then there will be a delay in my start as I have current project to wrap up...Surprise 

Cool badge BTW~ Henry Ford said 'You can buy a car in any color...as long as it was black!'


Glad to see you decided to join us, I'll add you to the front page.

I know you mentioned in the other post about being unsure of the time frame. The end date is soft  so there is a little wiggle room. If this is still going strong as we approach June, I would be fine with an extension or even a part 2. I just don't want to be on the hook runninng the thing for a full year if it peters out in a few months. So far it looks like it is off to a good start. Toast

  • Member since
    April 2005
  • From: Australia
Posted by taxtp on Thursday, November 11, 2010 6:50 AM

Hi Everyone,

Tonight's update : I've gloss coated the body, this will now be left to dry over the weekend before I touch it again.

Here's a photo of the completed dashboard and steering wheel.

I might go quiet on this build for a couple of days as I do another kit for the weekend Madness GB, but since it's a car I'll post here too :)

Cheers

Tony

I'm just taking it one GB at a time.

  • Member since
    September 2007
  • From: Truro Nova Scotia, Canada
Posted by SuppressionFire on Thursday, November 11, 2010 7:56 AM

Actually contest season starts around May out here so its a good motivator for me to 'git R done buddy!'

I haven't built a model car sense I was a kid and am looking forward to becoming 'crazy about my Mercury'

Have a quick errand to run and will get the started pictures up sometime today. (need sugar for my coffee)Coffee

So yes sign me up!

Jason

http://i6.photobucket.com/albums/y211/razordws/GB%20Badges/WMIIIGBsmall.jpg


  • Member since
    January 2008
  • From: Tulsa, OK
Posted by acmodeler01 on Thursday, November 11, 2010 9:37 AM

I'll join in also. I have Lindberg's 1/16 scale 1910 Model T Runabout that I'm planning to build for a coworker. More appropriate than I first thought, considering the GB badge.

  • Member since
    September 2007
  • From: Truro Nova Scotia, Canada
Posted by SuppressionFire on Friday, November 12, 2010 5:48 AM

Here are the pictures of what has been started, have another project to complete before getting into this one.

Turned the pullies on a variable speed drill, cut apart the motors from transmissions, detailed the bell housing of the transmission visible in the motor compartment. (wind up watches have the best 'gears' for scratch building) Chopped the top!

That is it until I officially get started on this one!

Jason

http://i6.photobucket.com/albums/y211/razordws/GB%20Badges/WMIIIGBsmall.jpg


  • Member since
    March 2007
  • From: Atlanta, Ga.
Posted by MrSquid2U on Friday, November 12, 2010 6:02 AM

^^^

"S,F,"


Oh, I can tell this will be cool! You're off to a great start and I hope to see more soon.Toast


  • Member since
    March 2010
  • From: New Zealand
Posted by Scorpiomikey on Friday, November 12, 2010 1:49 PM

Ok, i picked up the Tamiya 1/24 Tom's Toyota 84C

Looking forward to it, already got the engine almost built. Going out to buy more paint today.

"I am a leaf on the wind, watch how i soar"

Recite the litanies, fire up the Gellar field, a poo storm is coming Hmm 

My signature

Check out my blog here.

  • Member since
    April 2005
  • From: Australia
Posted by taxtp on Friday, November 12, 2010 2:02 PM

Jason - that is some impressive work, I'll be waiting for you to pick it up again.

Mike - That is a good choice. Those Tamiya Group C cars are outstanding kits. I hope it's the first of many.

Cheers

Tony

I'm just taking it one GB at a time.

  • Member since
    September 2015
  • From: The Redwood Empire
Posted by Aaronw on Friday, November 12, 2010 11:37 PM

I've got the front page updated, if I've missed anyone let me know and I'll fix it.


I'm doing Lindberg's Dodge L-700, which was originally an IMC kit released in 1970. It comes as a semi tractor but I'll be building it as a stake bed using parts from a Ford C-600 kit. I've got 3 of these trucks now because Lindberg packages them with their trailer kits, and I bought one when they first brought it out all by itself. Anyway I figured I should build one, so I could get some ideas for the other kits. So far I'm finding it a bit fidly but not too bad if I take my time with it.


I've got the cab parts primered and have almost finished the engine.


  • Member since
    March 2007
  • From: Atlanta, Ga.
Posted by MrSquid2U on Saturday, November 13, 2010 1:04 PM

^^^


Ooooh! I love that truck! Eyed it when I was growing up but never bought it and only a while ago I picked up the 'new' one! I'll be watching your build!Cool


  • Member since
    April 2005
  • From: Australia
Posted by taxtp on Saturday, November 13, 2010 4:55 PM

Hi Everyone,

I'll look forward to seeing that truck Aaron.

I thought I'd post some progress photos of the 1/43 Heller Williams Honda FW-11B that I'm racing through over at the Weekend Madness III GB.

Hope you like 'em.

The starting point:

First progress photo:

Using a photocopy of the decals to work out where to mask :

2nd progress photo:

All paints used are Tamiya aerosol. There is some risk that the masking will pull the paint up with it when it comes off. On the plus side, the decals are excellent in this otherwise rather poor kit. I think it was aimed at a very young demographic.

Cheers

Tony

I'm just taking it one GB at a time.

  • Member since
    November 2003
  • From: Nashville, TN area
Posted by bobbaily on Saturday, November 13, 2010 6:14 PM

Hey all.  Although this isn't may 'official' build for this GB, just thought I'd post it as a 'warm up' for me.  The kit is the AMT 1949 Mercury.  Good kit. lots of options but fit is a bit challenging.....especially for a Weekend GB.

Here's the pics of where I'm at.  I'm calling it finished although I didn't do the 'dot filtering' yet.  Maybe another day.  My intent is to use this kit as a test bed for weathering.  The kit itself (AMT) wasn't bad....plenty of detail....great  426 wedge engine and a flat head with Offy heads & dual  carb intake.  However, fit was an issue in more than a couple of places.  Given more time.....and skill...it could be turned into a great build. 

Here's the interior & engine after an artist oil wash

Here's the finished build.  I'll try to take the Merc' outside tomorrow and get some better pics:

Not sure what my official entry is going to be....right now it's between Tom McEwen's funny car or the '32 Ford sedan that I started for the Weekend Madness III GB.  I'll decide soon and hopefully get started after the Thanksgiving holidays.....travel and all.....

Cheers

edit-Jason-I just noticed that you're building the same kit.  I like the fact that you have chopped the top.  Are you going the Rat Rod route?  And the engine detail is outstanding.  Looking forward to seeing more progress pics.

Bob


  • Member since
    March 2010
  • From: New Zealand
Posted by Scorpiomikey on Saturday, November 13, 2010 8:29 PM

Nice builds guys, this being my first car kit, i must say im enjoying the ease in which i can get to all the fiddly bits to paint. However im really not used to working in such size. Theres alot of surface area to cover.

Question, whats the best way to get rid of the mold seam on the tired? I tried hooking them up to the dremmel and holding them against some sandpaper and it kinda worked, but made a hell of a mess.

Heres a couple shots of the engine so far.

Ive got a little bit of tidying up to do, but its almost done.

"I am a leaf on the wind, watch how i soar"

Recite the litanies, fire up the Gellar field, a poo storm is coming Hmm 

My signature

Check out my blog here.

  • Member since
    April 2005
  • From: Australia
Posted by taxtp on Saturday, November 13, 2010 10:09 PM

Good work on the Toyota Mike.

I've very taken with that Merc, it's come out better than I thought possible in a weekend. I really like the 'Mexican blanket' seats too.

Cheers

Tony

I'm just taking it one GB at a time.

  • Member since
    April 2005
  • From: Australia
Posted by taxtp on Sunday, November 14, 2010 4:17 AM

Here is another couple of progress picks of the Heller 1/43 Williams Honda FW-11B from 1987 that I've been on this weekend.

I love the Tamiya aerosol paints, and the highlight of the kit is the decals, which are really good even after 20 dusty years in my garage.

The low point is the quality of the molding, it really is very, very basic. However it's good for a quick build.

It would be dead easy to convert one of these into the FW-11, which was raced throughout 1986. If I come across another one at the right price, I might be tempted.

Cheers

Tony

I'm just taking it one GB at a time.

  • Member since
    April 2005
  • From: Australia
Posted by taxtp on Sunday, November 14, 2010 5:50 AM

...and now for some finished shots. This model is far from perfect, but it's been fun.

Cheers

Tony

I'm just taking it one GB at a time.

  • Member since
    April 2005
  • From: Australia
Posted by taxtp on Monday, November 15, 2010 7:26 AM

I'm back onto the Porsche 962C...and tonight's meagre update consists of me cleaning up my modelling cupboard after visiting a friend who has a super set-up. Then I've completed the thankless task of painting the inside of the body shell with black. It's a necessity, but I haven' bothered with pics.

This thing is actually not too far off being finished, believe it or not. Completion this week is a distinct possibility as most of the remaining work is the seat assembly, windscreen and windows, then final assembly.

Cheers

Tony

I'm just taking it one GB at a time.

  • Member since
    October 2009
  • From: Texas
Posted by Gregbbear on Monday, November 15, 2010 2:53 PM

Good stuff so far!  I, too am a fan of the Mexican blanket.  Those are some nice weekend builds too.  All I've been doing is lurking so far.  I should get some done on the Mustang this week.  I have such a back-log of projects just waiting on some paint booth time, including this one, that desperately needs primer (I hate red plastic!).

Cheers,

Greg

- yat yas!


  • Member since
    April 2005
  • From: Australia
Posted by taxtp on Tuesday, November 16, 2010 6:17 PM

I have the Whistler Mustang in my stash, so I'll be very interested to see how you progress and what you find.

One of the things I keep going back to is building Triumph road cars, for the models that are available in plastic at least. Now, the Triumph TR-8 cam with Tartan seat covers. I haven't even tried tartan when I'm painting figures. If you could please give some more details of your technique, I might be able to utilise the same.

As far as my Porsche 962C goes, I had a model club meeting last night so all I've done is attach the Studio etched seat belt to the seat, after priming and painting it flat red, and adding some brand decals from the the spare decals folder.

Tonight I hope to finish the headlight assembly, mask and spray the edges of the windscreen and windows, and if I'm going really well mask and spray the cockpit back and floor assembly.

Once all of this is done, it's final assembly time.

Cheers

Tony

I'm just taking it one GB at a time.

  • Member since
    November 2003
  • From: Nashville, TN area
Posted by bobbaily on Tuesday, November 16, 2010 7:30 PM

Tony-I'm not sure if your question about the seat cover was directed to me, but if it was......

I saw agentg take a piece of paper, use some ink markers and make a blanket for his rat rod build.  I cheated-Google'd 'Indian blanket' and found a picture of six different ones.  Printed, trimmed and dipped in white glue/water mixture.  Next time I'll use more glue-started coming up as it dries.  Or try some other type of adhesive....maybe rubber cement?

If it wasn't directed to me,....never mind.....

Bob


  • Member since
    April 2005
  • From: Australia
Posted by taxtp on Tuesday, November 16, 2010 11:01 PM

Hi Bob,

That was rude of me, my apologies. Yes I was asking for your help, and thank you for providing it. The only problem I see is that I couldn't find the right pattern of tartan last time I googled it, however I'll give it anothr go when I get this one out of the stash.

I thought that was a really nice model, BTW.

Cheers

Tony


I'm just taking it one GB at a time.

  • Member since
    November 2003
  • From: Nashville, TN area
Posted by bobbaily on Wednesday, November 17, 2010 6:03 AM

Tony,

No need for apologize.  And thank you for the kind words regarding the Merc.  With a bit more time and attention (and skill) that kit could be made into a really nice model.

Good luck on finding the right pattern.

Bob


  • Member since
    April 2005
  • From: Australia
Posted by taxtp on Thursday, November 18, 2010 12:10 AM

Quick update on the 962C (from work)

I've completed the headlight assembly, attached the dashboard to the body, done the same with the fuel filler caps and front tow hook.

I need to get myself into the mood for masking the clear bits, hopefully tonight.

If I can sneak in a good night with masking and spraying, then completion by this weekend is a big possibility.

Cheers

Tony

I'm just taking it one GB at a time.

  • Member since
    September 2015
  • From: The Redwood Empire
Posted by Aaronw on Sunday, November 21, 2010 12:06 AM

I had to take a little break following the Weekend madness build, but I'm back to work on the Dodge. I foiled the logos then painted the cab. Once the paint has cured I will lightly sand the paint away from the logos leaving the chrome. I've decided to build it as a National Park Service stake side. In the 1960s through the mid 70s the Park Service used an odd light green color on most of its vehicles. The green is similar but a lighter shade of green than that used by the US Forest Service. I've found Krylon Celery is a good match this green. 

  • Member since
    March 2007
  • From: Atlanta, Ga.
Posted by MrSquid2U on Sunday, November 21, 2010 12:48 AM

Just a catch-up from my last update:


  • Member since
    September 2015
  • From: The Redwood Empire
Posted by Aaronw on Sunday, November 21, 2010 11:47 AM

What are the tiny bits you have arranged like a smiley face? I assume they go into the wheel and brake assembly which follows but can't make them out in there.


Nice progress so far, I'm typically a "if I can't see it I'm not doing it" builder but I do enjoy watching people go hog wild on the details.  

  • Member since
    March 2007
  • From: Atlanta, Ga.
Posted by MrSquid2U on Sunday, November 21, 2010 12:41 PM

GeekedAaron,

 The "smiley bits" are components to the shocks on the front end. I can agree with ,"Out of sight, out of mind". But on this lil roadster pickup those things are all exposed.Wink


  • Member since
    October 2009
  • From: Texas
Posted by Gregbbear on Sunday, November 21, 2010 1:33 PM

That is some cool detail that you are adding!

Aaron, I like the forrest truck idea.  That ought to be pretty interesting.

I am half way through a 96 hour stretch at work, and I forgot my darn car!  The model one, that is, otherwise I'd still be walking!  I'm still following, even if I'm not building at the moment though.

Cheers,

Greg

- yat yas!


  • Member since
    April 2005
  • From: Australia
Posted by taxtp on Monday, November 22, 2010 11:20 PM

I like both of those updates, the truck will be good Aaron. That is some serious detailing, done the hard way without aftermarket, Mr Squid.

I've found that there is more work than I thought to complete my Porsche. I'd forgotten that the banner across the top of the windscreen is different for this car, so I've used a number of decals from other sources to achieve it.

It's getting close now, but probably a couple more days are required. I'm resisting posting a photo until it is finished.

Regards

Tony

I'm just taking it one GB at a time.

  • Member since
    March 2010
  • From: New Zealand
Posted by Scorpiomikey on Tuesday, November 23, 2010 2:01 PM

Nice updates everyone, sorry for the lack of updates on my part.

Progress so far, the chassis is pretty much done. Il now working on the body shell which is being a PITA cos of the red. (red and white dont mix well together) Ill get there tho, and ill post photos this weekend.

"I am a leaf on the wind, watch how i soar"

Recite the litanies, fire up the Gellar field, a poo storm is coming Hmm 

My signature

Check out my blog here.

  • Member since
    March 2007
  • From: Atlanta, Ga.
Posted by MrSquid2U on Tuesday, November 23, 2010 4:29 PM

Tony?

 Do I hear those boots sneaking up to prod you to post pics?Devil

Thanks gents for the kind words. I do appreciate them and should have pics later tonite.Hmm


BTW: Aaron, I wanted to mention that growing up in the Bay Area IIRC PacBell although I forget what it was called then, used lil utility vans painted kinda close to that green of yours? Too Cool!


  • Member since
    April 2005
  • From: Australia
Posted by taxtp on Tuesday, November 23, 2010 5:46 PM

Mr Squid,

I am acutely conscious of the the boots and have been continuing work.

To be honest, I could put up a photo now and call it finished. However there are three small items still requiring some effort.

1. Add an antenna from piano wire.

2. Black wash or marker pen in the panel lines

3. I noticed the other night that this car carried some little finlets at front corners, as did many other 962Cs. The Studio 27 photo etched set actually has them. They need to be white. One side is primed and sprayed, the other side should get done tonight. Then I have to fix them to the body, which may be a little delicate, so I'll do it as the very last thing.

Cheers

Tony

I'm just taking it one GB at a time.

  • Member since
    April 2005
  • From: Australia
Posted by taxtp on Wednesday, November 24, 2010 7:07 AM

Well here it is, a 1/24 Hasegawa Joest Racing Porsche 962C. It's got Studio 27 decals, modified to represent a 962C short tail as raced at the Silverstone 1000 in 1988. The Studio 27 set is for a long tail, as raced at Le Mans in the same year. The tyre sponsorship is Dunlop ratehr than Goodyear, these decals were sourced from other kits. The driver line up is different, so I made these decals using Microsoft Word and some clear decal paper. The banner across the windscreen is made from red decal stock and some lettering I pinched from another kit. The wheels are from another kit too. I've also added an antenna, some racing harnesses, the little fins on the front corners of the car, but that is about it. The only other additional work was to polish out the windscreen, as it was too scratched.

Aaron - I've completed my two builds listed on page one, I'll come back with another one shortly.

Cheers

Tony

and here is one of the Group C section of the cabinet

I'm just taking it one GB at a time.

  • Member since
    November 2003
  • From: Nashville, TN area
Posted by bobbaily on Wednesday, November 24, 2010 7:39 AM

Very nice build Tony.  Good work.

Bob


  • Member since
    March 2007
  • From: Atlanta, Ga.
Posted by MrSquid2U on Wednesday, November 24, 2010 1:08 PM

Tony,

 That is an excellent CLEAN build there! Mighty impressive collection (that section?) too. I think you are safe from the "boots" now!Stick out tongue


  • Member since
    April 2005
  • From: Australia
Posted by taxtp on Wednesday, November 24, 2010 2:23 PM

Thanks very much Bob and Mr Squid.

I'm just taking it one GB at a time.

  • Member since
    March 2007
  • From: Atlanta, Ga.
Posted by MrSquid2U on Thursday, November 25, 2010 4:15 PM

Tony,

 I came back just to appreciate your Porsche build again and better soak in the details and mods you made.


It is truly one clean, fine build.


I'm envious- wish I had one that good.Toast


  • Member since
    April 2005
  • From: Australia
Posted by taxtp on Thursday, November 25, 2010 11:02 PM

HI Mr Squid,

Thank you very much for your kind words.

Actually I set out at the start of this year to build a succession of car kits, just so that I could refine my techniques and then establish some consistency in my finishing approach and therefore results.

That Porsche is the 9th car kit I've completed this year, and it's probably starting to reflect what I was trying to achieve, although, to be honest, it is far from perfect, and is only a curbside.

It's interesting that I've been able to finish 9 this year, but I've only got 27 in total (including these 9) since I started building car kits in 1990. That being said, there have been a few figures, aircraft, ships, AFVs, and other assorted stuff too.

If you look at the photo of my car cabinet above,  one of the Silk Cut Jaguars near to the Porsche was built in 1990, all of the other Group C cars have been completed this year.

I'm going to decide on my next car build in the next few days. At the moment I am leaning towards another Group C car, or otherwise a quick build of a Heller 1/43 F1 Car. They did five of them originally, but I've worked out that you can actually complete 9 different cars by doing some simple conversions. I've got some of these planned in 1/20 (for example I converted a Lotus 99T to a 98T a little while ago) but it would be fun to knock some of these over as quick little 1/43 builds. The detail in these kits is so poor that  it's about all they're good for.

Cheers

Tony

I'm just taking it one GB at a time.

  • Member since
    April 2005
  • From: Australia
Posted by taxtp on Friday, November 26, 2010 10:59 PM

Here I go again, this time it's Hasegawa Sauber MercedesC9 from the 1989 WSPC season, the first 'Silver Arrow' after their 33 year exile from motor racing. The team went on to win seven out of eight races and took the constructors and drivers championships with Jean-Louis Schlesser crowned champion.

The kit decals show it as raced at Suzuka in the first race of the season, that's good enough for me. The race was won by Schlesser and Mauro Baldi in the Mercedes.

Here's what you get:

Progress photos to come once I've started.

Cheers

Tony

I'm just taking it one GB at a time.

  • Member since
    April 2005
  • From: Australia
Posted by taxtp on Wednesday, December 1, 2010 5:51 AM

Hi Everyone,

I've spent several days preparing the body and chassis for primer. Apart from a lot of cleaning up of ejection marks, sinkholes, rough edges and the usual stuff, I've fixed in some side panels, added the rear suspension and a few other odds and sods to the chassis, and fared in the rear panels of the body, which just didn't fit too well. Cyanoacrylate is used exclusively as the filler. The body has already received it's first coat of Tamiya grey primer, after I took these photos, but it's still wet.

The ejection pin marks and Hasegawa logo still visible on the last photo of the chassis are completely hidden once the model is put together, so I just haven't bothered.

cheers

Tony

I'm just taking it one GB at a time.

  • Member since
    September 2007
  • From: Truro Nova Scotia, Canada
Posted by SuppressionFire on Wednesday, December 1, 2010 5:58 AM

Good work everyone!

Sorry I have not been model building the last few weeks so no WIP's from me. Probably early 2011 before I hit the Mercury. Have a 1/72 scale Hetzer that needs finishing and a street scene base to go along with it.

Did flip through the pages and it is very inspiring to say the least!

Keep on trucking... er model car building buddies!

http://i6.photobucket.com/albums/y211/razordws/GB%20Badges/WMIIIGBsmall.jpg


  • Member since
    September 2015
  • From: The Redwood Empire
Posted by Aaronw on Wednesday, December 1, 2010 8:07 PM

Very nice group of racers you have going there.

I've been falling behind a bit in my duties here, work and cold weather have kind of put a damper on my enthusiasm. I've got the front page updated and hope to get more done on my projects.


Squid, I grew up in the SF Bay Area back when the phone company was simply Pacific Bell or more typically THE phone company. I really don't recall their trucks though, except for the current white trucks.

  • Member since
    October 2009
  • From: Texas
Posted by Gregbbear on Thursday, December 2, 2010 12:13 AM

Tony, your 962 came out great.  That and the C9 are a couple of my all time favorites.  I have built the Tamiya versions, but not the Hase, although I have both in the stash.  You have great taste in cars for sure!

I should have some wip pictures by tomorrow of my mustang.

Cheers,

Greg

- yat yas!


  • Member since
    March 2008
  • From: Toledo, Ohio
Posted by phoneguy on Thursday, December 2, 2010 6:14 PM

Would you accept a 68 GTO from the movie "My Science Project"?  I Have a couple of 72's that I have been wanting to build like the 68.  I'll sned pics when I can this weekend.  Let me know.  Thanks


On the Bench:

B-29 Superfortress

1/48th A-6E Bomber

Welcome to Wal-Mart:  Get your stuff and get the HECK Out! 

Shut up, I'll Keel U!


  • Member since
    April 2005
  • From: Australia
Posted by taxtp on Thursday, December 2, 2010 9:15 PM

Hi Phoneguy,

I'm not running the show here, but I would love to see another participant come on board.

Cheers

Tony

I'm just taking it one GB at a time.

  • Member since
    September 2015
  • From: The Redwood Empire
Posted by Aaronw on Friday, December 3, 2010 2:15 AM

Phoneguy, a GTO would be fine, just let me know the scale and kit.

  • Member since
    April 2005
  • From: Australia
Posted by taxtp on Friday, December 3, 2010 6:37 AM

Hi Everyone,

Here is a quick status update on the Sauber Merc C9. The chassis and wheels have been sprayed flat black and the body has been sprayed Gloss Aluminium. I think I may put down a coat of gloss or two prior to decalling just to ensure good smoothness and also allow for some good old fashioned polishing if required later on.

I hope to photograph tomorrow once the paint is dry.

I too have both the Tamiya and Hasegawa kits,and also the Revell re-pop of the Hasegawa one. The bodys make an interesting comparison, I'll try to photograph that too.

For my money, the Tamiya kit is superior by quite a long way, but I'm saving it for one of those rare occasions when I feel like going for full detail. There is a lot of aftermarket available for it too.

For some reason, my current interest is attracted more to the variations in liveries of these racing cars rather than reproducing the full engine bay, cockpit and brake detail. I think that reason might be called the 'lazy streak', or maybe 'short span of attention'.

Cheers

Tony

I'm just taking it one GB at a time.

  • Member since
    September 2015
  • From: The Redwood Empire
Posted by Aaronw on Friday, December 3, 2010 10:09 AM

I wouldn't call that lazy, just different priorities, and really which will be more noticable once it is on display. I think that is one of the (many) reasons I like 1/72 for aircraft, not a ton of hidden detail and they are small and cheap enough to allow me to build several of the same kit if there are many different paint schemes.

  • Member since
    March 2008
  • From: Toledo, Ohio
Posted by phoneguy on Friday, December 3, 2010 6:19 PM

I'm gonna try to find a 68 gto.  I have two 72's.  May have to bash them and redo the hood, and front end to make it like the 68.  I would like to do it like the "My Science Project" gto tho.  The 72's are made by mpc and are in 1/25th scale.  will let you know more if i can find one or have to do alterations.  Hope that is still within the guidelines.  let me know please.


On the Bench:

B-29 Superfortress

1/48th A-6E Bomber

Welcome to Wal-Mart:  Get your stuff and get the HECK Out! 

Shut up, I'll Keel U!


  • Member since
    September 2015
  • From: The Redwood Empire
Posted by Aaronw on Friday, December 3, 2010 10:18 PM

Are you going to include the raising light up finger in the back window? I haven't seen the movie in a longtime, but that stands out.

As long as it has wheels and goes vroom it should be good. Big Smile

  • Member since
    April 2005
  • From: Australia
Posted by taxtp on Saturday, December 4, 2010 3:13 AM

Hi Everyone,

Here are a couple of photos of the body, which I've painted with Tamiya aerosol gloss aluminium now. This is the colour recommended in the Tamiya kit instructions.. The photos of the chassis didn't work out, I'll post some more next time. It's just flat black at this stage, not too exciting.

Cheers

Tony

I'm just taking it one GB at a time.

  • Member since
    March 2008
  • From: Toledo, Ohio
Posted by phoneguy on Saturday, December 4, 2010 6:57 AM

I forgot about that one.  I was planning on watching the movie to see what exactly i have to do.  I think the hand was in the other car tho, not the gto.

On the Bench:

B-29 Superfortress

1/48th A-6E Bomber

Welcome to Wal-Mart:  Get your stuff and get the HECK Out! 

Shut up, I'll Keel U!


  • Member since
    October 2009
  • From: Texas
Posted by Gregbbear on Saturday, December 4, 2010 1:50 PM

Yes, I have actually done something on this hunk of red plastic.  Some of the assemblies are simplified to the point, it would require major surgery to get them right.  Nice kit though, except for the red plastic!  Can you tell I hate colored plastic?

Tony, looking good on the C9.  I like that Tamiya gloss aluminum.  It is one of the few spray can paints I have had great success with.  I built the Tamiya version years ago.  It was a great kit.  I have another one that is in the stalled stage.  I did pick up the new Tamiya one half off recently.  I'm thinking about building them together.....

Better get back too it.

Cheers,

Greg

- yat yas!


  • Member since
    October 2009
  • From: Texas
Posted by Gregbbear on Saturday, December 4, 2010 10:45 PM

Got some more done on my Mustang.  Not a lot, but photographable.....

Back to the P-38!

Cheers,

Greg

- yat yas!


  • Member since
    April 2005
  • From: Australia
Posted by taxtp on Sunday, December 5, 2010 6:43 AM

Hi Greg,

I'm with you on the colored plastic thing, why do they do it ? I always end up priming heavily to hide it. I do most of my modelling late at night, when my eyes are tired, and dark coloured plastic is starting to give me some trouble. Nonetheless, your Mustang is coming along, I can see a that you are spending some time on the details too.  I like the way they build up with the chassis and roll cage, I might have to go there.

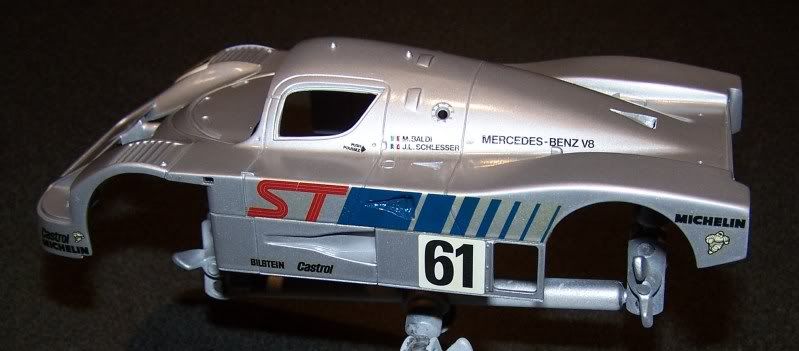
In the meantime I decalled the Merc today. After several glitches with earlier builds of these Hasegawa Group C cars, I'd sworn off their decals and determined to use aftermarket where ever possible. That strategy has been working well, until, , I got sucked in again. They've all gone on perfectly, but for some reason the blue stripes on the sides became really rough in texture. I thought they were breaking up, but they didn't.. After multiple iterations of heat, pressure, Super Set , Sup Sol and bad language, I think I've got them down flat enough that I can put a few coats of clear over them and polish it out where necessary. However, you can make out how bad it is within the NACA duct, I'll have to get those out and paint it I think. It happened on both sides, and only to the blue part of the decal...go figure. All other decals were just fine. You may also notice that the bottom edge of the blue decal is a little uneven, but its right on a panel line and can be trimmed and tidied up easily enough.

As far as those blue stripes goes, the silver C9s raced at many venues with out it. To my eye, the car is more aesthetically pleasing without it too. However, the research I've  done so far is indicating that Suzuka was the only race where the car had the front centre panel as depicted in the Hasegawa kit, and silver liverie. It also had those blue stripes. Think I'm stuck with it.

This version raced a few times in 1988 in AEG Circuit Board liverie too. If you want to see the difference, compare the front centre panel of the car on the Tamiya box lid above, with this front centre panel below. On the Tamiya kit, the front panel is larger, and that air scoop (I guess that's what it is) is situated in the middle of the panel, immediately above the red AEG (it's a little hard to see). On the Hasegawa kit, the panel is smaller, the air scoop juts out above it. It raced like this at a few races in 1988, and only at Suzuka in 1989. I have to check my Revell Kouros C9 as well, because it was based on the Hasegawa kit, so may well have the smaller panel. However, the car raced with Kouros liverie in 1987, and I haven't found any photos showing the car being raced in this configuration during 1987. I may have to stick my Kouros decals onto a Tamiya body.

BTW, there is a Studio 27 decal sheet, featuring the Kouros liverie, and also one where Michelin was the major sponsor. It was discontinued so long ago though, I haven't been able to find one.
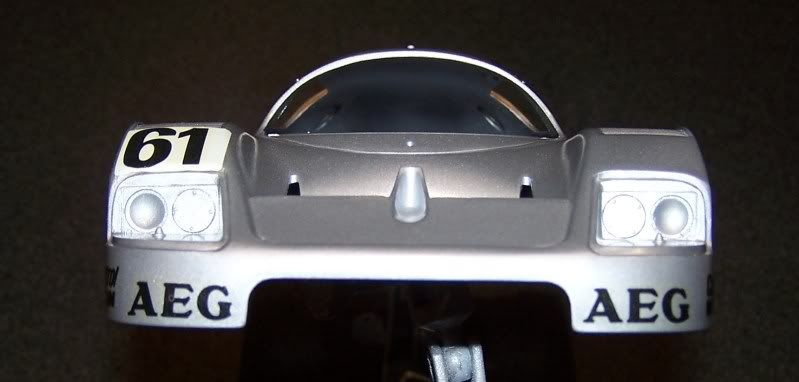
Here is the rest of the progress shots.
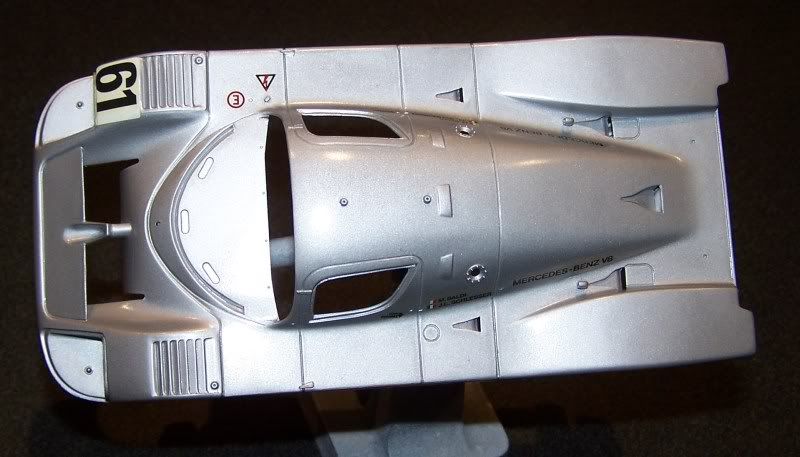
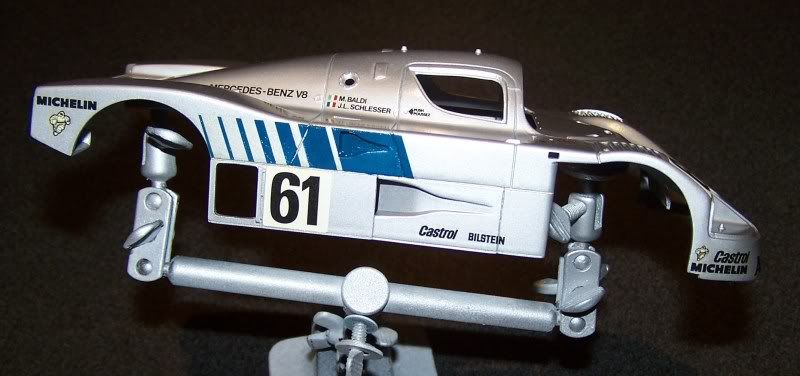
 

I haven't picked up that version of the Tamiya C9 kit as yet, getting one at half price would be ideal. However, in line with my earlier comment, I do have the Studio 27 decal sheet for it on order.

I'm just taking it one GB at a time.

  • Member since
    October 2009
  • From: Texas
Posted by Gregbbear on Sunday, December 5, 2010 12:47 PM

Tony, it looks really good!  Sorry about that blue in the naca duct though.  I will certainly beware of hase's decals.  The Michelin version is an alternate decal in the recent RoG reboxing.  I plan on doing that version at some point, as it is really cool and I love the bright metallic blue.  I was actually thinking about kitbashing the Tamiya with the Hase to make a full detailed version of it.  It is those types of grandiose plans that get me in trouble!

It is sometimes hard to accurately reflect a specific car, so I feel your pain on that one.  I didn't realize Hase paints you into a corner with that boxing.  I think Tamiya got the nose right on this modified re-issue, but I think they may have gotten the uprights for the wing wrong.  I have a book on the C9 somewhere that I will break out before I begin.  I have a silver Tamiya that I started a couple of years ago, that needs finishing too.  On that one, I opened the doors, and nose, painted it, and not much else.  You've inspired me to get going on one as soon as I clear some room.

Cheers,

Greg

- yat yas!


  • Member since
    April 2005
  • From: Australia
Posted by taxtp on Sunday, December 5, 2010 5:30 PM

Hi Greg,

Many thanks for the tip on the Michelin decals. That's a huge favor, it saves me a long, possibly fruitless search and probably a premium price.

All I need is another Revell C9 (just got a cheap one off ebay). I've also opened the one I've got. The way they get around the difference in front panels is to give you a square of clear plastic, and a drawing with some dimensions to cut it out to. I've never seen that approach on a mainstream kit before, but it should be OK.

They recommend a mix of two Revell colours to make the blue, but mixing colours is another thing that I avoid, particularly if I am going to build 3 models (AEG circuit board, Kouros and Michelin) which should have exactly the same colour. I see that Tamiya also recommend a mix for this colour too.

Zero paints make a matched colour for it. I've never tried them, but I've heard good things, so I think I'll give it a go.  

Cheers

Tony

I'm just taking it one GB at a time.

  • Member since
    October 2009
  • From: Texas
Posted by Gregbbear on Sunday, December 5, 2010 7:24 PM

Thanks Tony, that is good info.  I've heard good things about Zero brand paints too.  I am unsure if anybody carries that line in the U.S..  Can you get it locally, or do you have to order it internationally too?  I did find my book on the C9.  Now I need to hurry up and finish my mustang, so I can start on my Saubers! 

Cheers,

Greg

- yat yas!


  • Member since
    April 2005
  • From: Australia
Posted by taxtp on Sunday, December 5, 2010 10:14 PM

Hi Greg,

I've ordered mine from Hiroboy in the UK. I also ordered their clear and some Jagermeister orange. The postage hurts though. I don't know of anywhere else that stocks it (yet).

I'll rashly state that I'll build one of these next, so I can report on how they go, or maybe, how I go with them..

Cheers

Tony

I'm just taking it one GB at a time.

  • Member since
    April 2005
  • From: Australia
Posted by taxtp on Monday, December 6, 2010 6:37 AM

Well tonight I haven't really felt in the zone, so I've just done some of the hack work. The good thing is I've got a jar of Humbrol #15, which looks like a pretty good match to the troublesome blue decals. I'll clean up the decals in those NACA ducts before spraying the clear coats, then paint the NACA ducts once all the polishing is completed. Tamiya TS-13 destroys Humbrol enamel, so I'll have to go in that order. It's too windy to spray here tonight,  it just puts a few dust particles into the air around my spraying bench in the garage.

There is one other liverie for the C9 that I'd like to attempt:

http://www.racingsportscars.com/photo/1987/Norisring-1987-06-28-061.jpg

http://www.racingsportscars.com/photo/1987/Norisring-1987-06-28s-061.jpg

http://www.racingsportscars.com/photo/1987/Norisring-1987-06-28s-063.jpg

These are the only photos I've found. I don't know of any decals and haven't been able to google any.

I really need a better side on photo, then I can assess whether it's achievable using available decals for the minor sponsors possibly with some home made ones for the 'SAT Additive' and 'JK' logos. The other possibility is to source these decals from some decal sheet that is intended for another make of car, but once again, I haven't found any (yet).

I think this would then cover all of the main liveries worn by the C9 in anger.

Cheers

Tony


I'm just taking it one GB at a time.

  • Member since
    October 2009
  • From: Texas
Posted by Gregbbear on Monday, December 6, 2010 9:55 PM

Tony, interesting livery.  I haven't seen that one before.  Have you ever gone to stradasports.com?  They are one of my favorites for endurance/F1 model parts.  They don't have those decals, just some WSPC Suzuka silver scheme, and the Michelin man scheme.  They do have some really nice p.e. sets for both Hase/Revell, and the Tamiya.  There is a set for the Tamiya that comes with resin brake calipers.  It looks sweet.  Gotta go put my kids to bed, hope you have a good one.

Cheers,

Greg

- yat yas!


  • Member since
    April 2005
  • From: Australia
Posted by taxtp on Tuesday, December 7, 2010 4:12 AM

Hi Greg,

My kids have just gone to bed.

I often purchase from Kevin at Strada. I'd say it is probably my favorite place for the 'exotic' stuff other than mainstream kits. My ridiculous decal collection is partly his fault ! I should add that I enjoy dealing with M&S Hobbies too. Sometimes I have to go far and wide to get hold of that hard to find piece though.

Cheers

Tony

I'm just taking it one GB at a time.

  • Member since
    March 2008
  • From: Toledo, Ohio
Posted by phoneguy on Tuesday, December 7, 2010 8:02 PM

Aaronw:

Found a 68 in columbus.  It's a Revell 69 2 in 1.  Model # 85-2072.  It can be made as a 68 or 69.  I don't have a camera to take pics here and download.  I will get pics as soon as poss. 

If anyone know someone who has a 1977 firebird (smokey and the bandit) model with the snowflake wheels i would appreciate some info.  looking for them. 

Great pics from everyone else!  Hopefully I can send some soon!!

Give thanks to all that have served and gave their life for this Great country of ours!!  Remember this day for them!

On the Bench:

B-29 Superfortress

1/48th A-6E Bomber

Welcome to Wal-Mart:  Get your stuff and get the HECK Out! 

Shut up, I'll Keel U!


  • Member since
    October 2009
  • From: Texas
Posted by Gregbbear on Thursday, December 9, 2010 10:59 AM

Tony, I with you on those two places.  Strada is my favorite, but MS isn't far behind.  They both have good selections and customer service.  I'm thinking about getting the Hobby Design pe set for the C9.  Since I cut open my "silver arrows" one, I figure that might it worth it.  I built a silver Tamiya years ago, one of my first attempts to add wiring, plumbing, pe, and composite decals.  It is such a great kit, it is like it was made for super detailing!  Hopefully, I will get some more done on the mustang tomorrow.  I scrounged some shock reservoirs, and a few other odds and ends for it.  Funny, the kit comes with the rear ones, that can barely be seen, but none up front.  I also need to try and make some Ford and Motorcraft logos to dress up some parts.  I haven't done that before, so I hope my computer is up to the task. 

Cheers,

Greg


- yat yas!


  • Member since
    April 2005
  • From: Australia
Posted by taxtp on Friday, December 10, 2010 4:08 AM

Hi Greg and all,

I find myself going back to both websites, and browsing for the interesting stuff. Prices are pretty good too.If you're going to cut that C9 open, then having an etched fret or two should add greatly to the stuff you do yourself. I want to do it to their Jag XJR-9 some day as well. It will be good to see your progress on your Mustang. BTW, what do you have for reference on it ? I keep thinking of going back to the old Monogram Miller Mustang. Funnily enough, I have decals for it bought from Strada. Let me know if you run into trouble with your Ford and Motorcraft logos, I've made a few small decals myself recently, might be able to offer some encouragement. Thinks have been a bit slow for the Merc of late, but I'm about to crack it open.It's had a gloss coat, and  I've fixed the NACA ducts blue decal problem, scraped it out and painted with Humbrol #15 with some gloss white added. It's a good match.

More photos when I've got something interesting to show.

Cheers

Tony


I'm just taking it one GB at a time.

  • Member since
    October 2009
  • From: Texas
Posted by Gregbbear on Saturday, December 11, 2010 3:52 PM

Tony, (and all), I think the Tamiya Jag would be an excellent candidate for the super detail treatment.  I haven't built one, although I have a couple in my stash with p.e., and fill in decals for the "silk cuts".  I have been using a book called "Mustang Race Cars" by Dr J Craft for my reference.  Since I am not building a race specific car, I am doing as I please with a lot of details.  It seems there was A LOT of variances in plumbing, coloring, etc. between cars/races.  There were no front shock reservoirs because there were no front shocks!  The front suspension is only somewhat crudely represented.  I made some quick coilovers and added the reservoirs.  It is not going to be a show stopper, but I think it'll look cool enough for me.  I have some extra brakes from a C-5R, that should look the part of the big Alcons.  I am only putting them up front, as they will never be seen in back (along with a couple of other things I wasted my time on).

I like the Miller Mustang kit.  I have one in my closet.  I was building the Ford Motorsport version, but I got distracted while decaling the body, and misplaced some stripes, and never finished. 

As for decals, I am going to copy the set from my Motorcraft Mustang for starters.  I found some good logos, but I can't seem to shrink them down to size.  My computer will let me enlarge, but I can't find shrink.  Did you use a special program? 

Here are a couple of shots I took the other night.

Cheers,

Greg

- yat yas!


  • Member since
    March 2010
  • From: New Zealand
Posted by Scorpiomikey on Saturday, December 11, 2010 4:39 PM

HAH, finally got some photos.

And now im stalled a bit. The bodyworks being an ass. The red bleeds into the white and silver. then the white starts clumping, grrr. i cant win with this thing.

"I am a leaf on the wind, watch how i soar"

Recite the litanies, fire up the Gellar field, a poo storm is coming Hmm 

My signature

Check out my blog here.

  • Member since
    October 2009
  • From: Texas
Posted by Gregbbear on Sunday, December 12, 2010 2:13 PM

Mike, your Toyota is looking good.  Those Tamiyas build up nice.  Sorry about the body work and paint problems.  

Cheers,

Greg

- yat yas!


  • Member since
    March 2010
  • From: New Zealand
Posted by Scorpiomikey on Sunday, December 12, 2010 3:52 PM

one this ive learned from this GB.

I HATE WHITE PAINT!!!!!!!!!!!


"I am a leaf on the wind, watch how i soar"

Recite the litanies, fire up the Gellar field, a poo storm is coming Hmm 

My signature

Check out my blog here.

  • Member since
    October 2009
  • From: Texas
Posted by Gregbbear on Sunday, December 12, 2010 4:45 PM

Recently, I learned to hate white paint too.  Strange, maybe a global conspiracy?  If it is Tamiya white, then it must be, because that would make three of us.  I used to pretty good with Tamiya white too.  I guess I lost my mojo.

Cheers,

Greg

- yat yas!


  • Member since
    March 2010
  • From: New Zealand
Posted by Scorpiomikey on Sunday, December 12, 2010 5:17 PM

I think it is a conspiracy. I think they replaced all white paint with foggy clear coat. 

"I am a leaf on the wind, watch how i soar"

Recite the litanies, fire up the Gellar field, a poo storm is coming Hmm 

My signature

Check out my blog here.

  • Member since
    April 2005
  • From: Australia
Posted by taxtp on Monday, December 13, 2010 6:16 PM

Hi Everyone,

I don't hate white paint (yet). However, now that I have learned that there is a global conspiracy, I'm sure it will bite me hard next time. I also use Tamiya TS pure white.

One thing I have been doing, mainly to get a better delineation when I mask, is to spray a cost of gloss  clear after masking, but before laying down the next colour. I'm not sure if this is helpful at all, but it seems to work for me.

The Toyota looks great nonetheless, keep pushing forward.

How's that Mustang Greg ?

Progress on the Sauber is slow at the moment. The combination of extra commitments due to the season, and busy at work have reduced the time I have to do it, and the motivation to sit there and concentrate. I really want to knock it off this year though, so I'll just keep puttering along.

Cheers

Tony

I'm just taking it one GB at a time.

  • Member since
    March 2008
  • From: Toledo, Ohio
Posted by phoneguy on Monday, December 13, 2010 7:00 PM

Even when I use gloss white from any manufacturer, it takes at least 2-3 coats to cover.  I haven't tried tamiya yet. 

I need to get a sm card adapter to post some pics from the 68 gto.

Thanks again for looking Scorpio. 

Maybe someone on this thread will see it also and no offense be closer.

On the Bench:

B-29 Superfortress

1/48th A-6E Bomber

Welcome to Wal-Mart:  Get your stuff and get the HECK Out! 

Shut up, I'll Keel U!


  • Member since
    April 2005
  • From: Australia
Posted by taxtp on Tuesday, December 14, 2010 11:03 PM

Hi Phoneguy,

When you do get around to trying Tamiya, prime it with their aerosol 'Fine white primer', then you'll only need some light coats of their TS Pure White. Be warned about Racing White though, it's more cream than white.

Cheers

Tony

I'm just taking it one GB at a time.

  • Member since
    March 2010
  • From: New Zealand
Posted by Scorpiomikey on Wednesday, December 15, 2010 1:51 PM

taxtp

 Be warned about Racing White though, it's more cream than white.

Yeah found that one out the hard way lol.

"I am a leaf on the wind, watch how i soar"

Recite the litanies, fire up the Gellar field, a poo storm is coming Hmm 

My signature

Check out my blog here.

  • Member since
    September 2015
  • From: The Redwood Empire
Posted by Aaronw on Thursday, December 16, 2010 12:53 AM

phoneguy, I've got you added to the list of participants. Sorry, I saw your post before and completely spaced adding you to the list.

  • Member since
    March 2008
  • From: Toledo, Ohio
Posted by phoneguy on Thursday, December 16, 2010 5:40 PM

Thanks.  I'm looking for the rims for it tho.  Revell discontinued the camero that I could have used.  I gotta find it online or somewhere. 

On the Bench:

B-29 Superfortress

1/48th A-6E Bomber

Welcome to Wal-Mart:  Get your stuff and get the HECK Out! 

Shut up, I'll Keel U!


  • Member since
    March 2008
  • From: Toledo, Ohio
Posted by phoneguy on Thursday, December 16, 2010 5:42 PM

I'll keep that in mind.  See what I can do once I get back to Toledo for awhile, and not out of town.  Hard to paint (spray) in a hotel room.

On the Bench:

B-29 Superfortress

1/48th A-6E Bomber

Welcome to Wal-Mart:  Get your stuff and get the HECK Out! 

Shut up, I'll Keel U!


  • Member since
    April 2005
  • From: Australia
Posted by taxtp on Sunday, December 19, 2010 9:47 PM

Hi all,

The parcel of Zero paints arrived from Hiroboy over the weekend. I can comment that they were very well packaged, and are surprisingly large jars of paint. For example, the Mercedes C9 blue will be more than enough to spray the three cars I need to do, and I don't have enough cars with Jagermeister decals to use up all of the orange (I've got a 962 and a BMW 320). Maybe I should invest in a 1/12 Porsche 934 just so as not to waste the paint :)

The question in my mind is whether to prep and spray the three bodies at the same time. I think probably not, as building three cars all of the same colour in a row may be a good way to lose interest.

Hopefully when I get home from work today and rip off the masking from my silver C9, I'll be able to comment that all spraying of the body has been completed. I've done the matt black around the cockpit, and just sprayed a couple of NACA ducts this morning.

Cheers

Tony

I'm just taking it one GB at a time.

  • Member since
    October 2009
  • From: Texas
Posted by Gregbbear on Monday, December 20, 2010 2:35 AM

Tony, I totally agree with your rational to buy the 1/12 Jaegermeister Porsche.  Glad to hear your paint made it safe and sound from the other side of the world.

I made a little bit of progress on my Mustang, and went backwards some too.  I have to reassemble the engine; however, I dropped it.  I also need to dig through the spares and find some Simpson labels for the seat belts and pedals for the floor.  It is looking okay.

It would require a serious re-work to be a  completely accurate model, but what I have added (and will add)  I think will make a difference, at least in the more visible spots.  I think that the removable steering wheel, and heat shielding will add interest too.  I also noticed the kit does not have any representation of tow hooks, but I've got some p.e. ones that will do the part.  The hard part will be getting a perfect finish for the body......

Cheers,

Greg

- yat yas!


  • Member since
    November 2004
  • From: Freeport, IL USA
Posted by cdclukey on Monday, December 20, 2010 10:14 AM

I'm in. Revell-Monogram Bill Elliott McDonald's Ford Taurus in 1/24. Started but the chassis isn't even built yet.


  • Member since
    April 2005
  • From: Australia
Posted by taxtp on Wednesday, December 22, 2010 6:13 PM

Welcome aboard. I'm always happy to see another racing car being built. When do we get the photos ?

Greg - that looks really good, I recommend to everyone that you maximise the size of the photos to have a better look at the detail. When are you starting on the body ?

I'd forgotten how hard it is to get any modelling done in December, too many distractions. The body is all but done now, photos as soon as I can get around to it. I still need to sand and polish the windscreen, finish the rear spoiler, tyres, and a few smaller items. Once it quietens off next week, I want to push hard so that I can complete my target of ten car models completed in 2010.

I'm wondering if that means I have to complete 11 in 2011 ?

Merry Christmas to you all if I don't post again before then. I hope Santa's got a sack full of plastic for you all.

Cheers

Tony

I'm just taking it one GB at a time.

  • Member since
    March 2008
  • From: Toledo, Ohio
Posted by phoneguy on Thursday, December 23, 2010 6:08 PM

On the Bench:

B-29 Superfortress

1/48th A-6E Bomber

Welcome to Wal-Mart:  Get your stuff and get the HECK Out! 

Shut up, I'll Keel U!


  • Member since
    March 2008
  • From: Toledo, Ohio
Posted by phoneguy on Thursday, December 23, 2010 6:20 PM

Aaron, I just tried to post pics of the shell and interior.  just a rough paint so far.  This should get me in correct??

On the Bench:

B-29 Superfortress

1/48th A-6E Bomber

Welcome to Wal-Mart:  Get your stuff and get the HECK Out! 

Shut up, I'll Keel U!


  • Member since
    September 2015
  • From: The Redwood Empire
Posted by Aaronw on Thursday, December 23, 2010 6:49 PM

cd got you added to the roster.


Phoneguy, you want to use the option with [ img ] [ /img ] (without any spaces) on the ends if you want it to show on the site instead of just being links.


Looks like you are off and building. Yes

  • Member since
    October 2009
  • From: Texas
Posted by Gregbbear on Thursday, December 23, 2010 7:00 PM

Tony, you are quite right, bench time is of a premium this time of year!  I'm sure most of us are in that boat.  I spent most of the day shopping in women's clothing stores.  Thrill a minute there.....  My pre-teen daughter is all about the clothes.  I did manage to get by the hobby shop for a split second to say Merry Christmas and pick up Squadron's brand new F4U Corsair in Action.  He also got in some really beautiful wire wheel sets for the Hase Testa Rossa.  I didn't bother to ask about the price in front of my wife!

Phoneguy, I have always liked that body style of GTO.  I look forward to seeing it come together.

As for the Mustang....  I got a little bit done last night.  Until I get a chance to use either Metalizer of Alclad on the headers, I am almost to a stopping point on the chassis.  I really like how my dashboard and instrument panel came out.  Hopefully, the picture will do it justice.  As for the body, I need to put down another coat of primer, and then go from there.

I wish all of you a Merry Christmas, and a Happy New Year full of cool kits and lots of bench time! 

Cheers,

Greg


- yat yas!


  • Member since
    December 2009
  • From: Weirton, West Virginia
Posted by xradio81 on Friday, December 24, 2010 9:48 PM

I just saw this groupbuild and I'm in with a Revell 1/24 1964 Mustang pacecar convertable.

  • Member since
    September 2015
  • From: The Redwood Empire
Posted by Aaronw on Monday, December 27, 2010 1:29 AM

xradio81

I just saw this groupbuild and I'm in with a Revell 1/24 1964 Mustang pacecar convertable.


Welcome, I added you to the roster on page 1.

  • Member since
    April 2005
  • From: Australia
Posted by taxtp on Thursday, December 30, 2010 2:31 PM

Hi Everyone,

Firstly, I must apologise for the lack of WIP photos this time. I've ended up doing a heap of work since Christmas in order to complete it by the end of the year. This is the tenth car model I've completed in 2010, which is something I never thought possible, given that I've never completed more than 3 in a year previously. Here's a couple of WIP photos, then some photos of the finished Sauber Mercedes C9, and the final one is the 'Group C Section' of my cabinet.

Cheers

Tony

I'm just taking it one GB at a time.

  • Member since
    October 2009
  • From: Texas
Posted by Gregbbear on Friday, December 31, 2010 10:56 AM

Fantastic Tony, your C9 is a great addition to your already great collection.  Ten cars in one year is fantastic.  Especially since they are so well done.  I don't think I could finish ten snap-together cars in one year!

Happy New Years!

Cheers,

Greg

- yat yas!


  • Member since
    April 2005
  • From: Australia
Posted by taxtp on Saturday, January 1, 2011 5:04 AM

Thanks very much Greg, your kind words and encouragement throughout are very much appreciated.

I'm just taking it one GB at a time.

  • Member since
    September 2015
  • From: The Redwood Empire
Posted by Aaronw on Monday, January 3, 2011 6:24 PM

Tony, you are just cranking those cars out. Yes  Very nice, and I've got it added to the completed builds. 

  • Member since
    April 2005
  • From: Australia
Posted by taxtp on Tuesday, January 4, 2011 3:14 AM

Thanks heaps Aaron. I'm going to finish a couple of part completed builds, then I'll be back with another one.

Cheers

Tony

I'm just taking it one GB at a time.

  • Member since
    March 2007
  • From: Atlanta, Ga.
Posted by MrSquid2U on Wednesday, January 5, 2011 2:34 AM

Tony,

 That's another nice one there and you've just about amassed an entire starting grid for your own race!Cool


  • Member since
    April 2005
  • From: Australia
Posted by taxtp on Thursday, January 6, 2011 6:39 AM

Thanks Mr Squid.

I'm just taking it one GB at a time.

  • Member since
    March 2008
  • From: Toledo, Ohio
Posted by phoneguy on Friday, January 7, 2011 4:12 PM

Finally got the rims.  Painted them while I was watching the OSU-ARK game.  Gotta run lines for the brakes and fuel yet, and put the headliner in yet.  Here are some pics so far.  Hope you enjoy.

Still thinking about the shocks and engine wiring.

On the Bench:

B-29 Superfortress

1/48th A-6E Bomber

Welcome to Wal-Mart:  Get your stuff and get the HECK Out! 

Shut up, I'll Keel U!


  • Member since
    September 2015
  • From: The Redwood Empire
Posted by Aaronw on Sunday, January 16, 2011 2:25 AM

Nice that you found the right rims. It looks like things are going well so far.


All these race cars seem to have knocked something loose in my brain. I think I'm going to sneak a Lancia Rally car in here, maybe after that I can get inspired to get back to work on the Dodge truck. 

  • Member since
    April 2005
  • From: Australia
Posted by taxtp on Sunday, January 16, 2011 8:24 PM

I think I missed a post. That looks great so far Phoneguy, what were you clamping in the middle picture ?

Aaron, what sponsorship does your Lancia have ? Have you got a photo or a box lid ?

Cheers

Tony


I'm just taking it one GB at a time.

  • Member since
    October 2009
  • From: Texas
Posted by Gregbbear on Monday, January 17, 2011 11:46 AM

Looks good Phoneguy.

I haven't made much progress on my Mustang, but some progress nonetheless.  I had put another coat of primer on the body to seal the red, and I ended up finding more flaws, and sanded through the primer in spots.  I want the final primer coat to be white, so the red and white come out bright.  I finally sprayed metalizer on the headers, so I will try and get the engine together and in the chassis.

Cheers,

Greg

- yat yas!


  • Member since
    March 2008
  • From: Toledo, Ohio
Posted by phoneguy on Monday, January 17, 2011 4:09 PM

taxtp

I think I missed a post. That looks great so far Phoneguy, what were you clamping in the middle picture ?

Aaron, what sponsorship does your Lancia have ? Have you got a photo or a box lid ?

Cheers

Tony


I was gluing the windshield into place.  towels just protecting glass.

On the Bench:

B-29 Superfortress

1/48th A-6E Bomber

Welcome to Wal-Mart:  Get your stuff and get the HECK Out! 

Shut up, I'll Keel U!


  • Member since
    November 2004
  • From: Freeport, IL USA
Posted by cdclukey on Thursday, January 20, 2011 8:55 AM

I've decided I'm going to try to knock out two for this build, so I'm adding a 1/24 Revell 2006 Dodge Magnum SRT. I may not get both finished, but I'll give it a shot and will definitely get one done. I feel that the Magnum will be a good warmup for the remainder of the Taurus, plus it was a Christmas present and it doesn't feel right to leave it on the shelf for months.

As for WIP photos...here's what the Bill Elliott Taurus looks like so far:

/forums/t/126989.aspx


  • Member since
    September 2015
  • From: The Redwood Empire
Posted by Aaronw on Thursday, January 20, 2011 9:13 PM

taxtp

I think I missed a post. That looks great so far Phoneguy, what were you clamping in the middle picture ?

Aaron, what sponsorship does your Lancia have ? Have you got a photo or a box lid ?

Cheers

Tony


It's the Hasegawa 1975 Stratos Safari kit, I think the sponsor is Aeritalia. I'm out of town through next tuesday but I will post the box when I get home (and get back to work on it). I've never done anything with so much decal coverage, but I'm actually looking forward to the challenge.

  • Member since
    March 2010
  • From: New Zealand
Posted by Scorpiomikey on Sunday, February 13, 2011 4:01 PM

ok so i "finished" my 84c. Ill get photos as soon as i can be bothered (in a bit of a funk at the moment) I left off alot of the sponsor decals for now. Just kinda wanted to get it done and off the bench. The major markings are on. But the smaller stuff ive left off. Oh well.

Photos to follow soon.

"I am a leaf on the wind, watch how i soar"

Recite the litanies, fire up the Gellar field, a poo storm is coming Hmm 

My signature

Check out my blog here.

  • Member since
    March 2008
  • From: Toledo, Ohio
Posted by phoneguy on Tuesday, February 15, 2011 8:18 PM

Ok, now I am in Hartford, CT.  don't know how long yet.  Did get some bench time yesterday and today; and finally have a good internet connection. 

got the engine wired, brake lines done, and the battery wired.  Also got the body glued to the chassis.  Hope these pics turn out.

On the Bench:

B-29 Superfortress

1/48th A-6E Bomber

Welcome to Wal-Mart:  Get your stuff and get the HECK Out! 

Shut up, I'll Keel U!


  • Member since
    March 2008
  • From: Toledo, Ohio
Posted by phoneguy on Thursday, February 17, 2011 9:44 PM

got the hood cut for the blower and painted tonight.  the last thing to do.  cant find a decal for the pontiac emblem on the nose.  think i have the decals for the license plate here.  if not, will have to wait till i get back home. 

hope you enjoy the future pics. (when the hood is on).


On the Bench:

B-29 Superfortress

1/48th A-6E Bomber

Welcome to Wal-Mart:  Get your stuff and get the HECK Out! 

Shut up, I'll Keel U!


  • Member since
    October 2009
  • From: Texas
Posted by Gregbbear on Friday, February 18, 2011 10:21 AM

Looking good Phoneguy!  It is nice to see somebody making some progress.  I have been quite the slacker myself.

Cheers,

Greg

- yat yas!


  • Member since
    July 2005
  • From: Texas
Posted by painklr on Friday, February 18, 2011 11:26 AM

Nice work on the Merc. Bobbaily.  I have the AMT kit sitting in my closet that I acquired back in the 90's.  Might need to pull it out and go to work on her.  Thanks for the inspiration.


  • Member since
    March 2010
  • From: New Zealand
Posted by Scorpiomikey on Monday, February 21, 2011 4:09 PM

Fianlly photos

"I am a leaf on the wind, watch how i soar"

Recite the litanies, fire up the Gellar field, a poo storm is coming Hmm 

My signature

Check out my blog here.

  • Member since
    April 2005
  • From: Australia
Posted by taxtp on Monday, February 21, 2011 5:47 PM

Hi Mike,

That Toyota 84C looks the business !. Looks like a nice clean finish. I think I want one to put with my 88Cs, and the 87C I plan to do.

Really good work, and congrats on the finsh.

Cheers

Tony

I'm just taking it one GB at a time.

  • Member since
    April 2005
  • From: Australia
Posted by taxtp on Monday, February 21, 2011 5:47 PM

Hi Mike,

That Toyota 84C looks the business !. Looks like a nice clean finish. I think I want one to put with my 88Cs, and the 87C I plan to do.

Really good work, and congrats on the finish.

Cheers

Tony

I'm just taking it one GB at a time.

  • Member since
    October 2009
  • From: Texas
Posted by Gregbbear on Tuesday, February 22, 2011 7:27 PM

Looks great Mike.  I love Tamiya cars.  I actually could finish, yes I said the "F" word, a car when I would build those pretty much box stock.  Then I got afflicted with this senseless disease that makes me add composite fiber decals, and lots of wiring and plumbing.  Spending waaay too much time finding pictures of where said wiring and plumbing goes, and rarely ever finishing a darn thing.  Much, much worse when I try and do that to a Revell kit, because then I have to correct inaccuracies, huge glaring omissions, mold lines galore, and lots of body work.  It drags on too long, I lose interest, and move on to something else. 
Whew!  Since I got that off my chest, I guess I don't need to find a therapist after all.....  Or maybe a self help group like Styrene Anonymous or something.

Really, it looks good.  I love those Group C cars. 

Mike, I hope you and yours are all doing good.  My prayers go out to all you New Zealanders.

Cheers,

Greg

- yat yas!


  • Member since
    September 2015
  • From: The Redwood Empire
Posted by Aaronw on Thursday, February 24, 2011 9:50 PM

Nice job on the Toyota, I'll get you updated.


I've been gone a lot, but I'm finally getting back to the Stratos.

  • Member since
    March 2008
  • From: Toledo, Ohio
Posted by phoneguy on Tuesday, March 15, 2011 7:59 PM

just got the decals on for the plates.  I think I can call this project done.  It's the first car I've done in years!!  Not too bad as far as I see.  Any pointers would be appreciated.  I had to get about three other models to get all the fine points on it.  Like the rims and blower and the right tires.

all in all I think it looks good, enjoy the pics.


On the Bench:

B-29 Superfortress

1/48th A-6E Bomber

Welcome to Wal-Mart:  Get your stuff and get the HECK Out! 

Shut up, I'll Keel U!


  • Member since
    March 2010
  • From: New Zealand
Posted by Scorpiomikey on Tuesday, March 15, 2011 9:03 PM

Thanks guys. Were all good down here. Only casualty in our place was my 72nd mosquito. Fell sideways and bent a prop. That and ALL out cutlery and food lol.

That car damn near drove me insane.I thought "Lets be smart and paint the red instead of using decals" Indifferent Putting red next to white when brush painting is not exactly a good idea.  

"I am a leaf on the wind, watch how i soar"

Recite the litanies, fire up the Gellar field, a poo storm is coming Hmm 

My signature

Check out my blog here.

JOIN OUR COMMUNITY!

Our community is FREE to join. To participate you must either login or register for an account.

SEARCH FORUMS
FREE NEWSLETTER
By signing up you may also receive reader surveys and occasional special offers. We do not sell, rent or trade our email lists. View our Privacy Policy.