SEARCH FINESCALE.COM

Enter keywords or a search phrase below:

The group build to end all group builds - THE GREAT WAR

156176 views
1091 replies
1 rating 2 rating 3 rating 4 rating 5 rating
  • Member since
    April 2005
  • From: Piscataway, NJ!
Posted by wing_nut on Wednesday, June 22, 2011 10:33 AM

Jack, this "gigantic listening device"Stick out tongue

I want to reproduce this photo.  The guy with the shovel is perfect.  Thanks.

Marc  

  • Member since
    April 2006
  • From: ON, Canada
Posted by jgeratic on Wednesday, June 22, 2011 1:41 AM

Well good news for those interested in the Nieuport 28 PE set from

JADARHOBBY  has it for $23.39 USD and they do accept paypal.  I have ordered from them many times, so yes they are legit.  It is a bit better price than the $31.00 Rollmodels is asking for.

regards,

Jack

  • Member since
    June 2010
  • From: Austin, TX
Posted by DoogsATX on Tuesday, June 21, 2011 10:48 PM

waikong - I think they're the same concept as the aeronautical flying wires used by the Pup and many other British aircraft. Think this is a bigger implementation, as the Pup still used double wires coming from the upper wing struts.

I eyed that set (RB Model makes them, no?) when I was prepping for the Pup, but cut-to-length on something like that gives me the willies!

As for EZ Line, I've got some. Didn't know it sat flat, but then I haven't taken it out of the little bag it came in, either.

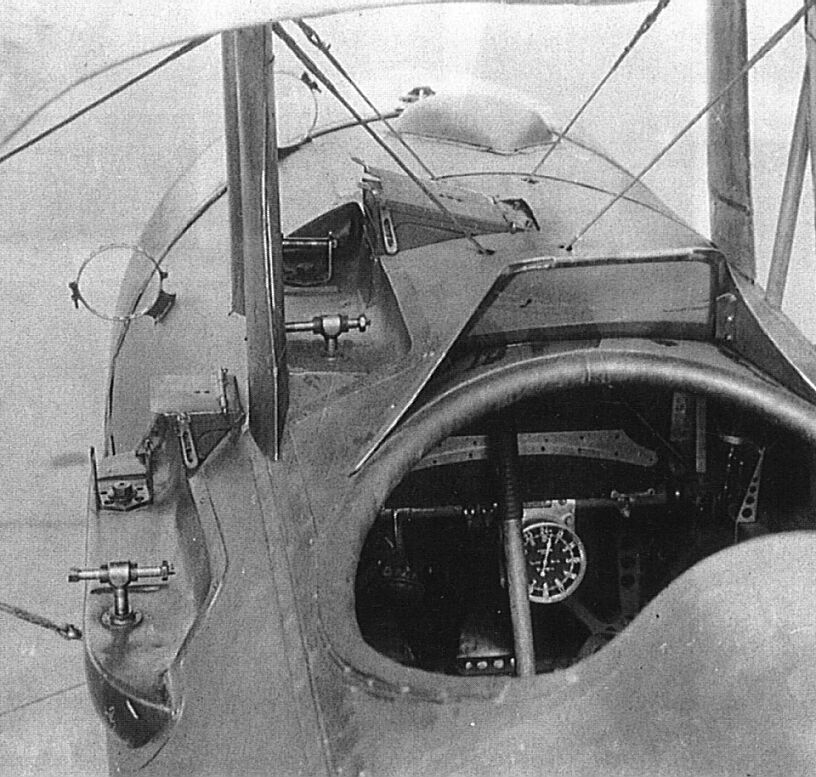
Heavens Eagle - I think there may be a double turnbuckle (or some kind of wider, flatter thing) going on, but I can't find a single angle of an actual WWI N.28 showing those upper strut-to-fuse wires as doubles. 

This one's like the one above, only at greater resolution.

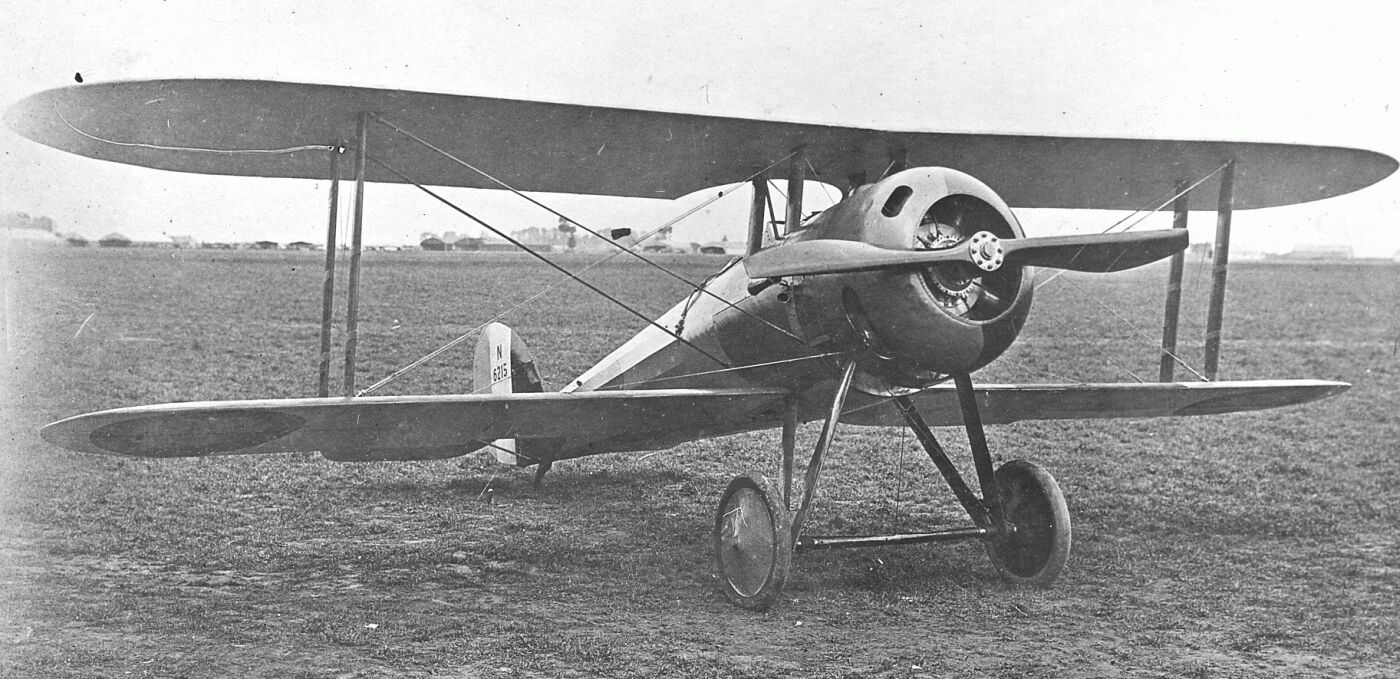
Here's the prototype (if you look closely you can make out the Eiffel Tower above the cowl). 

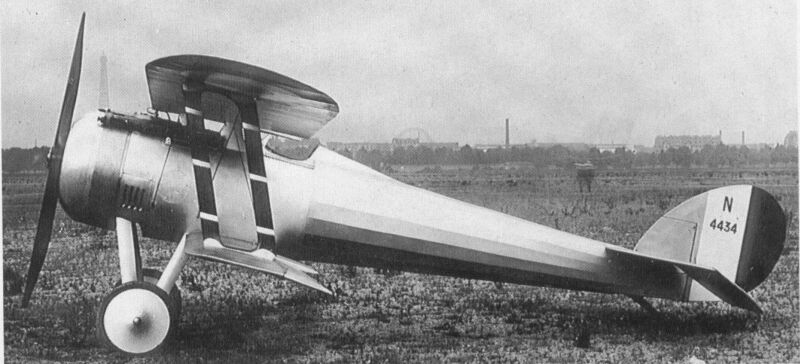
A Swiss example. Looks like the forward wire is actually a bit slack in this one.

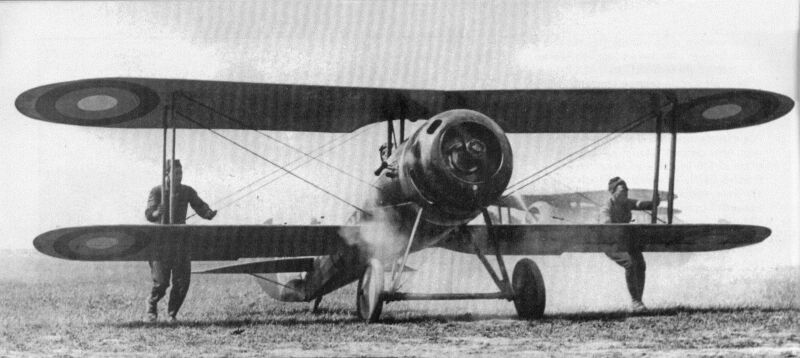
This one would make a great diorama:

Post-war courier service, but same idea:

Far bottom left. There's clearly only the one eyebolt and what looks like one turnbuckle. 

This is apparently from the national museum of the USAF, and confuses the heck out of me. I need to do more research into this particular aircraft and whether it's a replica or not.

On the Bench: 1/32 Trumpeter P-47 | 1/32 Hasegawa Bf 109G | 1/144 Eduard MiG-21MF x2

On Deck:  1/350 HMS Dreadnought

Blog/Completed Builds: doogsmodels.com


  • Member since
    December 2010
  • From: Memphis TN
Posted by Heavens Eagle on Tuesday, June 21, 2011 9:27 PM

Do you have a link to the Polish company that made those PE for the Roden kit?

  • Member since
    December 2010
  • From: Memphis TN
Posted by Heavens Eagle on Tuesday, June 21, 2011 9:25 PM

If you look at the last close up photo there seems to be a clue there.  Here is a blow up of it:


I believe there are the 2 wires as shown.


  • Member since
    December 2002
  • From: NYC, USA
Posted by waikong on Tuesday, June 21, 2011 8:18 PM

I believe those wires were actually oblong and known as 'flying wires'.  I saw this place in Europe selling them in PE form

http://www.radubstore.com/index.php?main_page=product_info&cPath=2_68&products_id=321&zenid=f022504d5f5346d6b319941020768120

 After my Fokker, I realize I don't like the 'cut to exact length' method that these will require. But you you may find them useful.  I also have EZ line that I've been meaning to try out. It's a elastic line that really stretches, unstretched its flat in profile. If you pull it really taught, it becomes very thin, but I imagine you can pull it tight let still maintain a flat profile. The nice thing about it is that it gives so it minimizes damage after its been mounted. Like I said, I have some, but didnt' have a chance to use it yet.

http://www.bobeshobbyhouse.com/ezl.html

Here's another review

http://misc.kitreview.com/tools/ezlinereviewbg_1.htm


My website: http://waihobbies.wkhc.net


  • Member since
    February 2010
  • From: Berkeley CA/St. Paul MN
Posted by EBergerud on Tuesday, June 21, 2011 8:18 PM

Doog,

Let me check a Listserv list on WWI models: vets all. I've got a Nuke too and would like to know.

Eric


A model boat is much cheaper than a real one and won't sink with you in it.

  • Member since
    June 2010
  • From: Austin, TX
Posted by DoogsATX on Tuesday, June 21, 2011 7:49 PM

Alright gents - rigging conundrum!

So...most modern pictures of the Nieuport 28 show double flying wires, a la the Pup:

BUT...if you look at the actual aircraft flown by the 94th Aero Squadron during the war...

It's obvious that, not only is it NOT a double wire, it's flat. Like a really big version of the Brits' flat aero wires.

So the question becomes...how to rig this!?!?

At first I was thinking like a really thin rubber band or something. Or flat nylon thread, perhaps? But then how to attach it and make sure it's taut?

On the Bench: 1/32 Trumpeter P-47 | 1/32 Hasegawa Bf 109G | 1/144 Eduard MiG-21MF x2

On Deck:  1/350 HMS Dreadnought

Blog/Completed Builds: doogsmodels.com


  • Member since
    March 2006
Posted by TD4438 on Tuesday, June 21, 2011 5:51 PM

DoogsATX

TD - Very nice! I tore through all the books of the Destroyermen series recently (WWII sailors on a WWI-era four-stacker destroyer get transported to an alternate earth where dinosaurs never went extinct and intelligent life evolved far differently...), and it's definitely piqued my interest in WWI floaty things. May have to branch into ships at some point...

I, too, thought the portholes were drilled out. Excellent job on those!

I am an avid reader and will be on the lookout for these.

  • Member since
    June 2010
  • From: Austin, TX
Posted by DoogsATX on Tuesday, June 21, 2011 4:31 PM

jgeratic1

Doogs - nice snag there... Part (from Poland) has a detail set for that Roden kit.

I'm definitely considering it, but 1) it's pricey and 2) I can't seem to find a US source for it anywhere. But man, I'm LOVING the brass + acetate windscreen and the bracing wires in the cockpit.


On the Bench: 1/32 Trumpeter P-47 | 1/32 Hasegawa Bf 109G | 1/144 Eduard MiG-21MF x2

On Deck:  1/350 HMS Dreadnought

Blog/Completed Builds: doogsmodels.com


  • Member since
    April 2006
  • From: ON, Canada
Posted by jgeratic on Tuesday, June 21, 2011 1:34 PM

Doogs - nice snag there... Part (from Poland) has a detail set for that Roden kit.

  • Member since
    June 2010
  • From: Austin, TX
Posted by DoogsATX on Tuesday, June 21, 2011 1:22 PM

So I went to the LHS today.

30% off sale on ALL Roden kits.

Suffice to say...I'm going to throw my "hat in the ring" with Roden's 1/32 Nieuport 28c1. Embarrassed

Interestingly enough, though French, the 28c1 was only flown in combat by American forces.

Think I'm probably going to start soon. Have to drill out the rigging holes (weak), but this one is way easier on the parts count than the WnW kits.

On the Bench: 1/32 Trumpeter P-47 | 1/32 Hasegawa Bf 109G | 1/144 Eduard MiG-21MF x2

On Deck:  1/350 HMS Dreadnought

Blog/Completed Builds: doogsmodels.com


  • Member since
    April 2006
  • From: ON, Canada
Posted by jgeratic on Tuesday, June 21, 2011 12:40 PM

Marc - not sure what is meant by "gigantic listening device" but a couple brands not mentioned:

Royal Model

Model Victoria

regards,

Jack

  • Member since
    June 2010
  • From: Austin, TX
Posted by DoogsATX on Tuesday, June 21, 2011 9:13 AM

TD - Very nice! I tore through all the books of the Destroyermen series recently (WWII sailors on a WWI-era four-stacker destroyer get transported to an alternate earth where dinosaurs never went extinct and intelligent life evolved far differently...), and it's definitely piqued my interest in WWI floaty things. May have to branch into ships at some point...

I, too, thought the portholes were drilled out. Excellent job on those!

On the Bench: 1/32 Trumpeter P-47 | 1/32 Hasegawa Bf 109G | 1/144 Eduard MiG-21MF x2

On Deck:  1/350 HMS Dreadnought

Blog/Completed Builds: doogsmodels.com


  • Member since
    April 2005
  • From: Piscataway, NJ!
Posted by wing_nut on Tuesday, June 21, 2011 7:29 AM

TD... very nice indeed.  I thought the portholes were drilled out too.  I will update the roster with the "Finished Page". 


Thanks again for the comments.

jgeratic1

I noticed you had a post in the figure forum for a civilian, was that for this display?

Jack, no it was not but it wouldn't be a bad idea to have a guy working on something.  I was looking for a guy to be standing at one of those gigantic listening devices.  Either what I have in my head doesn't exist, or I am just not looking in the right places, but there's not a lot inthe way of just "people".

Marc  

  • Member since
    March 2006
Posted by TD4438 on Tuesday, June 21, 2011 5:10 AM

Thanks for the compliments.No plans for rigging at this time.I wish I had that particular talent.The only thing I masked off and sprayed was the lower hull (except the props).Everything above the black water line was free handed with a good old fashioned bristle brush.

  • Member since
    April 2006
  • From: ON, Canada
Posted by jgeratic on Tuesday, June 21, 2011 2:38 AM

Marc - that is one heck of a build and display, terrific work!  I noticed you had a post in the figure forum for a civilian, was that for this display?

TD4438
- very crisp paint job - any masking or freehand brush work involved?  I do hope you add some rigging to her, it will make it appear that much more impressive.

regards,

Jack

  • Member since
    March 2006
Posted by TD4438 on Tuesday, June 21, 2011 1:24 AM

EBergerud

TD

Very clean build on a veteran kit. I did the same kit a few months back. You did a better job than yours truly on drilling out the port holes. I remember them being stuck on rather haphazardly by Airfix. Yours like very good. How'd you do it?

Eric

Thank you sir.I didn't drill out the portholes,I painted them black,then drybrushed the edges with white paint.I considered it,but I don't have a small enough drill bit.

  • Member since
    February 2010
  • From: Berkeley CA/St. Paul MN
Posted by EBergerud on Monday, June 20, 2011 11:42 PM

TD

Very clean build on a veteran kit. I did the same kit a few months back. You did a better job than yours truly on drilling out the port holes. I remember them being stuck on rather haphazardly by Airfix. Yours like very good. How'd you do it?

Eric


A model boat is much cheaper than a real one and won't sink with you in it.

  • Member since
    March 2006
Posted by TD4438 on Monday, June 20, 2011 8:51 PM

  • Member since
    March 2006
Posted by TD4438 on Monday, June 20, 2011 8:46 PM

HMS Iron Duke reporting for duty!

  • Member since
    March 2006
Posted by TD4438 on Monday, June 20, 2011 3:38 PM

I normally use Testors dullcoat in the black and white can.Works great.

All I currently have is Testors Lusterless (#1960).Fancy name and packaging for something that doesn't work.

  • Member since
    June 2010
  • From: Austin, TX
Posted by DoogsATX on Monday, June 20, 2011 3:36 PM

TD4438

I was going to finish and post pics of the Duke today,but the dull coat did the exact oppsite of what it is for!What a PITA!Everything has a bit of a sheen to it.

I'm gonna have to pick up a new can from the LHS Maybe later tonite I'll have the pics up.

If you can find it, try a can of Tamiya Flat Clear. Stuff works.

On the Bench: 1/32 Trumpeter P-47 | 1/32 Hasegawa Bf 109G | 1/144 Eduard MiG-21MF x2

On Deck:  1/350 HMS Dreadnought

Blog/Completed Builds: doogsmodels.com


  • Member since
    March 2006
Posted by TD4438 on Monday, June 20, 2011 3:27 PM

I was going to finish and post pics of the Duke today,but the dull coat did the exact oppsite of what it is for!What a PITA!Everything has a bit of a sheen to it.

I'm gonna have to pick up a new can from the LHS Maybe later tonite I'll have the pics up.

  • Member since
    March 2006
Posted by TD4438 on Monday, June 20, 2011 2:18 PM

I think you've built ypurself a Gold Medalist there wing!

  • Member since
    February 2010
  • From: Berkeley CA/St. Paul MN
Posted by EBergerud on Monday, June 20, 2011 12:59 PM

Doog,

OK: what size sleeves did you use? Bob at Bob's Buckles (love that name: say it five times fast) sells precut brass tubing at .5mm - the same width as the "midge" tubing I used. (That was your idea if you recall and a really good one. I will not try to cut a few dozen mini-pieces of brass rod, especially with Bob offering it so cheap: delivery very fast too. Anyone wanting a good look at rigging stuff should check out the site: http://www.bobsbuckles.co.uk/index.html. And, yup, he also sells buckles.) 2lb fly line is about .11mm and it went through the plastic tubing like a champ. Des, purist that he is, uses .4mm brass tubing and bores it out a little. He says he uses Maxima - I don't think they make anything smaller than 2lb. The line you recommend is .004" - Maxima claims .005" for (.11mm) for their 2lb. Anyway, I used 2lb PLine (great stuff if you fish: Japanese). BTW: the Caneis line I referred to is .002" or .05mm - Stockhard measured it specifically for modeling. That's thin. Might come in handy if you ever decide to put full rigging on a 1/72 scale bipe - course that might be cruel and unusual punishment and hence illegal except at Gitmo. (Like your tank too. The owner of the local shop a while back was going nuts with snow: what he wanted was to get both glitter and dirt - which is what ice looks like on vehicles. At the time,m he couldn't figure the right combination. Am awaiting your final results. I really think my next tank will have winter camo, something I've never done. Need all available inspiration.)

WN: absolutely splendid Albatross. I really like the understated dio also. I too have some doll house material: a type of old fashioned glue some gurus recommend for ship rigging. Although I can't get used to something that's beyond your control. That lozenge camo reminds me of a "low rider" or a hot rod with flame painted on: just not a purple fan unless it covers a Minnesota Viking. I know it's good history though and that must count for something.   

Eric


A model boat is much cheaper than a real one and won't sink with you in it.

  • Member since
    April 2005
  • From: Piscataway, NJ!
Posted by wing_nut on Monday, June 20, 2011 11:21 AM

WOWSER!  Look at all the stuff going on in here.

Doogs, your right..it's not my DVa.  That ones the worng color and I just saw mine on my bech not a minuyte agoWhistling  But oyur Pup is damn nice.  It really truned out great. 

Td, Bondo... you guys are doing a hull of good job.  Yeah yeah, quit oyur groaning,.  I knbow it was bad.

Waikong That look really nice.  You don't have to worry about comparingthat to anyting.

MIKE!!!  Great to see yiou still aliove and kicking.  When I didn't get an answer to the emal I snet I was gettign kind of worried.


A happy belated Father’s Day to all you dads out there.  And a great Father's Day it was.  A day of relaxation, dinner with family... and form my mom... instructions to buy the kit of my choice as my gift.  I've been to the WNW site already but can't decide.  I am thinking of doing a "D.Va Redux"


The 1st thing for the day was to complete this piece.  All finished up.  The bench, sawhorse and tool box are all made form basswood.  The tools are from  http://vectorcut.com/accessoriesHO.htm  Laser cut paper that's just simply amazing.  I don’t have a magnifier strong enough to see if it can be read but there is writing in the depressions in the tools handles.  The ground work is a mat from http://www.model-scene.com/  


Marc  

  • Member since
    June 2010
  • From: Austin, TX
Posted by DoogsATX on Monday, June 20, 2011 7:54 AM

EBergerud

Very very sweet build Doog. You've got the attention to detail to match the skills required to get very impressive results. One question though: which uni-mono thread did you use. I have some the ultra light Caenis thread made by Uni that is so light weight that I find it difficult to use it at all. The fly shop does carry other Uni lines however: which one did you use? (Still not really sure how you got thread taught with the way by rigging the upper wing before install. I'll have to go through the build again step by step.) I take it you didn't find the cabane fit solid enough to glue them in first, attach the upper wing and wiggle the big struts in. Des thought the Wingnut fit precise enough to do that as I recall. I've got a WN Pfalz at home ready to roll after I fight Waterloo with Konig - question is whether I take it on directly or build the Academy Nieuport for more bipe practice. Des thinks the Nieuport is actually a good kit - not sure I'd say that about their Camel. The Pfalz is so pretty I don't want to mess it up.

Thanks Eric! I still maintain this one looks good from a distance but kind of falls apart when you get close. Mainly due to that stupid Tamiya dusting. Next one will go better.

For the rigging, I used Uni-Mono Fine .004" - you can find it here. It's very thin (.1mm) but I didn't find it any harder to deal with than fishing line. Actually easier, since it'll slot through the tubing more easily.

As far as rigging the upper wing...doing that first was only so I wouldn't have to rig upside down in such tight spaces. It certainly saved some time, but I think I may only pre-rig about half the wing next time around.

I actually attached all of the struts at the same time. Since I pre-rigged, I didn't want to deal with wiggling and risking eyebolts or anything (of course, I still popped a good dozen during the rigging!). The fit was good enough that I probably could have gotten away with not gluing, but I used a dollop of Gators Grip in each strut hole.

If you're nervous, you may want to check out the Nieuport. It looks like a cinch next to the Pup. The fuselage rigging holes are...interesting...thinking I might wrap some line around some brass rod, stuff it through the holes, then let the rod keep it from coming out again. 

On the Bench: 1/32 Trumpeter P-47 | 1/32 Hasegawa Bf 109G | 1/144 Eduard MiG-21MF x2

On Deck:  1/350 HMS Dreadnought

Blog/Completed Builds: doogsmodels.com


  • Member since
    February 2010
  • From: Berkeley CA/St. Paul MN
Posted by EBergerud on Monday, June 20, 2011 1:03 AM

Very very sweet build Doog. You've got the attention to detail to match the skills required to get very impressive results. One question though: which uni-mono thread did you use. I have some the ultra light Caenis thread made by Uni that is so light weight that I find it difficult to use it at all. The fly shop does carry other Uni lines however: which one did you use? (Still not really sure how you got thread taught with the way by rigging the upper wing before install. I'll have to go through the build again step by step.) I take it you didn't find the cabane fit solid enough to glue them in first, attach the upper wing and wiggle the big struts in. Des thought the Wingnut fit precise enough to do that as I recall. I've got a WN Pfalz at home ready to roll after I fight Waterloo with Konig - question is whether I take it on directly or build the Academy Nieuport for more bipe practice. Des thinks the Nieuport is actually a good kit - not sure I'd say that about their Camel. The Pfalz is so pretty I don't want to mess it up.

I like the Tripe. Beyond being perhaps the most famous aircraft of WWI (thanks to the red one, it was actually a very minor player - about 300 made as I recall) it doesn't need have the fancy rigging of the other kits. I suppose you could have added your own to impress folk. Des at WWI recommends the Tripe as one of the best "first timer" bipes because there's so little rigging involved. The paint job is very nice and that's why people like German aircraft - they have neat colors. I don't know what color WWI tires were, but after haunting some very good boards and lists, grey is the shade of choice among Bipe loonies. I followed the WWIaircraft advice and used graphite for them: worked very well.

History trivia: The Kaiser had a big mouth and there wasn't a soul in the German government that thought Germany would dominate China for 1,000 years. The huns were real enough though. They were a probably a group of warrior nomadic tribes unified by a string of charismatic leaders the most famous of which was Attila. They terrorized Europe and the western steppe for about a century: about 450 AD give or take their empire was huge. After Attila died they simply disapered: no doubt terrorized each other. We're not even sure what language they spoke: early Turkic is a good guess. Their reputation of pointless cruelty made them a fodder for legend among Germans, although the Huns killed more Germans than other peoples probably. Hence the idiotic remark by the Kaiser which made good fodder for British propaganda during WWI. Very odd guy, the Kaiser, wanting to identify his soldiers with probably the most nihilistic group of barbarians in history. Brit soldiers called the Huns "Jerry" or "Fritz" and only rarely "the Hun" - reason not clear. Maybe they weren't good at Turkic.    

Eric


A model boat is much cheaper than a real one and won't sink with you in it.

  • Member since
    April 2006
  • From: ON, Canada
Posted by jgeratic on Sunday, June 19, 2011 11:43 PM

Doogs - grats on the completion... looks great from here. Beer

JOIN OUR COMMUNITY!

Our community is FREE to join. To participate you must either login or register for an account.

SEARCH FORUMS
FREE NEWSLETTER
By signing up you may also receive reader surveys and occasional special offers. We do not sell, rent or trade our email lists. View our Privacy Policy.