SEARCH FINESCALE.COM

Enter keywords or a search phrase below:

Spitfire GB

150881 views
933 replies
1 rating 2 rating 3 rating 4 rating 5 rating
  • Member since
    September 2003
  • From: AandF in the Badger State
Posted by checkmateking02 on Sunday, January 8, 2012 12:58 PM

Nice looking Spitfire, sub--with an eye-catching and unusual paint job.  I wish I'd thought of this when my daughters were little.


  • Member since
    August 2009
  • From: MOAB, UTAH
Posted by JOE RIX on Sunday, January 8, 2012 8:19 AM

Well Done Sub. Sharp job on an interesting Spit. Thanks for building and sharing that one with us.

Jack - Really Nice work! Especially well done on your touch ups and recoveries.

"Not only do I not know what's going on, I wouldn't know what to do about it if I did". George Carlin

  • Member since
    December 2009
Posted by ww2psycho on Sunday, January 8, 2012 8:14 AM

Very nice!

  • Member since
    April 2006
  • From: ON, Canada
Posted by jgeratic on Sunday, January 8, 2012 7:56 AM

Sub - I like the overall look and the pink appears quite a bit lighter since your last post.  Did you apply another coat of paint?  Main thing that stands out for me is some seams on the fuselage.  Congrats on the completion. Toast

regards,

Jack

  • Member since
    September 2009
  • From: Guam
Posted by sub revolution on Sunday, January 8, 2012 3:26 AM

And done! Just in time too (I leave tommorow!)

IMG_0383

IMG_0384

IMG_0385

Showing the camera ports, which I cut out with a hobby knife and then filled with clear glue. Hard to tell here, but they look pretty convincing!

IMG_0387

I'm amazed at how much cockpit detail is still visible. Even the oxygen tanks!

IMG_0390

Looks right at home flying along.

IMG_0391

And it actually fits in with her room very well!

IMG_0392

I think she approves!

Well, thanks for looking guys, I had a lot of fun and learned some things. Not my best work, but alright for as many issues I had this last month. Feel free to critique!

Travel

NEW SIG

  • Member since
    September 2009
  • From: Guam
Posted by sub revolution on Wednesday, January 4, 2012 5:02 AM

Well, it's pink:

It's far from perfect, but it's MUCH better than any of my handbrushed attempts, and given my time constraint, I don't have room to be overly picky. As long as I get the decals on tommorow, I should still be able to finish it before I leave.

And my airbrushing solution? Painting in the bathroom with a sheet thrown over the toilet and a fan blowing out the window!

Also, thanks to Doogs for posting this excellent website talking about the pink Spits (with video) on Facebook:

http://io9.com/5872484/why-world-war-ii-spy-planes-used-pink-camouflage

NEW SIG

  • Member since
    August 2010
  • From: New Zealand
Posted by Furyan on Tuesday, January 3, 2012 12:48 PM

jgeratic1

Spitfire serial N3280 was the mount Canadian pilot Keith 'Skeets' Ogilvie was flying when he achieved his first kill.  I will post more info once the build is complete.  Coincidently, here is a photo of him with Eugene 'Red' Tobin on the right.

http://www.acesofww2.com/Canada/aces/z_images/ogilvie_tobin.jpg

regards,

Jack


Thats an awesome photo, thanks!

Last build: Tamiya's P-51D Mustang in big 1/32 - Lt Col J C Meyer and his blue nosed bastards. Never forgotten.


  • Member since
    December 2009
Posted by ww2psycho on Sunday, January 1, 2012 7:02 PM

I like it a lot!

  • Member since
    April 2006
  • From: ON, Canada
Posted by jgeratic on Sunday, January 1, 2012 6:43 PM

With a paint brush and some old European craftsmanship, managed to clean up the squadron codes.  Have also removed the masks; canopy looks pretty grungy and the rear section had lifted off.  Right now the aircraft is drying with a final application of future.  Tomorrow will try and buff up the clear parts and give it a coat of future, hopefully this will clean it up to satisfaction.

The wheel wells fared much better.  Just a few specs to touch up and some paint chipping happened on the well edge of the port wing.

regards,

Jack

  • Member since
    April 2006
  • From: ON, Canada
Posted by jgeratic on Sunday, January 1, 2012 2:00 AM

Spitfire serial N3280 was the mount Canadian pilot Keith 'Skeets' Ogilvie was flying when he achieved his first kill.  I will post more info once the build is complete.  Coincidently, here is a photo of him with Eugene 'Red' Tobin on the right.

regards,

Jack

  • Member since
    July 2004
  • From: Sonora Desert
Posted by stikpusher on Saturday, December 31, 2011 6:35 PM

You're a brave soul to mask over decals Jack. Good recovery from the minor mishap. Just curious, but do you know who's mount that is from 609 Squadron that you are building? I am doing a 1/32 build (the old Revell kit which I am dressing up with scratch built details) for Red Tobin's Battle of Britain mount. Since he was a local boy from L.A. here that joined the RAF, fought with 609 and died with the Eagle Squadron before the US entered the war.


F is for FIRE, That burns down the whole town!

U is for URANIUM... BOMBS!

N is for NO SURVIVORS...

       - Plankton

LSM


  • Member since
    February 2011
  • From: Monterey Bay,CA-Fort Bragg, NC
Posted by randypandy831 on Saturday, December 31, 2011 6:03 PM

so, is this GB build still going on? if so, throw me in. Italeri 1/48 Mk.IX with BS273 markings. high altitude spit. 

tamiya 1/48 P-47D $25 + shipping

tamiya 1/48 mosquito $20+ shipping

hobby boss 1/48 F-105G. wings and fuselage cut from sprue. $40+ shipping. 

  • Member since
    September 2003
  • From: AandF in the Badger State
Posted by checkmateking02 on Saturday, December 31, 2011 5:36 PM

Nice recovery, Jack.  Looks good.


  • Member since
    April 2006
  • From: ON, Canada
Posted by jgeratic on Saturday, December 31, 2011 4:19 PM

The saga continues... two steps forward, one step back.

Monday I had all the decals on.  After comparing to some period photos from 609 Squadron, the Xtradecal generic 30" codes looked a bit lean. 

So I decided to beef them up.  First thought was to just cut strips of decals from the same sheet and widen the letters, but the edges were too noticeable.
So broke out the masking tape and sprayed some medium sea gray.

Removing the masks I find all kinds of underspray occured and on the starboard side a section of the fuselage roundel got torn off.

The lettering now needs touch up, but as seen in this photo does not have to be all that pristine.

A quarter section of a spare decal was cut and placed over the torn one.  In this image the roundel looks wrinkled, but both decals cracked and light reflection pronounces it that much more.

Next up is a flat overspray so that touch ups with a paint brush will adhere better.

Best of the New Year to everyone!

regards,
Jack

  • Member since
    July 2010
Posted by jbrady on Thursday, December 29, 2011 8:27 PM

I'd like to add a build to this GB. Tamiya 1/48 Spit Mk V in the livery of the 4th Fighter Group. Just about to button the fuselage.


  • Member since
    November 2005
  • From: Leonardtown, Maryland
Posted by Greenshirt on Tuesday, December 27, 2011 11:36 AM

The key is the cornerstone of our hobby: patience. I thin the paint, not as much as for airbrushing, and the slop on the first coat. After a day to dry I then put on the second coat, a bit thinner than the first. If it needs more paint to get that smooth look, I wait another day and put another thin coat. I also use a trick learned recently for acrylics: take an old tshirt and rub the cured paint (give it at least a day to dry) with some spit. Take your time in front of a good movie and some of the brush stokes will smooth out. 

Another technique I use is to "prime" the entire model in a flat coat of the lightest color, then hand brush he other colors. This works better for enamels. 

Tim

On the bench (all 72nd):

  • 7 Spitfires & Seafires
  • Wellington III
  • N-9H Navy Jenny

  • Member since
    July 2010
Posted by jbrady on Tuesday, December 27, 2011 7:20 AM

Gotta agree with you. I can brush some enamel colors... mostly flats. For the most part, though, my brush painting efforts look like crap. Not too bad with an airbrush though.


  • Member since
    September 2009
  • From: Guam
Posted by sub revolution on Tuesday, December 27, 2011 3:58 AM

I give up.

I don't know how you brush-painters do it. And I really don't understand people who say you can't airbrush until you learn how to handbrush, because I can do a decent airbrush job, but I can not hand brush to save my life!

I tried several different ideas before I gave up completely and just stripped the whole thing down. Tommorow night's project will now be figuring out where the heck I can set up an airbrush here.

Hopefully I can still get this thing finished up soon.

NEW SIG

  • Member since
    April 2006
  • From: ON, Canada
Posted by jgeratic on Sunday, December 25, 2011 6:17 PM

So I've managed to get her back to the stage before my mishap.  I painted in reverse order this time.  First a dark grey and then masked the ports before applying the dark earth.  Followed with the dark green and lastly the undersides.

I didn't have much of my home brewed sky left, so instead of mixing more, opened a new bottle of "official" Sky Type S for the first coat.  A second layer of pure white in the panel areas and thirdly, my home made N*1 Sky Blue.

-Merry Christmas! everyone-

regards,

Jack


  • Member since
    April 2006
  • From: ON, Canada
Posted by jgeratic on Thursday, December 22, 2011 10:07 AM

sub - very brave,  this is the first I've seen of using hand brushing on a pre-shade technique.  I agree, try adding a few more layers on that one wing and maybe some light sanding on each successive coat.  That red on the panel lines looks stark enough to handle a few more coats.

regards,

Jack

  • Member since
    July 2010
Posted by jbrady on Thursday, December 22, 2011 7:57 AM

Before you strip it down, try adding more paint to the mix and a couple more coats. I've had the same thing happen when I brush on paint I've thinned for airbrushing... it can be done just takes a lot of coats.


  • Member since
    September 2009
  • From: Guam
Posted by sub revolution on Thursday, December 22, 2011 6:26 AM

Oh boy.

I think I may have really screwed the pooch this time.

Then again, maybe I should not have attempted my first pre-shading and my first hand painting on the same model.

So after reading around on the forums here, I noticed people saying that to hand brush you should really thin the paints down, which I thought made sense. But I never applied that sense to the pre-shading, which I just kind of slopped on, figuring (hoping) that the final color would cover up the sloppiness.

Oh boy.

Exhibit "A" is my X-plane that I use to test out new paint ideas/colors (why I didn't try the preshading on this first, I have no idea!) This model has really only ever seen an airbrush, so it has a nice smooth finish:
SDC10141

You can see the spots where I lightly brushed on the homemade pink paint mixture and, well, it looks pretty good.

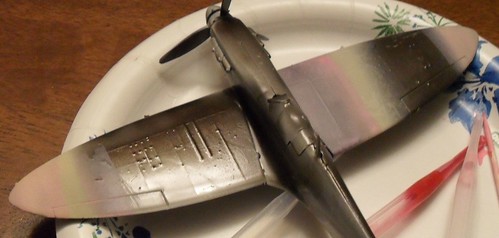
Exhibit "B" is..... is..... Bleh:

SDC10143

While my preshading might make a convincing whitewash, it does not seem to be doing what I wanted. The wing on the left hand side (the right wing) has been painted pink over the pre-shading. Once I saw what it was doing, I decided to only do one wing and see if I could rescue it. I'm wondering if maybe I can just do multiple coats until it looks "good enough," or if it is so far up river that I just need to strip the whole thing down. Boo Hoo Boo Hoo

Oh boy.

What do you guys think?

NEW SIG

  • Member since
    July 2010
Posted by jbrady on Tuesday, December 20, 2011 7:19 AM

Jack that sucks. I've had the same thing happen on occasion that's why I use Pro Modeler washes almost exclusively. Comes off with little effort even if you use it on a flat finish.


  • Member since
    February 2003
  • From: Rothesay, NB Canada
Posted by VanceCrozier on Tuesday, December 20, 2011 7:09 AM

Wow - I've missed a bunch! I've been in a pre-Christmas rush at the office trying to get things wrapped up, working on some freelance stuff at home + fighting off a bugger of a cold recently. Sorry I haven't been around & contributing - I'll have to poke my head in here to get caught up.

On the bench: Airfix 1/72 Wildcat; Airfix 1/72 Vampire T11; Airfix 1/72 Fouga Magister

  • Member since
    April 2006
  • From: ON, Canada
Posted by jgeratic on Tuesday, December 20, 2011 3:43 AM

My fix is to remove all surface paint.  I work at a print shop and was able to find an industrial type degreaser (something similar to superclean).  Originally was thinking brake cleaner, but read it eats away at the glue and would likely result in the model falling apart.

It has been a good five years since I had built an aircraft and in that time I forgot some basics.  Firstly, ten hours was not enough for the future to cure.  Secondly, since the wash was an acyrlic based paint, the protective clear coat needed to be a different medium, like Testors enamel gloss clear.

I managed to get the majority of the surface cleaned up.  I did leave the masking on the canopy and wheel wells.  I didn't dare look underneath to see if any paint damage occured here from the cleaner as I was discouraged enough as it was.  I'll worry about that later.

As for discovering a new weathering technique, it's just too hap-hazard.  Could probably get the same result (and better control) by using a fine grit sand paper.

regards
Jack

  • Member since
    September 2009
  • From: Guam
Posted by sub revolution on Tuesday, December 20, 2011 12:12 AM

On the plus side, I think you accidently discovered one hell of a weathering technique. Yes Now if you could just cover up the spot where the bare plastic shows through...

NEW SIG

  • Member since
    September 2003
  • From: AandF in the Badger State
Posted by checkmateking02 on Monday, December 19, 2011 11:04 PM

That's really disappointing, Jack.  I've been trying pinwashes lately, and even though I've used dish detergent too, and a 9 to 1 ratio of acrylic paint to water, they still seem resistant to wiping off if left on more than 10 to 15 minutes.

Hope you can fix this.  It was looking very good.


  • Member since
    December 2009
Posted by ww2psycho on Monday, December 19, 2011 8:33 PM

Dang that sucks really bad!

  • Member since
    April 2006
  • From: ON, Canada
Posted by jgeratic on Monday, December 19, 2011 6:15 PM

Well I guess it was my turn to have disaster strike.  Things were going too smoothly and murphy's law decided to rear it's ugly head.  After applying a pin wash made of water and some dish soap, I can usually wipe the excess off with a damp cloth and water, but not this time.  Even a 50/50 mix with Tamiya thinner couldn't lift off the wash.  Against better judgement went with straight thinner. That got it, along with the future and the the underlying paint. 

regards,

Jack

  • Member since
    April 2006
  • From: ON, Canada
Posted by jgeratic on Monday, December 19, 2011 10:27 AM

The suggested method for canopies is to dip them in a suitable container filled with future.  I did this originally but after I glued it in place, did another round of sanding and had to hand brush the future on, with no problems.  I wonder if anyone has ever tried submerging a whole aircraft in future.

When applying the future with a brush, do not overload the bristles (I used a flat 3/8" wide sable hair).  You don't necessarily need to work quickly, but you should spread out each application as much as possible before dipping into he bottle for the next round. Just as in painting, do not go back over an area that has already begun to dry. 

You will likely get a few accumulations of future on an edge.  Again do not try to even it out with the brush.  If it is still fresh use a paper towel to absorb it on the edge, but not directly on the flat surface.

regards,

Jack


JOIN OUR COMMUNITY!

Our community is FREE to join. To participate you must either login or register for an account.

SEARCH FORUMS
FREE NEWSLETTER
By signing up you may also receive reader surveys and occasional special offers. We do not sell, rent or trade our email lists. View our Privacy Policy.