SEARCH FINESCALE.COM

Enter keywords or a search phrase below:

Blitzkrieg in the West (France 1940) Sept. 18 2011 - March 1 2012

144765 views
2290 replies
1 rating 2 rating 3 rating 4 rating 5 rating
  • Member since
    March 2003
  • From: Rain USA, Vancouver WA
Posted by tigerman on Saturday, December 17, 2011 8:15 PM

Merry Christmas and thanks for stopping in Terry.

   http://i7.photobucket.com/albums/y269/wing_nut_5o/PANZERJAGERGB.jpg

 Eric 

  • Member since
    March 2006
  • From: Right Side of a Left State
Posted by Shellback on Saturday, December 17, 2011 8:20 PM

tigerman

Okay, here we go. Please be kind. LOL I missed some seams. It seemed as though every piece had a seams on them. This again was Bronco's first kit. I don't claim to be a good weatherer either. Okay, enough pity party.

http://img.photobucket.com/albums/v381/tigerman12/DSC02139.jpg

http://img.photobucket.com/albums/v381/tigerman12/DSC02138.jpg

http://img.photobucket.com/albums/v381/tigerman12/DSC02137.jpg

http://img.photobucket.com/albums/v381/tigerman12/DSC02136.jpg

http://img.photobucket.com/albums/v381/tigerman12/DSC02131.jpg

http://img.photobucket.com/albums/v381/tigerman12/DSC02130.jpg

http://img.photobucket.com/albums/v381/tigerman12/DSC02122.jpg

All I can say is that I've enjoyed this build very much and have learned a great deal as well. Stay tuned for another GB. Wink

OH MY ! OH MY GOSH ! Look at them seamsWink !   Actually ...............Confused.................i dont see any seams that look out of the ordinary for a tank Eric . After your disaster the other day i'm glad to see your model done and looking good . Nice work my friend .Yes

  • Member since
    October 2009
Posted by PANZERWAFFE on Sunday, December 18, 2011 2:08 AM

CARL, WBILL - Thanks.  Agree, always fun finding photo's of details and sometimes surprising seeing what people actually came up with.

ERIC - AHHH NICE!  Was worth the wait, I love it!  Think your construction looks great and can't see or tell you had any problems at all.  It seems that I can't see your seams Yes  Really like your weathering.  Very happy to see you finish this one up! YesBeer

Very happy I had the pieces you needed.  Glad you could use them on such a great build.

What could your next GB be......the world wonders.............???

TERRY - Thank you much.  Hope to see some more of your beautiful B1 soon.  Have a Merry Christmas Gift


Update:

Got a late start tonight but was able to get some paint put down.  Still have the same complaint as earlier, problems with the AB.  WBill, Carl did clean the tips and there was a little build up but that did not completely solve the problem.  Still waiting to get the brush I want, hopefully soon!

Used a dark olive drab for the base and then tried to post shade with faded olive drab.  Does not really show and I blame this largely on the AB.

Had the rear plate break off when removing the mask, was surprised but broke clean and should go right back on.

Was originally thinking of going with a earth brown camo job but have only found this pattern on early British vehicles, all Commonwealth later war.  Still plan on putting Canadian markings so believe will leave it the solid olive green.

More work on the figs.  Touched up their faces, gave them some hair, base coat on uniforms and started with the uniform color coat.  Much left to do to these fellows.

That's it for tonight.

Rob

  • Member since
    March 2006
  • From: Right Side of a Left State
Posted by Shellback on Sunday, December 18, 2011 3:12 AM

Rob , paint job looks just fine . Those figures are coming along just fine also . I like the "flat top " ..........hee hee .

I dont remember the complaint about your A.B. right now Hmmand i'm too lazy to go back and lookStick out tongue but if cleaning didnt solve it the only other things i can think of would be paint consistency or air presure , unless your A.B. crapped out .Sad What make is it ?

  • Member since
    November 2003
  • From: Nashville, TN area
Posted by bobbaily on Sunday, December 18, 2011 7:31 AM

Eric-very nice job...then throw in the difficulty level of the kit, makes it even more impressive....I'd be proud to add that one to my shelf.

Rob-your carrier and figures are outstanding.  Can't wait to see the final product.  And I'm glad that you finished the head of the one figure....it was starting to freak me out....the 'half a head' thing...

Sorry for the absence....however I have been lurking and admiring all of the great work being done....and a bit overwhelmed by the group's quality of work.

I finally opened the Airfix 109 and washed the spruce.....quality levels aren't quite Tamiya/Hasegawa levels, but neither is the price.  I think I'm going to go OOB for this one to save time and sanity.  Also, I'm going to attempt a different approach-assemble the interior components (that would be the cockpit) and then paint...dunno if it will work any better, but change is good, right?

Bob


  • Member since
    November 2009
  • From: SW Virginia
Posted by Gamera on Sunday, December 18, 2011 11:46 AM

Eric: She looks really good to me, I think the weathering came out great. Looks used but not overdone.

Rob: Super job on both the UC and the figures.

Terry, Merry Christmas to you sir!


"I dream in fire but work in clay." -Arthur Machen


  • Member since
    March 2003
  • From: Rain USA, Vancouver WA
Posted by tigerman on Sunday, December 18, 2011 12:48 PM

Thanks Carl, Rob, Bob and Cliff. Appreciate it.

Rob, I can't wait to this see build done.

As for the next GB, hmmmm, haven't made up my mind yet, but there is a Tiger I that keeps looking at me and I did score some Cavalier zimmerit which is very hard to get. Not sure what I could do with that. I could go for a Tiger Family GB perhaps?

Stay tuned.

   http://i7.photobucket.com/albums/y269/wing_nut_5o/PANZERJAGERGB.jpg

 Eric 

  • Member since
    December 2006
  • From: t.r.f. mn.
Posted by detailfreak on Sunday, December 18, 2011 8:39 PM

                                  Tigerman, the hotchkiss turned out very nice. Very unique paint schemes on those french vehicles.

                                  Panzerwaffe the little carrier looks pretty sharp,nice little added details.

                                  Great builds all around everyone.Will update the panzer II shortly.

[View:http://s172.photobucket.com/albums/w1/g-earl828/]  http://i158.photobucket.com/albums/t104/cycledupes/1000Roadwheels4BuildBadge.jpg

  • Member since
    March 2003
  • From: Rain USA, Vancouver WA
Posted by tigerman on Sunday, December 18, 2011 8:55 PM

detailfreak

                                  Tigerman, the hotchkiss turned out very nice. Very unique paint schemes on those french vehicles.

                                  Panzerwaffe the little carrier looks pretty sharp,nice little added details.

                                  Great builds all around everyone.Will update the panzer II shortly.

Thanks Greg and you are correct about those unique schemes. I admit that I wussed out and chose a simpler striped scheme. I probably should have used the numbers, but wrecked them. Plus those hearts were just calling my name.

   http://i7.photobucket.com/albums/y269/wing_nut_5o/PANZERJAGERGB.jpg

 Eric 

  • Member since
    October 2010
  • From: Buenos Aires, Argentina
Posted by Kveldulfr on Sunday, December 18, 2011 9:09 PM

Hi guys, I have catch at last with the posts, since my last one I only has two or three hours to work in my model, and not even has read the forum until tonight

It´s has been a pleasure to see too many exelent works, I hope to be at least as half good as you are.

I'll have two or three days after xmas to work on my munitionsschlepper and finish at least the suspension. Tomorrow night I´ll post some new photos.

And now I like to ask something: Someone have a drawing or photos of the part that joins the two leaf springs in every wheel? The best images I have are from the vehicle at Littlefield museum that I found in Toadmans Tank pictures site, The photos are excellent, but I can´t find one that show the part.

I´s past midnight, so I´m going to sleep.

Good modelling!

  • Member since
    March 2003
  • From: Rain USA, Vancouver WA
Posted by tigerman on Sunday, December 18, 2011 9:17 PM

Hope to see some pics of your build kveldufr.


   http://i7.photobucket.com/albums/y269/wing_nut_5o/PANZERJAGERGB.jpg

 Eric 

  • Member since
    December 2006
  • From: t.r.f. mn.
Posted by detailfreak on Sunday, December 18, 2011 9:55 PM

                                 Well after working my way through a computer gliche I finally have some progress pics. The upper hull is now in primer and it looks pretty good.


                                    Seems a bit finicky on the fit between the upper and lower but it will work out.My intentions are to leave the armament out on a table or makeshift workbench in preperations for a good cleaning.More on that later. Also been working on the tools. The woodblock is real ,the kit supplied item was terrible. The P.E. tool clasps are Voyager and seem to be easier to deal with than Dragons.


                                        As always any questions or comments are welcome.

                                                          Greg"Detailfreak"RowleyYes

[View:http://s172.photobucket.com/albums/w1/g-earl828/]  http://i158.photobucket.com/albums/t104/cycledupes/1000Roadwheels4BuildBadge.jpg

  • Member since
    March 2003
  • From: Rain USA, Vancouver WA
Posted by tigerman on Monday, December 19, 2011 2:01 AM

Hope you can rectify the problems Greg. Good to see some progress.

   http://i7.photobucket.com/albums/y269/wing_nut_5o/PANZERJAGERGB.jpg

 Eric 

  • Member since
    July 2004
  • From: Texas
Posted by wbill76 on Monday, December 19, 2011 7:16 PM

Spending time with the devil is certainly a long and involved process! I've gotten the details for the fenders and rear hull completed and all of the various tools installed. I used MM non-buffing Metalizer for the metal portions followed with a light dry-brushing of MM enamel Steel. Wood portions were done using a base coat of 50/50 Light Gray/Panzer Dunkelgelb with a thinned wash of MM enamel Leather followed by a dusting of Burnt Umber artist pastels. The wire cutters had their Bakelite handles done using MM enamel Italian Dark Brown and the rubber end caps with MM enamel Gunmetal. I also detailed the head pads on the commander's hatches using the same Italian Dark Brown. Everything was clamped down using the kit-supplied PE parts where necessary. The gun cleaning rods were detailed and installed as well, I used a pin vise to drill out the connecting "female" end of the top rod for a little more accurate detail.

The rear hull also received some detailing attention, the exhausts for the main engine and turret traverse motor were treated with a base coat of MM non-buffing metalizer Gunmetal followed by very careful applications of an enamel Rust wash to create their finish. I say careful as the metalizer will lift easily so time between applications of the wash is essential. The smoke grenades were detailed using a custom mix of "field gray" consisting of Russian Armor Green combined with Panzer Schwarzgrau to produce the desired shade. The pull chains on the grenades were added courtesy of the kit-supplied PE fret and painted with MM non-buffing metalizer Gunmetal. I used Tamiya Clear Red for the brake light lenses and the rear fender deflector.

Next up will be getting it ready for the markings and moving on to the weathering stages.

  • Member since
    October 2010
  • From: Buenos Aires, Argentina
Posted by Kveldulfr on Monday, December 19, 2011 7:44 PM

Well, the biggest update until now...

The gap filled and puttyed.

I glued my fingers to the back armor, and another missfit.

The back was very inaccurate, so I filed it flat.

One of the sides.

The engine cover after I open it.

The front spring oob.

My replacement under construction.


This is the end of the photos, I have made some progress but is really slow rebuild the leaf springs, remove the flash and fill all the sink marks.

Good modelling!

  • Member since
    March 2003
  • From: Rain USA, Vancouver WA
Posted by tigerman on Tuesday, December 20, 2011 2:20 AM

That's a lot of surgery there Kveldulfer. It looks as though your on top of it.

Bill, good to see more progress. Hopefully you can't make it before the holidays end.

   http://i7.photobucket.com/albums/y269/wing_nut_5o/PANZERJAGERGB.jpg

 Eric 

  • Member since
    April 2003
  • From: 41 Degrees 52.4 minutes North; 72 Degrees 7.3 minutes West
Posted by bbrowniii on Tuesday, December 20, 2011 3:35 PM

Hey guys

Sorry for my extended absence and lack of participation.

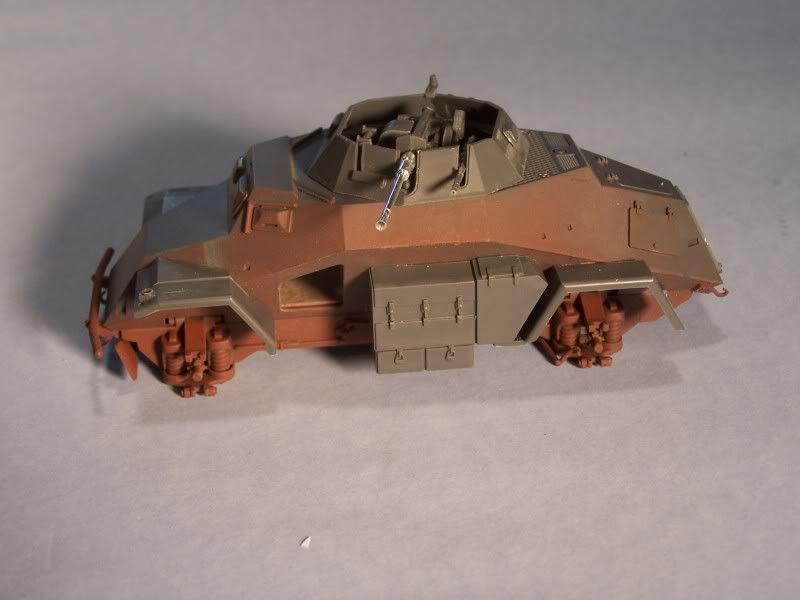
I've got a few update photos of the 222. Basically, minus a few small additions, construction is complete and all that is left is the paint job.

The last time I left you, I was arguing with myself about how crazy to go on the interior. In the end, I compromised. I used a combination of ref photos from the web and a picture of the Tristar interior for their version of the 222.

On the right, I added a mount for a gas mask canister, a helmet, and a rack for some grenades.
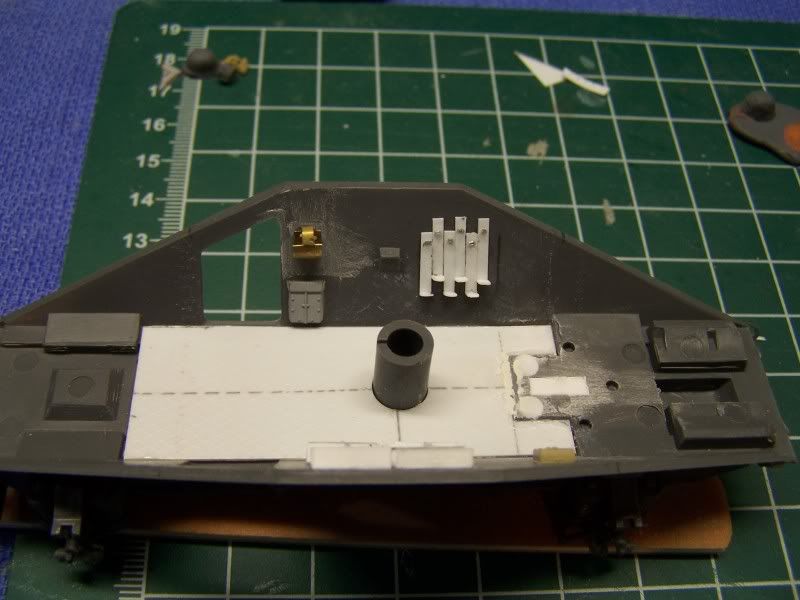
On the left, I scratchbuilt a rack for ammo cans for the MG-34. I got this idea from the Tristar kit. Truth be told, I could not find a single ref photo that supported that this thing, in fact, existed. But I liked the look of it so, what the hell. Of course, I am guessing that my measurements were off because I cannot rotate the turret with the rack in place... Whistling Still, I like the looks of it.... that's my story and I am sticking to it!
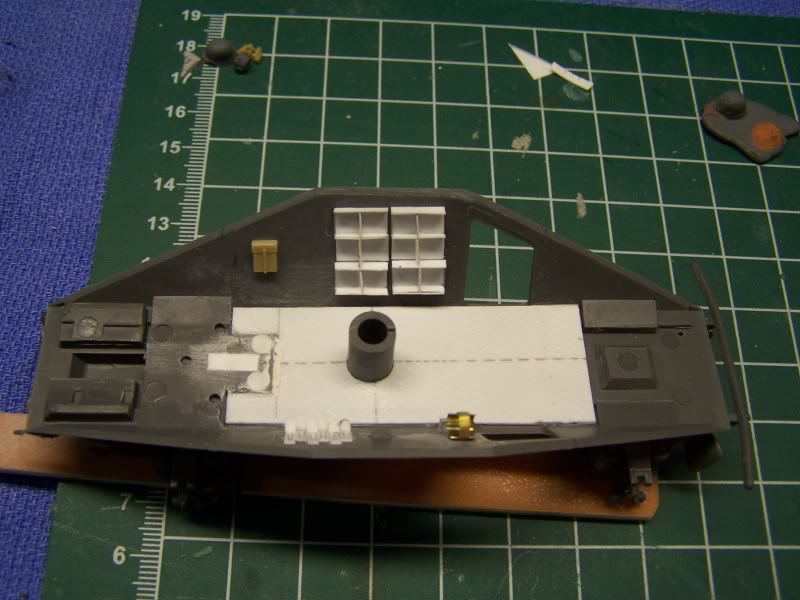
Here is everything painted up and loaded...

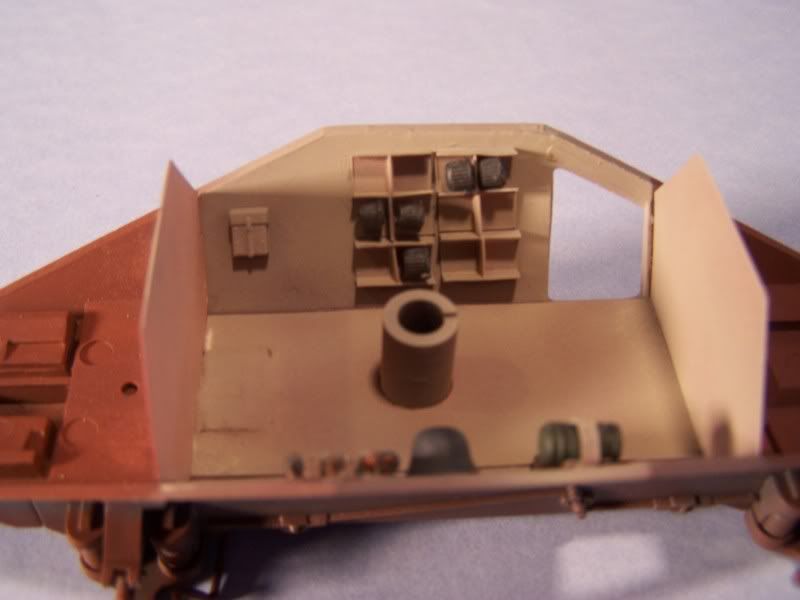
And here is the vehicle all buttoned up, waiting for paint:
As always, comments if ya got em'!

By the way, great work you guys. Lots of really nice builds going on in here. I wish I could comment on all of them, but I'm a bit pressed for time.

'All that is necessary for the triumph of evil is for good men to do nothing' - Edmund Burke (1770 ??)


  • Member since
    July 2004
  • From: Texas
Posted by wbill76 on Tuesday, December 20, 2011 6:36 PM

Eric, thanks for the comments. I'm shooting to have this one done before year's end. I have a week off from my classes next week so won't have any excuses in that department! Big Smile

Kveldulfr, that's some nice surgery and enhancements going on. Nice work on the rear deck intake and suspension springs.

Boyd, nice "gizmology" on the interior of the 222. I've got interior shots of a museum restored 222 and they don't show that any kind of rack like that existed...what it does show is that there were racks for various stuff on that hull side including three vertical slots that held either the "two-by-two" drum racks for the MG34 or standard MG34 belt boxes (not sure which). You can see it in the pic below. What you came up with fills the space but I can see why it would interfer with the turret rotating. No pressure on fixing but thought you might like to see the actual arrangement for future reference (or for anyone else contemplating the same kit).

  • Member since
    April 2003
  • From: 41 Degrees 52.4 minutes North; 72 Degrees 7.3 minutes West
Posted by bbrowniii on Tuesday, December 20, 2011 7:34 PM

Bill

Thanks for the photo. That is very similar to one of the pictures that I used (from the Littlefield collection, maybe? - or from pics at Toadman's (are his of the 222 from Littlefield? Is there a 222 from Littlefield?) except the grenade racks were on the other side.

I realized pretty early on that my ammo rack is most likely fiction, but it fits the bill of giving the impression that something is in there. Most of it is invisible with the gun in place anyways, which is one of the reasons why I didn't put too much effort into trying to accurately represent the interior. It was actually one of my struggles, because I really wrestled with going whole hog and adding just about everything that I could find pictures for... but then I realized that: A) 95% of it would be hidden and B) I just didn't feel like it Stick out tongue

By the way, this probably goes without saying, but your Pz III is superb!


'All that is necessary for the triumph of evil is for good men to do nothing' - Edmund Burke (1770 ??)


  • Member since
    April 2003
  • From: 41 Degrees 52.4 minutes North; 72 Degrees 7.3 minutes West
Posted by bbrowniii on Tuesday, December 20, 2011 7:40 PM

Well, I just went back and looked at my photo, and the grenade racks are on the left. Looks like I put them on the wrong side.

Oh well....Wink

'All that is necessary for the triumph of evil is for good men to do nothing' - Edmund Burke (1770 ??)


  • Member since
    July 2004
  • From: Texas
Posted by wbill76 on Tuesday, December 20, 2011 10:02 PM

Boyd,

Thanks for the kind words on the Pz III, much appreciated! Beer I assume the photos are from the Littlefield 222 but am not 100% sure on that. I hear you about agonizing over stuff that's not really visible in the end, chalk it up to Advanced Modeler Syndrome (AMS)! As for the grenade racks being on the wrong side, it's an easy mistake to make as both sides had MG34 ammo racks and they look very similar if you aren't paying too close attention. The model accuracy police aren't going to bust down your door anytime soon so I wouldn't lose any sleep over it. Wink

  • Member since
    November 2009
  • From: SW Virginia
Posted by Gamera on Wednesday, December 21, 2011 9:21 AM

Great work all around guys!!!

I"m afraid I haven't gotten much done since the filter I put down on the Char B1 came out really dark and kinda nasty looking. Trying to decide to leave it or take some thinner and blot some of it off hopefully not wrecking the paint already on the model.

"I dream in fire but work in clay." -Arthur Machen


  • Member since
    March 2003
  • From: Rain USA, Vancouver WA
Posted by tigerman on Wednesday, December 21, 2011 1:19 PM

Clif, can you use a real light duty filter to perhaps lighten it up? Maybe a few filters?

   http://i7.photobucket.com/albums/y269/wing_nut_5o/PANZERJAGERGB.jpg

 Eric 

  • Member since
    November 2009
  • From: SW Virginia
Posted by Gamera on Wednesday, December 21, 2011 2:36 PM

Eric: That's a good idea, only the filter dried sorta blotchy and uneven. I think I may have used the thinner stuff off the top on other models and ended up with too much paint and too little thinner. Or if I can remember back to college chemisty the filter had too much solute and not enough solvent.

If I used a lighter filter I think it would lighten the whole thing instead of just the heavy areas. It's not too bad I suppose, it does look sorta dirty and muddy - which is fine on the lower areas but just looks odd to me on the top of the turret. I guess the tracks could throw mud up there, but it doesn't look right to me.

I've been meaning to post photos and ask what ya'll think but keep forgetting. Propeller

"I dream in fire but work in clay." -Arthur Machen


  • Member since
    April 2003
  • From: 41 Degrees 52.4 minutes North; 72 Degrees 7.3 minutes West
Posted by bbrowniii on Wednesday, December 21, 2011 5:59 PM

wbill76

 The model accuracy police aren't going to bust down your door anytime soon so I wouldn't lose any sleep over it. Wink

Well, that is certainly a relief.

"HEY HONEY, YOU CAN UNBAR THE DOOR NOW.".......... Stick out tongue

'All that is necessary for the triumph of evil is for good men to do nothing' - Edmund Burke (1770 ??)


  • Member since
    March 2003
  • From: Rain USA, Vancouver WA
Posted by tigerman on Wednesday, December 21, 2011 8:32 PM

bbrowniii

 wbill76:

 The model accuracy police aren't going to bust down your door anytime soon so I wouldn't lose any sleep over it. Wink


Well, that is certainly a relief.

"HEY HONEY, YOU CAN UNBAR THE DOOR NOW.".......... Stick out tongue

LOL

Cliff, let's see what you've got, it might give us a better perspective.

   http://i7.photobucket.com/albums/y269/wing_nut_5o/PANZERJAGERGB.jpg

 Eric 

  • Member since
    April 2009
  • From: Carmel, IN
Posted by deafpanzer on Wednesday, December 21, 2011 10:40 PM

Bill- Great paint job on your Pz III!!!  Always wanted to do that paint scheme... one day I will!!!  Excellent tip about using pin vise to drill hioles for "female' end of the rod.  Never thought about this earlier... Beer

Boyd- Nice interior details! Yes  You are very lucky... I have contacted the model accuracy police station as soon as I saw the error but they are closed for the holidays.  Nah, I will have not known about the wrong side if you didn't tell me...


Andy

  • Member since
    October 2009
Posted by PANZERWAFFE on Thursday, December 22, 2011 7:50 PM

CARL - Glad you like the figures and he no longer has that flat top Wink  No problem worrying about what was wrong with my AB.  It crapped out Angry  It was an Aztek.  No worries because my new Renegade Krome should be here any day now Stick out tongue

BOB - Thanks and look forward to your 109.

CLIFF, ERIC, DETAIL FREAK - Pz II is looking good.  Like the driver hatch open.  The wood block and tool clasp are well done Yes

WBILL - Looks great Yes

KVELDULFR - Nice work on the hull.  The cleaned out engine cover is a nice touch.

BROWNIII - Nice scratch work.

Have been putting on the last of the small details, ammo and water cans, etc.  Added decals and have done quite a bit of dry brushing.  Still working on the unit and formation signs.  Did not have a decal for this that was the correct number or color.  To remedy this have decided to hand paint them.  This is the beginning of that

The Tamiya decals really suck and very thick so did not use them.  For the vehicle ID numbers had found some spares in the decal box and used them instead.  The only upsetting thing about that is the spares I used do not have the "C" in front of the number.  "C" designating Canada but thats OK because many of the Canadian vehicles had the standard British marking beginning with the "T" and that is whats now on the carrier.


Rob

  • Member since
    March 2006
  • From: Right Side of a Left State
Posted by Shellback on Friday, December 23, 2011 1:38 AM

Rob , i guess the Aztecs just crap out after a time ? I've got one but dont use it that often . Mostly i go with my Badgers . One of them, the 150 ,  i've had for 30 yrs and its still working fine .

The details on the tools and inside the compartment look great .

  • Member since
    March 2007
  • From: Carmel, CA
Posted by bondoman on Friday, December 23, 2011 1:59 AM

My two bits.

I have a Badger 105 which is a great brush, although not set up for fine detail.

I had two Azteks. The flaw is that the spring is in the paint path, and gets gummed up. Unscrew the tip, pull out the spring/ needle/ cap and drop it all into a paper cup. Swill lacquer thinner in there, pull it all apart and wipe down the needle, toothbrush the spring, put it all back together and it works fine.


JOIN OUR COMMUNITY!

Our community is FREE to join. To participate you must either login or register for an account.

SEARCH FORUMS
FREE NEWSLETTER
By signing up you may also receive reader surveys and occasional special offers. We do not sell, rent or trade our email lists. View our Privacy Policy.