SEARCH FINESCALE.COM

Enter keywords or a search phrase below:

No More Excuses GB: Part Deux. Closed to New Entries But Finish What You Signed Up For

82199 views
690 replies
1 rating 2 rating 3 rating 4 rating 5 rating
  • Member since
    April 2006
  • From: Denver, Colorado
Posted by waynec on Sunday, February 19, 2012 1:44 PM
repainted all the rocks with a light grey wash to even out the dark splotches and went over that with a dark grey wash and also washed the ties in dark grey with a darked subtle streak down the middle from everything trains used to drop on the tracks. think it was successful. before after at least good enough for dislay. second one will be much better given what i learned. need to add the rails but just gluing and spiking, no fancy german mountings at 1/72. LESSON 2. WASH MODEL. WASH HANDS, PUT ON RUBBER GLOVES BEFORE POWDERING. looks like a csi crime scene with fingerprint dusting. engine needs to be weathered and i have enough room to add a railcar, maybe the UM px-38 RO-RO flat car in dark tellow and red brown for some color. someone at the contest suggested doing a BIG BOY in german red and black, maybe make the silver nose red too.

Никто не Забыт    (No one is Forgotten)
Ничто не Забыто  (Nothing is Forgotten)


  • Member since
    March 2010
  • From: Buffalo, NY
Posted by macattack80 on Sunday, February 19, 2012 4:46 PM

NIce fix on the railbed waynec!  Your practice model would be something I would proudly put on my display shelf. Bow Down   Keep up the good work.

Kevin

[


  • Member since
    April 2005
Posted by Thunderbolt379 on Sunday, February 19, 2012 5:05 PM

Railbed looks fantastic! WOW! YesYes

M/TB379

http://worldinminiature.blogspot.com/

  • Member since
    September 2007
  • From: Relocating
Posted by Mobious on Sunday, February 19, 2012 7:57 PM

Waynec, Outstanding! The locomotive looks right at home on the rail base. Nice save. Looking forward to seeing updates.

"It's a problem of applied physics" Roy Brown

  • Member since
    April 2006
  • From: Denver, Colorado
Posted by waynec on Sunday, February 19, 2012 10:32 PM
thanks to all for the kind comments. ANOTHER LESSON LEARNED things tend to look better 2-3 days after they look bad (unless it's obvious). took a break after fixing the bed and started on a 1/35 gondola. nice working with bigger pieces. i think i am going to build the plastic bed for this for a couple of reasons. 1- to see if i can paint it to look as good as a scratchbuild 2- so i have a correct rail width for testing all other 1/35 builds and makinga rail gauge 3- so i have a quick finished base for other rail car builds. may grind down the plastic ballast with my battery powered fingernail fixing machine i got at walgreens for under $10US (less power than a dremel for plastic work) and add O guage ballast.or i may use the plastic ties and rails and lay ballast. will weather engine on mon and get rails down so i can take it to feb club meeting on wed. NOTE TO RAIL BUILDERS IN 1/35 if you are thinking of building a train of 2 or more cars, build and paint the couplers so they can move and hook to one another. DO NOT add the kit air hoses on either side. you will hacve to make your own and hook the air hoses on both cars together. shouldn't be difficult and, if you get a judge that actually knows something about trains like me, he will look for that. wish trumpeter would come out with a 1/35 german boxcar. could probably scratchbuild one using the gondola base.

Никто не Забыт    (No one is Forgotten)
Ничто не Забыто  (Nothing is Forgotten)


  • Member since
    February 2010
  • From: New Jersey
Posted by 68GT on Tuesday, February 21, 2012 6:01 PM

Wow, that engine looks great!

More of the MIG

Just have to clear it and get a base since its gear up.

On Ed's bench, ???


  • Member since
    March 2010
  • From: Buffalo, NY
Posted by macattack80 on Wednesday, February 22, 2012 3:31 PM

Your MiG is looking great 68GT!  What kind of paint did you use?

The FOD covers and nozzles arrived today.  I should be able to get the ball rolling on this Tomcat now. 

Kevin

[


  • Member since
    February 2010
  • From: New Jersey
Posted by 68GT on Wednesday, February 22, 2012 5:29 PM

I used a black lacquer for the base and Model Masters non-buffing Aluminum Metalizer on top.  I just kept it simple and didn't even apply any clear to it.

The green is a mix of 2 parts FS Dark Green and 1 part FS Medium Green (don't know the numbers off the top of my head).

On Ed's bench, ???


  • Member since
    March 2010
  • From: Buffalo, NY
Posted by macattack80 on Wednesday, February 22, 2012 6:07 PM

Thanks for the info 68GT.  It looks fantastic.

Kevin

[


  • Member since
    April 2005
Posted by Thunderbolt379 on Wednesday, February 22, 2012 8:24 PM

68GT -- I wish I could spray metallics like that! The last few times I've tried I've got a mess, which means my Mustang fleet is on hold (waahhh!)

I got back to the Meteor yesterday when my black panel wash arrived, she is rewashed and re-clear coated, and I have started work on the decals. Photos later!

Cheers, Mike

http://worldinminiature.blogspot.com/

  • Member since
    March 2010
  • From: Buffalo, NY
Posted by macattack80 on Wednesday, February 22, 2012 8:51 PM

Mike, definetly looking forward to seeing more progress pics of the Meteor.  I will hopefully get some pics posted of the Tomcat in the next day or two.

Kevin

[


  • Member since
    April 2005
Posted by Thunderbolt379 on Thursday, February 23, 2012 5:41 AM

Mac -- your wish is my command.

Here she is re-panel washed in black, and recoated with satin:
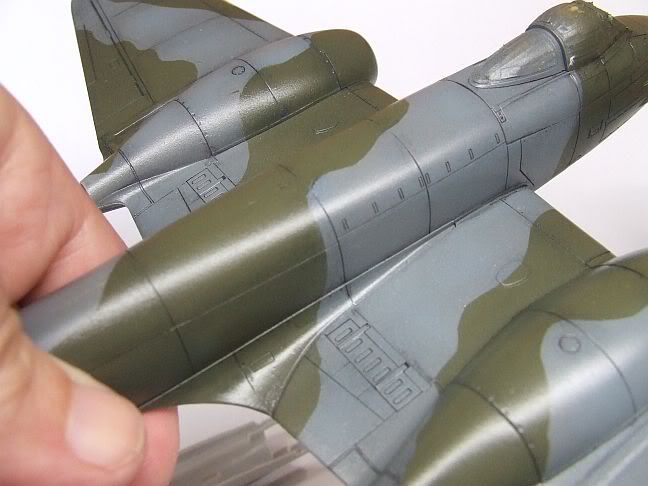
The black creates more definition and the eye seems to get hold of it easier... Maybe overdone against the real thing, but the effect in miniature says something.

Next, decals underway:
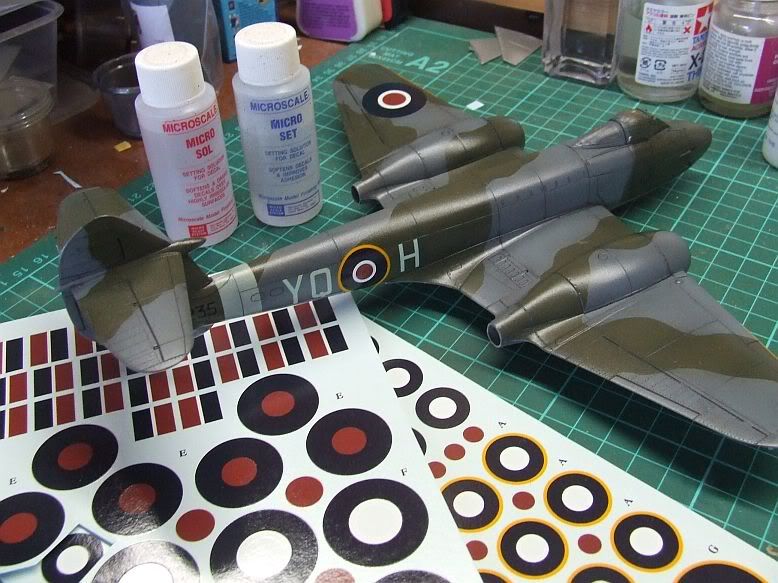
As you can see, I went AM for the insignia. The Tamiya decals were slightly out of register on the fuselage roundels so I bought Eagle Strike 48136 to replace them. It turns out the kit sheet was also somewhat too light and bright on the red and blue, so I replaced them all. The ES decals are thin and responsive and did a good job.

Here's the state of play with the mains all done and stencils just getting started:
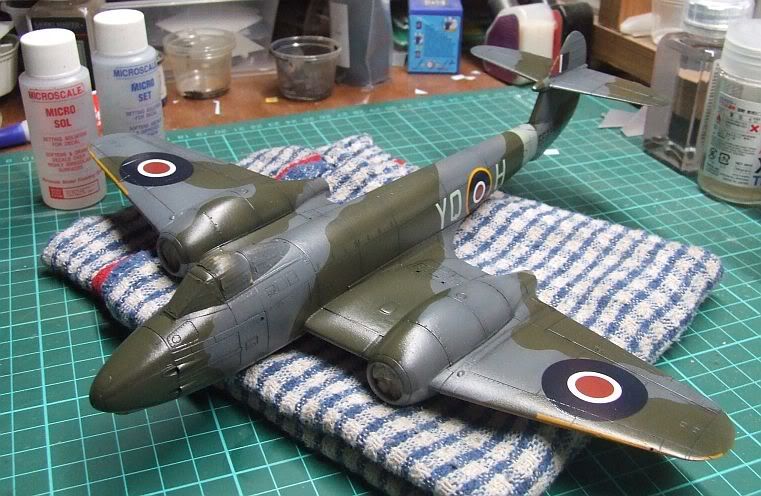
She's nowhere near as smooth as I would like, the finish is grainy at a fine level and I must find a way to spray both paint and clear and end up with a smoother surface in future.

Cheers, Mike/TB379

http://worldinminiature.blogspot.com/

  • Member since
    March 2010
  • From: Buffalo, NY
Posted by macattack80 on Thursday, February 23, 2012 3:30 PM

That turned out great!  I like the black panel wash.  If the plane was just gray it may have been a bit stark but it looks really nice with the green and gray.  Nice job.

Glad to hear the Eagle Strike decals worked out so good.   I think I have a decal sheet from them somewhere around.  Good to know they should work out.  Decaling is one of my least favorite steps in model building but it's the step that really brings a model to life.

Kevin

[


  • Member since
    April 2005
Posted by Thunderbolt379 on Thursday, February 23, 2012 4:05 PM

Thanks, Kevin. I have about 50 stencils to apply now, whch will take a few rounds of work, then I must decide if I'll use a final topcoat, and if I should pull the shine down... Then there's the main gear bays to mask, spray and weather. I need an extra shade of gray to get the landing gear together, and stencils of some sort for the wheels -- there's a way to go yet.

Cheers, Mike/TB379

http://worldinminiature.blogspot.com/

  • Member since
    March 2010
  • From: Buffalo, NY
Posted by macattack80 on Thursday, February 23, 2012 4:34 PM

Here are the resin covered GE F110 Nozzles from Steel Beech and the die cut FOD intake covers.   I chose blue because I figure it will look nice with the blue on the decals.  I will paint the nozzle covers blue to match.

Kevin

[


  • Member since
    October 2008
  • From: italy
Posted by bsyamato on Friday, February 24, 2012 5:12 AM

Waynec good CSI work!!  terrain look are realistic

68GT great NMF 

So the meteor near end line and turn really cool Thunderbolt YesYes


  • Member since
    February 2010
  • From: New Jersey
Posted by 68GT on Friday, February 24, 2012 5:27 AM

Mike, that was looks good on there.  It might get covered up with a little more weathering but I think it looks good as is.

On Ed's bench, ???


  • Member since
    April 2005
Posted by Thunderbolt379 on Friday, February 24, 2012 5:43 AM

Thanks, guys. These planes did not see a great deal of flying before the end of the war, so I might hold the weathering to some dust and oil streaks on the underside.

Well, all the decals are on -- EIGHTY of them, but most of them stencil data so fine and small it's invisible in any other than macro close up. I had to use a large hand lens in addition to magnifying specs to read some of it so I could be sure it was going on the right way up!

I have been very impressed by how well both the Eagle Strike and kit decals have behaved, both responding very well to Microscale chemistry. If the surface had been smoother and my painting more consistent I'd have been happier, but all in all this is turning into a very attractive piece nonetheless.

I'll probably set it aside for a few days and work on others, then come back and tackle the landing gear, weathering and final clear coat.

Cheers, Mike/TB379

http://worldinminiature.blogspot.com/

  • Member since
    March 2010
  • From: Buffalo, NY
Posted by macattack80 on Friday, February 24, 2012 4:12 PM

Looking great Mike!  You are right....it is a very attractive model.  Looking forward to seeing the weathering process. 

Kevin

[


  • Member since
    February 2010
  • From: New Jersey
Posted by 68GT on Friday, February 24, 2012 8:47 PM

While waiting for the varnish to dry on the base for the MIG I found this closet critter way in the back.  Its a Revell Nike Hercules from their History Makers series.  Not sure when it came out but I've had it at least since the 80s.  It needs to be completed and will be my next kit to work on.

On Ed's bench, ???


  • Member since
    April 2005
Posted by Thunderbolt379 on Friday, February 24, 2012 9:18 PM

68GT -- that one was first issued back around 1958, '59 or so, not entirely sure myself, but I have a reference to it in a 1961 book. I have their most recent reissue and look forward to building it as a companion to my Trumpeter SA-2.

Cheers, Mike/TB37

http://worldinminiature.blogspot.com/

  • Member since
    April 2006
  • From: Denver, Colorado
Posted by waynec on Friday, February 24, 2012 10:28 PM
neat. i somtimes wander why i work on and old old kit when i have so many nice ones. among the 20 or so wip's is an alanger 1/400 russian predreadnought. why am i building it? i need practice doing some things got my bettter zvesda predreanoughts and my bronco sino-japanese warships of 1894. oh and my lusitania. never rigged in 1/350 and also have stack stays and lots of boats bit no pe aa guns. but i digress. finished the br-52 and will have some really good glamour shots later. the first rail was easy just superglued it to the ties. i need to make a good rail jig in 1/72 and 1/35 for later builds (11 in total at this point). anyway i measured and marked and spiked the second rail. that got better as i ran out of mistakes to make. didn't spike every tie, just enough to hold the rail. OOPS HAVE ONE LEAD WHEEL I HAVE TO ADJUST. boy did i learn a lot on this one. now to finish the k-5 rr gun, canadian LAV in white, 2b uboat, and me-163 and iatalian MAS boat.

Никто не Забыт    (No one is Forgotten)
Ничто не Забыто  (Nothing is Forgotten)


  • Member since
    March 2010
  • From: Buffalo, NY
Posted by macattack80 on Friday, February 24, 2012 10:52 PM

waynec, all I can say is WOW!  That looks awesome!  Bow Down Glad to hear you got all the wheels on the rails.  I have trouble getting 3 tires on the gound on an aircraft kit. Embarrassed  I will add it to the front page.

68GT, glad to hear that you will grace us with another build. 

Kevin

[


  • Member since
    February 2010
  • From: New Jersey
Posted by 68GT on Sunday, February 26, 2012 3:02 PM

I'm going to stick a fork in the Matchbox MIG-21 completed now that it is on a base.

Wish I had pulled a pilot out of the spares box for the cockpit.

On Ed's bench, ???


  • Member since
    March 2010
  • From: Buffalo, NY
Posted by macattack80 on Sunday, February 26, 2012 10:31 PM

Alright 68GT!  That looks awesome!  I really like how the NMF came out.  Don't worry about the lack of a pilot.  This bird can be called the Ghost Rider.  Wink

Kevin

[


  • Member since
    October 2008
  • From: italy
Posted by bsyamato on Monday, February 27, 2012 5:38 AM

Old times style kit !! well done 68GT Toast i grow up with matchbox kits

  • Member since
    March 2010
  • From: Buffalo, NY
Posted by macattack80 on Thursday, March 1, 2012 12:13 AM

This gloss black paint on the F-14 is still a little tacky.  The basement in my new house is a little bit more humid than the one at the old house.  I am sure it  has something to do with it.  I really wanna get some detail painting done but I don't wanna booger up the gloss black.  Patience is a virtue I suppose.

Kevin

[


  • Member since
    March 2006
Posted by simpilot34 on Thursday, March 1, 2012 12:47 AM

All projects are looking good!!Yes I would really like to join this one!!! I just need to get my man cave sorted out so I can. Moved in with my fiance in October and have been flat chat since. So when I do officially join I have about 5 things that qualify in varying stages of completion.

1. 1/72 Italeri F4U-4B with PE

2. 1/72 Academy FW-190A-8....OOB

3. 1/72 Hasegawa Kawanishi E7K1 Alf....OOB mainly

4. 1/48 Airfix Buccaneer with interior and exterior PE and resin wheels.

5. 1/72 Heller DC-6B to DC-6 firebomber 'Tanker 68'

Cheers, Lt. Cmdr. Richie "To be prepared for war, is one of the most effectual means of preserving the peace."-George Washington
  • Member since
    March 2010
  • From: Buffalo, NY
Posted by macattack80 on Thursday, March 1, 2012 1:21 AM

Welcome aboard simpilot34!  I will add you to the roster.  Thanks for signing up.  Looking forward to seeing your projects take shape.  Especially the DC-6.

Kevin

[


  • Member since
    March 2006
Posted by simpilot34 on Friday, March 2, 2012 1:07 AM

Thanks Mac!!! Yeah well, the DC-6, lol. That one will be aways away in being finished. When I started her, I got the office done albeit not very much to do there as it will be mostly unvisable, and the fuse shortened by 5 scale feet. The original DC-6 was 5 feet shorter than the A or B models. Tanker 68 was an original purchase by American Airlines and I believe that throughout it's life had retained most of it's original paint scheme. Pics I have found show where the AA writing had been sanded off and the scuffing never polished out, so American Airlines was still legible amongst the skin while retaining the lightning bolt stripe down the side. That's how I want to depict that one!Big Smile Sadly she was broken up and is no more. Anyway thanks for the welcome and when I get something going wil definately be posting and watching. CHEERS!!!Toast

Cheers, Lt. Cmdr. Richie "To be prepared for war, is one of the most effectual means of preserving the peace."-George Washington
JOIN OUR COMMUNITY!

Our community is FREE to join. To participate you must either login or register for an account.

SEARCH FORUMS
FREE NEWSLETTER
By signing up you may also receive reader surveys and occasional special offers. We do not sell, rent or trade our email lists. View our Privacy Policy.