SEARCH FINESCALE.COM

Enter keywords or a search phrase below:

Steel Cats (Sept. 2012-Aug. 2013)

322301 views
3330 replies
1 rating 2 rating 3 rating 4 rating 5 rating
  • Member since
    March 2003
  • From: Rain USA, Vancouver WA
Posted by tigerman on Sunday, March 3, 2013 12:35 PM

I've seen that book popping up a lot Jack. I'll see if you recommend it.

   http://i7.photobucket.com/albums/y269/wing_nut_5o/PANZERJAGERGB.jpg

 Eric 

  • Member since
    April 2005
  • From: Piscataway, NJ!
Posted by wing_nut on Sunday, March 3, 2013 3:50 PM

I very much want to get a copy of that book.  Supposed to be pretty darn awesome.

Jack, What decals do you need?  Iv'e got lots of extra of all sorts of stuff.

A BTW and FYI to Bob and anyone else that looked at the weathering steps.  Nothing original there. That procedure is right of the AK Interactive DVD by Mig Jimenez, "Washes, Fading and oils"

Marc  

  • Member since
    November 2003
  • From: Nashville, TN area
Posted by bobbaily on Sunday, March 3, 2013 6:23 PM

Thanks Marc-that looks like a resource that I need to add to my library.  I think your results are a great endorsement of the dvd.

Bob


  • Member since
    March 2003
  • From: Western North Carolina
Posted by Tojo72 on Sunday, March 3, 2013 6:42 PM

I got mine last week,a real nice refrence,not too expensive either,I think thre more to come.

  • Member since
    July 2006
  • From: San Francisco Bay Area
Posted by bufflehead on Sunday, March 3, 2013 10:56 PM

Hey Fellas, I'm back!  Sorry to be gone for so long, but health, work and home problems have kept me away from the bench.  Gotta say you guys are doing an absolutely amazing job here!  I'm sad to have missed so much.

For some reason I'm not feeling any inspiration with my 1/72 builds for this GB right now.  I've been sitting at the bench for a few days, just toying with the kits, barely making a dent with assembly.  You know something's wrong when you can't make a dent on a braille scale kit with minimal parts!!  Actually, I managed to finish an older 1/72 Dragon Panther G w/Zim that' s been sitting around for a few years:

Again, this isn't one of the kits I'm building for the Steel Cats GB, just an old, unfinished build that I hoped might get me in the mood for small scale.

That Panther didn't provide the kick start I wanted so I took a look at the stash and my eyes fell on an old Dragon Panther F kit (#9008).  I opened it up, inspected the parts and realized that I also had a resin turret for this kit!  Excitement time! The juices are now starting to flow again, so Eric, can you add this to the list?  If all goes well I'll get back to the little kitties if I feel up to it later on! 

And the Accurate Armour resin turret.

I can't remember why I have this resin turret, but I do know that the kit turret is inaccurate and Accurate Armour's is much more accurate and has more detail!

I'm going to start working on this tomorrow night, but only for a couple of nights as I'm going out of town this weekend.


Ernest

Last Armor Build - 1/35 Dragon M-26A1, 1/35 Emhar Mk.IV Female


Last Aircraft Builds - Hobby Boss 1/72 F4F Wildcat & FW-190A8


  • Member since
    April 2006
  • From: ON, Canada
Posted by jgeratic on Sunday, March 3, 2013 11:21 PM

Marc - thx for the decals offer, but I should be alright - will know better in a few days.  I'm only looking at creating the name Heidi for the front and a couple stalking tigers in black - the latter is possibly fictitious as not all vehicles had them.  There is also the name plate for the base display, so I'm crossing fingers that I'll have better results at work.

Regarding Michael Rinaldi's book I linked, have read the preface and main body, along with his detailed description for  building a grey Tiger I (presented over 30 pages or so).   He seems to be very heavy into oil paints.  Though he does use the dot filter system, it is a lot more thought out and is not randomly applied as seen in the forums here.  He in fact refers to it as OPR  - oil paint rendering.

He also likes the powdered pigments used both wet and dry.  He is trained in commercial art, and admits his techniques are presented in artistic terms, hence the title TANKART  .  No doubt, his work is outstanding.  I'd recommend it to anyone looking to push their builds further, though some that are just getting into the hobby, or armour for that matter, might be a tad overwhelmed by it all.

regards,

Jack

  • Member since
    April 2005
Posted by Thunderbolt379 on Monday, March 4, 2013 2:15 AM

Bufflehead, that's a great accessory kit! I'll need one for the Dragon Panther II I picked up not long ago. So am now on the lookout for a set that won't break the bank...

M/TB379

http://worldinminiature.blogspot.com/

  • Member since
    November 2009
  • From: SW Virginia
Posted by Gamera on Monday, March 4, 2013 7:28 AM

Marc: Thanks for the walk-though on your finishing, really helps to understand what you did and why.

Jack: Looks interesting, I'm guess the techniques can be applied to any vehicle, not just German?

Ernest: Cool! I had that same Panther F kit years ago- screwed up it up royally too!

Sorry, said I'd post photos this weekend but didn't get them taken. The whole dio is so close to being done I figured I'd just get the whole thing in one fell swoop. Just need to paint the spare ammo and then tidy things up, hopefully the light is at the end of the tunnel here (and not a train)...

"I dream in fire but work in clay." -Arthur Machen


  • Member since
    March 2003
  • From: Rain USA, Vancouver WA
Posted by tigerman on Monday, March 4, 2013 9:39 AM

Ernest, glad to have you back. I know how you feel about a project sometimes. It can be hard to get motivated. I failed to get as much done as i wanted this weekend. Worked mostly on the tracks and I'm in limbo on the cables.

   http://i7.photobucket.com/albums/y269/wing_nut_5o/PANZERJAGERGB.jpg

 Eric 

  • Member since
    April 2006
  • From: ON, Canada
Posted by jgeratic on Monday, March 4, 2013 1:24 PM

Gamera

Jack: Looks interesting, I'm guess the techniques can be applied to any vehicle, not just German?

Yes, the techniques are universal in terms of subject.   In fact he urges the reader/modeller to look at photos of all types vehicles for weathering ideas, not just tanks.  This first book deals with German armour, with specific photo shoots and write ups on 5  subjects.  Each is roughly 30 pages in length, and ends with a double page spread outlining in sequence the major steps with 24 captioned photos.

The next volume will deal with Allied armour, and the third is planned for modern subjects.

Here's an online link to a photo of his Tiger I:

 Note heavy use of powders on the lowers.  Overall, you can see the "painterly" look of his style which is unique.  Should add that he worked off and on over a span of three years before calling it done.  It essentially was the testbed for his subsequent style of weathering.  It is very war weary, but that is what gives it it's character.

regards,

Jack

  • Member since
    April 2011
  • From: imperial beach, ca
Posted by malone duke on Monday, March 4, 2013 2:20 PM

  • Member since
    April 2011
  • From: imperial beach, ca
Posted by malone duke on Monday, March 4, 2013 2:21 PM

started with a little detailing, filtering and washing...  a little sloppy at this point but it gets better...

  • Member since
    November 2003
  • From: Nashville, TN area
Posted by bobbaily on Monday, March 4, 2013 4:35 PM

Looks good Malone-the filtering & wash are making the camo scheme come together.

Bob


  • Member since
    July 2012
Posted by Hasenpfeffer on Monday, March 4, 2013 5:51 PM

Hey Malone - that really toned things down nicely. Nothing like a Panther-on-a-Stick it seems. Wink

Jack - I'm really diggin' the color you've come up with. Really neat variation too. Saw a pic or two of the tank you're doing. Was thinking it would be pretty cool to do "Heidi" (lol) and now I get to see it done! Yes

Plugging away at my end. There are a ton of little things to do when the detail isn't there to begin with. And it seems like it is always still lacking. I'm hoping that in the end the biggest glaring deficiency will be the cupola periscopes.

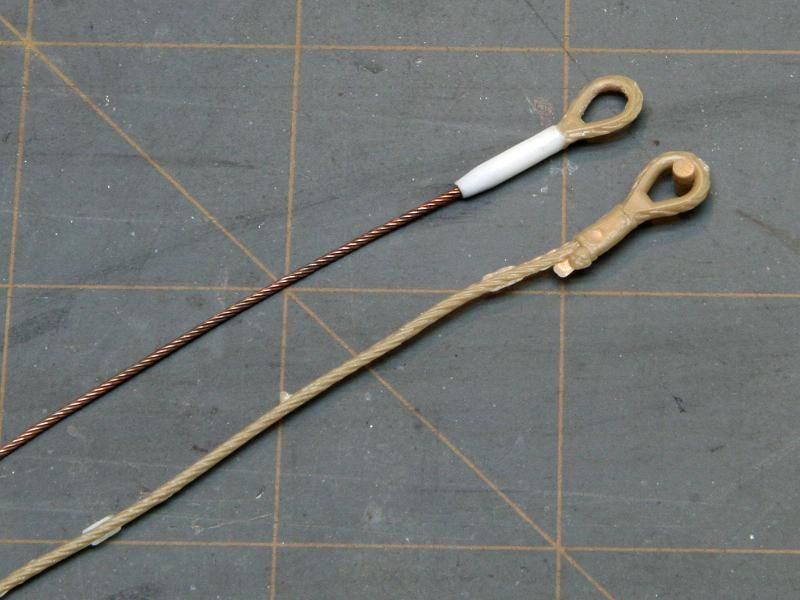
So, I replaced the kit tow cables with some semi-scratched ones. I have quite a bit of left over cable from the Karaya set I bought for the last Panther. Built the sleeves and glued the loops from the kit cable on. Not too bad. I wish I had a little better loops, but this will do.

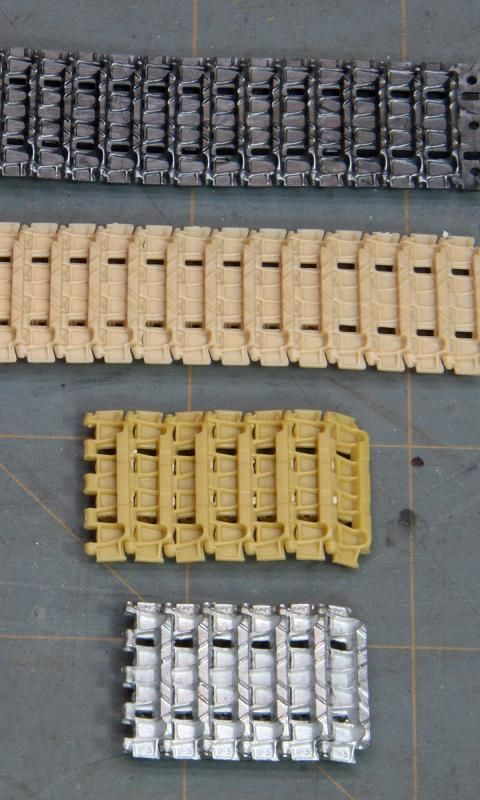
Played a little with the Bronco track links. Built a short run for comparison's sake. I have to say that I'm pretty impressed with the detail. I hope that I will be up to the task of painting and weathering...

Here: Top to bottom - Kit, DS, Bronco, Friul

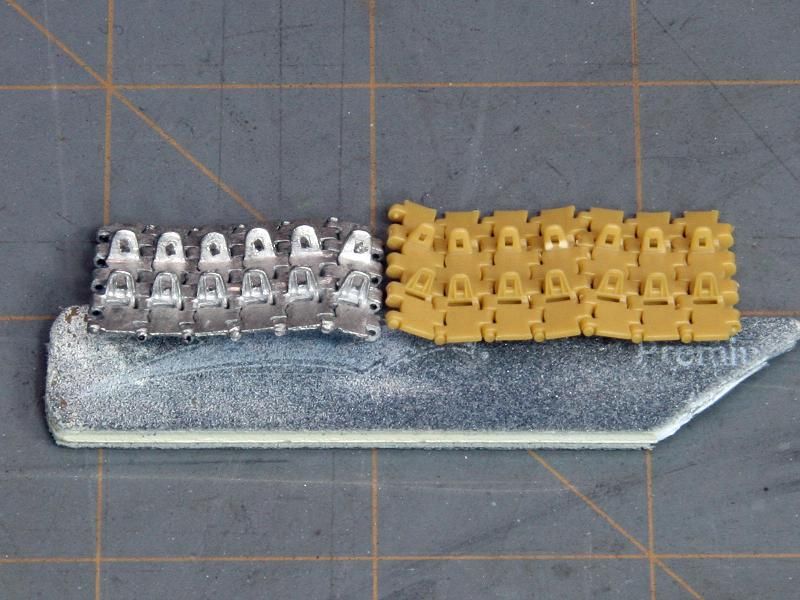
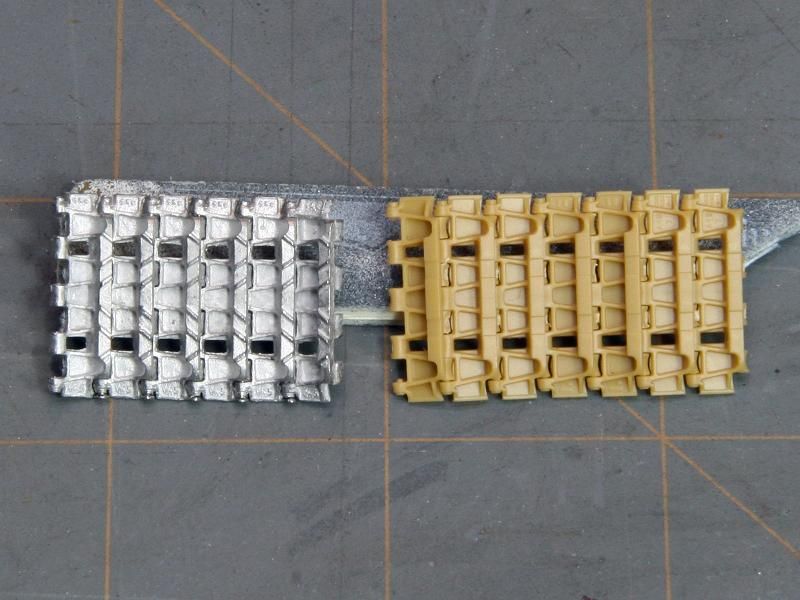
Detail of Bronco vs. Friul. The Friuls are definitely more sturdy, especially if you use dress pins to put the links together, but the Broncos aren't bad, and there is much less cleanup. (Even though I did a poor job here... Embarrassed

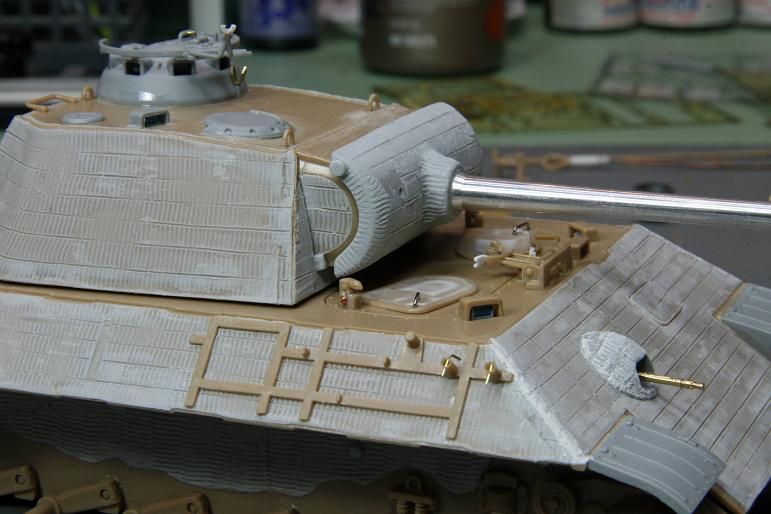
Finally, some of the other detail I've added. Can't all be seen really well in the one photo, but you get the idea. Gun travel lock, added the chain handle positions for open or closed. Wish I had a replacement chain for open. Looks kinda kooky with it in the open position and the chain shaped like it's closed on the gun. Added release levers/springs to the hatch retainers. Drilled out the tubes on the RH tool bracket. Made pins for these and the replacement spare track brackets on the rear (18 total). Won't use them all, but it's all good practice. Also finished up the AA mg mount and cupola. Not quite as cool looking as the CH (Dragon) kit, but it'll work.

Thanks for lookin' fellas.

  • Member since
    April 2005
  • From: Piscataway, NJ!
Posted by wing_nut on Monday, March 4, 2013 6:27 PM

edit.. see the next one.

Marc  

  • Member since
    April 2005
  • From: Piscataway, NJ!
Posted by wing_nut on Monday, March 4, 2013 6:32 PM

Anyone else this problem   Click on Latest Post and get an almost blank screen.  But Dave's post was actually there.

Marc  

  • Member since
    July 2012
Posted by Hasenpfeffer on Monday, March 4, 2013 7:10 PM

Yeah, Marc... it did that but posted anyway. Figured it was just some glitch on my end. Guess not. I just reloaded the page and everything seemed fine.

  • Member since
    November 2003
  • From: Nashville, TN area
Posted by bobbaily on Monday, March 4, 2013 7:24 PM

Dave-your Panther continues to impress.  And thanks for the track comparison-I'll have to take a look at Bronco tracks for some future projects.

Bob


  • Member since
    April 2009
  • From: Carmel, IN
Posted by deafpanzer on Monday, March 4, 2013 10:07 PM

tigerman

I've seen that book popping up a lot Jack. I'll see if you recommend it.

Yes, it is one of those MUST TO HAVE books.  Trust me... one of best books I have seen so far.  I drool every time I turn a page... 

Great work on your cats... I have been lurking.  Working on a little helicopter right now and I have only less than 20 days to finish it in time for the model show.  Lucky me... 

Andy

  • Member since
    November 2009
  • From: SW Virginia
Posted by Gamera on Tuesday, March 5, 2013 7:24 AM

Jack: Thanks! I'll have to give the Allied manual a good look and as you said even the German one should be really useful. I like the look of the Tiger you posted, not really as beat up as just dirty, grimy, and filthy - which is how I've seen most AFVs in action from photos.

MD: Again, nice work, she's coming together! A little slop is ok, we're not auto modelers where everything has to be perfectly shiny and smooth are we? Wink

Dave: Nice work there on the tow cables and tracks. Although frankly guess I am a slob since I don't see that much difference between the different tracks- and I'd coat 'em with dirt and mud anyway!

Marc: I'm getting the same issue. And it showed up on my Japanese GB too. I think the software FSM is using in their forum has some odd error that you get this result when a thread reaches a certain length.

Anyway, I painted the ammo last night and glued the last figure to the base. Adding more knick-knacks to the base. Hopefully will be done soonish... 

"I dream in fire but work in clay." -Arthur Machen


  • Member since
    April 2007
  • From: Schroon Lake, NY
Posted by SMJmodeler on Tuesday, March 5, 2013 9:24 AM

jgeratic


jgeratic: I'm writing this after just falling off my chair looking at that Tiger I!...  I am a HUGE FAN of Mike Rinaldi's work and this one certainly doesn't disappoint!  I HAVE to get that book! 

 I LOVE his "artsy" style...not only do I appreciate the technique/execution of the weathering but his work also evokes a feeling of what the tank and the crew endured.  IMO he raises model building to an art form...something the rivet counters can't/don't/won't ever appreciate (too bad for them)...


  • Member since
    May 2011
  • From: Illinois
Posted by armor86 on Wednesday, March 6, 2013 12:04 AM

Photos and Update on DAK Tiger I - Fenders installed, added tools and some small details - tie down lugs which were used to secure a tarpaulin and Bosch head light cable fittings. Reviewing the set of Bison Decals - Tigers in Africa # 1 and 2. The instructions provide several paint schemes for DAK Tigers, possible two tone. Amour86


Dan

  • Member since
    March 2003
  • From: Rain USA, Vancouver WA
Posted by tigerman on Wednesday, March 6, 2013 1:09 AM

Looking flashy Dan. Cool

   http://i7.photobucket.com/albums/y269/wing_nut_5o/PANZERJAGERGB.jpg

 Eric 

  • Member since
    November 2003
  • From: Nashville, TN area
Posted by bobbaily on Wednesday, March 6, 2013 6:39 AM

Very nice Dan-I always enjoy seeing PE done well.

Question for the group-what is your technique for painting the periscopes (if that's what they're called)-what colors for the glass, other tips....thanks

Bob


  • Member since
    April 2005
  • From: Piscataway, NJ!
Posted by wing_nut on Wednesday, March 6, 2013 7:29 AM

A86, I surley do love the look when they are bristling with little brass goodies.  Loks mighty fine.

Eric, get  your cut and paste fingers all limbered up.  4th, and final, (yeah... we'll see) entry to the GB is done.

I say the 1st done pics since like with the Panther,it's not really "done, done" yet. Figures... then base.. and who knows what else. Stage one is the completion of the vehicle. Got a couple cover plates on the cable clamps but it's pretty much done. Pictures kinda suck cuz my 1 month old camera has decided to suck.


Marc  

  • Member since
    March 2003
  • From: Rain USA, Vancouver WA
Posted by tigerman on Wednesday, March 6, 2013 10:36 AM

Marc, it's stunning as I've become to expect. From the work on the tools to the weathering, you've hit another home-run. Thanks for being a part of the GB, it's been great having your participation.

   http://i7.photobucket.com/albums/y269/wing_nut_5o/PANZERJAGERGB.jpg

 Eric 

  • Member since
    November 2009
  • From: SW Virginia
Posted by Gamera on Wednesday, March 6, 2013 11:20 AM

Dan: I do like the look of all those shiny brass goodies!

Marc: Love her!!! Looking forward to seeing her 'done' done!

"I dream in fire but work in clay." -Arthur Machen


  • Member since
    November 2003
  • From: Nashville, TN area
Posted by bobbaily on Wednesday, March 6, 2013 3:38 PM

Marc-can't really add any more to what's been said-that is one outstanding KT-I love the weathering.  Very nice job.

I was able to start on the camo scheme over the weekend-I need to go over a few areas with some Olivegruen, but overall, I'm hoping that it comes together after some washes & dot filtering....if not, I can always start over....wouldn't be the first time.....

Bob


  • Member since
    November 2009
  • From: SW Virginia
Posted by Gamera on Wednesday, March 6, 2013 8:51 PM

Nice camo Bob- and I love the Lego paint rack!

"I dream in fire but work in clay." -Arthur Machen


  • Member since
    July 2012
Posted by Hasenpfeffer on Wednesday, March 6, 2013 9:54 PM

Armor86 - Looks sweet! We want paint! We want paint! Enough teasin' already... Big Smile

Marc - As Bolt's hamster companion would often say... "(s)he's f-u-l-l-y awwwsooome!" Will comment some more after I've given it a proper look. But from where I'm sittin', crack open the MM. Oh, you already have... Stick out tongue

Bob - I like it. Yes Did you decide to go with 121 or similar? As for the periscope painting, I just paint a layer of Tamiya clear blue (let dry) then a layer of Tamiya clear green. I just make sure the base color is light. Gray seems to work fine. I then mask them off with a little strip of tape cut to shape with ye 'ole Exacto. I peel that off with tweezers pretty much last thing after I'm all finished. Here's how the peri's wound up on my last Panther. (I'm sure one method of many) Wink

JOIN OUR COMMUNITY!

Our community is FREE to join. To participate you must either login or register for an account.

SEARCH FORUMS
FREE NEWSLETTER
By signing up you may also receive reader surveys and occasional special offers. We do not sell, rent or trade our email lists. View our Privacy Policy.