SEARCH FINESCALE.COM

Enter keywords or a search phrase below:

ANZAC GB Sept 2012 to Sept 2013

36063 views
410 replies
1 rating 2 rating 3 rating 4 rating 5 rating
  • Member since
    March 2010
  • From: New Zealand
Posted by Scorpiomikey on Tuesday, January 15, 2013 1:46 AM

Just found this.

"I am a leaf on the wind, watch how i soar"

Recite the litanies, fire up the Gellar field, a poo storm is coming Hmm 

My signature

Check out my blog here.

  • Member since
    September 2006
  • From: Australia
Posted by Blitzwing on Tuesday, January 15, 2013 2:08 AM

Is that an A380?

URL=http://picasion.com/]

  • Member since
    March 2010
  • From: New Zealand
Posted by Scorpiomikey on Tuesday, January 15, 2013 1:10 PM

lol yup.

"I am a leaf on the wind, watch how i soar"

Recite the litanies, fire up the Gellar field, a poo storm is coming Hmm 

My signature

Check out my blog here.

  • Member since
    May 2005
Posted by pyrman64 on Tuesday, January 15, 2013 9:24 PM

Blitzwing
.........unfortunately it is still the best matt varnish I have used so far because I prefer spraying with acrylics.

you might try PollyScale's flat coat (or MM/ACRYL flat coat) - BOTH work like a charm.

Greg H

"There is many a boy here today who looks on war as all glory, but, boys, it is all hell." Gen. Wm T. Sherman (11 April 1880, Columbus, Ohio)

  • Member since
    September 2006
  • From: Australia
Posted by Blitzwing on Wednesday, January 16, 2013 4:22 AM

I've never seen PollyScale in Australia before and Model Master is rare but I might have a look online and see if I find anything. Thanks Greg.

URL=http://picasion.com/]

  • Member since
    March 2010
  • From: New Zealand
Posted by Scorpiomikey on Thursday, January 17, 2013 4:22 PM

I havent seen polyscale in NZ either.

"I am a leaf on the wind, watch how i soar"

Recite the litanies, fire up the Gellar field, a poo storm is coming Hmm 

My signature

Check out my blog here.

  • Member since
    September 2006
  • From: Australia
Posted by Blitzwing on Friday, January 18, 2013 2:14 AM

I wonder how hobby stores pick which paints they want to stock? The ones here I go to almost all universally have Tamiya paints being the most well stocked, followed by Humbrol paints. Then there is the dusty third paint understocked paint rack usually Gunze or Model Master.

URL=http://picasion.com/]

  • Member since
    March 2010
  • From: New Zealand
Posted by Scorpiomikey on Friday, January 18, 2013 2:35 AM

Its the same here. Im wondering if its to do with what shipping companies will transport into the southern hemisphere.

Ive seen a very very limited range of MM paints here. Like 3 pots on special order kind of thing.

"I am a leaf on the wind, watch how i soar"

Recite the litanies, fire up the Gellar field, a poo storm is coming Hmm 

My signature

Check out my blog here.

  • Member since
    September 2003
  • From: AandF in the Badger State
Posted by checkmateking02 on Tuesday, January 22, 2013 6:23 PM

I haven't gotten around to posting any progress for weeks, so I've got a backlog of photos of the build progress.  To recap, I am contributing a Spitfire from 603 Squadron, RAF, piloted by Brian Carbury of New Zealand during the Battle of Britain.

I planned on building one of the elderly Airfix 1/72 kits, but with the advent of the newer tooling, the old ones seem unavailable now--which is all right, since the original kit dated back to the 1980's, when people still wore mullets and listened to Blondie.

Here is the obligatory view of the newer box.  I think the new kit was issued in 2010, around the 70th anniversary of the BoB.

The first construction step is for the assembly of the cockpit.  Here are all the pieces.  The main assembly consists of three piece--IP, flooring and bulkhead.  

I used MM RAF Interior Green.  The seat is WEM's anti-fouling red, a ship color, but it looks close to the color used for the "plastic" seats installed after about May, 1940.  Previous to this, it appears the seats were metal, and would have been in Interior Green also.

I'll put the finished cockpit in a separate posting, since I've run into problems in the past trying to put too many pictures in one posting.


  • Member since
    September 2003
  • From: AandF in the Badger State
Posted by checkmateking02 on Tuesday, January 22, 2013 6:32 PM

The cockpit as completed.

I lightened up some Interior Green and applied it to the prominent portions, then ran a pin wash of thinned acrylic craft paint from Apple Barrel into the the recesses.

I made the harness from painted masking tape.  It extends back into the fuselage, since the prototype system used pulleys and wire to allow the pilot to tighten up the straps.

Airfix thoughtfully included a nice decal for the IP, so those of us with unsteady hands and lamentable painting skills can achieve a reasonable appearance

When I tested the assembly for fitting into the fuselage, it seems the IP was too wide at the shoulders, so I sanded it down until it co-operated.  Once it was installed, I touched it up with black paint.

This finishes up the first step of building (according to the instruction sheet).  Thanks for looking.


  • Member since
    March 2010
  • From: New Zealand
Posted by Scorpiomikey on Tuesday, January 22, 2013 7:39 PM

Got this kit in the stash. Looking forward to seeing how it comes out.

"I am a leaf on the wind, watch how i soar"

Recite the litanies, fire up the Gellar field, a poo storm is coming Hmm 

My signature

Check out my blog here.

  • Member since
    September 2006
  • From: Australia
Posted by Blitzwing on Wednesday, January 23, 2013 3:30 AM

Nice start so far. I'm building the Airfix Sea Harrier FA2 right now and have been really impressed by how well it goes together. I hope yours goes together just as well. Keep the updates coming.

URL=http://picasion.com/]

  • Member since
    September 2003
  • From: AandF in the Badger State
Posted by checkmateking02 on Wednesday, January 23, 2013 2:51 PM

Thanks, Blitzwing.  Is the Sea Harrier a new tooling?  The recent offerings from Airfix are pretty good.  

As to the Spitfire, construction step 2 is the propeller, spinner and backing place.

Construction step 3 brings us to the fuselage interior.  I used MM Interior Green on the front part and behind the bulkhead used Floquil RR Old Silver.  It seems the rear portions of the fuselage were left unpainted.  I lightened up the Green and applied some to the raised surfaces, then a pin wash of Apple Barrel black craft paint.  The instruments were also painted with the black craft paint.

Not much progress shown below.  The silver canisters are compressed air containers--on the real thing; not on this model!  Once the fuselage is closed up and the canopy installed, it will take Robert Ballard to find them again.

Thanks for looking.


  • Member since
    September 2003
  • From: AandF in the Badger State
Posted by checkmateking02 on Thursday, January 24, 2013 2:10 PM

A visitor showed up to check out the progress at this stage, which is construction step four.  Cockpit is installed, horizontal stabilizers were attached  and adjusted with a protractor prior to closing up the fuselage.  The seams are sanded and panel lines rescribed, but  even so, Gollum doesn't seem happy about it.  Wonder if he thinks a Spitfire is precious?

Maybe he's looking for a gold ring in there.  I used WEM Colourcoats Sky Type S paint on the wheel wells, lightened some more and applied it to the raised detail.  Next I applied a darker green acrylic wash with craft paint.

Airfix's instructions commanded me to paint the topside of the lower wing, below the cockpit, so I obeyed.  Probably won't be visible anyway when it's attached to the fuselage.  But at least the wing is done.

Thanks for looking.


  • Member since
    January 2010
  • From: Nebraska, USA
Posted by CallSignOWL on Thursday, January 24, 2013 3:02 PM

wat?

LOL

------------------------

Now that I'm here, where am I??

  • Member since
    September 2003
  • From: AandF in the Badger State
Posted by checkmateking02 on Thursday, January 24, 2013 3:47 PM

Yet another visitor!  I hope they don't bring twelve dwarfs along.  I'm all out of seed cake.

Fuselage and wings finally got married, but Bilbo arrived just in time to show me that I forgot all about the propeller.  Usually, I would install the back plate through the fuselage before attaching the wings.  This time, I forgot all about it.  

So I drilled out the hole in the nose to accommodate a fix, which will appear later in the construction log.

There was a fairly large gap where the front of the wings joins the fuselage (and that's what Bilbo Baggins hates).  I filled it with superglue, sanded it smooth and rescribed.

Gollum was astonished to discover another large not-so-precious gap at the rear of the wings, which I dealt with as aforesaid.  He seems surprised that it worked.  Often, so am I.

The canopy was masked with narrow strips of Duck brand tape from Wally's mart, then filled in with MicroMask.  "What's it got in its cockpitses?"  I didn't put a gold ring inside before attaching it, so Gollum is out of luck there again.  

Thanks for looking.  


  • Member since
    March 2010
  • From: New Zealand
Posted by Scorpiomikey on Thursday, January 24, 2013 4:07 PM

lol the precious is coming along.

"I am a leaf on the wind, watch how i soar"

Recite the litanies, fire up the Gellar field, a poo storm is coming Hmm 

My signature

Check out my blog here.

  • Member since
    September 2006
  • From: Australia
Posted by Blitzwing on Thursday, January 24, 2013 4:34 PM

LOL! Now that's something you don't see every day in a build log. I love it. And yes the Harrier is a new tooling, and by the looks of it has panel lines the same size as the ones you have on your Spitfire.

URL=http://picasion.com/]

  • Member since
    September 2003
  • From: AandF in the Badger State
Posted by checkmateking02 on Thursday, January 24, 2013 7:43 PM

Ms. OWL:  I didn't mean to startle you.  Sorry.

Mikey:  I think the Spitfire is a precious plane, but I suppose looking for a missing ring is distracting.  And the attention wanders when waiting for second breakfast.

Blitzwing:  I think there's a similar "look" to several of the new Airfix toolings.  


  • Member since
    September 2003
  • From: AandF in the Badger State
Posted by checkmateking02 on Friday, January 25, 2013 2:37 PM

Now we're at the stage for attaching the last little gems to the underwings.

I painted the exhaust stacks with MM's burnt metal, and the other parts with WEM's Sky.  These will benefit from a pin wash, I think.  I'll paint the tyres with acrylic craft paint, using a brush.  The clear sprue holds a lens for the light on the fuselage undersides.  Unfortunately, when cleaning it up, it popped away and disappeared faster than a hobbit with the one ring of power.  It will never be seen again.  I substituted a drop of white glue to simulate the missing lens.

Here's the fix for the prop.  I found some retaining rings in the parts box, slipped them over the shaft, then glued on the kit's prop retainer.  This assembly should now fit through the enlarged hole on the aircraft nose from the outside, and atone for my baffling lapse in memory.  The rings directly behind the back plate will glue to the fuselage, hold the assembly in place, and stlll let the prop move--truly rings of power.

Again, thanks for looking.


  • Member since
    September 2003
  • From: AandF in the Badger State
Posted by checkmateking02 on Friday, January 25, 2013 2:52 PM

Gollum is inspecting the paint job for the undersurfaces.  It might not appear so on the computer monitor, but there is a definite greenish cast to WEM's interpretation of Sky Type S.  It's a very leasing colo(u)r, I think.

I used MM's RAF Dark Earth for the base coat, and will finish up with MM's RAF Dark Green.  I masked with Duck brand paint masking tape.  It has a low tack, and doesn't leave sticky residue, as I have found some other brands doing.  I cut the mask using a pattern from the now-discontinued Eduard set.  Brian Carbury's Spitfire was done up in the "A" scheme, used by Fighter Command in 1940 along with a mirror-image "B" scheme.  

The new visitors are Pikachu and Pikatwo.

Gollum found his gold ring--lots of them!!  Maybe one of them will be the precious.

To reproduce Brian Carbury's Spitfire, which he flew with 603 Squadron in August and September, 1940, I used Xtradecal's RAF roundels for the fuselage and underwings.  For the squadron codes (XT-W), I used a Model Decal sheet.  All the rest of the deals came from the Airfix kit itself, and they include a complete set of stenciling.  Information for the camo pattern and markings came from Dr. Alfred Price's Spitfire Mark I/II Aces 1939-1941 (Osprey)

I will post the final photos of the finished model in the near future.

Thanks for looking.


  • Member since
    September 2003
  • From: AandF in the Badger State
Posted by checkmateking02 on Friday, January 25, 2013 2:59 PM

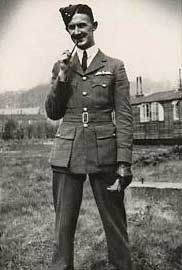
Brian Carbury was born in New Zealand in 1918.   Intending to join the Royal Navy, he traveled to England in 1937, but was rejected because he was deemed too old.  The Royal Air Force accepted him, however, on a short-service commission.

Eventually assigned to 603 Squadron, Brian’s greatest achievements came in the time between August and October, 1940.  According to Dr. Alfred Price in Osprey’s Spitfire Mark I/II Aces 1939-41, he became “ace in a day” by destroying five kills during three patrols on 31 August.  By 2 September, he had added an additional three victories.

Brian was awarded the Distinguished Flying Cross, apparently in September, 1940, and the next month, received a Bar to the DFC.  His eventual claim of 15 destroyed enemy aircraft and one shared placed him “among the five top-scoring pilots in RAF Fighter Command (http://www.century-of-flight.net/Aviation%20history/WW2/aces/Brian%20John%20George%20Carbury.htm).”

In early 1941, Brian became an instructor and did not fly operations again.  His career with the RAF ended later that year, under rather unfortunate circumstances.

It seems that Brian’s wife at the time was unable to control her spending and ran up substantial debts.  Brian found it difficult to pay these and was charged in late 1941 with issuing between 9 and 17 bad checks (cheques).  A court-martial followed, Brian was found guilty and dismissed from the RAF as of 1 October, 1941.  His rank at the time appears to have been Flying Officer.

Although Brian and this wife divorced during the war, his difficulties were hardly over.  He was charged in 1948/49 (sources vary as to the date) with illegally exporting Bristol Beaufighters to Palestine.  He and each of three other defendants were found guilty and fined GBP 100.  Brian also lost his British pilot’s license as a result of the sentencing.

Brian later remarried, and the couple had a child, also named Brian.  Unfortunately, Brian (senior) contracted leukemia, and died in 1961/62 (sources again vary, although most say July of the latter year).  A memorial was erected to Brian John George Carbury in Wellington, New Zealand.
Sources:

http://www.century-of-flight.net/Aviation%20history/WW2/aces/Brian%20John%20George%20Carbury.htm

http://disc.yourwebapps.com/discussion.cgi?disc=105008;article=16588

http://www.the-battle-of-britain.co.uk/pilots/Ca-pilots.htm

http://en.wikipedia.org/wiki/Brian_Carbury

Spitfire Mark I/II Aces 1939-41 (Osprey Aircraft of the Aces 12, p. 94)


  • Member since
    September 2003
  • From: AandF in the Badger State
Posted by checkmateking02 on Friday, January 25, 2013 3:10 PM

I'm surprised I could get all the final photos in one posting, without having the whole thing jam up half-way through.

I'm calling the build complete.  I appreciate the opportunity to participate in the GB and add this tribute to a fine airman.  Thanks to Scorpiomikey and Call Sign OWL.

Thanks for looking.


  • Member since
    January 2010
  • From: Nebraska, USA
Posted by CallSignOWL on Friday, January 25, 2013 4:31 PM

very nice!

------------------------

Now that I'm here, where am I??

  • Member since
    March 2010
  • From: New Zealand
Posted by Scorpiomikey on Friday, January 25, 2013 11:46 PM

Thats an airfix kit? WTF?

Thats awesome.

"I am a leaf on the wind, watch how i soar"

Recite the litanies, fire up the Gellar field, a poo storm is coming Hmm 

My signature

Check out my blog here.

  • Member since
    April 2006
  • From: ON, Canada
Posted by jgeratic on Saturday, January 26, 2013 1:22 AM

cmking02 - excellent build on this iconic fighter.  After seeing you knock out these new tooled Spits from Airfix, I've added one to my stash, even though it's not my usual scale.  Wonder what that red patch is on the fuselage spine, bullet repair?

regards,

Jack

  • Member since
    September 2003
  • From: AandF in the Badger State
Posted by checkmateking02 on Saturday, January 26, 2013 8:52 AM

Thanks, Ms OWL.  Your expertise with cockpit detailing inspired me to spend more time with the Spitfire's office this time.  

Mikey:  Thanks, and, yes, it's Airfix--1/72 no less.  It takes a nice picture!  I think they released it about two years ago, just in time for the 70th anniversary of the BoB--at least, the first kit I bought had a sticker on the box that mentioned this.  Since the company was obtained by Hornby, they've released some new toolings that are really pretty good--although I still have a fondness for some of the old stuff.

Jack:  thank you.  I've admired the various Spits you've submitted to the Forum.  As for the red patch, I have no idea.  At that point on the fuselage moulding, there is an engraved square with a slight depressed dimple.  I can't say I've seen such a marking in either photos or profiles, and pondered on whether to use it or not--but there it was on the decal sheet, so now there it is on the model.

I have twelve more Spitfires stockpiled--10 more of these; one of Airfix's recent Mk I/IIa; and one Tamiya, which I haven't even opened since, to me, Airfix is "the precious."

I appreciate the comments.    


  • Member since
    September 2006
  • From: Australia
Posted by Blitzwing on Saturday, January 26, 2013 5:18 PM

Very nicely finished CheckMate. The first of the new Airfix new toolings did have those large panel lines like on you Spitfire but they have been steadily improving. Have you got any of the new ones in 1/48? How are they?

URL=http://picasion.com/]

  • Member since
    September 2003
  • From: AandF in the Badger State
Posted by checkmateking02 on Saturday, January 26, 2013 5:25 PM

Thanks, Blitzwing.  

I only build in 1/72 for the constant scale (except ships in 1/700), although I appreciate the level of detail and artistry folks achieve in the bigger scales.

The panel lines look pretty daunting and stark when you first look at them, but they kind of settle down after painting and a pin wash.


  • Member since
    March 2010
  • From: New Zealand
Posted by Scorpiomikey on Sunday, January 27, 2013 2:56 PM

72nd? Ive got a 48 scale one. Ill be lucky if it looks half as good as yours.

"I am a leaf on the wind, watch how i soar"

Recite the litanies, fire up the Gellar field, a poo storm is coming Hmm 

My signature

Check out my blog here.

JOIN OUR COMMUNITY!

Our community is FREE to join. To participate you must either login or register for an account.

SEARCH FORUMS
FREE NEWSLETTER
By signing up you may also receive reader surveys and occasional special offers. We do not sell, rent or trade our email lists. View our Privacy Policy.