SEARCH FINESCALE.COM

Enter keywords or a search phrase below:

Longest Day GB

265288 views
2863 replies
1 rating 2 rating 3 rating 4 rating 5 rating
  • Member since
    January 2013
Posted by jibber on Tuesday, October 22, 2013 11:47 AM

Wayne thanks, both of you are a wealth of knowledge.

  • Member since
    January 2013
Posted by jibber on Tuesday, October 22, 2013 11:47 AM

Dragon 6080 but I may pick another, seems I have a habit to overlap others.

  • Member since
    December 2002
  • From: Bury St Edmunds, Suffolk, England
Posted by Bish on Tuesday, October 22, 2013 11:37 AM

jibber, the 116th arrived after the end of June, so were to late for this GB. The 12th SS Pz Regt belong to the 12th SS Pz Div HitlerJugend and did indeed take part. The Pz IV Ausf J I am doing has that units markings, but there's always room for another. Which kit do you have.

I am a Norfolk man and i glory in being so


On the bench: Airfix 1/72nd Harrier GR.3/Fujimi 1/72nd Ju 87D-3

  • Member since
    April 2006
  • From: Denver, Colorado
Posted by waynec on Tuesday, October 22, 2013 11:36 AM

At 1000 hours on 7 June, Kurt Meyer's 25th SS Panzergrenadier Regiment, along with 50 Panzer IV tanks of the 2nd Battalion of Max Wünsche's 12th SS Panzer Regiment, arrived and moved into position north west of Caen.[10] Supported by a battalion of artillery (3rd Battalion, 12th SS Panzer Regiment), this battle group was ordered to crush the advancing Canadian infantry and tanks and drive through to the coast, still only a few miles away (wikipedia)

Никто не Забыт    (No one is Forgotten)
Ничто не Забыто  (Nothing is Forgotten)


  • Member since
    January 2013
Posted by jibber on Tuesday, October 22, 2013 11:34 AM

Bish doing more research, I think the 116th was involved in the Normandy defense. I might add the Panzer IV Ausf. J  to the build, I have one on the shelf.

  • Member since
    January 2013
Posted by jibber on Tuesday, October 22, 2013 11:12 AM

Bish, Panzer IV Ausf. J was assigned to the 12th Regiment, SS Division, were they in Normandy? I know they were assigned to France but were they one of the units "held back" and not in the area?

  • Member since
    May 2005
Posted by pyrman64 on Tuesday, October 22, 2013 7:03 AM

Thank you, sir! Embarrassed

Greg H

"There is many a boy here today who looks on war as all glory, but, boys, it is all hell." Gen. Wm T. Sherman (11 April 1880, Columbus, Ohio)

  • Member since
    November 2009
  • From: SW Virginia
Posted by Gamera on Monday, October 21, 2013 11:09 PM

Greg: that's some impressive work there too!

"I dream in fire but work in clay." -Arthur Machen


  • Member since
    May 2005
Posted by pyrman64 on Monday, October 21, 2013 6:05 PM

Bish, Gamera & SS: thanks for your kind words. Embarrassed


Jack: that's the same info I used for my A3 turret - here's a pic

Greg H

"There is many a boy here today who looks on war as all glory, but, boys, it is all hell." Gen. Wm T. Sherman (11 April 1880, Columbus, Ohio)

  • Member since
    April 2013
Posted by SchattenSpartan on Monday, October 21, 2013 4:57 PM

Greg: Looking really good indeed!

Jack: That is simply amazing! You did a great job on modifying and detailling that kit! Kudos to you for all of that!

  • Member since
    November 2009
  • From: SW Virginia
Posted by Gamera on Monday, October 21, 2013 7:33 AM

Greg: Looks good! Lots of detail for a small vehicle.

Jack: Wow, nice work! I wouldn't know where to begin on modifications like that.

"I dream in fire but work in clay." -Arthur Machen


  • Member since
    December 2002
  • From: Bury St Edmunds, Suffolk, England
Posted by Bish on Monday, October 21, 2013 3:18 AM

Nice work there guys, both of those are looking great.

I am a Norfolk man and i glory in being so


On the bench: Airfix 1/72nd Harrier GR.3/Fujimi 1/72nd Ju 87D-3

  • Member since
    April 2006
  • From: ON, Canada
Posted by jgeratic on Monday, October 21, 2013 1:59 AM

Thank you, Greg.

Yes, the cast cheek armour was something stumbled upon after noticing there was no sign of the pistol port in my reference photo.  Upon further reading, I learned that this usually  meant the cheek armour was added during the casting process.  It really isn't noticeable, except at the bottom.

I was lucky to fine this diagram, though intended for a 1/35 build, and a decent photo to give a general idea of the look to go for.

I used three separate sheets of styrene so it would be more pliable around the curves of the turret.  Each piece was cut smaller than the previous, though they all share the same bottom edge to form the distinct lip.  Also, each section of sheet was sanded slightly before another was added on top, as .030 inches is the suggested thickness for  1/35 scale.  The third and final layer roughly represents the flat portion.

regards,

Jack

  • Member since
    May 2005
Posted by pyrman64 on Sunday, October 20, 2013 9:20 PM

Jack: thanks for the compliment.  The Firefly looks great!

On a related note, it took me almost a month to build up the cheek armor on an -A3 Sherman....kind of burned me out on it too.

Greg H

"There is many a boy here today who looks on war as all glory, but, boys, it is all hell." Gen. Wm T. Sherman (11 April 1880, Columbus, Ohio)

  • Member since
    April 2006
  • From: ON, Canada
Posted by jgeratic on Sunday, October 20, 2013 7:38 PM

Hi Greg, looking good, and nice to see someone else also doing some scratch building...

-----------------------------

... speaking of which, I think I'm done in that department - at least enough to start throwing paint on this thing.

I've raised the rear tool box to make room for the deep wading gear, of which I completely scratched based from what I could make out in period photos.
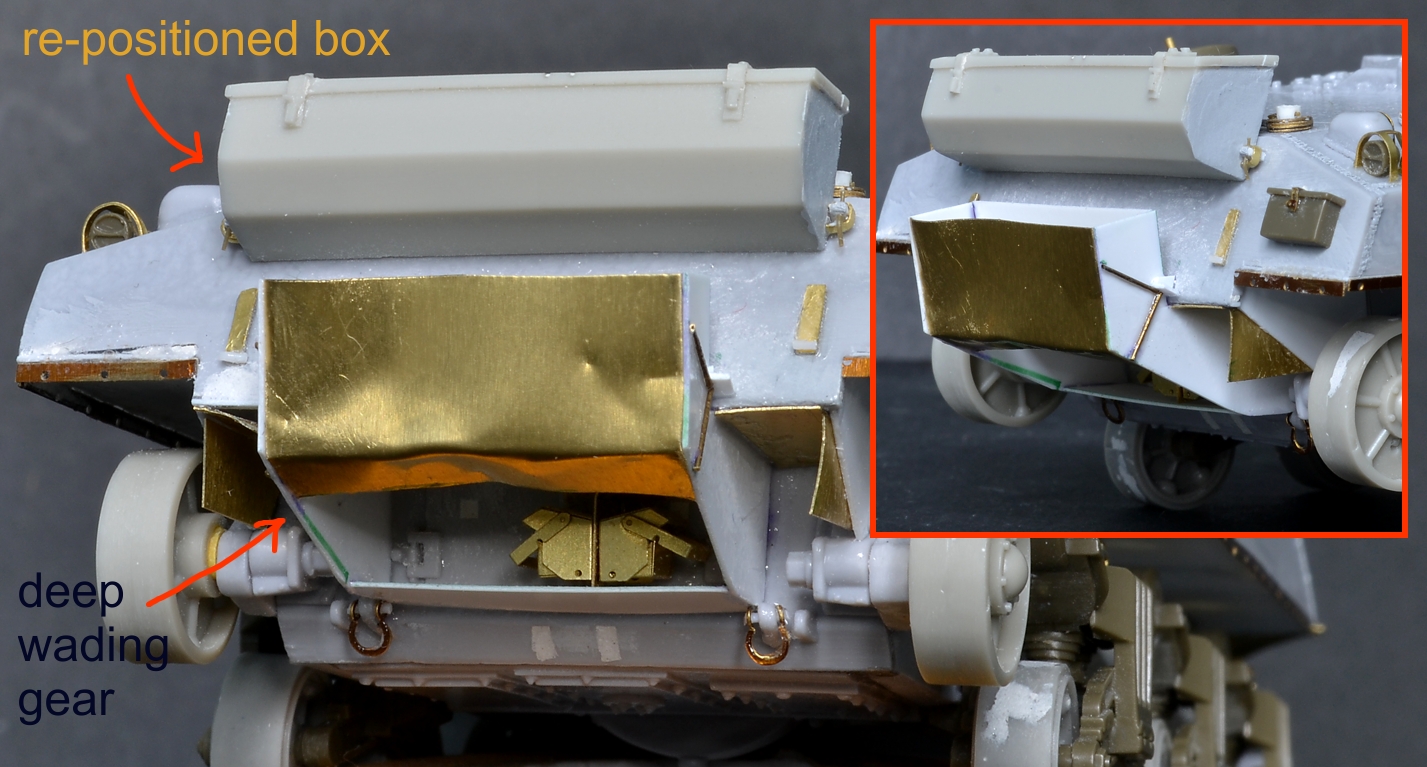
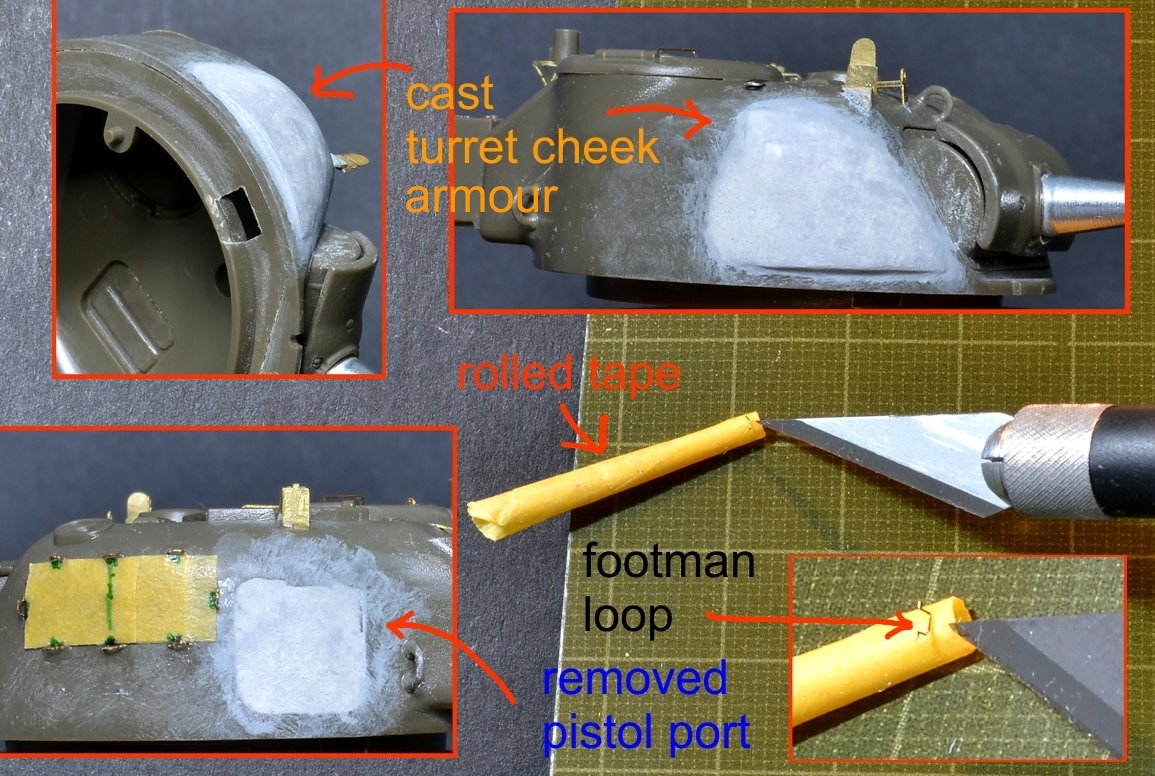
The turret needed some changes:

1.) removal of the gun port, which was pretty straight forward grinding and then puttied over.

2.) cast turret cheek armour.  Did this with first layering 3 sections of .010" plastic sheet, and then puttied over and smoothed out.

The footman loops are really small.  Found best way to hold them was with a section of rolled Tamiya tape (sticky side out).  Another piece of tape on the turret helped with the placement.
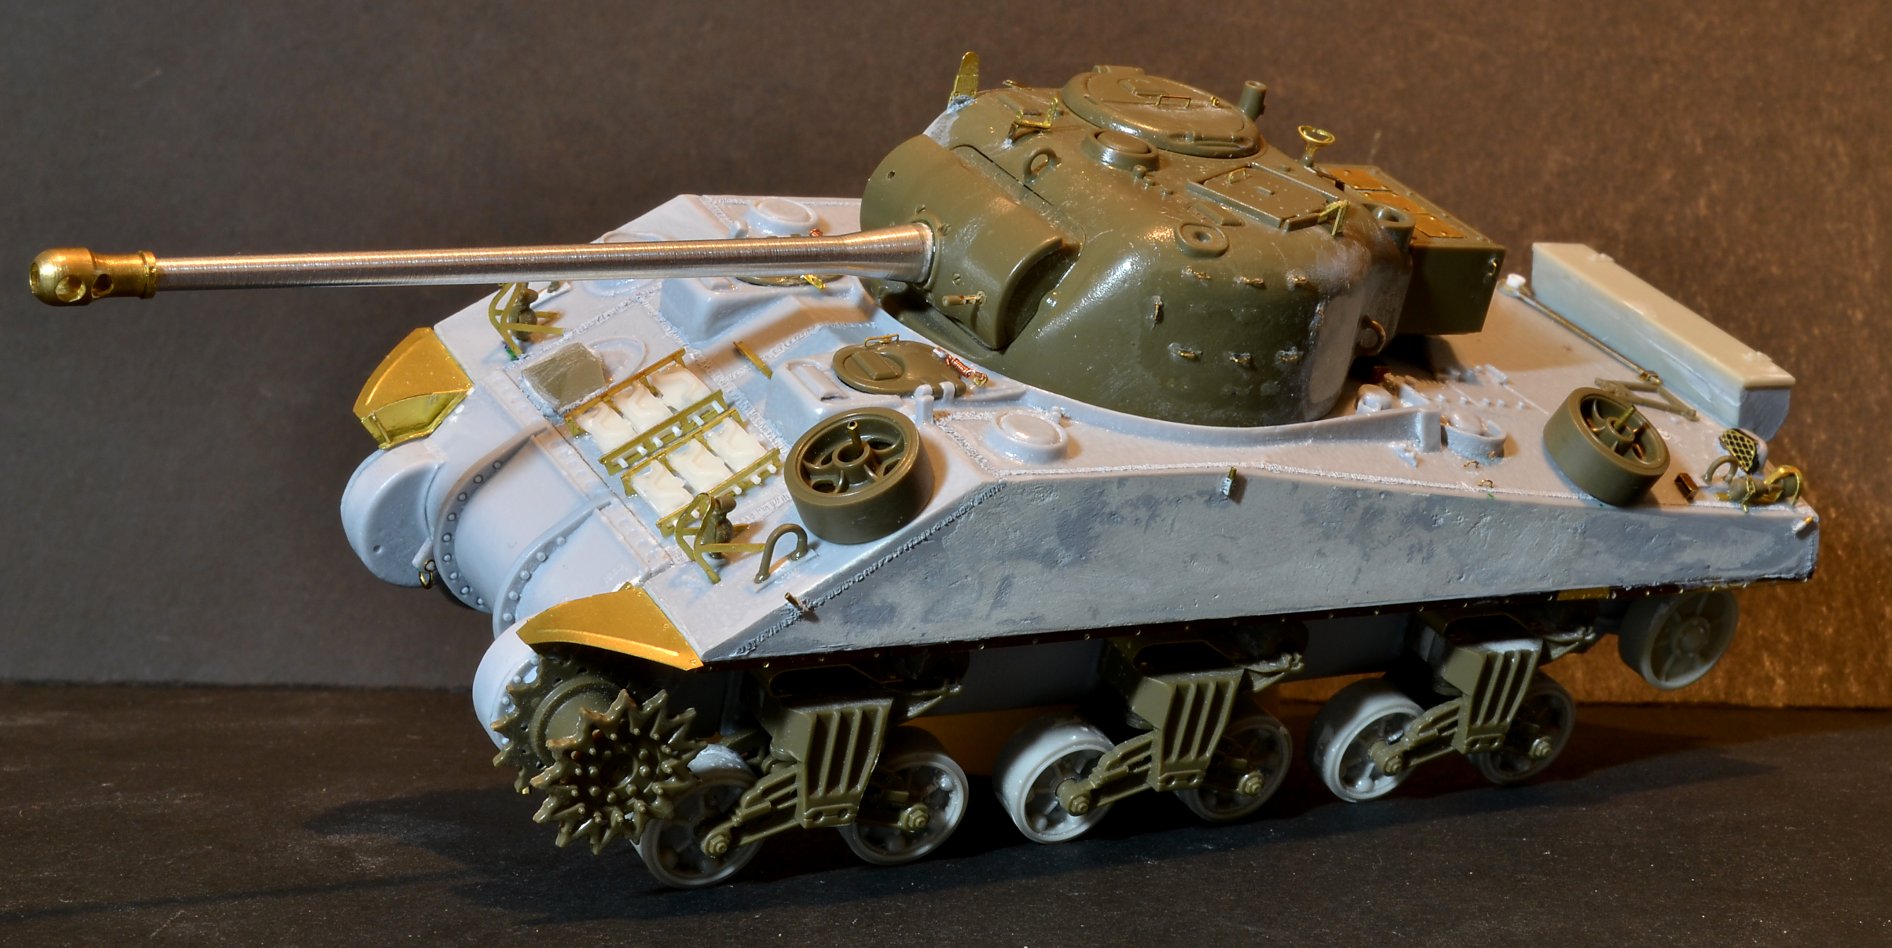
Next up is paint, but will add some more spare track, towing cable and a few fuel cans afterwards.
regards,

Jack

  • Member since
    May 2005
Posted by pyrman64 on Saturday, October 19, 2013 3:21 AM

Dang...it's been almost a month since I last posted on the Horch.  Here's what I've done so far.

I mated the body to the floor pan...what a pain.  There where cat gaps where the floor was supposed to meet the spare tire wells - filled those with .010x.020 Evergreen strip.  I closed off the rear cargo area and added the lid to the side window storage bin and added the handle.

I aded the bonnet/front engine cover.

The dashboard is funky- there's only 4 dials on the Horch 1a dash

The interior has been pre-painted in Tamiya German grey.  Since the 711.ID was formed pre-43, my Horch will have a grey interior and Dunkelgelb exterior with some sort of camo.

Now to find one of Tamiya's Panzer 4 OVE sprues....I need a rear NoTek taillight.Indifferent

Tags: Horch

Greg H

"There is many a boy here today who looks on war as all glory, but, boys, it is all hell." Gen. Wm T. Sherman (11 April 1880, Columbus, Ohio)

  • Member since
    April 2006
  • From: Denver, Colorado
Posted by waynec on Thursday, October 17, 2013 12:11 PM

solved my problem with figures. the guy holding the shell can be altered to look through the sight on left. second guy standing to the right holding the lanyard and a 3rd guy standing on the left next to wheel observing. no room for ammo (shells, rounds, bombs oh my) unless i make a larger base. may do that and just use this base for a couple of infabntry.

Никто не Забыт    (No one is Forgotten)
Ничто не Забыто  (Nothing is Forgotten)


  • Member since
    April 2003
Posted by shivinigh on Thursday, October 17, 2013 3:26 AM
JG- when I did some work with the artillery the guy pulling the lanyard was also the same guy that opened and closed the breech and we stood on the right side of the breech. We used m101 105mm guns. Not the same I know but the setups are almost the same from looking at the video


  • Member since
    April 2006
  • From: ON, Canada
Posted by jgeratic on Thursday, October 17, 2013 2:41 AM

I've looked at this youtube vid several times,

http://www.youtube.com/watch?v=ucOhFxHWWQg

but couldn't  make out where the lanyard is attached.   The person standing on the immediate right is definitely the firing position, while the crew member on the immediate left is is in charge of the sights.

As witnessed in the video, the rope does pass through  a ring on the backside of the gun shield and then attached to a second ring located on the firing lever, (diagram only illustrates the hole on the firing mechanism, I believe this is where the other ring should be to attach the lanyard):

regards,

Jack

  • Member since
    April 2006
  • From: Denver, Colorado
Posted by waynec on Wednesday, October 16, 2013 8:53 PM

ok all you lanyard yankers, i need some help. my german 150mm is going to get some figures. looks like 3, a soldier holding the lanyard, one ready with the next round, and a third holding the powder chatge. the breech opens horizontally to the right and the sight is on the left. aimming posts are not deployed so this is in direct fire mode. where would the 3 soldiers stand and where would the lanyard be attached?

Никто не Забыт    (No one is Forgotten)
Ничто не Забыто  (Nothing is Forgotten)


  • Member since
    July 2004
  • From: Sonora Desert
Posted by stikpusher on Wednesday, October 16, 2013 11:59 AM

Looks very good there Wayne. almost like a German MERDC ;-) Yes, there has been quite a bit of discussion about the IPMS bases rules after the National at both the local IPMS and AMPS chapters.


F is for FIRE, That burns down the whole town!

U is for URANIUM... BOMBS!

N is for NO SURVIVORS...

       - Plankton

LSM


  • Member since
    April 2006
  • From: Denver, Colorado
Posted by waynec on Wednesday, October 16, 2013 9:56 AM

thanks to all for the complements. the red/brown was hand painted and might be a tad thick in spots. perservered on this one too. which means more shelf queens will be completed in the future. glad the base did what it was suppose too, present the model rather then be a part of the model. as i get more info on the IPMS-USA base discussions i will pass them along. guess i best finish up the LCVP.

Никто не Забыт    (No one is Forgotten)
Ничто не Забыто  (Nothing is Forgotten)


  • Member since
    January 2013
Posted by jibber on Wednesday, October 16, 2013 8:28 AM

I'm not sure what I like best, the camo or how you finished the gun. I think you've done an awesome job on both. Wayne did you hand paint the brown striping?

  • Member since
    November 2009
  • From: SW Virginia
Posted by Gamera on Wednesday, October 16, 2013 7:31 AM

Wayne: Looks good! Again excellent work on the model and the base works- looks good but not so elaborate it distracts from the model.

"I dream in fire but work in clay." -Arthur Machen


  • Member since
    December 2002
  • From: Bury St Edmunds, Suffolk, England
Posted by Bish on Wednesday, October 16, 2013 3:30 AM

wayne, another great addition to the front page.

Jack, a pity about those tracks. But from what I have seen, I am sure you can make something decent out of what you have.

I am a Norfolk man and i glory in being so


On the bench: Airfix 1/72nd Harrier GR.3/Fujimi 1/72nd Ju 87D-3

  • Member since
    April 2006
  • From: ON, Canada
Posted by jgeratic on Tuesday, October 15, 2013 7:47 PM

Wayne, nice one! Yes

I'm thinking I like the ground work more than the model piece, my eyes keep going back and forth from one to the other - excellent work!

----------------------------------------

Quick update on the Firefly progress:

1.) After corresponding with the 3D printer as well as the individual that owns the design of the Sherman tracks, they informed me that at this time they cannot produce them in 1/48 scale. The medium used to create their products would not be able to hold the smaller detail.  So I will have to work some magic with what I currently have.

2.) About halfway done scratch building some deep wading gear. Mostly from sheet plastic, but will add a brass section as it better holds the dented and beat up look.  Should have some photos posted in a few days.

regards,

Jack

  • Member since
    April 2006
  • From: Denver, Colorado
Posted by waynec on Tuesday, October 15, 2013 6:37 PM
calling this done. threw together a little generic base. have to be careful i don't overdo the base as IPMS USA is cracking down on fancy bases in armor and aircraft categories and moving them to dioramas. (PS my friend and club member is the IPMS-USA head judge now).\

the kit is ok and i have a second one, but i made almost every model building 101 dumbass (pronounced like the french DOO MAHS) mistake. MMA paints, burnt umber pin wash and tamiya metallic gray with blue oil wash on the gun metal toned down with gray oil wash. tires are painted MMA engine gray and light dusting with tamiya powders.

Никто не Забыт    (No one is Forgotten)
Ничто не Забыто  (Nothing is Forgotten)


  • Member since
    January 2013
Posted by jibber on Tuesday, October 15, 2013 8:10 AM

Camo is awesome

  • Member since
    April 2006
  • From: Denver, Colorado
Posted by waynec on Monday, October 14, 2013 3:30 PM

thank you. base moulding is drying. should add texture and a bit of splash though this will be a generic base for 2 reasons: 1) so i can use it to photograph various small guns and 2) so it doesn't get pulled out of artillery and into diorama category. camo is what i would go as gun chief if i was going to deploy in crop filled fields.

what to do next? working on DANA and LCVP, looking at FLAK 37, searchlight, FLAK 38, truck for this gun, canadian 6 pounder w/ truck  or modern us M-102 105mm and LVTM truck in merdc desert camo.

or i could start my DO-335

Никто не Забыт    (No one is Forgotten)
Ничто не Забыто  (Nothing is Forgotten)


  • Member since
    November 2009
  • From: SW Virginia
Posted by Gamera on Monday, October 14, 2013 1:45 PM

Jack: Looks good! That is odd about the storage bin though.

Wayne: Dang, you're almost done there. Camo looks good, I don't think I'd ever see it!

"I dream in fire but work in clay." -Arthur Machen


JOIN OUR COMMUNITY!

Our community is FREE to join. To participate you must either login or register for an account.

SEARCH FORUMS
FREE NEWSLETTER
By signing up you may also receive reader surveys and occasional special offers. We do not sell, rent or trade our email lists. View our Privacy Policy.