SEARCH FINESCALE.COM

Enter keywords or a search phrase below:

US CARRIER AVIATION GROUP BUILD 2013

145163 views
1622 replies
1 rating 2 rating 3 rating 4 rating 5 rating
  • Member since
    July 2004
  • From: Sonora Desert
Posted by stikpusher on Thursday, June 27, 2013 12:11 PM

Are they on sale again? I got one set with the CBUs a couple months ago when it was on sale. They sent it ASAP


F is for FIRE, That burns down the whole town!

U is for URANIUM... BOMBS!

N is for NO SURVIVORS...

       - Plankton

LSM


  • Member since
    September 2011
  • From: Milaca, Minnesota
Posted by falconmod on Thursday, June 27, 2013 11:41 AM

Dre,

 Well that 1/32 stuff is so heavy don't they charge you special rates2 centsSurprise

John

On the Bench: 1/72 Ki-67, 1/48 T-38

1/144 AC-130, 1/72 AV-8A Harrier

Dre
  • Member since
    June 2007
  • From: here, not over there
Posted by Dre on Thursday, June 27, 2013 11:29 AM

I hate waiting as well- I ordered some of the 1/32 US weapons sets from Squadron cuz they were on sale and they haven't left even left Texas yet...

  • Member since
    September 2011
  • From: Milaca, Minnesota
Posted by falconmod on Thursday, June 27, 2013 10:48 AM

Clemen's,

  I know what you mean,  it's no fun waiting for that delivery guy to show up.

John

On the Bench: 1/72 Ki-67, 1/48 T-38

1/144 AC-130, 1/72 AV-8A Harrier

  • Member since
    April 2013
Posted by SchattenSpartan on Thursday, June 27, 2013 10:33 AM

Looking great, John! I want to continue work on my wildcat so badly, but it needs at least one week to arrive...

  • Member since
    September 2011
  • From: Milaca, Minnesota
Posted by falconmod on Thursday, June 27, 2013 9:38 AM

Dre,

  Well the last number I remember was 78.  But I can't remember if it started at one.  But it seemed like I'd never be done.

John

On the Bench: 1/72 Ki-67, 1/48 T-38

1/144 AC-130, 1/72 AV-8A Harrier

Dre
  • Member since
    June 2007
  • From: here, not over there
Posted by Dre on Thursday, June 27, 2013 8:50 AM

That's looking good, John.   How many decals are on this model?   Looks like quite a few...

  • Member since
    September 2011
  • From: Milaca, Minnesota
Posted by falconmod on Thursday, June 27, 2013 8:24 AM

Well I finally got a chance to get some updated pictures.

As of 2 AM CST I have one decal left to put on. Toast  The main tail decals and some of the squadron numbering was from a old micro scale sheet, the rest are from the supplied decals.  I encountered some issues of silvering on the decals, I always use micro-set and micro-sol but I had a few stubborn ones and I went and got some of the Walther's decal set,  that stuff is hot!!  gotta be real careful.  I thought I had ruined the top walk way decal as when I went to bed it was very wrinkled.  went down this morning and it was flat on the fuselage, looked great.  I was very pleased.  now I need to flat coat it and work on the weathering.

John

On the Bench: 1/72 Ki-67, 1/48 T-38

1/144 AC-130, 1/72 AV-8A Harrier

Dre
  • Member since
    June 2007
  • From: here, not over there
Posted by Dre on Wednesday, June 26, 2013 2:38 PM

Now I feel a little bad... sorry.

  • Member since
    January 2006
  • From: Earth
Posted by DiscoStu on Wednesday, June 26, 2013 1:46 PM

Dre

DiscoStu- sorry to hear that you changed you mind about the F-14. <sad face>

Lets just say you set the bar a little highWink

I had built the HobbyBoss F-14 before and while it is light years better than the Hasegawa kit it's still quite a handfull of a project.  Having just completed the Kittyhawk Jaguar I needed a simple break.  The Hasegawa A-4 is a nice, relaxing kit.  That Jaguar just took a lot out of me.  Not necessarily a bad kit, but boy did it fight me every step of the way.

"Ahh the Luftwaffe. The Washington Generals of the History Channel" -Homer Simpson


Dre
  • Member since
    June 2007
  • From: here, not over there
Posted by Dre on Wednesday, June 26, 2013 1:31 PM

DiscoStu- sorry to hear that you changed you mind about the F-14. <sad face>

  • Member since
    September 2003
  • From: AandF in the Badger State
Posted by checkmateking02 on Wednesday, June 26, 2013 11:53 AM

You're welcome, Greg.  I'm glad you found it useful.  I'm sure we all have finished models sitting around, with colors used that aren't really correct--but we didn't know better at the time.  I know I have many of them.


  • Member since
    May 2013
  • From: Indiana, USA
Posted by Greg on Wednesday, June 26, 2013 10:53 AM

Checkmate, thank you for the info and link, is excellent (and no, I'd not found that in all my hours of searching online). It has been duly bookmarked for future reference.

Also, you have saved me from some errors on the undercarriage, especially the landing flap interiors, which I would have posted (should I ever finish this project) in, yes, you guessed it, zinc chromate. I had searched endlessly, only reference I could find was screenshots of a TBM flight simulator which showed inside of extended flaps zinc chromate. I just didn't think that was right. I built and painted the flaps early on (my very first PE project, btw. A hair-puller for me). But easy to respray.

BTW, I have learned (in the middle of my build, of course) that zinc chromate isn't really a color, and that I should really refer to interior green, but the color I started with was MM zinc chromate, so it is what it is this time around.

Thanks again!

  • Member since
    April 2013
Posted by SchattenSpartan on Wednesday, June 26, 2013 10:30 AM

No problem, Stu. I changed it for you.

Cheers, Clemens

  • Member since
    January 2006
  • From: Earth
Posted by DiscoStu on Wednesday, June 26, 2013 10:09 AM

I think I may change my build up a bit.  I still owe you all pics of the Hellcat now that it is done.  I started on my Hobbyboss F-14 but the build is identical to the other F-14 in this GB (Only 1/48) that any pics I could post would pretty much just be "ditto".

So I think I'm changing my build up a bit.  I have a process that determines what models I build.  Back in the day I would build a kit, hit a step that I didn't like, and shelve the kit for another project.  This led to shelves full of unfinished kits.  To remedy this when we moved into our new house I took it upon me to focus on only 3 builds at a time.  So I inventoried all the kits in my stash on Excel (Starting to get obsessive, I know, but bear with me) divided them into three categories: Prop, Jet, and Armor.  I printed out the spreadsheet and cut strips with the kits names and put them into three seperate jars.  So now when one kit of a particular genre is finished I get to pick the next one out of the jar randomly.  It keeps me focused on the project at hand and keeps me from shelving a kit........at least until the people from the institution come to get me......

All that said, I recently finished the Kittyhawk Jaguar and pulled the Hasegawa 1/48 A-4 (the Promodeler version with Blue Angels markings).  So seeing as the A-4 is a Navy plane I think I'm going to count it in this GB.  The Blue Angels are a favorite of my Daughter (When she was very little she used to like to watch the old Van Halen/Blue Angels video repeatedly) so I'm doing it as a wheels up, in-flight wall display.

"Ahh the Luftwaffe. The Washington Generals of the History Channel" -Homer Simpson


  • Member since
    September 2003
  • From: AandF in the Badger State
Posted by checkmateking02 on Tuesday, June 25, 2013 10:19 PM

Sorry to hear and see this tragedy, Clemens.  I hate when this kind of thing happens.  It puts a hold on everything you're planning to do.  But it's good you've got a solution in the works.

Greg:  here's some information on Avenger interiors.  It comes from this website, which you may already be familiar with, so excuse the redundant information if you have it.  Don't know that it's a specific answer to the engine mount color, but. . .never can have too much information, I think

http://www.ipmsstockholm.org/magazine/2004/05/stuff_eng_interior_colours_us_part3.htm


Grumman TBF/TBM Avenger

In earlier production models TBF-1 and TBF-1C, the crew compartment        was finished in two colours - Bronze Green forward from the bulkhead in        front of the turret with Interior Green for the rear crew areas. Grumman        Grey was used inside the cowling.

In a later set of Erection & Maintenance manuals, Dull Dark Green        replaced the Bronze Green in the cockpit.

The TBM-1C and TBM-3 series aircraft built by the Eastern Aircraft        Division of General Motors had everything from the inside of the cowling        all the way back painted Interior Green.

In common with the general Navy practice the wheel bays,        undercarriage legs, wheel hubs, landing flap bays, etc. were all        finished in the lower surface colour throughout the Avenger production.


  • Member since
    May 2013
  • From: Indiana, USA
Posted by Greg on Tuesday, June 25, 2013 5:21 PM

Thanks for the motor mount help, stik.

  • Member since
    April 2013
Posted by SchattenSpartan on Tuesday, June 25, 2013 4:28 PM

Thanks for all the encouraging words, guys! I just hope the 2nd kitten arrives soon... I can work on my never ending pile of other projects in the meantime. Eduard's Fw190A-8/R2 should keep me busy untill then (it looks awesome, but is a real pain to build for a newbie like me...) Dead Wink

Cheers, Clemens

  • Member since
    July 2004
  • From: Sonora Desert
Posted by stikpusher on Sunday, June 23, 2013 7:12 PM

Greg, on the motor mounts, it could be one of several colors- Interior Green, Zinc Chromate, or Light Gull Gray (Grumman used that as an interior color in non cockpit areas on many of their aircraft. I don't have any references here with me to give yoou a definte answer.


F is for FIRE, That burns down the whole town!

U is for URANIUM... BOMBS!

N is for NO SURVIVORS...

       - Plankton

LSM


Dre
  • Member since
    June 2007
  • From: here, not over there
Posted by Dre on Sunday, June 23, 2013 6:39 PM

Greg- that's some nice clean work going on.   Those cowls really do look 1-piece.  

Clemens- yikes!   Nice work around to get a replacement canopy- problem fixed and stash acquired.Yes

  • Member since
    May 2013
  • From: Indiana, USA
Posted by Greg on Sunday, June 23, 2013 6:35 PM

Clemens, sorry to hear. Hope there wasn't other too difficult to repair damage! Really like you attitude and disaster recovery plan a LOT! You get an 'atta-boy' for sure.

Stik, thank you.

Uh, it never occurred to me that the motor mount might be visible through the offset jugs. I don't think so, but will go check! Doh! What would be a proper color to paint it???

  • Member since
    July 2004
  • From: Sonora Desert
Posted by stikpusher on Sunday, June 23, 2013 5:27 PM

Greg, your Avenger interior is looking very sharp! Dont forget to paint that motor mount ;-)

Schatten, bummer about the canopy hood on your F4F, but at least you have the solution heading your way...


F is for FIRE, That burns down the whole town!

U is for URANIUM... BOMBS!

N is for NO SURVIVORS...

       - Plankton

LSM


  • Member since
    April 2013
Posted by SchattenSpartan on Sunday, June 23, 2013 3:49 PM

Your Avenger looks awesome, Greg! Really lovely detailling on the inside!

I have some really bad news sadly:

When I was about to add some new rivets to the wildcat, I somehow managed to knock the whole box off the bench. The canopy is now broken (it is split right in the middle)

Here's a pic:

I've already ordered a replacement part for it, but it will take untill August to arrive. So I ordered another Wildcat (it takes only 2-3 weeks to get here). I'll just take the Canopy of the 2nd kitten for this build and use the replacement for that kit. So you guys can expect a second Wildcat (3-color scheme) in the future! The kitten is on hold untill the 2nd one arrives though...

Cheers, Clemens 

  • Member since
    May 2013
  • From: Indiana, USA
Posted by Greg on Sunday, June 23, 2013 1:52 PM

checkmateking02

Greg, that looks really, really good!  Nice job on the seam filling.  I don't see any evidence that they were ever two parts.  Nice work.  That interior is really sharp.  Very attractive.

Thank you so much, sir!

  • Member since
    September 2003
  • From: AandF in the Badger State
Posted by checkmateking02 on Sunday, June 23, 2013 1:39 PM

Greg, that looks really, really good!  Nice job on the seam filling.  I don't see any evidence that they were ever two parts.  Nice work.  That interior is really sharp.  Very attractive.


  • Member since
    May 2013
  • From: Indiana, USA
Posted by Greg on Sunday, June 23, 2013 1:37 PM

Dre, thanks for 'splaining!

I'd like to share my progress.....

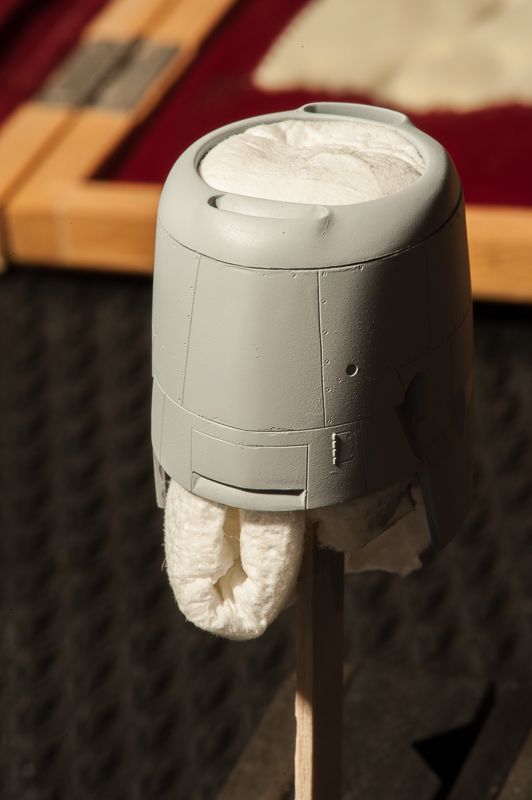
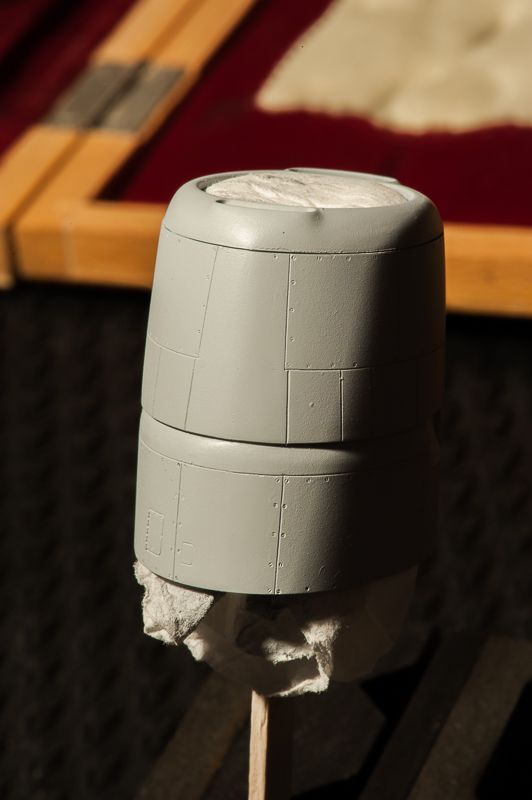
First, after a period of time that would make you all ROFL, finally got my first seam fill attempt as done as it's going to get. Engine cowling. I had it close several days ago, then somehow managed to squeeze something too tightly and heard a rather sickening "click". (bottom join failed). But the good news is with all the new stuff I've learned here, had it better than new in short order.

Bottom

Top

Though not up to the skill levels I see here, I'm pretty happy for the first time I've not just given up on seam issues. I think I know what I did to cause the chipping, how to mostly avoid it as I move forward, and reparing it is beyond my skill level (and I think patience) atm.

Thanks to all for the tips and techniques. MIght mention that after the crack incident, repaired with super glue seam method in short order. Also, the advice I recieved to 'go slow' has been invaluable. So thanks to many folks here many times over.

Oh, and the cowl was also my very first go at re-scribing. Been interesting. :)

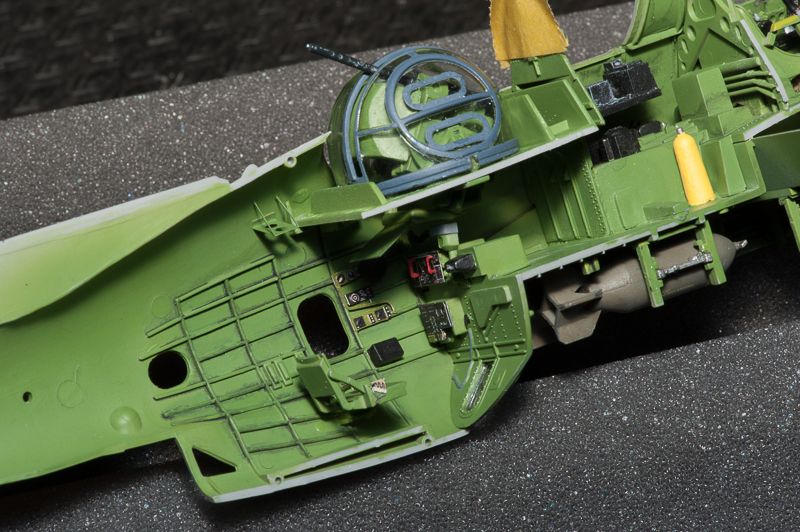
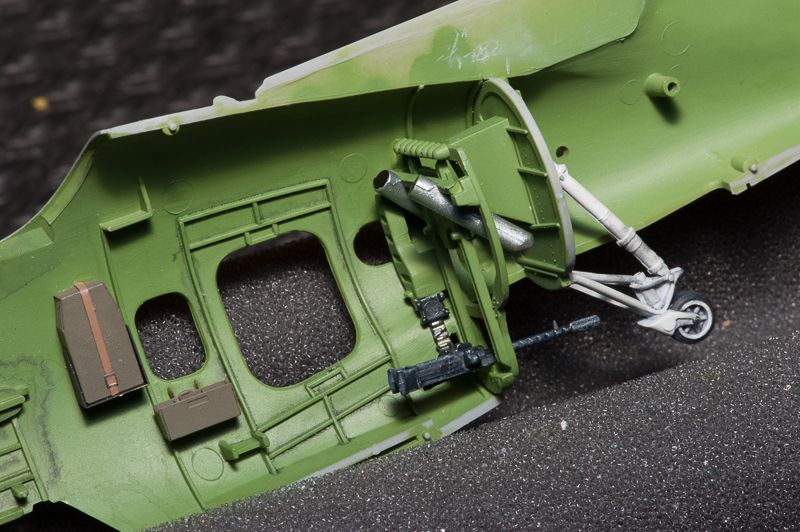
I've joined the halves and would like to post a couple more interior shots of stuff pretty much never to be seen again, short of a flashlight and 20/20 vision.

Rear interior, left aft


Right aft

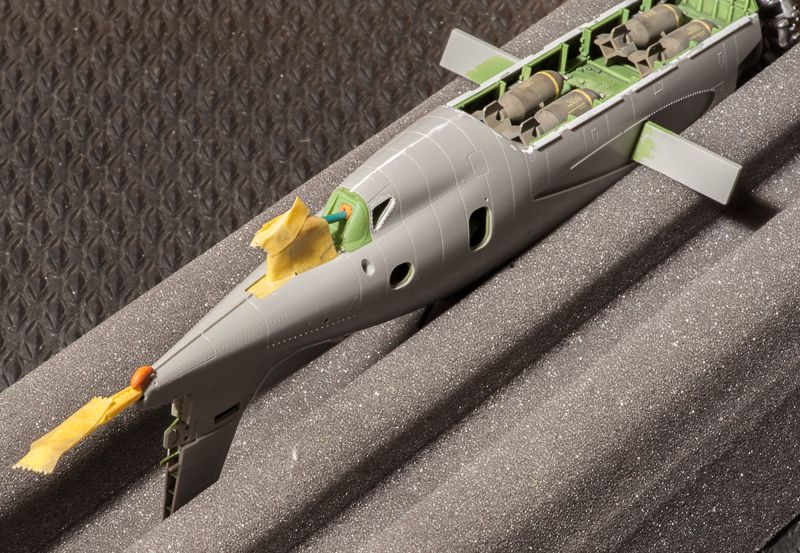
And a couple of the joined fuselage, the bottom one showing my masking attempts thus far. It is probably difficult for you to remember the head scratching I'm having trying to figure out how to mask stuff, which is for the first time for me, far as I remember because I don't remember painting an exterior after assy short of my brush painted camo attempts as a kid! :)

Thanks for looking (and again for all the ongoing help), and hope this post isn't too long!

Dre
  • Member since
    June 2007
  • From: here, not over there
Posted by Dre on Thursday, June 20, 2013 12:02 PM

Greg- at first i tried to pour it through the trunks, but that caused the clumpy runs and blobs because this stuff is thicker than gravity's pull...  so into the SimpleGreen it went.

Last night I simply painted the interiors with a brush and I'll have to do a second coat for better coverage and filling.

The theory I read was to simply pour it in and let gravity do the work, but that didn't work as advertised. BUT...  where it didn't run and clump it looked absolutely smooth and seamless.

Keeping it off the exterior was easy, and it cleans up with warm soapy water and an old toofbrush.

I think that this particular paint is just wee bit too thick for the pour-through method, but I hesitate to thin it any.  

Checkmateking02- I've imposed my will, now we wait to see if the plastic has even noticed...

  • Member since
    September 2003
  • From: AandF in the Badger State
Posted by checkmateking02 on Wednesday, June 19, 2013 9:33 PM

That's the attitude, Dre!!  I wish I could impose my will on plastic like that!


  • Member since
    May 2013
  • From: Indiana, USA
Posted by Greg on Wednesday, June 19, 2013 8:28 PM

Looking good, Dre. Be most interested to see how the Valspar ends up. Intriguing idea.

How did you pour it on, or through, or whatever? And avoid getting it on the exteriors?

Dre
  • Member since
    June 2007
  • From: here, not over there
Posted by Dre on Wednesday, June 19, 2013 8:04 PM

Oh, no worries- this paint experiment will work.   It has no choice. Angry

I need to see how much of the engines are exposed through vents and such before I start adding the exterior parts to them- if all that's going to be visible are the compressor faces, then into the spares bin go the extra parts.    I usually paint unseen details out of habit, but I'll let these slide by unpainted if I can.

JOIN OUR COMMUNITY!

Our community is FREE to join. To participate you must either login or register for an account.

SEARCH FORUMS
FREE NEWSLETTER
By signing up you may also receive reader surveys and occasional special offers. We do not sell, rent or trade our email lists. View our Privacy Policy.