SEARCH FINESCALE.COM

Enter keywords or a search phrase below:

Japanese Group Build Part III

90691 views
946 replies
1 rating 2 rating 3 rating 4 rating 5 rating
  • Member since
    November 2009
  • From: SW Virginia
Posted by Gamera on Saturday, March 29, 2014 7:26 PM

Hey Panzerpilot- she's just gorgeous! Fantastic job I love everything about her!

Going to update the front page now, and of course if you don't like the photo lemme know and I'll change it out.

"I dream in fire but work in clay." -Arthur Machen


  • Member since
    April 2006
  • From: ON, Canada
Posted by jgeratic on Saturday, March 29, 2014 3:42 PM

Panzerpilot - that is a sweet build you have arrived at. Yes

A really eclectic build, with both a natural metal and camou finish, and even some chipping - nicely done!

regards,

Jack

  • Member since
    December 2002
  • From: NYC, USA
Posted by waikong on Saturday, March 29, 2014 10:19 AM

Excellent, the camo over NMF really came out looking nice!

  • Member since
    December 2004
  • From: Houston, Texas
Posted by panzerpilot on Saturday, March 29, 2014 12:28 AM

I'm done! Ki-61 Tony. 1/32 Hasegawa. What a good feeling it is to be done! Thanks for taking a look!...

-Tom

  • Member since
    November 2009
  • From: SW Virginia
Posted by Gamera on Friday, March 28, 2014 10:42 AM

They're all different sizes, some of the smaller ones would probably work for 1/72nd and the bigger ones for 1/32nd but it was probably marked 1/48th. I honestly can't remember the brand now though. I'll check for you once I get home.

"I dream in fire but work in clay." -Arthur Machen


  • Member since
    December 2004
  • From: Houston, Texas
Posted by panzerpilot on Friday, March 28, 2014 10:31 AM

Gamera. Does that sheet include 1/32? I found one for 1/48, but not 1/32. Do you remember where you got it?

-Tom

  • Member since
    November 2009
  • From: SW Virginia
Posted by Gamera on Friday, March 28, 2014 8:53 AM

Hey Jack and Johnsan thanks for the tips on the tools guys!

The two shades in the NE corner look more right to me - I don't think you can go wrong with the Insignia Red there.

I thought about masking and painting my hinomaru but I'm still undecided if I'll try it or not. I've got a couple of sheets of nothing but hinomaru decals I picked up a few years ago.

"I dream in fire but work in clay." -Arthur Machen


  • Member since
    April 2006
  • From: ON, Canada
Posted by jgeratic on Friday, March 28, 2014 1:23 AM

Johnsan - never heard of a stencil cutter available to the general public.  After looking it up, wow! That has to be very handy to have around when opting to create a unique set of markings.  

Panzerpilot - I think Tamiya tape should work fine for the masks.  I have a wide roll of the stuff, but seems a lot more sticky.    I'll have to rub it down and lift it a couple times to decrease the tackiness - would hate to lift up paint at this stage.  

As for the reds, I've got all three on order.  Whatever I don't use, will be useful for some Napoleonic and medieval figures in my grey army.  

regards,

Jack

  • Member since
    December 2004
  • From: Houston, Texas
Posted by panzerpilot on Thursday, March 27, 2014 11:26 PM

Jgeratic. That's a pretty neat gizmo. What do you plan on using for the masks? Frisket film? The italeri guards red seems to be the color on hasegawa tony decals I am finishing up. I messed up the prep a bit for those, so I bought some lifelike decals. There are about the same color. I do like the insignia red though!

-Tom

  • Member since
    January 2010
Posted by johnsan on Thursday, March 27, 2014 9:37 PM

Most true reds will work. Depending on what I'm doing, I'll either use Mr. Color or Tamiya acrylic red. Sometimes tinted with a touch of brown or yellow. Depends on what I'm going for. So long as the reds match on the model and are not too brown, pink, or orange, you'll be ok.

I have that circle cutter (it looks like the Olfa one) and used it for the hinomaru on one of my Fujimi Claudes. I didn't bother with trying to get the circle to 9mm, but closed it all the way. It looks close enough. These days I just draw a circle to the proper size and cut it with my silhouette stencil cutter. This can either cut decal paper, Tamiya masking tape, vinyl, or frisket. Very handy.

  • Member since
    April 2006
  • From: ON, Canada
Posted by jgeratic on Thursday, March 27, 2014 3:47 PM

Guys, thanks for the comments, and I've decided to take the advice and make my own masks for the hinomaru's.   So went ahead and ordered this gizmo;

The smallest circle it can cut is 10mm, but after measuring the kit decal roundels, those on the fuselage are about 9mm.  I'm thinking once I have this device in my possession, if I can shave about half a millimeter total off the arms, I should be able to squeeze them closer together to arrive at the proper size.

Now the only question remains is which red paint to choose.  There was an interesting discussion over at hyperscale, dated 2010 which is the most recent I could find.  So I put this chart together, alongside Italeri colours.  Insignia red seems to be popular, and will likely go with that.

Of course, trying to save on shipping costs, I could only find one site that had both paints and the circle cutter.  Hobbylinc though won't ship across border to Canada, even by ground, and  these are acrylic!!  Just as well, they wanted $10 per bottle.  So the tool is ordered from Amazon.ca, and the paints from Spruebrothers, along with Tamyia's A6M2 Zero in 1/72.  Sigh... the stash shows no sign of dwindling.

regards,

Jack

  • Member since
    November 2009
  • From: SW Virginia
Posted by Gamera on Wednesday, March 26, 2014 8:09 AM

Hey thanks for the run-down on the kits! The closest thing I have is Monogram's old P/F-80 in 1/48th. The Platz kit looks and sounds like a winner.

"I dream in fire but work in clay." -Arthur Machen


  • Member since
    January 2010
Posted by johnsan on Tuesday, March 25, 2014 9:45 PM

The Platz kit is very good; the best T-33 in any scale. It captures the shape well, again better than any other kit out there. Lockheed had a very distinctive rudder shape. Platz nailed this. Sword has a better detailed cockpit with their resin insert, but misses shape. Heller is chunky and misses shape. Hasegawa's ancient kit, one of their very first 72nd kits, is pretty good regarding shape. It is old, the molds are very tired, and it lacks detail. Still I rate it over both Heller and Sword.

I don't really follow 48th. I know only of the Academy/Hobbycraft kit. I hear it's shape is somewhat lacking.

In 32nd,  Squadron released one tooled by CMK. As CMK and Sword are from the same family, I suspect the errors with the 72nd are probably present with the 32nd. TBH, I haven't seen the CMK kit, so my comment is conjecture and I may be totally wrong on this. If so, I offer my apologies to Squadron and CMK.

All that said, Platz' kit is not without its problems. I rate them as minor. Others may disagree. First the panel lines are a bit soft. Fit is a bit iffy, but nothing that can't be improved with some minor shimming. Platz kit is the only T-33 kit that actually attempted to present the glove vanes at the leading edge of the wing next to the fuselage. All the other kits provide red decal to represent these. Unfortunately, Platz ends these at the wing when in actuality these continue on to the wing fuselage fairing. Just outboard of the vane, Platz placed a square shape. This should be sharp. So all easy fixes.

Positives for this kit include Cartograf decals, great shape, decent detail with the option of adding photo etch from both Platz and Eduard, and really good engineering. Platz especially did well with the intakes.

I started this kit when it was first released, but stopped soon with a medically forced hiatus from modeling. So I'm picking up where I left off: This is the last photo I took when I left off:
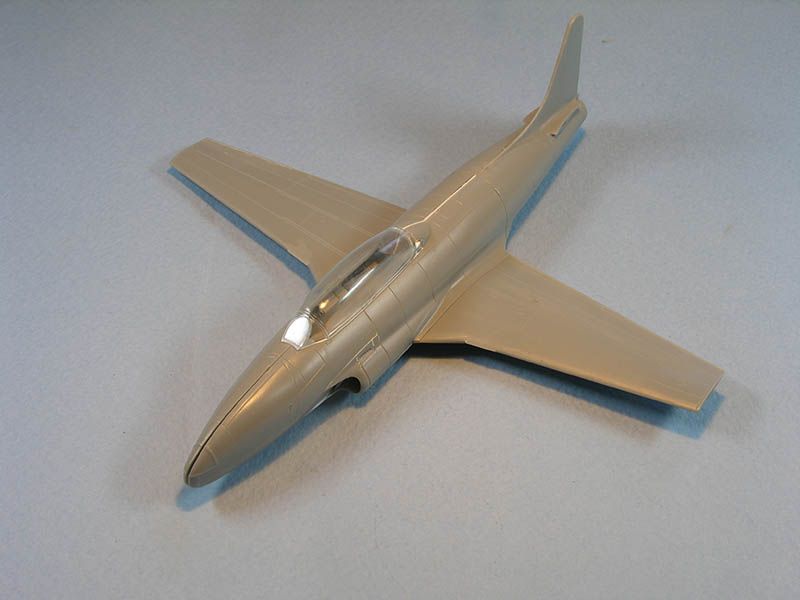
This just shows the parts pieced together to test fit after adding a shim aft of the cockpit topside. The wings are glued together. The aft fuselage is together. The cockpit has been started with some paint and some photo etch added. The forward fuselage is still in parts. Some of the molded on detail needs to be sanded back a bit. Construction is about a third done.

  • Member since
    November 2009
  • From: SW Virginia
Posted by Gamera on Tuesday, March 25, 2014 8:27 PM

johnsan

No need for apologies, Gamera. I should have noted the kit and scale. I hope I didn't appear touchy.

Oh no not at all, we're all friends here!

"I dream in fire but work in clay." -Arthur Machen


  • Member since
    January 2010
Posted by johnsan on Tuesday, March 25, 2014 5:51 PM

No need for apologies, Gamera. I should have noted the kit and scale. I hope I didn't appear touchy.

  • Member since
    November 2009
  • From: SW Virginia
Posted by Gamera on Tuesday, March 25, 2014 11:42 AM

Johnsan, sorry didn't mean to be picky- just like to have a list of scale and company at the beginning if anyone wants to buy the same kit you used.

Updating you now- I've heard a lot of good reviews of Platz kits, I'm looking forward to seeing her built up.

"I dream in fire but work in clay." -Arthur Machen


  • Member since
    October 2008
  • From: italy
Posted by bsyamato on Tuesday, March 25, 2014 10:46 AM

bsyamato

Jack i used a mix of 19 bright red with a micro add of yellow as i remember , unfortunalely i painted them after silver/mix coat.

Johnsan, not yet decided about the sonia scheme.. so many to choose :) from the decal sheet i think will use only the hiniomaru

.. forget the Brand, i used only humbrol enamels for the Claude Embarrassed

  • Member since
    January 2010
Posted by johnsan on Tuesday, March 25, 2014 9:25 AM

Sorry, Gamera. You shouldn't have to ask.

Platz & 72nd.

  • Member since
    November 2009
  • From: SW Virginia
Posted by Gamera on Tuesday, March 25, 2014 7:37 AM

Jack: Thanks for the walk-though there. Looks great and it's good to see what you did so we can build on what you've already done there.

Bsyamato: Beautiful job there and an interesting different approach to the golden tint.

Johnsan: I'll go ahead and put you down with the T-33 if that's what you're starting on. Could you please give me the company and the scale?  

"I dream in fire but work in clay." -Arthur Machen


  • Member since
    October 2008
  • From: italy
Posted by bsyamato on Tuesday, March 25, 2014 5:04 AM

Jack i used a mix of 19 bright red with a micro add of yellow as i remember , unfortunalely i painted them after silver/mix coat.

Johnsan, not yet decided about the sonia scheme.. so many to choose :) from the decal sheet i think will use only the hiniomaru

  • Member since
    January 2010
Posted by johnsan on Tuesday, March 25, 2014 4:38 AM

Good looking stuff, guys.

Jack, I think #3 looks best. If you're worried about reds matching, you could paint the hinomaru. Circle masks are very easy to do, especially without with surrounds. You won't have to worry about silvering and the red will match.

Bsyamato, looks good. Have you decided on which scheme for your Sonia? So many from which to choose.

I'm having a hard time getting started again on the Zeros. So instead, I'm going for something a bit more modern, a JASDF T-33 or 'San-san' as the JASDF called them. Actually this wasn't a hard decision. The T-33 is my favorite plane. Platz kit is really good. I'm still on an NMF kick. Yeah, it all works together.

  • Member since
    April 2006
  • From: ON, Canada
Posted by jgeratic on Monday, March 24, 2014 10:57 PM

Bsyamato - thanks, and I like your portrayal of the Claude.  

May I ask what brand paint you used for the red?  I'm not sure if I'll be able to create a paint  mix to match the kit decals.

regards,

Jack

  • Member since
    October 2008
  • From: italy
Posted by bsyamato on Monday, March 24, 2014 5:35 PM

Really i like the effect Jack Toast

I used a similar way to do my claude for first or second Jap GB, a silver finish and a final layer of glossy clear, yellow and few silver, all humbrol enamels

The final effect are less yellow, but just personal taste.. no claude survived as previously discussed here :(

indoor pictures shows better yellow tint

BTW this kit was one of  funny kits i ever build (out if my mistakes when build.. decals are painted out of few survived stewncils for bad first painting session) and wishing to get more copies of it :)

Waiting for your work

  • Member since
    April 2006
  • From: ON, Canada
Posted by jgeratic on Monday, March 24, 2014 3:16 PM

So here is how I went about creating the look of the 'golden' Claude:

1.) - after a grey primer, (and some pre-shading of black applied with the hairy stick), an overall steel colour.  Also applied dark dirt Flory wash, and wiped off with a section of cotton flannel and a little water.

2.) - to represent the possible amber protective coating, airbrush clear yellow overall.  Also added into the mix was future, lacquer thinner and some clear orange,  (a little less than one third) to avoid getting that puke green look.

3.) Though it looked cool, I thought the effect in step 2 was a bit too strong (perhaps a scale thing?).  Deciding it needed to be toned down, the remainder amber mix was added to aluminum - roughly 50/50 mix.  Reason I didn't use Steel here, simply ran out of the stuff.

Would most welcome to hear some feedback.

regards,

Jack

  • Member since
    October 2008
  • From: italy
Posted by bsyamato on Monday, March 24, 2014 12:18 PM

I hope so Huh? fear about possible problem with acrilic paint and enamels , asap will try

BTW the only picture i took of the Ki-51 sonia from hasegawa... it was a part of combo kit (as the rufe arrived in the same delivery) ,so no box to show :(

  • Member since
    November 2009
  • From: SW Virginia
Posted by Gamera on Monday, March 24, 2014 10:27 AM

Looking forward to seeing you work your magic! Big Smile

"I dream in fire but work in clay." -Arthur Machen


  • Member since
    October 2008
  • From: italy
Posted by bsyamato on Monday, March 24, 2014 8:46 AM

The washing will just pop up the panel lines Cliff :) i like too a clean finish for this plane

  • Member since
    November 2009
  • From: SW Virginia
Posted by Gamera on Monday, March 24, 2014 7:37 AM

Thanks guys, and Jack yeah that's the same method of pre-shading DoogsATX used here, I won't go into details but I like the technique and have been adapting it for myself.

Bsyamato: That is one beautiful clean build- seems almost a shame to put a wash on and dirty her up.

"I dream in fire but work in clay." -Arthur Machen


  • Member since
    October 2008
  • From: italy
Posted by bsyamato on Monday, March 24, 2014 5:00 AM

Thanx Jack, soon the Babs will be done :)

Last night decals, some fear about the acrilics that seems react with decals water Tongue Tied but after semms all ok. Next step ENAMEL gloss paint and washing Embarrassed

these decals was really old and take lots of time before to slide off the paper..

No fear about the sonia Cliff, you don't miss nothing , i don't post nothing till now , just announced :)

Perfect NMF with preshading on the Shiden Toast .. guns and antennas moulded with fuselage and wings are even a bad affairs :D

  • Member since
    April 2006
  • From: ON, Canada
Posted by jgeratic on Sunday, March 23, 2014 11:04 PM

Bsyamato - your build is taking shape now, I hope to be near that stage tomorrow.

Gamera - really nice NM, and I do detect pre-shading underneath.  

--------------------------------------

I've got the previously discussed details of the Claude squared away, and have sprayed the main body a metal colour.  I'll post a progress pic soon, just want to get in another day at the bench.

regards,

Jack

JOIN OUR COMMUNITY!

Our community is FREE to join. To participate you must either login or register for an account.

SEARCH FORUMS
FREE NEWSLETTER
By signing up you may also receive reader surveys and occasional special offers. We do not sell, rent or trade our email lists. View our Privacy Policy.