SEARCH FINESCALE.COM

Enter keywords or a search phrase below:

Japanese Group Build Part III

90691 views
946 replies
1 rating 2 rating 3 rating 4 rating 5 rating
  • Member since
    January 2010
Posted by johnsan on Tuesday, April 8, 2014 1:25 AM

Not sure I'd blame the vendor. Kits aren't wrapped in Japan by the manufacturers or distributors. If they are wrapped, it is at the actual shop. In any case if the decal was sealed and this is done by the manufacturer, I'm not sure what else could be done by the vendor. Decals do go off and are sometimes otherwise defective.

No matter. Your markings look quite good.

  • Member since
    April 2006
  • From: ON, Canada
Posted by jgeratic on Monday, April 7, 2014 5:43 PM

John - taking shape, glad to see this one coming along - this GB theme would not be complete without seeing at least one Zero.

Johnsan - the decal dilemma must have to do with the vendor.   I had ordered the kit from the UK, and received it with no cellophane wrapping around the box, but the decals were in their own plastic sleeve - and the whites had yellowed but cleared up after a few days exposure to sunlight.

-------------------------------------------

Tail teaser, the overall finish is still gloss, but I plan to dull down a bit, maybe satin finish?

Rib detail is provided as fine raised lines.  So to lend more depth, took a fine paintbrush and added some highlights and a little shadow:

regards,

Jack

  • Member since
    November 2009
  • From: SW Virginia
Posted by Gamera on Monday, April 7, 2014 11:33 AM

John, looks good, nice clean build.

"I dream in fire but work in clay." -Arthur Machen


  • Member since
    September 2011
  • From: Milaca, Minnesota
Posted by falconmod on Monday, April 7, 2014 7:48 AM

Well made more progress this weekend,  got the cockpit in and the wings and elevators glued on.  noe it's time to fill a few seems.

John

On the Bench: 1/72 Ki-67, 1/48 T-38

1/144 AC-130, 1/72 AV-8A Harrier

  • Member since
    January 2010
Posted by johnsan on Saturday, April 5, 2014 11:12 PM

That's not usual for Fujimi decals. My experience with them goes back a bit and I've never had this happen. Generally, I really like Fujimi's decals and replace them only when the whites aren't true. How did you store the decals. Expansion/contraction can play havoc with any make decals, as can moisture absorption from the air.

  • Member since
    November 2009
  • From: SW Virginia
Posted by Gamera on Saturday, April 5, 2014 7:45 PM

Thanks Jack, interesting, I may have to give that a try too.

Not sure about the decals, been some years since I've built a Fujimi kit. Glad to see you were able to save the decal markings if not the decals themselves.

"I dream in fire but work in clay." -Arthur Machen


  • Member since
    April 2006
  • From: ON, Canada
Posted by jgeratic on Saturday, April 5, 2014 7:00 PM

Johnsan - love the colouring on those, really eye catching.

Gamera

Hey Jack, that looks great! So you pre-shaded the panel lines under the red with the blue pencil and then highlighted the panel centers with white before painting the red?

That's it exactly.  I opted for the blue pencil crayon just because it was quicker.

------------------------------------------------

I'm at the decal stage. Luckily, the white code numbers for the rudder did not shatter, but the smaller stuff (like the warning stencil on the wing edge) did.  So I had to scan what remained on the decal sheet, and printed out on clear decal paper.  Not sure if  this is typical of Fujimi decals, or maybe just an old kit.

regards,

Jack

  • Member since
    November 2009
  • From: SW Virginia
Posted by Gamera on Friday, April 4, 2014 11:08 AM

Wow Johnsan, they look great, love the shading on the orange!

"I dream in fire but work in clay." -Arthur Machen


  • Member since
    January 2010
Posted by johnsan on Friday, April 4, 2014 2:37 AM

Looking good, Bsyamato, Jack. Way to hang in there, Falconmod. Hope to see more of this soon.

Had painting sessions last night and today. Here's the results:

This is the fourth time I've painted these tanks. I wasn't happy with my previous attempts. This isn't perfect, but it will do.

  • Member since
    November 2009
  • From: SW Virginia
Posted by Gamera on Thursday, April 3, 2014 8:03 PM

The Babs looks terrific there Bsyamato, a little wash and you're done!

Hey Jack, that looks great! So you pre-shaded the panel lines under the red with the blue pencil and then highlighted the panel centers with white before painting the red?

That's one reason I love these GB, I learn something from everyone I host or enter!  

"I dream in fire but work in clay." -Arthur Machen


  • Member since
    April 2006
  • From: ON, Canada
Posted by jgeratic on Thursday, April 3, 2014 4:36 PM

John and Bsyamato -, respective builds looking great.

---------------------------------------------

Guys, thanks for the comments and tips along the way.  

Round two for the hinomaru red - I think now I'm satisfied.  Part of the original problem was adding white into the airbrush cup, and further exasperated by the metal paint finish (it is shiny, but does present a dark background to overlay the red on).

So I re-masked and did some pre-shading, first with a dark blue pencil crayon along panel lines, followed with spraying some white in the centers.  This was then further lightened with overspray of white, and then finally topped over with my red mix.

regards,

Jack

  • Member since
    October 2008
  • From: italy
Posted by bsyamato on Thursday, April 3, 2014 12:48 PM

Great Updates guys .

These hinomaru looks good Jack and about perfect TonyPanzerpilot Yes

Johnsan first time i heard about platz but the kit seems really fine Indifferent

Cliff nice effect at all with the salt, i prefere to do paint scratches after complete the aircraft with a fine brush 

Just an image of the Babs after the humbrol enamel glossy cure before the washing.. hope soon to do it and finish the little plane Embarrassed

At the next

  • Member since
    November 2009
  • From: SW Virginia
Posted by Gamera on Thursday, April 3, 2014 9:35 AM

Hey you're making progress - that's good news!

Now that we're over the cold weather I'll probably end up stalling out with a stopped up pollen filled head...  

"I dream in fire but work in clay." -Arthur Machen


  • Member since
    September 2011
  • From: Milaca, Minnesota
Posted by falconmod on Thursday, April 3, 2014 7:39 AM

Well at least I finally got to a little something on this plane,  fuse glued together ready to install the office.

John

On the Bench: 1/72 Ki-67, 1/48 T-38

1/144 AC-130, 1/72 AV-8A Harrier

  • Member since
    November 2009
  • From: SW Virginia
Posted by Gamera on Wednesday, April 2, 2014 10:06 AM

Jack: That looks perfect! Great work on the NM and the red looks pretty darn close to me. And the grey on the engine harness really makes it 'pop' more.

As Johnsan said you can lightly sand or buff the Alclad to get rid of any blemishes like that and repaint. Very fine grit sandpaper works or sometimes I ball up a piece of heavy brown paper like from a paper bag and use it to sand.

"I dream in fire but work in clay." -Arthur Machen


  • Member since
    January 2010
Posted by johnsan on Wednesday, April 2, 2014 2:18 AM

Before breaking out more paint, try gently sanding the blemish away. You may be able to fix it, but if not it will smooth out the affected area prior to repainting.

Don't be alarmed. Bleed through happens.

  • Member since
    April 2006
  • From: ON, Canada
Posted by jgeratic on Tuesday, April 1, 2014 2:33 PM

Right, so mixed some X-9 brown into Tamiya's red.  Also added a little white afterwards in the airbrush cup to give a bit weathered look to the colour - I dunno, it looks like the wine colour I had posted earlier, but might be too pinkish burgundy?  I scanned in the colour swatch to display the original Tamiya red and the mix arrived at.

Little hiccup on one of the underside hinomaru.  I think I can tighten it up by placing a mask disc over it and spraying the aircraft colour over it.

Took the advice on using grey on the wires of the engine - a bit better photo this time.

regards,

Jack

  • Member since
    January 2010
Posted by johnsan on Tuesday, April 1, 2014 8:15 AM

Jack, you can, you might try painting the ignition wires a 'lighter' shade of black. It might make them pop out a bit and still look right. It's all about presentation.

  • Member since
    November 2009
  • From: SW Virginia
Posted by Gamera on Tuesday, April 1, 2014 7:37 AM

Hey Jack that's one heck of a job masking. And I'd love to see more close-ups of the engine you wired there, I can see them a little bit there.

Guys, I used Tamiya XF-70 for the green, looks reasonably close to Kawanishi green to me. I was trying to replicate some of the beat-up Shidens in 'Genda's Blade' but mostly as a test subject for the salt masking technique. I pulled a little Alclad off the bottom of one of the stabs which I'm repainting now, after that I'll decide what I'm going to do.

"I dream in fire but work in clay." -Arthur Machen


  • Member since
    January 2010
Posted by johnsan on Monday, March 31, 2014 9:16 PM

If you mix the Tamiya acrylic with lacquer and a bit of retarder and apply in very thin coats, you won't get cracking. Add a little brown to the mix. It doesn't need much.

Adding gloss isn't a bad idea. It will act as a retarder and will blend the paint better to the finish you have already. It'll also make it easy to add the numeral decals to the tail.

I'd be surprised if you found an FS match. Tamiya's red is matched to JPMA standard, like many of their other paints.

  • Member since
    April 2006
  • From: ON, Canada
Posted by jgeratic on Monday, March 31, 2014 6:44 PM

Panzerpilot and Jonhsan, for the red I was planning on Insignia Red  FS 31136.

You know, I do have some Tamiya XF-7 flat red, but never considered it an option, at least not straight from the bottle, as I just don't want to make a mix that will end up sitting around for years on end.    Looking back a few pages, you have (as repeated here), advised on adding a bit of tint to it.  

I think I will try it, but I'm thinking will need to add some gloss as well, so the current surface will accept it.  I'm afraid it might crack since it is a flat base going over a shiny coat.   Trying to pinpoint an FS number for this Tamiya red, I couldn't find one.  Going to http://scalemodeldb.com/paint , I've found XF-7 and Insignia Red.  This will give me a better starting point of where I need to go with the Tamiya shade.

In comparison, the above colour site's rendition of 1136 has more green(43) and blue(37) than the Federal Standard's version, which has no blue at all, and green being only (23).  The values in brackets are those representing the RGB system.

I know, I know, just paint the damn thing - lol.    Alrighty, off to the paint booth.....

regards,

Jack

  • Member since
    January 2010
Posted by johnsan on Monday, March 31, 2014 5:06 PM

Gamera - I was also curious about which paints you used.

Jack - Can you get Tamiya acrylics? Their red is a very good match for fresh hinomaru red and can be easily tinted for wear. About the peeling, this is more true for IJAAF than for IJNAF planes. It also depends on when. IJAAF planes were often delivered unpainted and field painting was on unprimed surfaces. Until fairly late in the ware, IJNAF planes were factory primed and painted. As to peeling effect, I guess. It's more a matter of degree. The scalpel can be used for just removing small chips as on the Oscar wings or mass amounts as seen on the Oscar fuselage.

Looking again at Gamera's George, it  looks like the salt technique would be very useful for replicating paint shifting color after prolonged sun exposure like on wrecks, stored, or derelict aircraft.

  • Member since
    December 2004
  • From: Houston, Texas
Posted by panzerpilot on Monday, March 31, 2014 4:36 PM

Thanks for the compliments on my "Tony", folks. I especially enjoyed working with mottling and am thinking of using that scheme again someday on another type.

Gamera. looks pretty good. Have you applied a clear coat? What did you use for the Green?

Jack. Those insignia will look nice with the Italeri's. What color will you use?

-Tom

  • Member since
    April 2006
  • From: ON, Canada
Posted by jgeratic on Monday, March 31, 2014 4:26 PM

Gamara - I think you succeeded with the salt technique, in as far as that method gives those exact results.  If you can link or post a period photo of the effect you are trying to replicate, I might be better able to comment

Johnsan - I like the look of that Oscar.  I think this is the paint peeling effect look? - something I read about briefly somewhere.  Sorry, I forget the particulars about why this happened to the finishes of Japanese planes.

------------------------------------------------------

This past weekend, I almost pulled the trigger on the red paint.  The compass circle cutter arrived Friday, but it would be Sunday afternoon before I found bench time for the masking.  I had discovered an old MM acrylic Insignia red in my basement.  It had the consistency of rubber, but I seemed to have been able to rejuvenate it with automotive lacquer thinner.  24 hours later though, as I was about to pour some in my airbrush cup, it had returned back to it's worthless state.

So while waiting on the Italeri Reds, I worked on the cowl.  I did add some speaker wire to the engine, but they don't stand out as much after painting them black.

regards,

Jack

  • Member since
    November 2009
  • From: SW Virginia
Posted by Gamera on Monday, March 31, 2014 11:23 AM

Hey Johnsan that looks good! I've never tried the scalpel, tape rip, or sand stick methods. So far I've liked what I've gotten with hairspray, I like how when you rub the paint it comes off the highpoints and front edges which seems more realistic to me. Plus I can just tap the brush on the areas of the model I want to chip more.  

"I dream in fire but work in clay." -Arthur Machen


  • Member since
    January 2010
Posted by johnsan on Monday, March 31, 2014 6:31 AM

I have to confess having never tried the salt technique. The results I've seen don't appear very realistic to me, but I understand that many guys do like the look it provides. The problem as I see it, and again I haven't used this technique, is the wear doesn't look very realistic to me.

A few years back I tried several techniques using dissimilar paint types. Of course I tried hairspray and generally like it. I use it for more than just chipping to show metal. For chipping to metal, I think I like the scalpel technique better. It's certainly more controlled. 
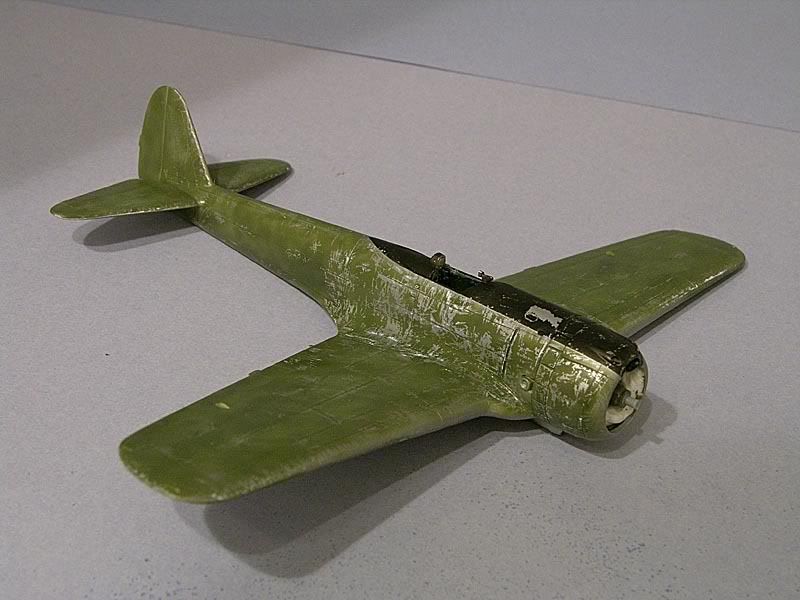
This is Hasegawa's 72nd Oscar. It was painted silver using Tamiya enamel aluminum, barrier coated with Future, and sprayed very randomly with a Mr Color green. While the green was fresh, like maybe 30 minutes after spraying, I chipped the green using a #15 scalpel blade and a light touch. Chips can be removed with the desired shape and at the desired position. The black was Tamiya's acrylic black and was too fragile for chipping this way. Touch ups are easy though and actually look better. Corrections add depth to the finish. I really liked the appearance of the finished model.

A modeling buddy likes to use the masking tape technique when he wants massive chipping. Again, dissimilar paints, a barrier coat, and a fragile final color coat. He then wads high tack masking tape in a ball and presses the tape in a random pattern. He then sharply pulls the tape away. This leaves a nicely chipped surface. This works really well for a highly chipped subject, but it's not as controllable as using a scalpel. It is much quicker, though.

These days, I generally use hairspray and chip with a dry toothpick or an abrasive erase. The final coat paint adheres to the hairspray. The hairspray doesn't really adhere to the paint layer below. That is at least not initially. 

I also like the sand stick method. Here the top layer is abraded using a fine sanding stick. This really is more a wear technique, but it can also chip paint. This works better with another chipping method. Again,  we're talking depth of finish here. 

There are other methods as well. We all have ways we like best. I won't tell someone not to use salt if that  look is what they like. It just seems to have be random to me. 

  • Member since
    November 2009
  • From: SW Virginia
Posted by Gamera on Sunday, March 30, 2014 10:10 PM

Weeeeeeeellllllllllllllllllll, here's my results. Not sure how much I like it. I think what I've done with the hairspray technique seemed to look better, to me at least.

"I dream in fire but work in clay." -Arthur Machen


  • Member since
    January 2010
Posted by johnsan on Sunday, March 30, 2014 9:30 AM

PanzerPilot, that is a thing of beauty. Very nice.

  • Member since
    October 2008
  • From: Georgia
Posted by Rigidrider on Saturday, March 29, 2014 9:57 PM

PanzerPilot... Outstanding!  Beautiful job all around!

When Life Hands You A Bucket Of Lemons...

Make Lemonade!

Then Sell It Back At $2 Bucks A Glass...

  • Member since
    November 2009
  • From: SW Virginia
Posted by Gamera on Saturday, March 29, 2014 7:35 PM

Oh btw that sheet of hinomaru is form Tech Mod and it's listed as 1/48th.

I bought it from Flightdecs Canada a couple of years ago but they don't have it listed now.

"I dream in fire but work in clay." -Arthur Machen


JOIN OUR COMMUNITY!

Our community is FREE to join. To participate you must either login or register for an account.

SEARCH FORUMS
FREE NEWSLETTER
By signing up you may also receive reader surveys and occasional special offers. We do not sell, rent or trade our email lists. View our Privacy Policy.