SEARCH FINESCALE.COM

Enter keywords or a search phrase below:

Japanese Group Build Part III

90672 views
946 replies
1 rating 2 rating 3 rating 4 rating 5 rating
  • Member since
    November 2009
  • From: SW Virginia
Posted by Gamera on Thursday, October 16, 2014 11:20 AM

Hey Tom, I love your idea but I believe I read somewhere on the J-Aircraft site that was the reason for the bad chipping on Japanese land based planes- that the paint was applied directly to the the metal skin with no primer or undercoating at all.

I'm not sure how it would work out on an aircraft with the grey on the top surfaces too. I'm wondering if the grey would chip but the green would stick to the grey paint underneath it and not come up by itself. 

Again, this is something I'm just guessing at, I'm sure there is more information on the J-Aircraft site but I'm not sure without doing more reading on it. I'll look around to see what I can root up, if anyone else wants to pitch in please do so! 

"I dream in fire but work in clay." -Arthur Machen


  • Member since
    July 2014
Posted by modelcrazy on Thursday, October 16, 2014 10:18 AM

Seems like a sound idea. I will be interested to see the end result.

Steve

Building a kit from your stash is like cutting a head off a Hydra, two more take it's place.


http://www.spamodeler.com/forum/

  • Member since
    July 2012
Posted by Tom68 on Thursday, October 16, 2014 10:14 AM

Here’s what I was planning.  Since I’ve never done chipping before this may turn out to be a disaster or it could work out to be pretty cool.

First, I was going to apply salt at various places and then paint the entire plane in IJN gray.  Then, rub some (not all) of the salt off (simulating chipping while the plane was in that paint scheme).  

Then, mask the bottom since it should remain IJN gray and add salt to the topside.  This will simulate chipping of the IJN green just down to the undercoat of gray.  

Then spray a random incomplete pattern of IJN green on the top as I’ve seen in a number of pics from the south pacific.

Then if I rub all the salt off, I should end up with some chipping of the green down to just the gray; and some all the way down to the silver.

Does any of this seem to make sense or am I crazy? (Be advised, there are those who are convinced I’ve been the later for many years! )

  • Member since
    November 2009
  • From: SW Virginia
Posted by Gamera on Thursday, October 16, 2014 8:54 AM

John: Sorry, not trying to rush you or anything just wanted to make sure you didn't think I'd forgotten about you. And make sure the photo on the front page is the one you want there.

"I dream in fire but work in clay." -Arthur Machen


  • Member since
    September 2011
  • From: Milaca, Minnesota
Posted by falconmod on Thursday, October 16, 2014 7:52 AM

Gamera,

  I'm  Going to get some new photos this weekend.

John

On the Bench: 1/72 Ki-67, 1/48 T-38

1/144 AC-130, 1/72 AV-8A Harrier

  • Member since
    November 2009
  • From: SW Virginia
Posted by Gamera on Thursday, October 16, 2014 7:48 AM

Tom: Looks good, both the NM paint and the chipped cowling.

Now that you mention it I don't think I've seen anyone add chipping to field applied camo either. Frankly I'd think it would chip more, since it was applied straight to the aluminum finish with no primer or anything under it. And I'd think the plain might not be totally clean at the time, maybe a little dusty keeping the paint from sticking all that much more. I'm not sure if maybe when the paint chipped the field crews might have repainted the areas so they didn't show the chipping???

Anyone else know more about this???

BTW: Falcon - are you still aiming to take more photos or would you like me to post that photo as your finished one?

"I dream in fire but work in clay." -Arthur Machen


  • Member since
    July 2012
Posted by Tom68 on Thursday, October 16, 2014 6:38 AM

I haven't posted much since I signed on here, but I have been making some progress.  Here's a few update pics.

The cowl was my first attempt at salt chipping.  I plan to do more of it on the fuselage and wings, hence the silver paint.

I have a question.  I was planning to do the scheme of the field painted camouflage.  I assume there was some paint chipping just like the factory painted planes; but I don't ever see anyone modeling that and don't really see it in actual pics.

Am I wrong, or didn't the field painted Zeros didn't chip?  Anyone have any thoughts on that?

  • Member since
    July 2014
Posted by modelcrazy on Thursday, October 9, 2014 9:23 AM

Looks great, love that Frank.

Steve

Building a kit from your stash is like cutting a head off a Hydra, two more take it's place.


http://www.spamodeler.com/forum/

  • Member since
    October 2008
  • From: italy
Posted by bsyamato on Thursday, October 9, 2014 5:09 AM

High quality finished models guys , really well done Yes Yes Yes Yes

falconmod

Well I'm  considering my Ki-84 Frank as finished. Toast

I'll try to get some better pictures than these at 12am. Surprise

John

More pics John!! Stick out tongue

  • Member since
    November 2009
  • From: SW Virginia
Posted by Gamera on Wednesday, October 8, 2014 12:00 AM

Sure enough!

"I dream in fire but work in clay." -Arthur Machen


  • Member since
    April 2006
  • From: Denver, Colorado
Posted by waynec on Tuesday, October 7, 2014 4:40 PM

Gamera
Wayne: Really cool! Love that camo and the wash really picked out the detail. I know what you mean about not attaching small parts- found it out the hard way myself. Do you want me to go ahead and post her or wait for more photos?  

thanks. lets call it done and we can update when i build the base. 

Никто не Забыт    (No one is Forgotten)
Ничто не Забыто  (Nothing is Forgotten)


  • Member since
    November 2009
  • From: SW Virginia
Posted by Gamera on Monday, October 6, 2014 7:05 PM

ADJ: Looks great to me, I've never tried building up the stringers like that but I like what you've got there.

Wayne: Really cool! Love that camo and the wash really picked out the detail. I know what you mean about not attaching small parts- found it out the hard way myself. Do you want me to go ahead and post her or wait for more photos?  

"I dream in fire but work in clay." -Arthur Machen


  • Member since
    April 2006
  • From: Denver, Colorado
Posted by waynec on Monday, October 6, 2014 6:54 PM

JGSDF TYPE 82 went a tad south so it is going in another direction which will be amusing. i have another in the stash. 1/72 TYPE 61 is done. HMG isn't mounted until i make a base. lessons learned: 1. brass ros axles for idlers and drive sprockets when using rubber band track, 2. leave the fiddly parts off until lower hull is painted, tracks are on and upper hull is attached. TAMIYA paints, black oil pin wash,  and REAL DEAL soft dirt the base may throw it into another category.

i am really getting into this scale which is scary given the 150 1/35 kits in the stash. i'll post better pics when the base is done.

Никто не Забыт    (No one is Forgotten)
Ничто не Забыто  (Nothing is Forgotten)


  • Member since
    October 2013
Posted by ajd3530 on Monday, October 6, 2014 2:53 PM
  • Member since
    October 2013
Posted by ajd3530 on Monday, October 6, 2014 11:31 AM
With a move looming within the next month, I'm kinda stuck between a rock and a hard place. I want to keep building, but I am leary of putting anything together enough that I can't fit it all back in its box for the move. With that in mind, I am starting on my Tamiya Pete today, my FIFTH ongoing project.

And with this comes my first real attempt at scratch building!
  • Member since
    October 2008
  • From: Georgia
Posted by Rigidrider on Monday, October 6, 2014 10:54 AM

LOLOL!!!

When Life Hands You A Bucket Of Lemons...

Make Lemonade!

Then Sell It Back At $2 Bucks A Glass...

  • Member since
    November 2009
  • From: SW Virginia
Posted by Gamera on Sunday, October 5, 2014 9:27 PM

Jack: Thanks, glad you like her, still a bit of a learning experience here.

Doug: Thanks! And I have to admit this is another learning experience, just grab a figure and fool with it until either you like the results or you're sick of it!

"I dream in fire but work in clay." -Arthur Machen


  • Member since
    October 2008
  • From: Georgia
Posted by Rigidrider on Sunday, October 5, 2014 6:03 PM

Cliff & Jack... Beautiful work on your figures for the heros and villans build! Wish I could make one look presentable! LOL! Great work guys!!!

Doug

When Life Hands You A Bucket Of Lemons...

Make Lemonade!

Then Sell It Back At $2 Bucks A Glass...

  • Member since
    April 2006
  • From: ON, Canada
Posted by jgeratic on Friday, October 3, 2014 2:10 PM

Gamera - beautiful work there Yes  , I like how both topside and underside came out. 

I've never really closely studied the peculiar paint wear of Japanese aircraft.   I do notice there is a different look between hairspray and salt techniques, where the latter provides  some soft edges where the salt has melted.

regards,

Jack

  • Member since
    July 2004
  • From: Sonora Desert
Posted by stikpusher on Tuesday, September 30, 2014 11:30 PM

Thanks Gamera, it's nice to get something nearly done. I have been sidetracked on too many projects this year and last year...


F is for FIRE, That burns down the whole town!

U is for URANIUM... BOMBS!

N is for NO SURVIVORS...

       - Plankton

LSM


  • Member since
    April 2014
  • From: Australia
Posted by lostagain on Tuesday, September 30, 2014 9:32 PM

Hi Jack,

Thanks for the info and the further references. Unusually, the references are narrowing down my choices, not confusing me more. I was heading down a much too orange path, as Cliff was saying.

That Ron Cole picture is really good, had not seen it before. A few more extra details to add...

Thanks

Piers

  • Member since
    November 2009
  • From: SW Virginia
Posted by Gamera on Tuesday, September 30, 2014 8:32 PM

SP: Hope you didn't burn out applying all those decals!!! Really, looks good and nice to see you almost done.

BTW: FINALLY got some sunny weather this weekend and got the photos of the Shiden. My first attempt at the salt weathering technique and not totally happy with the results, I like the hairspray technique much more. Still she's done.

And yes they had round bale technology in Japan in the '40s... really...Wink

"I dream in fire but work in clay." -Arthur Machen


  • Member since
    July 2004
  • From: Sonora Desert
Posted by stikpusher on Tuesday, September 30, 2014 5:17 PM

Here is the latest work... nothing too exciting

Future coat on in preperation for decals

decals on

and a close up...


F is for FIRE, That burns down the whole town!

U is for URANIUM... BOMBS!

N is for NO SURVIVORS...

       - Plankton

LSM


  • Member since
    July 2012
Posted by Tom68 on Saturday, September 27, 2014 9:20 AM

Stikpusher/Gamera,  Thanks for the info.  I ordered up a copy of the Osprey book.

  • Member since
    July 2004
  • From: Sonora Desert
Posted by stikpusher on Friday, September 26, 2014 12:48 PM

Dave, looking at my sub in black and knowing the history of that boat, I thought of that movie more than once myself. "Horrywood!"

Jack, your Spruce looks great. That color looks perfect to me. I was gonna suggest that Gunze shade, but I see that you used that and modified it. For Japanese propellors, Gunze makes, get this- "Propellor Color" in their Mr Color line. Polly Scale and Aeromaster also made the appropriate shade of Japanese Red Brown in their line ups. Tamyia's Red Brown will also work for props.

I airbrushed on a coat of Future on my sub getting her ready for decals. More photos once I get them on.


F is for FIRE, That burns down the whole town!

U is for URANIUM... BOMBS!

N is for NO SURVIVORS...

       - Plankton

LSM


  • Member since
    November 2009
  • From: SW Virginia
Posted by Gamera on Friday, September 26, 2014 11:53 AM

Hey Jack, thanks, I figured someone knew more about this than I did!

For some reason I keep thinking of a more 'pumpkin' shade like the Bell X-1 but what you've got there looks much, much closer to what I've seen.

"I dream in fire but work in clay." -Arthur Machen


  • Member since
    April 2006
  • From: ON, Canada
Posted by jgeratic on Friday, September 26, 2014 10:49 AM

lostagain - thanks, glad you enjoyed the Spruce and look forward to seeing yours.

For colour inspiration,  I had found this painting:

Nick Millman's blog, Aviation of Japan,  has a write up on Japanese trainer colour.  There doesn't seem to be a clear shade, but after reading it, I came away thinking it should probably be lighter (towards the yellow spectrum) compared to how most people interpret it.   He also has a free pdf file dealing with the subject, but he never got back to me with an email response.  All of that can be found here:

http://www.aviationofjapan.com/2012_02_01_archive.html

In the end, I just eyeballed a 50/50 acrylic mix using the paints below:
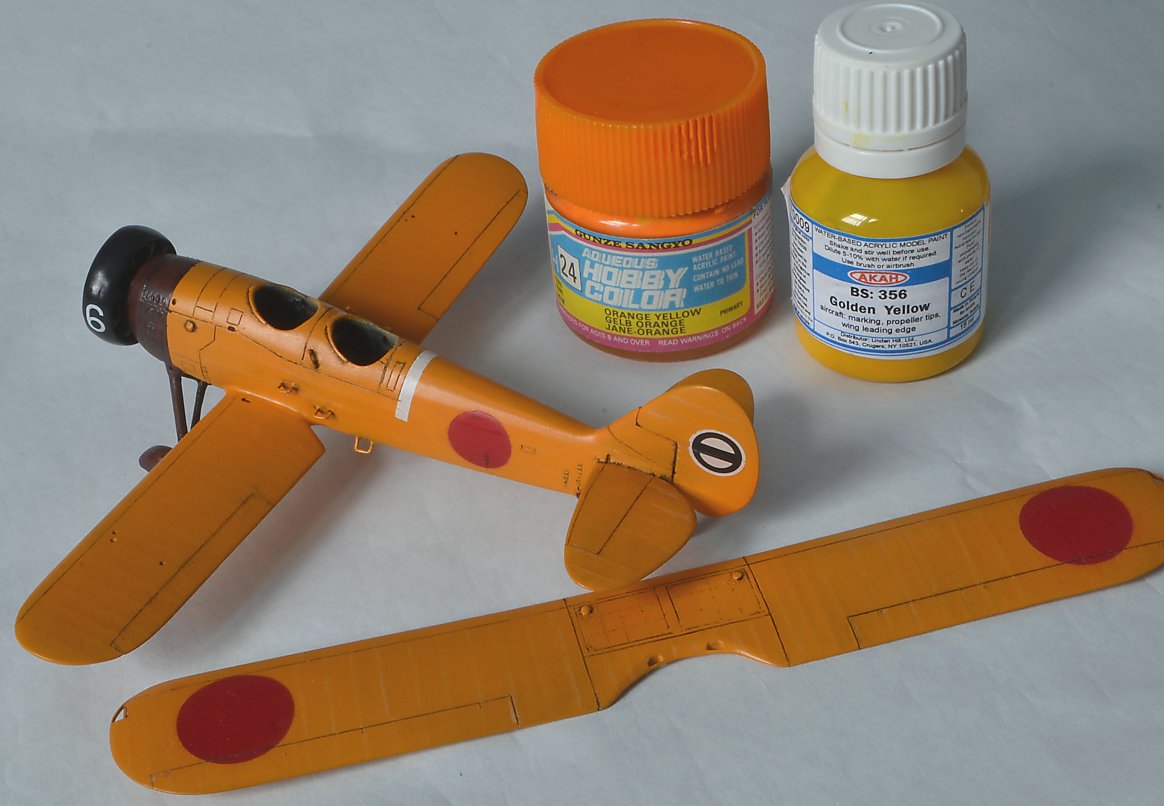
For the brown portions, I relied on Tamiya's XF-10 brown.  It's possible, as Cliff mentions, that it matched the brown used on propellers.  I didn't find any info at all for a suggested brown.

---------------------------------------------------------------------

This group continues to produce very fine work on the Japanese theme.  My compliments to all the latest finishes.  Yes

regards,

Jack

  • Member since
    January 2011
  • From: Commonwealth of Virginia
Posted by Tal Afar Dave on Friday, September 26, 2014 9:21 AM

Looking pretty sinister there, Stick!! Makes me think of the pier side scene from the movie "1941,"   "Whooahhhhh!!!!!  Jap sub!!  Is he heading to bomb John Wayne's house????

2022 New Year's Resolution:  Enter 1 group build and COMPLETE a build this year!!  Why Photobucket did you rob me of my one Group Build Badge???  Must be part of the strong anti-Monogram cartel!!!

 ]

  • Member since
    November 2009
  • From: SW Virginia
Posted by Gamera on Friday, September 26, 2014 7:51 AM

Hello Piers,

I've seen a number of different shades used for the trainer orange- most seem to be a sorta 'pumpkin' colour. The hull red is probably close to the propeller colour, a brown a with reddish shade to it.

I haven't actually painted anything in the trainer orange myself but a couple of the other members of the GB have, maybe you guys can give him some more useful advice?

Cliff

PS: Yeap, looks good SP, very stealthy! 

"I dream in fire but work in clay." -Arthur Machen


  • Member since
    April 2014
  • From: Australia
Posted by lostagain on Friday, September 26, 2014 3:05 AM

Hi Jack,

Great work on the Spruce, it looks excellent.

I have the Nichomo kit and have been ploughing through the translation for a while, although it is sitting at about 5th in the build list, so it will be some time yet. The Nichomo kit is good with plenty of detail given its age, not sure about the fit yet.

I would like to know which paints/colours you used or the instructions give as I am not sure what is the right orange colour - certainly not happy with the off the shelf solutions I have looked at to date. According to the Nichomo instructions, the brown on the spats/landing gear is a hull red, but seems it should be more brown - the literal translation was a red grape brown!

Again great build - your progress has given me more info and tips to ease my path when I start on it.

Piers

JOIN OUR COMMUNITY!

Our community is FREE to join. To participate you must either login or register for an account.

SEARCH FORUMS
FREE NEWSLETTER
By signing up you may also receive reader surveys and occasional special offers. We do not sell, rent or trade our email lists. View our Privacy Policy.