SEARCH FINESCALE.COM

Enter keywords or a search phrase below:

Japanese Group Build Part III

90679 views
946 replies
1 rating 2 rating 3 rating 4 rating 5 rating
  • Member since
    July 2004
  • From: Sonora Desert
Posted by stikpusher on Tuesday, September 2, 2014 10:50 AM

Yes, the PE does look good once it's on and under a coat of primer. I can not fault AFV for their results, but dang that was a trying task. Well now I am up to final paint scheme for it. Everybody likes to depict I-19 as she looked when she sank the Wasp, but I stumbled across a few tidbits of information over the past couple of days and I am leaning towards them now. I-19 was involved peripherally with the Pearl Harbor attack, sailing ahead of the carrier strike group and on the morning of the attack being in position to act as a radio beacon between the fleet and Oahu for returning aircraft. After her duties were done that morning the subs were cut loose to hunt and strike on their own in the waters surrounding Hawaii. A week or so later, she was one of several subs ordered to do the same off of the US West Coast. Arriving in California waters in the latter part of December she stalked and attempted to sink several merchant ships but most of her torpedoes missed. On Christmas, she did succeed in torpedoing a freighter just off Point Fermin that had to be beached nearby at Fort MacArthur to prevent her sinking. Her final task of the sortie to the West Coast was to have been participation in a bombardment of selected locations along with several other I-boats, but  most of the other submarines assigned to this task had exhausted their fuel reserves at the scheduled time of the action and so the mission was cancelled. Since all these incidents occurred locally to where I live, I like the tie in to the subject. I can see Pt Fermin and Ft MacArthur from the beach near where I live. For her time on these operations I-19 was painted Black with Black stained wood decks.  


F is for FIRE, That burns down the whole town!

U is for URANIUM... BOMBS!

N is for NO SURVIVORS...

       - Plankton

LSM


  • Member since
    November 2009
  • From: SW Virginia
Posted by Gamera on Tuesday, September 2, 2014 8:07 AM

SP: I see what you mean about a PE headache, looks good though!

John: Nice work, almost there now!

"I dream in fire but work in clay." -Arthur Machen


  • Member since
    September 2011
  • From: Milaca, Minnesota
Posted by falconmod on Tuesday, September 2, 2014 6:43 AM

I got some weathering done this weekend, yaa hoo!

Sorry for the fuzzy second picture.

John

On the Bench: 1/72 Ki-67, 1/48 T-38

1/144 AC-130, 1/72 AV-8A Harrier

  • Member since
    July 2004
  • From: Sonora Desert
Posted by stikpusher on Monday, September 1, 2014 6:40 PM

waynec

that turned out really nice. i like the dawn pictures. reminds me of pearl harbor pre launch pictures.

I was thinking the same thing...Hmm Very nice work BSY

Gamera, tough break on the antenna mast. But that should not be too difficult to scratch up a new one.

As for me, yesterday I airbrushed the lower hull with Tamiya Hull Red

and then today I spent a couple of hours today putting on the PE parts onto my I-19. Let's just say it was a less than pleasurable experience and many Censored were uttered...Whistling But I perservered

and afterwards it was time for the airbrush again... I airbrushed on a coat of Humbrol 1 Primer Gray

then a test fit & shots of the upper and lower hulls together

More to follow soon....


F is for FIRE, That burns down the whole town!

U is for URANIUM... BOMBS!

N is for NO SURVIVORS...

       - Plankton

LSM


  • Member since
    November 2009
  • From: SW Virginia
Posted by Gamera on Monday, September 1, 2014 5:18 PM

Very nice work as usual Bsyamato!!! I too love those dawn/twilight photos! I'll get you posted when I get back on the desktop computer.

BTW: The Shiden is done, except for the stupid blasted radio ariel behind the cockpit-it's fell off about a dozen times so far and now I can't find it at all. Guess I'll have to make a new one...

"I dream in fire but work in clay." -Arthur Machen


  • Member since
    April 2006
  • From: Denver, Colorado
Posted by waynec on Monday, September 1, 2014 12:21 PM

that turned out really nice. i like the dawn pictures. reminds me of pearl harbor pre launch pictures.

Никто не Забыт    (No one is Forgotten)
Ничто не Забыто  (Nothing is Forgotten)


  • Member since
    October 2008
  • From: italy
Posted by bsyamato on Monday, September 1, 2014 10:26 AM

I there Propeller

Great works on the Zero's and george finished John and Bob YesYesYes

So many updates Here guys Indifferent i returned today from holidaysbut have some trouble in the workbench to return soon on modelling. 

Heres the finished pictures of the hasegawa Sonia i finished about three weeks ago Embarrassed 

First pictures are took at dawn and sunset.. after regular pictures

more pictures here, two pages

http://s405.photobucket.com/user/bsyamato/library/modellismo/00%20WW2%20vol%203/Ki-51%20Sonia%20hasegawa%2072/Finished?sort=3&page=1

I hope you like it Smile

Asap will continue on the kurogane car 

  • Member since
    November 2009
  • From: SW Virginia
Posted by Gamera on Thursday, August 28, 2014 8:35 AM

stikpusher

Well if youre feeling realy rich and bold you can get the Academy 1/350 USS Indianapolis that comes with PE, Wood Decks, Brass guns, and the AFV Club I-58 kit. The I-58 is the sub that sank USS Indianapolis on her ill fated final voyage.

Hmmm, interesting idea- wonder if I can find a 1/350 Robert Shaw??? Wink

Actually I'd thought about picking up the same kit there of the I-19. On September 15, 1942 she launched a six torpedo spread at the USS Wasp hitting her with three and crippling her. Of the three errant torpedoes one hit and sunk the destroyer USS O'Brien and one hit the USS North Carolina killing five of her crew and injuring 23. The USS NC is museum is a couple of hours away from where I live and I've been on her almost a dozen times now so that adds a lot to my interest in the I-19. Still don't have a model of the USS NC though- battleships seem a lot of work to get looking good.  

"I dream in fire but work in clay." -Arthur Machen


  • Member since
    July 2004
  • From: Sonora Desert
Posted by stikpusher on Wednesday, August 27, 2014 2:08 PM

Well if youre feeling realy rich and bold you can get the Academy 1/350 USS Indianapolis that comes with PE, Wood Decks, Brass guns, and the AFV Club I-58 kit. The I-58 is the sub that sank USS Indianapolis on her ill fated final voyage.


F is for FIRE, That burns down the whole town!

U is for URANIUM... BOMBS!

N is for NO SURVIVORS...

       - Plankton

LSM


  • Member since
    November 2009
  • From: SW Virginia
Posted by Gamera on Wednesday, August 27, 2014 1:43 PM

Ummmmmm, might have to pick up one for myself...Whistling

"I dream in fire but work in clay." -Arthur Machen


  • Member since
    July 2004
  • From: Sonora Desert
Posted by stikpusher on Wednesday, August 27, 2014 10:54 AM

Oh AFV's armor is gorgeous. As is this kit. But yes, very intricate and fragile. And well engineered and detailed. She is a beauty for sure. This thing is pretty big too- as big as a modern sub and way bigger than a Type VII U-boat.


F is for FIRE, That burns down the whole town!

U is for URANIUM... BOMBS!

N is for NO SURVIVORS...

       - Plankton

LSM


  • Member since
    November 2009
  • From: SW Virginia
Posted by Gamera on Wednesday, August 27, 2014 8:41 AM

Wow, she's coming right along SP. I've always liked AFV Club armour (despite the zillion injection pin marks) but never tried building any of their ships or aircraft. Looks like a really well engineered and detailed kit.

"I dream in fire but work in clay." -Arthur Machen


  • Member since
    July 2004
  • From: Sonora Desert
Posted by stikpusher on Wednesday, August 27, 2014 12:08 AM

Thanks G! Thank goodness that the capstan was an easy piece to replicate and replace and that there was another to use as a guide for doing so...Black Eye

Well today was another session in between steps of another couple of projects. And I pretty much finished all the building today except for adding the PE and a couple of parts not glued in place to ease painting. Oh yeah, I am holding off in building the float plane as that is a little beast with lots of PE options. So here we go with today's steps.

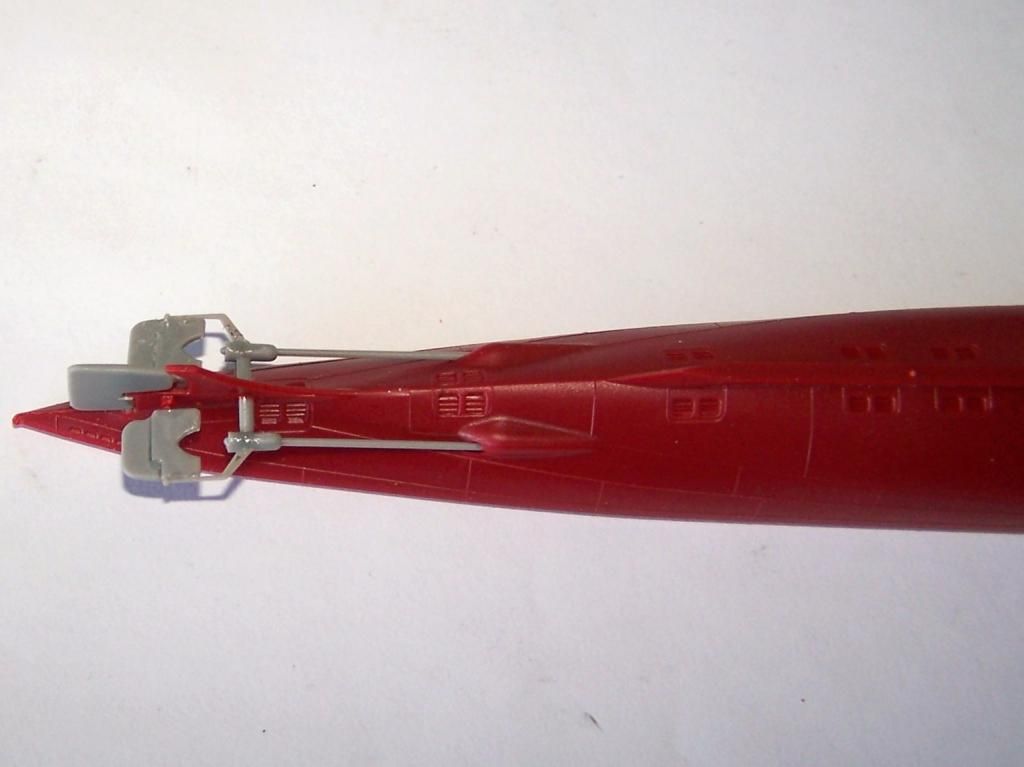
Step 5, the aft diving planes, lower rudder and prop shafts. I left off the screws until after painting. This area was really delicate.
Step 6, the pressure hull and stand- I dont know why they included the pressure hull as once the upper and lower hulls are joined you can not see it because the limber holes are molded recessed, not open, A bit of over engineering here again

Step 7 is building the Float Plane, which as I said above I skipped for now. Step 8 was the beginning of the sail/conning tower
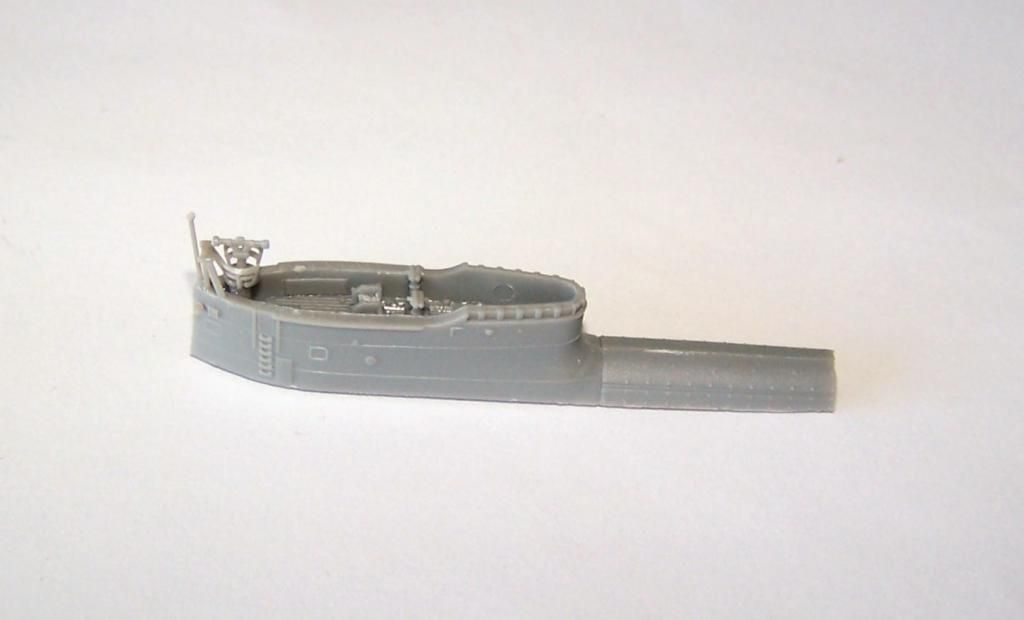
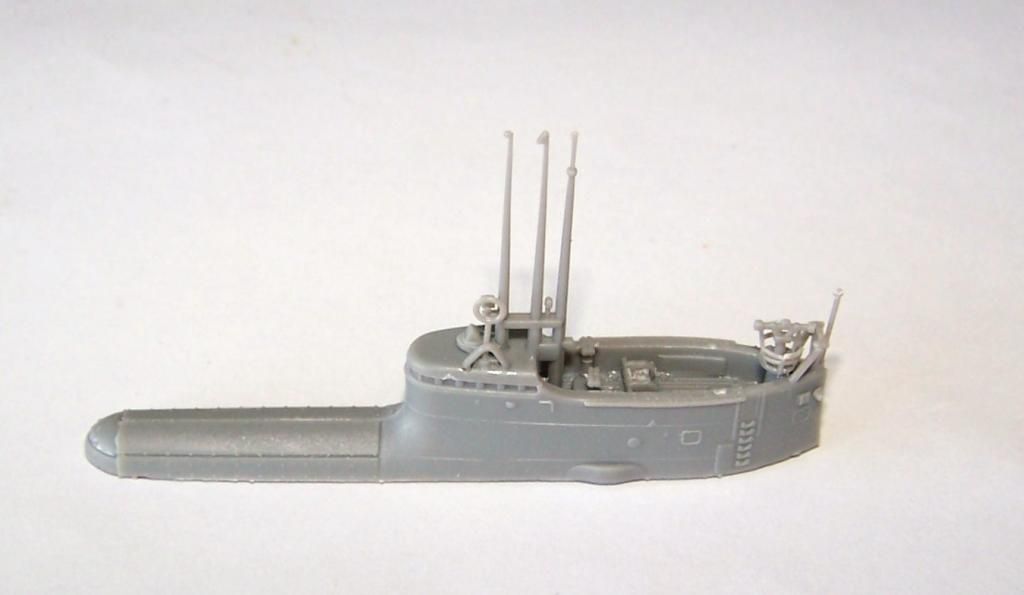
Step 9 is the completion of teh sail/conning tower. I left the upper portion loose to aid in painting the wood deck in there. I also left off the twin mount 25mm AA gun for painting purposes.
Step 10 was adding the guards around the bow diving planes and the float plane catapult
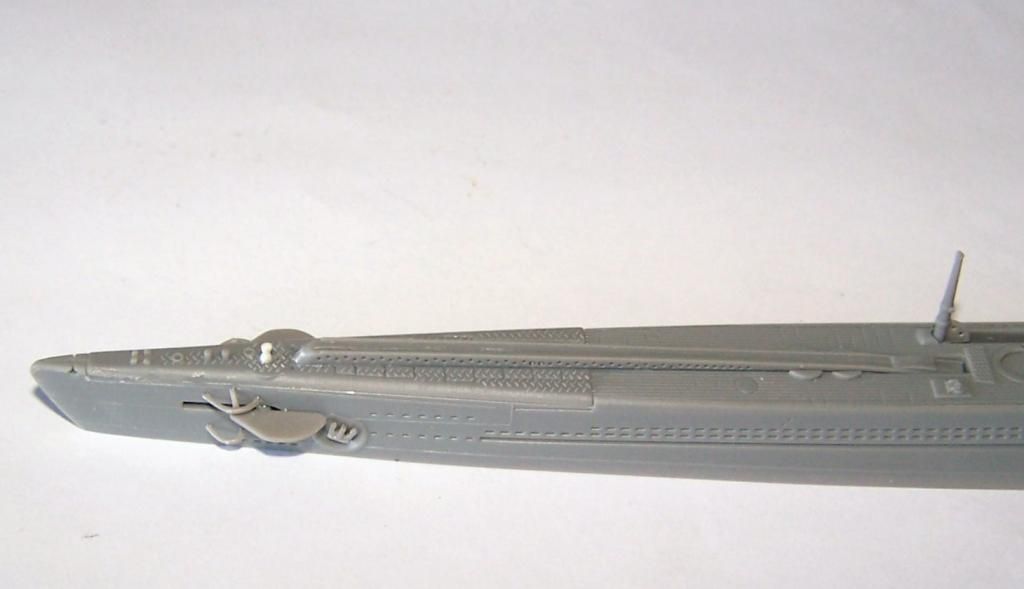
so here is the upper hull placed on the lower hull and conning tower placed on the hull.

I just need to add the PE, and then I can start painting. So far, so good, lost bow capstan notwithstanding.


F is for FIRE, That burns down the whole town!

U is for URANIUM... BOMBS!

N is for NO SURVIVORS...

       - Plankton

LSM


  • Member since
    November 2009
  • From: SW Virginia
Posted by Gamera on Tuesday, August 26, 2014 8:37 AM

SP: Very nice, you're making fine progress! The capstan looks perfect!

"I dream in fire but work in clay." -Arthur Machen


  • Member since
    July 2004
  • From: Sonora Desert
Posted by stikpusher on Tuesday, August 26, 2014 12:28 AM

More beautiful work here guys. Well I figured that I had better get my hiney in gear and start my build before this becomes another GB that I watch go by without successful completion.... or even starting... Embarrassed So tonite I began...Propeller

For my kit choice, I am building AFV Club's 1/350 IJN Submarine I-19

Step 1 is adding the crane to the foredeck and retractable boom mast to the after deck, as well as some sort of cylindrical container that goes under the sail/conning tower.

Step 2 was adding the bow diving planes

Step 3 was adding the deck to the bow and a capstan- infortunately my tweezers launched the kit part into oblivion, so I scratched a new one from some styrene rod

Step 4 was adding the capstan, screw guards, and upper rudder & guard to the stern

I did skip adding the PE parts to the bow and crane for tonite. I figured that launching the bow capstan was a bad omen for more tweezer work tonite...StormHmm


F is for FIRE, That burns down the whole town!

U is for URANIUM... BOMBS!

N is for NO SURVIVORS...

       - Plankton

LSM


  • Member since
    November 2009
  • From: SW Virginia
Posted by Gamera on Monday, August 25, 2014 10:49 AM

Falcon: Looks good to me, everything all neat and even. Were the landing gear bays natural metal or are you covering them with translucent blue-green for the aotake?

Didn't get much done here, painted the pitot tube and extendable steps aluminum and hated it. So I airbrushed them primer and then hit them with Alclad... a pile of work for three tiny pieces the size of a piece of paper clip wire.

"I dream in fire but work in clay." -Arthur Machen


  • Member since
    September 2011
  • From: Milaca, Minnesota
Posted by falconmod on Monday, August 25, 2014 7:23 AM

I only got the LG added to my plane this weekend.  at least one step closer to being able to weather the bottom.

On the Bench: 1/72 Ki-67, 1/48 T-38

1/144 AC-130, 1/72 AV-8A Harrier

  • Member since
    November 2009
  • From: SW Virginia
Posted by Gamera on Saturday, August 23, 2014 3:37 PM

WW: Thanks!

Wayne: Looks good!

Jack: LOL, no big deal - I thought 'ringleader' was pretty hilarious! So you do want to be the 'muscle?' Stick out tongue

"I dream in fire but work in clay." -Arthur Machen


  • Member since
    February 2007
  • From: Bronze Squadron - Battlestar Cerberus
Posted by Lodni Kranazon on Saturday, August 23, 2014 3:33 PM

Very nice 87, Wayne! Gamera, great job on the chipping!

[Admiring Starbuck's space fighter] Cassiopeia: It's a perfect machine! Born to dance amongst the stars! Starbuck: Yeah, it's bumping into them that has me worried.

  • Member since
    April 2006
  • From: ON, Canada
Posted by jgeratic on Friday, August 22, 2014 11:33 PM

lmao - Gamera, I guess ringleader has too many negative connotations, but it was meant in a good way.

regards,

Jack

  • Member since
    April 2006
  • From: Denver, Colorado
Posted by waynec on Friday, August 22, 2014 11:08 PM

been a while here. put away the JGSDF TYPE 87 SPAA until i feel like indy track. pulled out one of these from the modern asian stash, JGSDF TYPE 82 6x6 CinC vehicle.first glance and the tires were plastic, not  rubber. went together fine smoothed up well, painted MMA engine gray and 3 hubs will be jgsdf brown and 3 jgsdf green (kinda my tell for warwheels blending the wheel hubs with the body camo. ) will leave hatches closed u til my friend casts out a driver. had to drill holes for tool brackets which was annoying. tools, MGs and suspension are done. somehwat simple suspension and it would take surgery to turn front wheels. will put back and top on, fill and sand BEFORE rest of hand rails. mirrors are the last thing to go on.

Никто не Забыт    (No one is Forgotten)
Ничто не Забыто  (Nothing is Forgotten)


  • Member since
    November 2009
  • From: SW Virginia
Posted by Gamera on Friday, August 22, 2014 7:59 AM

jgeratic

Bob - very nice job on the Zero, and I like the method you used to paint the wheel wells. Yes

-----------------------------------------------------

Gamera - good to finally  see the ring leader post some progress.  Chipping looks very successful from here.

regards,

Jack

Thanks Jack- though 'ring leader?' You make this group sound like the Yukuza or something! I see us gathering outside hobby shops: 'Hey Mister, you wanna pay us some protection money, ya know like some nice high quality kits? Or else we can't be responsible for something that might happen to those nice shiny windows in your hobby shop there...' Stick out tongue

"I dream in fire but work in clay." -Arthur Machen


  • Member since
    February 2014
  • From: Michigan
Posted by silentbob33 on Thursday, August 21, 2014 7:19 AM

Thanks Jack! I spent a lot of time trying to find ways of mixing the metallic blue that the instructions called for until I started looking up more about aotake.  I really like the look of it.

On my bench: Academy 1/35 UH-60L Black Hawk

  • Member since
    April 2006
  • From: ON, Canada
Posted by jgeratic on Thursday, August 21, 2014 12:57 AM

Bob - very nice job on the Zero, and I like the method you used to paint the wheel wells. Yes

-----------------------------------------------------

Gamera - good to finally  see the ring leader post some progress.  Chipping looks very successful from here.

regards,

Jack

  • Member since
    November 2009
  • From: SW Virginia
Posted by Gamera on Wednesday, August 20, 2014 11:49 AM

Thanks guys! Yes I used the salt chipping method which I'm a little of two minds about, I like the randomness but I like the hairspray technique where I can choose where I want the chipping more by where I apply the brush to take the paint off. I tried to stick the salt where more chipping would occur but it sorta worked out and sorta didn't. I might try using both methods next I do this.

"I dream in fire but work in clay." -Arthur Machen


  • Member since
    February 2014
  • From: Michigan
Posted by silentbob33 on Wednesday, August 20, 2014 10:05 AM

Thanks guys! I like your chipping Gamera, did you use the salt method?

On my bench: Academy 1/35 UH-60L Black Hawk

  • Member since
    October 2008
  • From: Georgia
Posted by Rigidrider on Wednesday, August 20, 2014 10:05 AM

Bob... She came out great! Very nicely detailed.

Gamera...Also looking good!

When Life Hands You A Bucket Of Lemons...

Make Lemonade!

Then Sell It Back At $2 Bucks A Glass...

  • Member since
    March 2006
Posted by simpilot34 on Wednesday, August 20, 2014 9:10 AM

Bob she's a beaut mate! Gam that's looking great! Yeah I know silver paints are very grainy for the effect I'm looking for. One of the very reasons I wondered about the extremely fine pigments of a metalizer, I will let you know how it worked, just don't know when.

Cheers, Lt. Cmdr. Richie "To be prepared for war, is one of the most effectual means of preserving the peace."-George Washington
  • Member since
    November 2009
  • From: SW Virginia
Posted by Gamera on Sunday, August 17, 2014 5:35 PM

BTW: I did get a little more done over the weekend. Just took the masks off the canopy, need to attach it and get the drop tank painted- since it was underside grey I didn't attach it and paint it with the aluminum underbelly.

"I dream in fire but work in clay." -Arthur Machen


  • Member since
    November 2009
  • From: SW Virginia
Posted by Gamera on Sunday, August 17, 2014 5:28 PM

Hey guys, sorry I haven't been posting that much recently- things a little hectic here.

WW: Very nice work on the cockpit there, I know those older kits can be a little sparse in detail.

Simpilot: Not totally sure about doing silver doped fabric- I've tried silver paint it just seems too grainy. Your idea there of using a matte coat over the silver sounds good to me. Please let us know how it works out.

Bob: Beautiful job sir! Despite the problems you had she looks pretty darn fine to me! Going to update the front page now!

"I dream in fire but work in clay." -Arthur Machen


JOIN OUR COMMUNITY!

Our community is FREE to join. To participate you must either login or register for an account.

SEARCH FORUMS
FREE NEWSLETTER
By signing up you may also receive reader surveys and occasional special offers. We do not sell, rent or trade our email lists. View our Privacy Policy.