SEARCH FINESCALE.COM

Enter keywords or a search phrase below:

Japanese Group Build Part III

90679 views
946 replies
1 rating 2 rating 3 rating 4 rating 5 rating
  • Member since
    February 2014
  • From: Michigan
Posted by silentbob33 on Sunday, August 17, 2014 3:15 PM

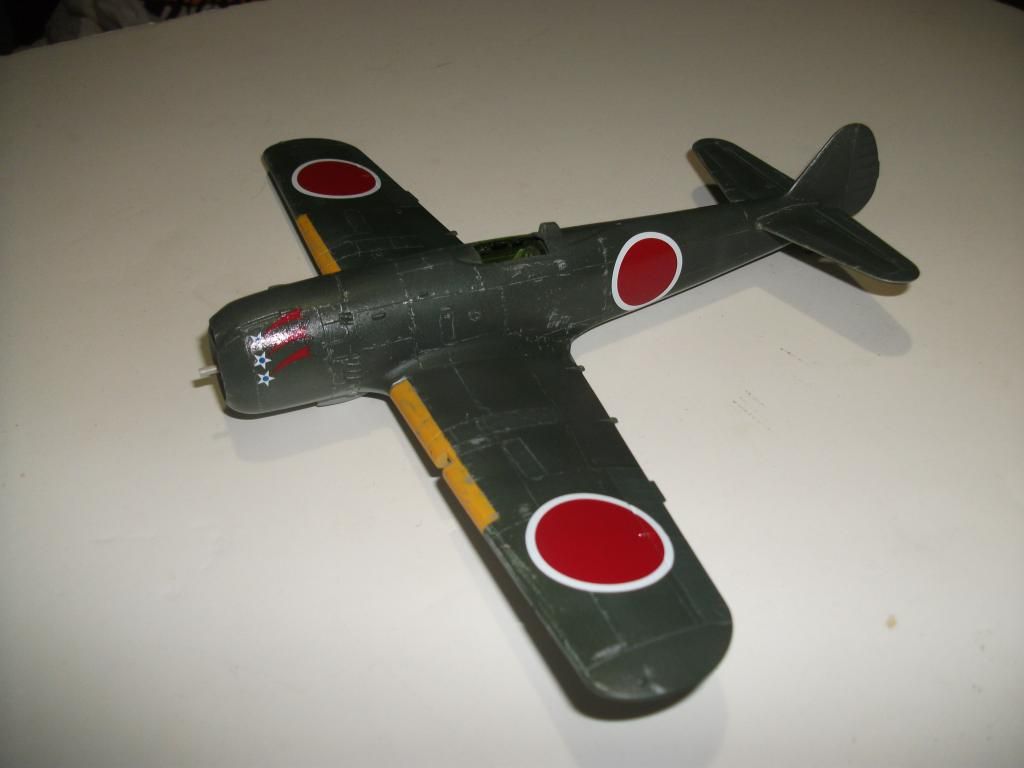
Well, I'm done!  The markings are for Lieutenant Commander Shigeru Itaya, leader of the fighters of the carrier Akagi during the attack on Pearl Harbor.  I read somewhere that the planes that were used in the attack were new, so I didn't weather it too much.  Thanks for hosting Gamera!

On my bench: Academy 1/35 UH-60L Black Hawk

  • Member since
    March 2006
Posted by simpilot34 on Sunday, August 17, 2014 7:32 AM

I really haven't done much rescribing of panel lines other than the sanded down join lines on to an bottom of a fuse lol. One day...... I hope to rescribe a raised line kit. 1/72 has its advantages there :-) Awesome work!

Cheers, Lt. Cmdr. Richie "To be prepared for war, is one of the most effectual means of preserving the peace."-George Washington
  • Member since
    February 2014
  • From: Michigan
Posted by silentbob33 on Sunday, August 17, 2014 6:49 AM

Thanks simpilot! So far my only issue with this build has been my fault with not doing a great job rescribing panel lines. Other than that I'm pretty happy.

On my bench: Academy 1/35 UH-60L Black Hawk

  • Member since
    March 2006
Posted by simpilot34 on Sunday, August 17, 2014 5:15 AM

Nice work Bob!  Looks right to me! I used the xtracolor tin on my Jake but found out, luckily before I closed the fuse, that it was supposed to be grey green lol. Anyway great work! I have the Tamiya kit as well in my stash and if I can get it half as good as yours I will be happy.

Cheers, Lt. Cmdr. Richie "To be prepared for war, is one of the most effectual means of preserving the peace."-George Washington
  • Member since
    February 2014
  • From: Michigan
Posted by silentbob33 on Saturday, August 16, 2014 8:53 PM

I have the house to myself this weekend, so I'm hoping to finish the Zero soon.  I'm working on the landing gear and painted the strut covers and gearbay with aotake.  After doing a lot of looking around, I used the method of painting the bays gloss silver and mixed a little bit of clear green with clear blue and covered the silver.  I like the look of it.

On my bench: Academy 1/35 UH-60L Black Hawk

  • Member since
    March 2006
Posted by simpilot34 on Friday, August 15, 2014 7:47 PM

Niceeee!!! All around! Trying to get my head around putting back those bits I sanded off aforementioned and trying to scope out the best paint to use for that silver doped fabric look. I'm going to do a trial spray of stainless steel buffing metalizer unbuffed then clear coated to protect the dullness I want. The color is right for what I want, just hope it conveys the effect I'm looking for. Any other suggestions will be appreciated. Chomping at the bit to get some visual progress on this floater!

Cheers, Lt. Cmdr. Richie "To be prepared for war, is one of the most effectual means of preserving the peace."-George Washington
  • Member since
    February 2014
  • From: Michigan
Posted by silentbob33 on Friday, August 15, 2014 5:10 PM

I put another layer of MicroSol on the decals before going to bed last night, thinking that might help.  When I looked this morning the decals weren't perfect, but they looked good enough.  So I'll keep on trucking where I am right now.  Here's a pic with the decals on.  

On my bench: Academy 1/35 UH-60L Black Hawk

  • Member since
    February 2014
  • From: Michigan
Posted by silentbob33 on Thursday, August 14, 2014 8:25 PM

I took a look at my Zero tonight and I noticed a huge mistake on my part.  I forgot to sand the panel lines I scribed, so my decals look horrible sitting on those lines.  I could strip the decals off, sand the lines down and repaint.  The downside to that is I won't have markings for a Pearl Harbor Zero.  I'd also have to make masks to paint the national insignia.  I did make a couple of black and white copies of my decal sheet so I could scan it, edit it some colors and try to print more decals.  Or, I could just carry on and leave this as a learning experience.  I'll have to think about what I want to do.

On my bench: Academy 1/35 UH-60L Black Hawk

  • Member since
    February 2007
  • From: Bronze Squadron - Battlestar Cerberus
Posted by Lodni Kranazon on Thursday, August 14, 2014 5:07 PM

Hey guys! Great work & builds! Sorry I haven't posted much lately. But I didn't forget about ya! Getting back to this Starfighter - I put in the cockpit decals and I've placed some bits of very thin plastic flash I saved over the multitude of sinkholes on the forward fuselage.  Geeked

[Admiring Starbuck's space fighter] Cassiopeia: It's a perfect machine! Born to dance amongst the stars! Starbuck: Yeah, it's bumping into them that has me worried.

  • Member since
    November 2009
  • From: SW Virginia
Posted by Gamera on Wednesday, August 13, 2014 7:28 AM

John: Nice work, I can see how you toned things down from your earlier photo. Gee it's the little things like that I bog down on too...

"I dream in fire but work in clay." -Arthur Machen


  • Member since
    September 2011
  • From: Milaca, Minnesota
Posted by falconmod on Wednesday, August 13, 2014 6:55 AM

I got a few more decals on.  This is the fun part.  unfortunately I still have all the little stuff to do,  landing gear, canopy, gear doors etc etc.

John

On the Bench: 1/72 Ki-67, 1/48 T-38

1/144 AC-130, 1/72 AV-8A Harrier

  • Member since
    March 2006
Posted by simpilot34 on Tuesday, August 12, 2014 10:28 PM

Looking great guys!! Will be back in this one soon. Had some life setbacks lately and managed to complete the head end of my 1/72 FW190 at least. Will get to that 'Alf' soonish.

Cheers, Lt. Cmdr. Richie "To be prepared for war, is one of the most effectual means of preserving the peace."-George Washington
  • Member since
    February 2014
  • From: Michigan
Posted by silentbob33 on Tuesday, August 12, 2014 3:59 PM

I put decals on today.  It always scares me when I see what Micro Sol does to them.  I'm going out of town for work for the next couple of days so I'll post some pics when I get back.

On my bench: Academy 1/35 UH-60L Black Hawk

  • Member since
    February 2014
  • From: Michigan
Posted by silentbob33 on Monday, August 11, 2014 8:19 AM

Thanks for the info!  I'll try that today.  I also misted on some light grey until it looked right to me.  It was nagging at me that the color didn't look right.  

On my bench: Academy 1/35 UH-60L Black Hawk

  • Member since
    November 2009
  • From: SW Virginia
Posted by Gamera on Monday, August 11, 2014 7:34 AM

John: Lookin' good! I believe the national markings were repainted by the ground crews when they chipped off. Seems like to me that would leave them different shades of red when you painted new patches over old faded paint. Maybe they painted the whole thing though? Here I'm not really sure- maybe someone else here knows?

Bob: Testor's Glosscote can be applied over Tamiya if the Tamiya is good and dried and you apply it lightly in a couple mist coats. Heavy coats will discolour the Tamiya, I found out the hard way. I've found an acrylic varnish in a spray can- I think it's Krylon that I've been using a lot of, works about as well and being acrylic itself there's no comparability issues. Plus it's much cheaper!

"I dream in fire but work in clay." -Arthur Machen


  • Member since
    September 2011
  • From: Milaca, Minnesota
Posted by falconmod on Monday, August 11, 2014 6:35 AM

Well I got a lot of work done on the Frank,  Sorry there are no earlier pictures as this was added after i started it.  I didn't think I would get to it in this build.  Had to switch to the army green for this one instead of the navy green on the Zero.

Tried doing the faded green look on the paint, I don't think it really shows up yet.   but I got a bunch of decals on last night.

Now i just need to figure out the best way to do the chipping on the national markings?Confused

John

On the Bench: 1/72 Ki-67, 1/48 T-38

1/144 AC-130, 1/72 AV-8A Harrier

  • Member since
    February 2014
  • From: Michigan
Posted by silentbob33 on Friday, August 8, 2014 10:43 PM

I forgot to ask, I normally use Testor's Glosscote lacquer.  Do I need to worry about it interacting in a bad way with the Tamiya acrylic?  I've never had a problem with it over enamel.

On my bench: Academy 1/35 UH-60L Black Hawk

  • Member since
    February 2014
  • From: Michigan
Posted by silentbob33 on Friday, August 8, 2014 6:04 PM

Well, she's painted.  My first time airbrushing Tamiya acrylics and I like it.  Certainly a better smell than enamels.  The paint looks a little too green to me, but it says it's Japanese Navy Gray on the bottle.  But then again, this is my first Japanese plane so I could be wrong.  Unfortunately, I can see where I made some mistakes scribing panel lines.  For some reason this kit had both raised and recessed panels.  The raised lines were lost when I primed it so I figured I would try to scribe them myself.  I probably should have practiced on some scrap first.  Luckily, most of my mistakes will be covered by decals.  Oh well, I'll chalk it up to a learning experience.  I'll use this as a practice kit so I know what I'm doing when I get my hands on a more detailed kit Wink.

On my bench: Academy 1/35 UH-60L Black Hawk

  • Member since
    February 2014
  • From: Michigan
Posted by silentbob33 on Friday, August 8, 2014 11:22 AM

Thanks for the help!  Jack that"s an awesome gallery!

On my bench: Academy 1/35 UH-60L Black Hawk

  • Member since
    April 2006
  • From: ON, Canada
Posted by jgeratic on Friday, August 8, 2014 11:13 AM

I'm not sure either about the cowling interior.   Found this from a series of walk around photos of  a refurbished aircraft, and interior looks the same as the outside:

Clicking the photo should send you to the web site where the photo was found.

regards,

Jack

  • Member since
    November 2009
  • From: SW Virginia
Posted by Gamera on Friday, August 8, 2014 9:23 AM

John: Sorry, dragging my feet last night but just posted those two beautiful fighters just now!

Bob: Cowling and the pre-shading look good! The interior of the cowling is probably just bare metal aluminum best I can remember. If anyone else knows please correct me!

"I dream in fire but work in clay." -Arthur Machen


  • Member since
    February 2014
  • From: Michigan
Posted by silentbob33 on Thursday, August 7, 2014 4:39 PM

Phone is charged so here are the pics of preshading and the engine cowling.  The flash makes it look more gray, and I added just a bit of blue to the black, it's very subtle to my eye.  Does anybody know what color the inside of the cowling was?  Sorry for so many questions, this is my first build of a Japanese plane.

On my bench: Academy 1/35 UH-60L Black Hawk

  • Member since
    February 2014
  • From: Michigan
Posted by silentbob33 on Thursday, August 7, 2014 10:59 AM

Thanks Gamera.  I was looking through my paint and came across a mix of dark blue and black I made for a night attack Stuka.  I might use that if it's still any good.

On my bench: Academy 1/35 UH-60L Black Hawk

  • Member since
    November 2009
  • From: SW Virginia
Posted by Gamera on Thursday, August 7, 2014 10:55 AM

Hey Bob, looking forward to the photos.

As I understand the cowlings had somewhat of a bluish sheen to them. You could just paint it black or add a little blue to the paint. I tend to pre-shade it by painting it black and then adding a light spray of thinned dark blue to the top areas.

"I dream in fire but work in clay." -Arthur Machen


  • Member since
    February 2014
  • From: Michigan
Posted by silentbob33 on Thursday, August 7, 2014 9:56 AM

I primed and preshaded my Zero, but as luck would have it I need to charge my camera.  I'll get pics posted as soon I'm able.  I do have a question about the engine cowling.  The instructions say it should be semi-gloss black, but I've also seen where people mixed their own black-blue color for it.  Which should I go with?  If it makes a difference I'm doing the markings for Shigeru Itaya's bird during the attack on Pearl Harbor.

On my bench: Academy 1/35 UH-60L Black Hawk

  • Member since
    November 2009
  • From: SW Virginia
Posted by Gamera on Thursday, August 7, 2014 9:49 AM

Thanks, got it!

"I dream in fire but work in clay." -Arthur Machen


  • Member since
    September 2011
  • From: Milaca, Minnesota
Posted by falconmod on Thursday, August 7, 2014 9:21 AM

Sorry, the Frank is 1/48  Tamiya

On the Bench: 1/72 Ki-67, 1/48 T-38

1/144 AC-130, 1/72 AV-8A Harrier

  • Member since
    November 2009
  • From: SW Virginia
Posted by Gamera on Thursday, August 7, 2014 9:19 AM

Lol, okay! Is the Frank 1/72nd too? And what company?

"I dream in fire but work in clay." -Arthur Machen


  • Member since
    September 2011
  • From: Milaca, Minnesota
Posted by falconmod on Thursday, August 7, 2014 9:03 AM

You can go ahead and put me down for the Frank,  can't remember where I'm at on the 2nd Zero at the moment.  Lol

John

On the Bench: 1/72 Ki-67, 1/48 T-38

1/144 AC-130, 1/72 AV-8A Harrier

  • Member since
    November 2009
  • From: SW Virginia
Posted by Gamera on Thursday, August 7, 2014 8:54 AM

Thanks and they are addictive!

Did you want me to put you down for those are are you doing them on your own time? Still five months to go here!

"I dream in fire but work in clay." -Arthur Machen


JOIN OUR COMMUNITY!

Our community is FREE to join. To participate you must either login or register for an account.

SEARCH FORUMS
FREE NEWSLETTER
By signing up you may also receive reader surveys and occasional special offers. We do not sell, rent or trade our email lists. View our Privacy Policy.