SEARCH FINESCALE.COM

Enter keywords or a search phrase below:

1944 Group Build

132077 views
1959 replies
1 rating 2 rating 3 rating 4 rating 5 rating
  • Member since
    December 2002
  • From: Bury St Edmunds, Suffolk, England
Posted by Bish on Saturday, February 22, 2014 10:31 AM

Nice start Doug. Don' think I have ever seen an otaki kit before.

bob, nice to see yours under way to.

I am a Norfolk man and i glory in being so


On the bench: Airfix 1/72nd Harrier GR.3/Fujimi 1/72nd Ju 87D-3

  • Member since
    December 2013
Posted by schmidty on Saturday, February 22, 2014 11:02 AM

Finally getting going on this.  Here are my sprue pics.

This will be across-over build with the Longest Day GB.  It's going to be OOB with the decals for "Old Crow" flown by Bud Anderson.  I've been dragging my feet starting this because it'll be the first model I've built in over 20 years.  But, I gotta start sometime...here goes!

--Mike

On the Bench: 1:72 Academy P-51B

On Deck: 1:72 Hobby Craft DHC-3 (U-1A) & 1:72 Academy Ju 87G-1

  • Member since
    October 2008
  • From: Georgia
Posted by Rigidrider on Saturday, February 22, 2014 11:41 AM

Jibber... I cant wait to see your finished build, That is going to be one BA looking model!

Bish... I read something on Otaki awhile back, The originator of the Otaki Plastics co set out in the late 80s(his goals) to build some of the best detailed and engineered kits available. But due to poor distribution and name recognition by the mid 90s I believe they were all but done for. There was also a close connection somehow with Arii models and ultimately I believe I read somewhere that Fujimi aquired them both. All in all not bad kit for the bucks, with a pretty nice over all fit, but so sadly lacking in any real detail.

Take care

Doug

When Life Hands You A Bucket Of Lemons...

Make Lemonade!

Then Sell It Back At $2 Bucks A Glass...

  • Member since
    April 2013
Posted by SchattenSpartan on Saturday, February 22, 2014 11:55 AM

Looking really nice there, Jibber! Just out of curiosity: Is there a particular reason why you prime your models in black?

  • Member since
    January 2013
Posted by jibber on Saturday, February 22, 2014 12:10 PM

I like the tint I get from it and it looks good under chipping. I also use some Poly Scale primer on occasion but I just seem to go back to Army Painter in a rattle can. It lays on real nice and I can paint and have it dry in a few minutes.  

  • Member since
    November 2003
  • From: Naples, FL
Posted by tempestjohnny on Sunday, February 23, 2014 8:13 AM

I'm late getting in on this. But I'd like to join with 72nd scale Hasegawa P-47D Razorback backdated to a C with True Details interior and Squadron canopy. Aero master decals for BEVOAPABML (Bird's Eye View of a Pigs Ass By Moonlight) flown by Lt. Peter Lehman 336th FS January 1944. John


  • Member since
    April 2013
Posted by SchattenSpartan on Sunday, February 23, 2014 8:19 AM

Welcome to the party, John! I'll put you on the list. It's great to see another Thunderbolt build in here (and the name of your bird is just so damn hilarious!)

  • Member since
    December 2002
  • From: Bury St Edmunds, Suffolk, England
Posted by Bish on Sunday, February 23, 2014 8:28 AM

Welcome aboard John. I will be keen to see how you do this, I have a D that I want to backdate to a C. I believe the cowl flaps are different, but not sure if there's anything else, so will be looking for tips.

I am a Norfolk man and i glory in being so


On the bench: Airfix 1/72nd Harrier GR.3/Fujimi 1/72nd Ju 87D-3

  • Member since
    April 2013
Posted by SchattenSpartan on Sunday, February 23, 2014 8:35 AM

Bish: Yes, the cowl flaps are different indeed (the lower 2 flaps on each side are missing). The -C model also lacked the bomb/drop tank mount on the fuselage, so the belly was less bulged.

  • Member since
    November 2003
  • From: Naples, FL
Posted by tempestjohnny on Sunday, February 23, 2014 9:16 AM

Most C's that were around long enough had the bulge on the belly but still no tank. Read that somewhere


  • Member since
    November 2003
  • From: Naples, FL
Posted by tempestjohnny on Sunday, February 23, 2014 9:27 AM

Going to do the cowl changes not going to sorry about belly. Also have to take the molded wing racks off of kit.


  • Member since
    April 2013
Posted by SchattenSpartan on Sunday, February 23, 2014 9:27 AM

Yeah, some of them were retrofitted with the tank mount. I don't have any pictures of that particular bird, so I can't tell if it was one of the upgraded Cs.

  • Member since
    August 2009
  • From: MOAB, UTAH
Posted by JOE RIX on Sunday, February 23, 2014 11:41 AM

Silent Bob: Clean up on the LCVP looks quit good. Going to be fun watching that come together.

Mike: Glad to have you join us. I know that you will enjoy your experience here with us. Nice to have another 1/72 in here. Is that the Academy P-51B?

"Not only do I not know what's going on, I wouldn't know what to do about it if I did". George Carlin

  • Member since
    August 2009
  • From: MOAB, UTAH
Posted by JOE RIX on Sunday, February 23, 2014 11:42 AM

jibber: Very well done on effectively dealing with the gap on your UHU. Looking really good.

"Not only do I not know what's going on, I wouldn't know what to do about it if I did". George Carlin

  • Member since
    April 2006
  • From: Denver, Colorado
Posted by waynec on Sunday, February 23, 2014 11:44 AM

boy i have been sporatic on the forum the past 5 weeks and haven't got much finished. i will have a 1/35 LCVP crossover from Dday GB here, maybe my 1/35 VOSPER in a never seen but look cool camo pattern.

Никто не Забыт    (No one is Forgotten)
Ничто не Забыто  (Nothing is Forgotten)


  • Member since
    October 2013
Posted by Big Blue on Sunday, February 23, 2014 12:32 PM

Wow... I have been away for a week and the GB has really progressed!  People have been putting up some very nice work; well done everyone.

I have some progress to share as well.  Its been a while, but I think my last post was after priming, and I was debating how to attack the invasion stripes.  Well I took the advice of Nathan, Clemens and others, and painted the stripes first, then masking them off to paint the rest of the fuselage.

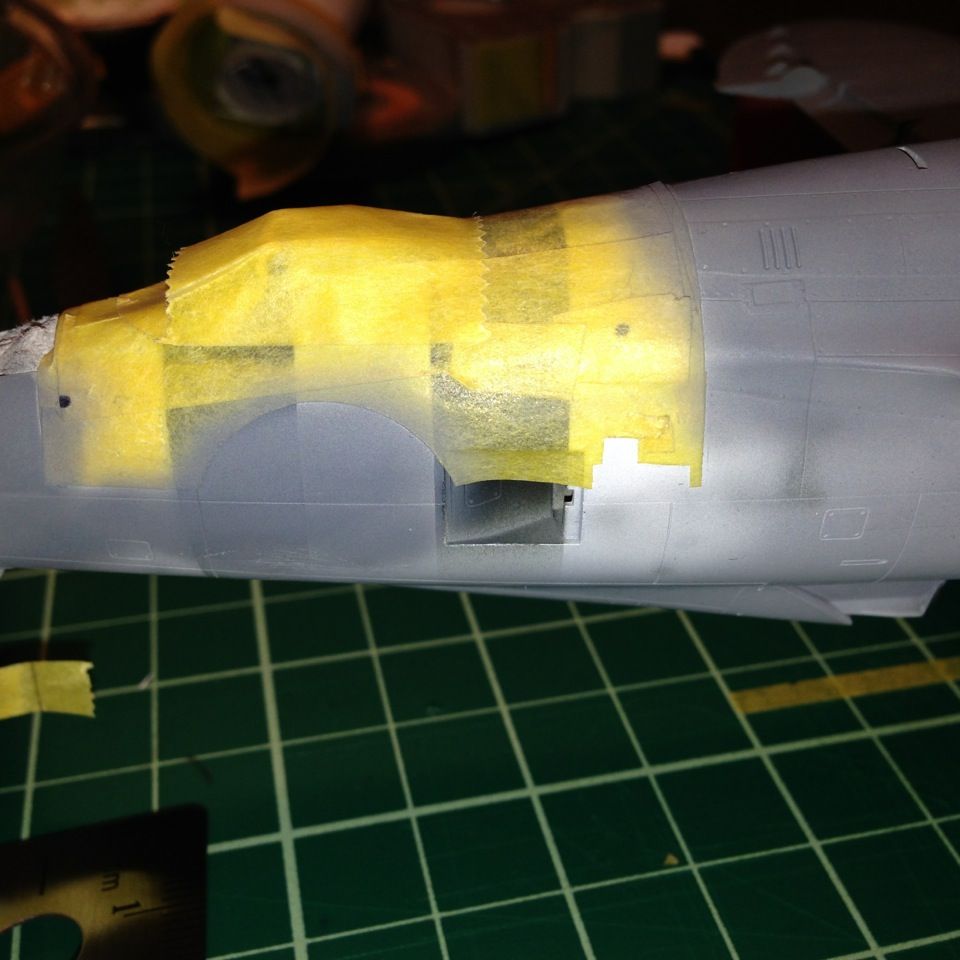
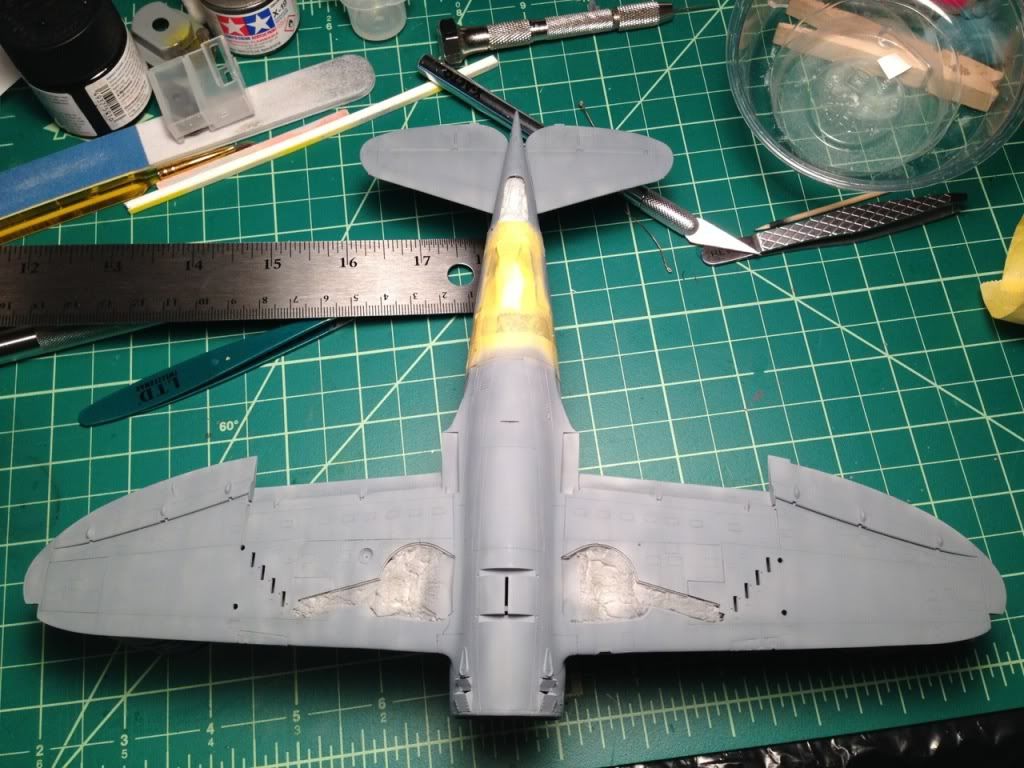
The stripes (which I didn't photograph pre-taping), were done with Gunze Off-White and Tamiya Nato Black.  While spraying the off-white, I also painted the stripes on cowling and vertical stabilizer.  

As the photo shows, I followed masking by painting Tamiya Neutral Gray (XF-63) on the undersurfaces.  I had done some pre-shading using both the black and white with the leftovers from painting the stripes.  That effort, combined with a fairly thin and patchy coat of gray resulted in this:

Next, I rolled some blue-tack to mask the demarcation lines, and put down a base coat of Tamiya Olive Drab (XF-62).  I then mixed the base olive with Yellow Green (XF-4... roughly 50/50) and lightened all of the panel centers.  Finally, I mixed this lighter shade with Tamiya Buff (XF-57, again roughly 50/50) and further lightened the centers of the panels on the wings and upper surfaces of the fuselage:

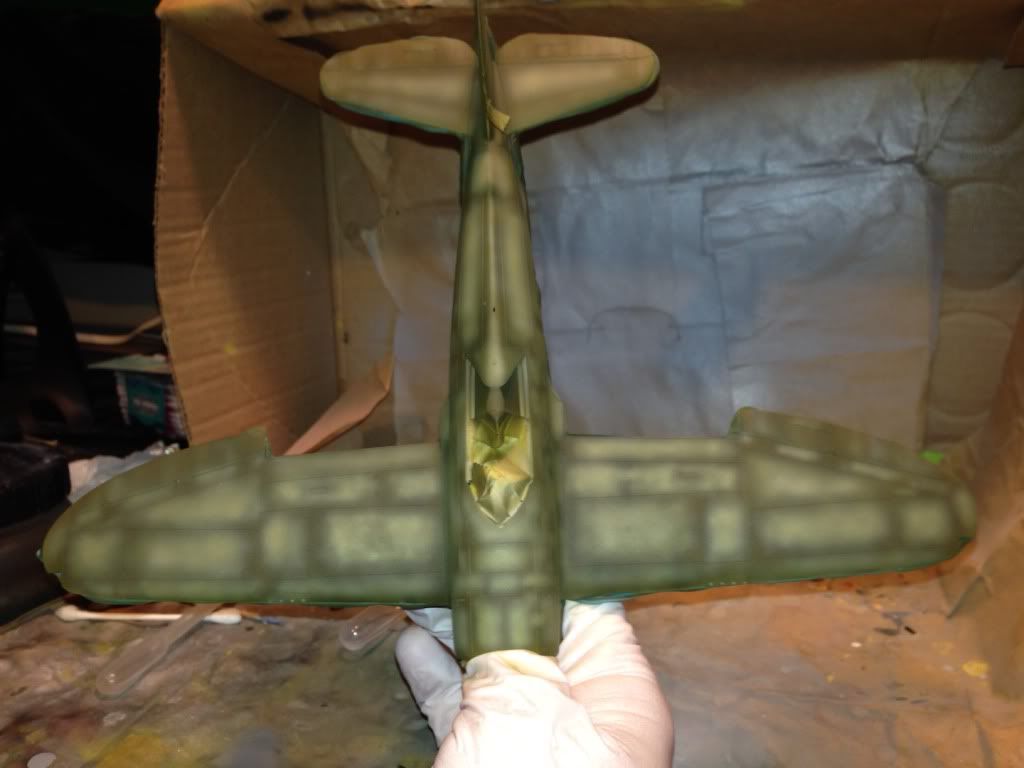
Finally, I went over the entire surface with a highly thinned coat of the original olive drab to blend it together.  I sprayed the blending coat in a haphazard, somewhat blotchy way to vary the final effect.  Here are the results:

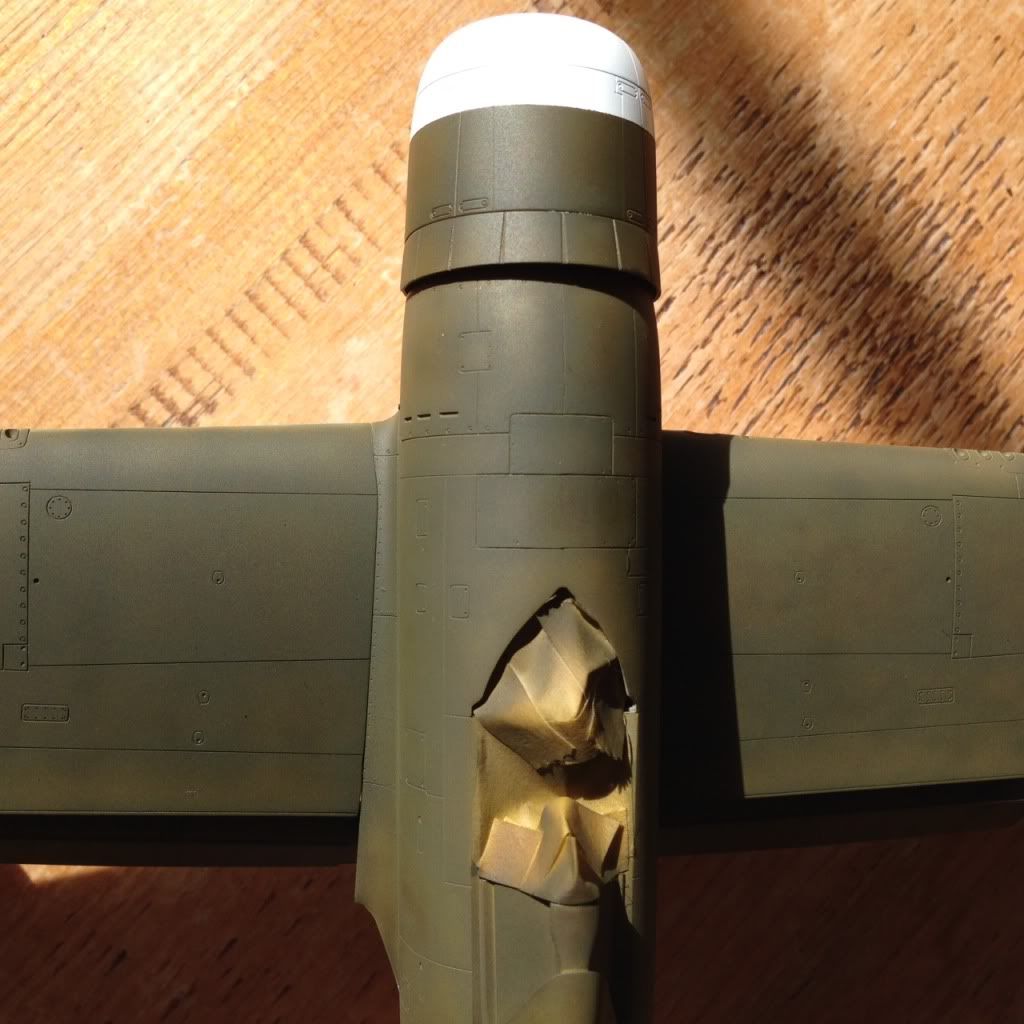
There is a spot or two where I had some overspray into the gray that required touch up, but overall I am happy with how the masking went.  The whole paint job is begging for some weathering, but that will have to wait.  The white is over exposed in the pictures, but there is some subtle darkening around the panel lines there as well.

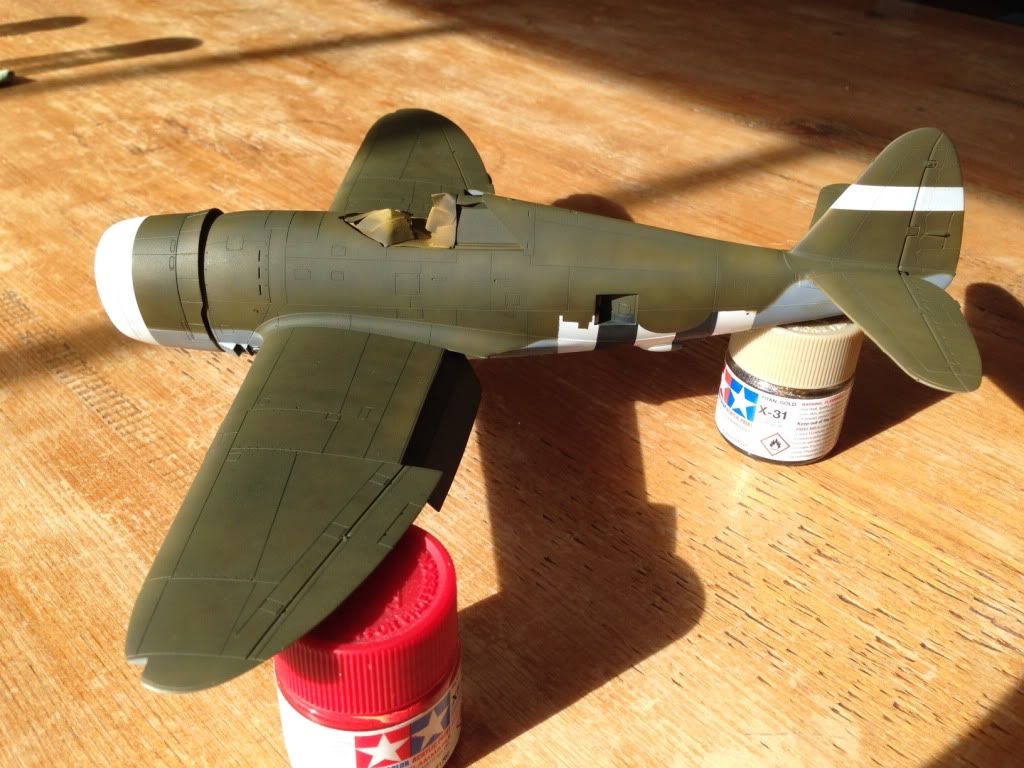
I have given everything a coat of Aqua Gloss, and will probably give it one more in preparation for decals and panel line washes.  Slowly coming together.

Thank for the comments and suggestions (as well as any to come).  Thanks also for sharing your work.

Blue

  • Member since
    April 2013
Posted by SchattenSpartan on Sunday, February 23, 2014 12:53 PM

Magnificent work, Blue! You did a great job on the Neutral Gray and you definitely nailed the weathered look on the Olive Drab. I'm not brave enough to attempt such effects on 1/48 birds, but I think I should give it a try.

  • Member since
    October 2013
Posted by Big Blue on Sunday, February 23, 2014 1:05 PM

Thanks Clemens.

If I can do it, you can do it.  I've seen your work!  Thin paint and light air pressure.

  • Member since
    April 2013
Posted by SchattenSpartan on Sunday, February 23, 2014 1:23 PM

Thanks for the nice words man! I thought about attempting a blotchy paint job on my Thunderbolt, but I did't want to distract from the yellow tail and bottom, so I stuck with pe-shading panel lines. All the photos of my German Jug showed a rather uniform finish, but quite some streking in the direction of airflow, so I tried to replicate that effect instead (the gray I used was a bit too light so it's only very subtile though).

  • Member since
    August 2009
  • From: MOAB, UTAH
Posted by JOE RIX on Sunday, February 23, 2014 1:30 PM

Big Blue: Now that there is some excellent painting. The stripes look great. Your OD work is especially well done. I mean it came out looking terrific. Thank you for taking the time to post pics of your process. It's really helpful to see how you achieved the wonderful effect.

Well. here is a pic of my test fitting of the major components. The cowling is a two half affair that one glues together. A nice feature of this kit is that they provide three different cowlings to reflect modifications to the F6F-3. Although this kit is beautifully molded I have encountered an unusual issue. The mounting spars for the rear tail planes are about a 1/16 of an inch to long on each plane. Thus, they meet center fuselage causing either A) the tail planes to stick out too far or B) the fuselage to not close by a good margin. Easily remedied with some healthy sanding though.

"Not only do I not know what's going on, I wouldn't know what to do about it if I did". George Carlin

  • Member since
    December 2002
  • From: Bury St Edmunds, Suffolk, England
Posted by Bish on Sunday, February 23, 2014 1:45 PM

Blue, that's looking really nice.

I am a Norfolk man and i glory in being so


On the bench: Airfix 1/72nd Harrier GR.3/Fujimi 1/72nd Ju 87D-3

  • Member since
    October 2008
  • From: Georgia
Posted by Rigidrider on Sunday, February 23, 2014 5:50 PM

Outstanding paint Blue!

Joe... Adapt, Improvise and Overcome! Ha... Dont blame you for dry fitting Eduard kits over and over...

Clemens... Waiting on that beauty of yours in the other GB... You've done some amazing work on it so far!

When Life Hands You A Bucket Of Lemons...

Make Lemonade!

Then Sell It Back At $2 Bucks A Glass...

  • Member since
    December 2013
Posted by schmidty on Sunday, February 23, 2014 7:34 PM

JOE RIX

Mike: Glad to have you join us. I know that you will enjoy your experience here with us. Nice to have another 1/72 in here. Is that the Academy P-51B?

Joe:  Thanks!  Yes it is the Academy.  Seems to be a nice kit, but this is all new to me (again)

--Mike

On the Bench: 1:72 Academy P-51B

On Deck: 1:72 Hobby Craft DHC-3 (U-1A) & 1:72 Academy Ju 87G-1

  • Member since
    February 2014
  • From: Michigan
Posted by silentbob33 on Sunday, February 23, 2014 7:52 PM

Blue: That paint looks amazing!  I wish I could do work like that, I'm a bit inexperienced with airbrushing.   I'm going to try a different preshading technique I saw on a different site on my LCVP.

Joe: Thanks! Every time I look at it I see more to clean up, probably best to take it a little at a time.  I'm not looking forward to scraping off the molded on rope on the rear deck so I can accurize it.

On my bench: Academy 1/35 UH-60L Black Hawk

  • Member since
    August 2009
  • From: MOAB, UTAH
Posted by JOE RIX on Sunday, February 23, 2014 11:06 PM

Rigidrider
Joe... Adapt, Improvise and Overcome! Ha... Dont blame you for dry fitting Eduard kits over and over.

LOL! Yes indeed. Although, I do this with all my models. I have to admit the tail plane issue caught me aback as that was never mentioned in any reviews or builds of this kit.

"Not only do I not know what's going on, I wouldn't know what to do about it if I did". George Carlin

  • Member since
    October 2008
  • From: Georgia
Posted by Rigidrider on Tuesday, February 25, 2014 5:13 PM

Just a little bit more done, Wings assy, attached to fuselage, and base coat of silver on...

When Life Hands You A Bucket Of Lemons...

Make Lemonade!

Then Sell It Back At $2 Bucks A Glass...

  • Member since
    October 2013
Posted by Big Blue on Tuesday, February 25, 2014 10:25 PM

Looks great so far RR.

Is the silver base for future chipping & weathering, or is there some other purpose?  (Always up for learning new techniques.)

Blue

  • Member since
    January 2014
  • From: Toronto
Posted by Rob S. on Wednesday, February 26, 2014 1:12 PM

Yes, I am wondering the same thing

______________________________________________________________________________


On the Bench: Nothing on the go ATM

  • Member since
    April 2013
Posted by SchattenSpartan on Wednesday, February 26, 2014 4:48 PM

Nice work there, Doug! What did you use for that silver layer?

JOIN OUR COMMUNITY!

Our community is FREE to join. To participate you must either login or register for an account.

SEARCH FORUMS
FREE NEWSLETTER
By signing up you may also receive reader surveys and occasional special offers. We do not sell, rent or trade our email lists. View our Privacy Policy.