SEARCH FINESCALE.COM

Enter keywords or a search phrase below:

1944 Group Build

132349 views
1959 replies
1 rating 2 rating 3 rating 4 rating 5 rating
  • Member since
    October 2009
  • From: Oil City, PA
Posted by greentracker98 on Friday, September 12, 2014 3:13 PM

Jsmyth

Thank you all for the great Comments.


Well here it is. The first group build is now done. I'm glad to finish this build. Its been a love-hate relationship on this one. I didn't think that the end would ever come. I hope you all have enjoyed my first group build. And here it is.

I found this website while doimg research. 

Chow-hound Factoid - Sometime after the 15th mission, a flak splinter or machine gun bullet penetrated the nose, right where the dog's (Pluto) stomach had been painted. Starcer (Who chose Pluto riding the bomb motif) painted a Purple Heart medal beside the shiny new flak patch.  

This is also the story of the downing of the Chow Hound  on August 8, 1944 in a french farmers field.

http://www.91stbombgroup.com/crewphotos/chowhound.html

http://www.arlingtoncemetery.net/aircrew-08081944.htm

It tells the story alot better than I can.

Great work

A.K.A. Ken                Making Modeling Great Again

  • Member since
    May 2014
Posted by Nomad53 on Friday, September 12, 2014 9:36 AM

Thank you Bish. Now to get the deck and superstructures done. That is going to take some time. I may have messed up tho. I built the structures with all the decks on them so masking will be a problem. Learn and learn some more.

Doug

Nomad53


  • Member since
    December 2002
  • From: Bury St Edmunds, Suffolk, England
Posted by Bish on Friday, September 12, 2014 7:13 AM

Nice start Doug.

I am a Norfolk man and i glory in being so


On the bench: Airfix 1/72nd Harrier GR.3/Fujimi 1/72nd Ju 87D-3

  • Member since
    May 2014
Posted by Nomad53 on Friday, September 12, 2014 6:59 AM

Okay all,

Here is the first photos of the USS Missouri that I am building. I still have to do some touch-ups on the hull and I hope I got the camo right. This model has more flash than a camera. A lot of clean up on some of the smaller parts. If I had to do it again I think I would rethink on how I would build this kit. Oh by the way If I have not said it before this is my first ship build.

Checkmateking, Your masking tips helped a great deal. That is going in my memory for future builds like this.

I have seen some outstanding work on all of your builds. maybe one day I will have the skill set to do that kind of work. I am learning so much here. Thanks all.

Doug

Nomad53


  • Member since
    December 2002
  • From: Bury St Edmunds, Suffolk, England
Posted by Bish on Friday, September 12, 2014 4:08 AM

Nice bit of pre shading there lost, very colourful.

Looking great check.

I am a Norfolk man and i glory in being so


On the bench: Airfix 1/72nd Harrier GR.3/Fujimi 1/72nd Ju 87D-3

  • Member since
    September 2003
  • From: AandF in the Badger State
Posted by checkmateking02 on Thursday, September 11, 2014 11:18 PM

Thanks, Joe.  I haven't done any permanent "water" for the ships, but I made a temporary photo set up with aluminum foil.  Found the directions on the web somewhere.  


  • Member since
    August 2009
  • From: MOAB, UTAH
Posted by JOE RIX on Thursday, September 11, 2014 8:49 PM

Lostagain: Good looking stuff you have done there. I'm liking the "thinking outside the box" attitude you have going on there with the pre shading. I'm certainly paying attention to how that comes out. I'm in the same court with you when it comes to trying to paint straight lines using two hands. Mine come out looking like I had a seizure while operating an etch-a-sketch.lol. I just fashioned a jig out of PVC pipe fittings that will hold my aircraft upright so that I can hold the airbrush with both hands to hopefully maintain better control. I will be trying that rig out on my next project. Keep up the fine work.

CMK: Nothing but more astonishing work coming from your end that's for sure. Your paint work is coming out awesome. The bow in your bow is certainly a bummer but it will certainly be unnoticeable in a water base. Which, by the way, I'm quite excited to see how you create your base. I've never tried that but I'm ready to learn.

"Not only do I not know what's going on, I wouldn't know what to do about it if I did". George Carlin

  • Member since
    September 2003
  • From: AandF in the Badger State
Posted by checkmateking02 on Thursday, September 11, 2014 5:45 PM

Thanks, lostagain.  That's some fancy paintwork there--the pre-shading!

Photos of USS North Carolina's main deck, painted.  I also started the second-level deck by painting the forward 40mm position in 5-L Light Gray.  The edges of the deck will be visible, so they'll also have to be masked off and painted to match the camouflage pattern, before I do the deck itself.

Nothing's glued in and permanent yet.  Just test fitting the pieces.  The deck took a little more attention to get it to fit into the hull.  Haven't got around to the brush touch-ups yet.

I see that Trumpeter's engineering leaves the bow lifted up.  Good thing this'll sit in water.


  • Member since
    April 2014
  • From: Australia
Posted by lostagain on Thursday, September 11, 2014 9:29 AM

Allen - the Typhoon looks great, hard to believe it is a 1/72 model. Like you I'm coming back into the hobby, I am trying to do at least one new skill each model. Being in the GB does encourage me, and I have a deadline to work to. Might make more than 3 models this year...

CMK - the North Carolina camo is wild. And it would send me round the bend. The detail (and time) is most impressive 

Jamie, the faded OD looks super. That B-17 has been a great build.

Jorge the 190 is going really well, I don't think you have anything to beat yourself up about.

And Joe, as my 'cat has come along, I can't say I have been as subtle as you on the panel lines - see below...

One of the things I noticed on this kit: scaled up, it looked like there were small AT guns in the wings rather than .50's 
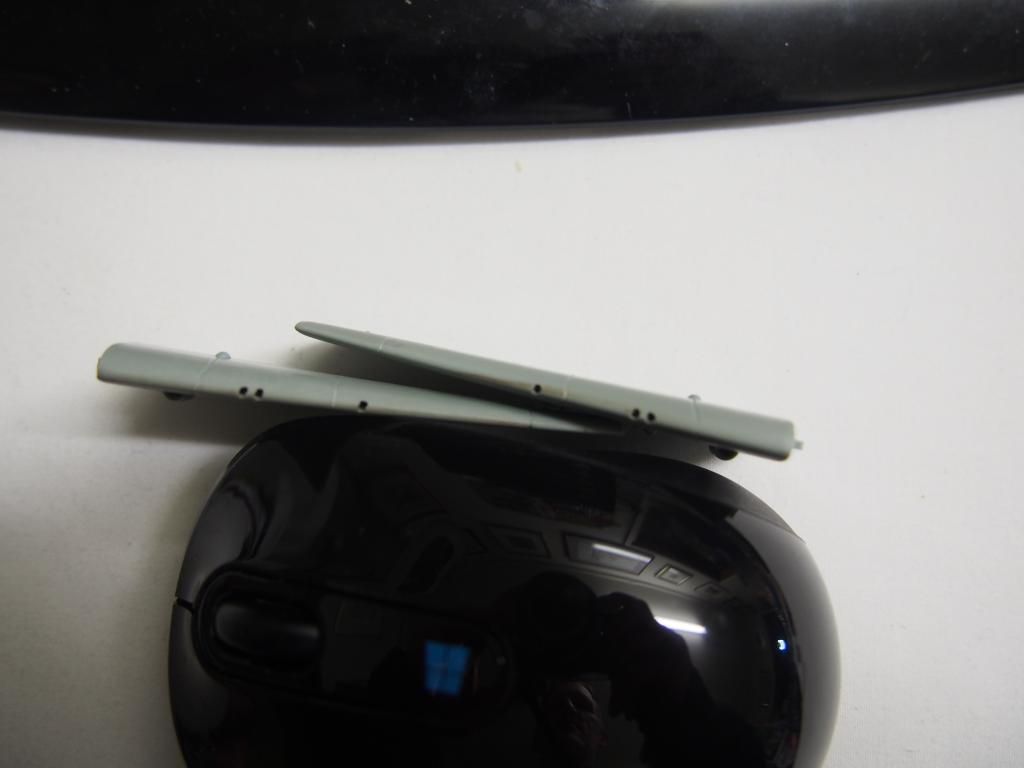
So I superglued some sprue in to get them back to size:
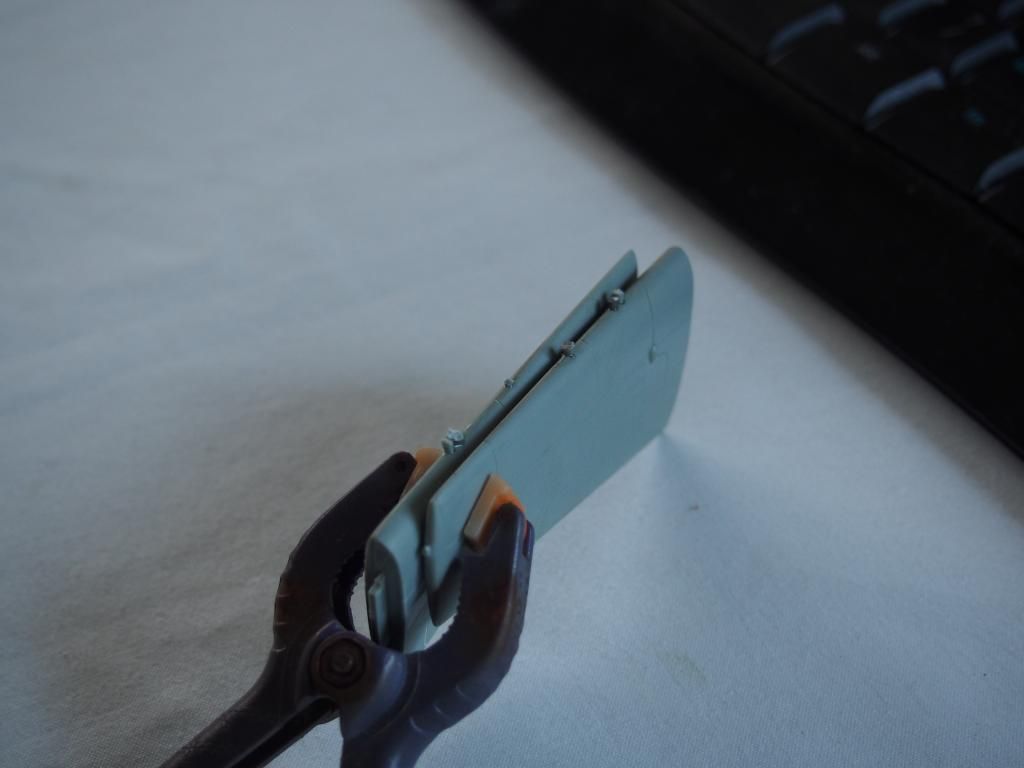
Also got annoyed by the size of the trim tab actuators, added leading edge landing light, reshaped the drop tanks and reduced the size of the seam running around their middle. Drilled holes for the belly formation? lights, splitting open the main seam, more filling and sanding.

Now have done the priming and panel line preshading (more or less - I can't hold the model in one hand and spray neatly with the other - I really could use a third hand) The experiment this time was to see if a bit of colour in the preshading would translate to a less monochrome effect in the finished product - the 2 tone Atlantic scheme.
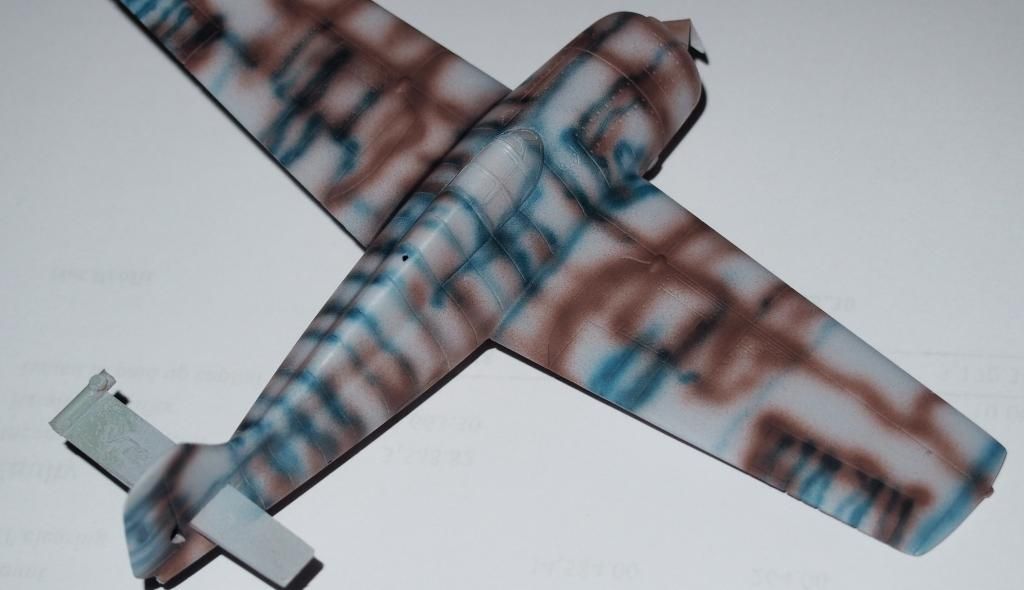
We shall see theory go into practice at the next post.

  • Member since
    April 2013
Posted by SchattenSpartan on Wednesday, September 10, 2014 4:44 PM

No, they didn't. And I sure ain't glad about that! Angry At least they are working on the problem... Let's hope they solve it soon. I can't continue work on my 190s without the goodies (well I could build them without goodies, but that's not how I like to do things...)

  • Member since
    August 2009
  • From: MOAB, UTAH
Posted by JOE RIX on Wednesday, September 10, 2014 4:37 PM

Oh Man Clemens, They still haven't found your box of goodies yet?

"Not only do I not know what's going on, I wouldn't know what to do about it if I did". George Carlin

  • Member since
    December 2002
  • From: Bury St Edmunds, Suffolk, England
Posted by Bish on Wednesday, September 10, 2014 4:37 PM

Yes

I am a Norfolk man and i glory in being so


On the bench: Airfix 1/72nd Harrier GR.3/Fujimi 1/72nd Ju 87D-3

  • Member since
    April 2013
Posted by SchattenSpartan on Wednesday, September 10, 2014 4:36 PM

Done Big Smile

  • Member since
    December 2002
  • From: Bury St Edmunds, Suffolk, England
Posted by Bish on Wednesday, September 10, 2014 4:33 PM

Cheers buddy, can you also add Nomad's USS Missouri to the roster, the details are in my first post.

I am a Norfolk man and i glory in being so


On the bench: Airfix 1/72nd Harrier GR.3/Fujimi 1/72nd Ju 87D-3

  • Member since
    April 2013
Posted by SchattenSpartan on Wednesday, September 10, 2014 4:22 PM

The front page is up to date now...

  • Member since
    April 2013
Posted by SchattenSpartan on Wednesday, September 10, 2014 4:22 PM

Ah, now I know your true intentions, mate! In that case I'm very glad to suffer in your place, cause I do love those Eduard kits.Wink They really are somewhat of a pain to assemble but they look so damn nice once you bent, filed and sanded them into submission! I got something special planned for that particular A-8 BTW... Just a little hint: It involved quite a bit of AM stuff (as if the damn kit wasn't problematic already)... I'll post the goodies in the 190 GB once my post office finally finds the box they're in again. Bang Head

  • Member since
    August 2009
  • From: MOAB, UTAH
Posted by JOE RIX on Wednesday, September 10, 2014 3:08 PM

Jorge, Your engine work appears rather excellent to me also. You have done some really fine detail and painting on it. Don't get down on yourself too hard about having tackled a kit above your skill level. The Eduard 190 is notorious for being a kit with nigh on zero tolerance in lining up the cockpit, gun bay and engine for a perfect fit. As well as the wing spar and gun bays. Many an advanced modeler has fallen victim to this micro tight tolerance. Your doing fairly well in my opinion. I actually sent mine to Clemens after I watched the some of the guys in The Butcher Bird GB fight this kit. Heck, you're past the difficult part. Now enjoy painting it.

"Not only do I not know what's going on, I wouldn't know what to do about it if I did". George Carlin

  • Member since
    March 2014
  • From: Cockeysville, MD
Posted by JaySantos on Wednesday, September 10, 2014 2:03 PM

Bish: I started with a Badger 100, then bought a 175 Crescendo, good AB, dual action, but bottom feed and now this infinity, I still like to use the 175 but it is not nearly good as having a top feed.

Check: thank you for the compliment, appreciated.

SS: The feature I most like on this ab is the button in the back that you push in order to regulate the thickness of the line been painted, really useful, I can now pull the trigger all the way back and not worry about the amount of paint leaving the Ab.

Thank you all for the nice comments.

Jorge  

  • Member since
    September 2003
  • From: AandF in the Badger State
Posted by checkmateking02 on Tuesday, September 9, 2014 8:36 PM

Thanks, Clemens.  I finished the deck tonight.  Some touch-ups required with a brush.  Will get to taking photos tomorrow--maybe; another late night to work.


  • Member since
    April 2013
Posted by SchattenSpartan on Tuesday, September 9, 2014 7:48 PM

CMK: Another great masking job!

Jay: That 190 looks great despite all the issues you had with it! You are going to love that Airbrush! I recently got the same one and it's fantastic! How do you like the adjustable trigger tension?

My apologies for not posting the B-17 and Tiffie on the front page. I actually did add them, but I must've messed up because apparently they aren't there... I'll get it updated untill tomorrow evening!

  • Member since
    September 2003
  • From: AandF in the Badger State
Posted by checkmateking02 on Tuesday, September 9, 2014 3:44 PM

There seem to have been some variations in the Measure 32 camouflage plans.  

Some diagrams I've seen indicate that one of the Measure colors was painted over the decks.  Other plans only show the blue.

In most cases, the standard US Navy practice was 20-B Deck Blue, painted on all horizontal surfaces of the ship, including the decks, tops of gun turrents; even the canvas lifeboat covers were to be dyed a matching color.

Maybe you've checked this site:

www.history.navy.mil/.../bb63.htm

There's a diagram there that shows this.  I'm not sure if this is the pattern you plan on using.  It appears that the bulk of the deck is 20-B, with "swirls" of 5-O added.


  • Member since
    September 2003
  • From: AandF in the Badger State
Posted by checkmateking02 on Tuesday, September 9, 2014 3:37 PM

I don't know, Jorge--your skill set must be pretty good, cuz that FW-190 is looking nice!!!  The engine is awfully impressive.


  • Member since
    December 2002
  • From: Bury St Edmunds, Suffolk, England
Posted by Bish on Tuesday, September 9, 2014 3:21 PM

I have two airbrushes, both badger, a 100 and 150. I got the connectors because I found with un screwing the hose after every session, I was having to replace that part, and they are not cheap. So when I got a second AB they made sense not only to save on threads but for the odd occasion I need to switch airbrushes.

I do like the look of that airbrush you have.

I am a Norfolk man and i glory in being so


On the bench: Airfix 1/72nd Harrier GR.3/Fujimi 1/72nd Ju 87D-3

  • Member since
    March 2014
  • From: Cockeysville, MD
Posted by JaySantos on Tuesday, September 9, 2014 2:25 PM

Bish: thank you for the comments.

The AB is a H&S Infinity with a 0.15 needle.

I started using the quick couplings because the other AB and hose that I had were Badger, so this way I didn't need to buy a new hose and can switch the airbrush without switching hoses. I am still going to use the badger with alclad and such and leave the Infinity for acrylic paints.

Jorge

  • Member since
    May 2014
Posted by Nomad53 on Tuesday, September 9, 2014 11:37 AM

What about the deck? The measure calls for deck blue but I see no color markings on the drawings like on the hull sides.

Doug

Nomad53


  • Member since
    December 2002
  • From: Bury St Edmunds, Suffolk, England
Posted by Bish on Tuesday, September 9, 2014 9:47 AM

Jorge, looks like your doing a great job on this. That engine looks damn good to me.

Nice looking airbrush as well, which one is it. I use those quick connectors as well. Have save me a fortune from replacing parts due to thread damage.

I am a Norfolk man and i glory in being so


On the bench: Airfix 1/72nd Harrier GR.3/Fujimi 1/72nd Ju 87D-3

  • Member since
    March 2014
  • From: Cockeysville, MD
Posted by JaySantos on Tuesday, September 9, 2014 9:40 AM

Hi everyone,

You guys are going a terrific job on all this builds!

Small update, I finally was able to install the engine in the fuselage, pretty much done with it, still need to glue one piece on each side of it, but because I am so good at breaking small parts I will only be doing it at the end of the build. I also may try to improve the weathering on the engine, it is not the way I would like it to look.

I think more and more that I shouldn't have done this kit at this point, I think that I don't have the skill level to do a good job with all this small parts, careful alignment etc etc, but at this point I will be happy to just finish it and make it vaguely look like a FW-190.   

Couple of pics:

On another subject, this is what my wife gave me as a gifts for my birthday a couple of weeks ago:


Freaking awesome!!

Thank you for looking and like always comments and suggestions are always welcome.

Jorge

  • Member since
    September 2003
  • From: AandF in the Badger State
Posted by checkmateking02 on Tuesday, September 9, 2014 8:23 AM

I haven't built a full-hull ship, so I'm not speaking from experience.

I think I'd start by painting the red on the lower hull.  Mask that when dry.  Then paint the black for the boot stripe, then mask that, to the proper width.

After that, I would move on to the upper hull colors.

I applied the 5-L Light Gray first, then the 5-O Ocean Gray, and the black last.

If there isn't a scribed line indicating where the boot stripe should be (and since you have to measure, it sounds like there isn't) then doing the boot stripe and getting everything horizontal might be a little tricky.

I hope you have good results with this.  


  • Member since
    May 2014
Posted by Nomad53 on Tuesday, September 9, 2014 7:42 AM

Thanks checkmateking,

That will work. I do have a question tho. Do I need to paint the lower half of the hull red and then put the black water line, then paint the upper half with the camo? The instructions that I have says to measure down 3/8 of an inch and mask then paint that part dark red.

Doug

Nomad53


  • Member since
    September 2003
  • From: AandF in the Badger State
Posted by checkmateking02 on Monday, September 8, 2014 9:14 PM

Doug:

here are photos of the hull; not the same ones I posted earlier.  Can't get any closer and still include the whole hull.

Not sure how useful they'll be to you.  I used the mask making process I described earlier to paint the hull.


JOIN OUR COMMUNITY!

Our community is FREE to join. To participate you must either login or register for an account.

SEARCH FORUMS
FREE NEWSLETTER
By signing up you may also receive reader surveys and occasional special offers. We do not sell, rent or trade our email lists. View our Privacy Policy.