SEARCH FINESCALE.COM

Enter keywords or a search phrase below:

PACIFIC CARRIER AVIATION GROUP BUILD

90866 views
1294 replies
1 rating 2 rating 3 rating 4 rating 5 rating
  • Member since
    August 2005
  • From: Long Island, New York, USA
Posted by fjs3 on Saturday, January 10, 2015 12:21 AM

Sure thing Rob

Weathering was done using a series of steps, involving painting the model.  Then it was done with thinned oils and chalk pastels.  

There are a lot of steps to the painting, but I'll try to sum it up in a nutshell.   I used Testors Model Master enamels.  

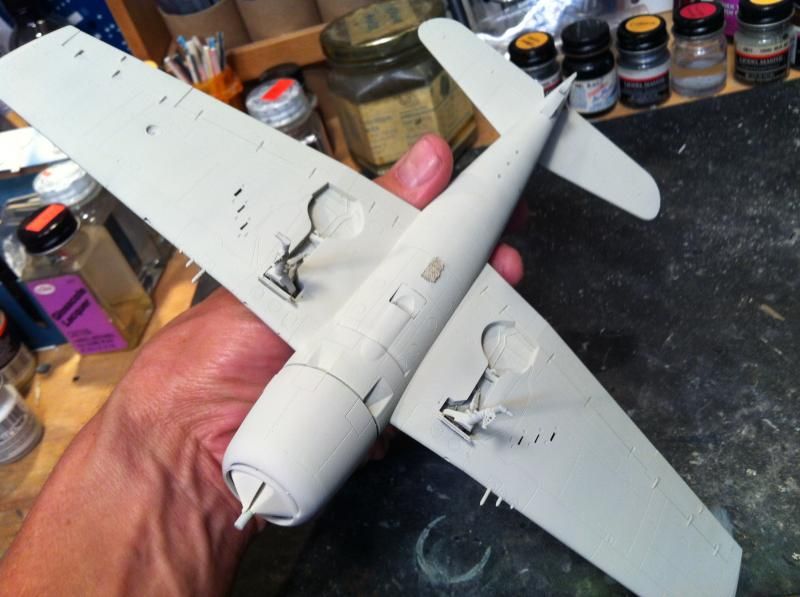
First coat was Camo Gray for the undersides.  I used this color instead of Insignia White, because the aircraft were dirty, and Camo Gray, looks the part of dirty white.  then I masked off the lower surfaces.

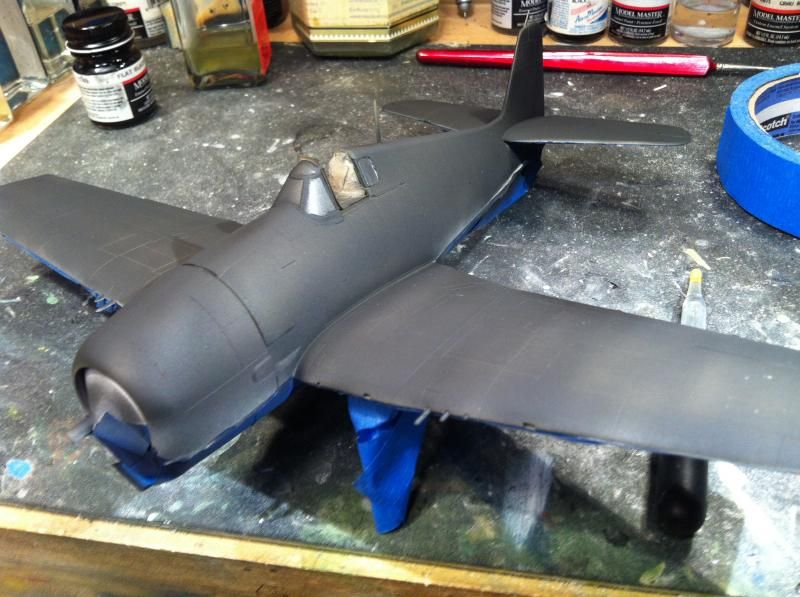
Uppers were painted flat black first.  Then the Intermediate Blue, applied in a streaking fashion to give the illusion of Intermediate blue, but covering, AND letting the black bleed through a little.  Then masked this loosely, because I wanted the demarcation line between all colors to be soft

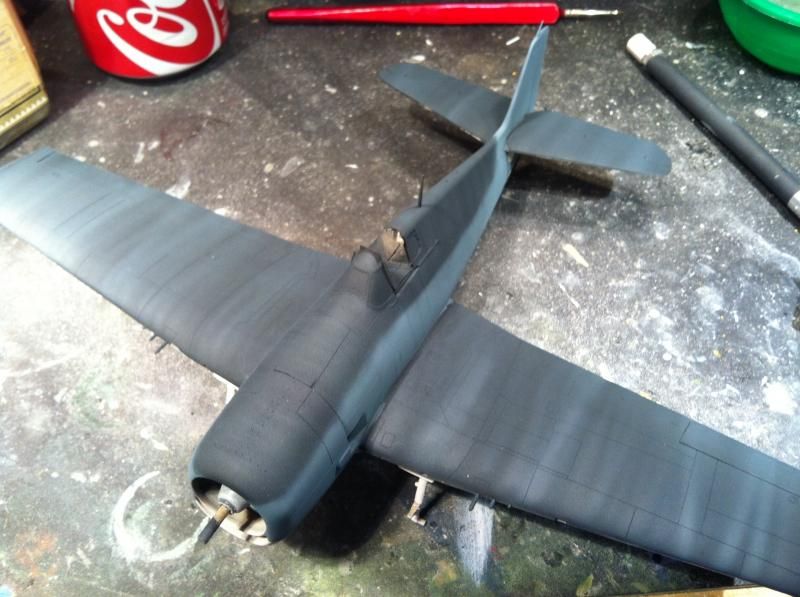
Upper surfaces were painted the exact same way.  Color was applied over the flat black in a streaky manner to give the illusion of Dark Sea Blue,and letting the black bleed through.  Streaks were done in the direction of the airflow on both the wings, AND the tail planes.  On the fuselage however, the streaks are done cross ways, to simulate drying stains and oxidation from rain and sea water.

But your not done yet.  when putting on the first coat of Dark Sea Blue, the passes you make make to be quick and relatively close together.  This goes for both the wings, tail and fuselage.  

Next, lighten the base coat a little, with some light gray.  Just a bit.  repeat the passes, but widen the gaps between passes.  Repeat again with a still lightened version of the base coat, widening the passes further still.  You can do these steps as much as you feel you need too, to get the desired effect.  

It may look drastic at first, but, when

you beginning applying your clear gloss and flat coats, it WILL tone it down a bit...

First pic is camo grey...
Now the black on the upper surfaces, before any other colors are applied...
Now the paint is on, and the streaks are VERY obvious.....right now at least Lastly, with the clear coats and decals applied, you can see how all the streaks have been toned down a bit
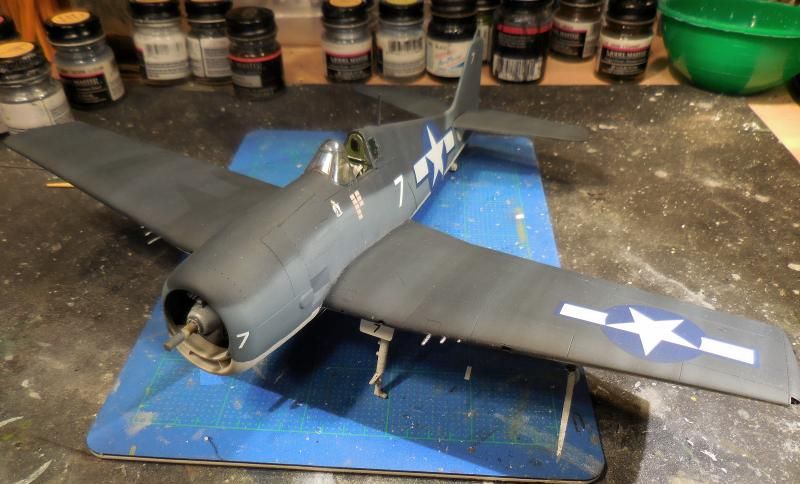
Add a little thinned oils.. I used a thinned neutral Gray for the upper surfaces, and a grimey brown/black for the lowers. 

I hope all that helps someone out.  It's a lot of steps, but in he end, it looks prety good on a model, especially if you are looking to make her LOOK like a combat aircraft

"I'm gonna build all these models one kit at a time!

  • Member since
    December 2012
Posted by flyerduke on Saturday, January 10, 2015 8:07 AM

fsj3- Wow!  Those are very impressive airplanes.  You got that weathering down.

  • Member since
    January 2008
  • From: Limoges
Posted by Rob.H on Saturday, January 10, 2015 8:17 AM

Thanks for the tips Freddie.  I never would have thought to put a black coat under the base colour and "weather" the base coat by spraying it overtop like that.

on the bench: Moebius Battlestar Galactica, Tamiya 1/35 M13/40

 photo PacificCarrierBuild2014small_zps595053a9.jpg

  • Member since
    August 2009
  • From: MOAB, UTAH
Posted by JOE RIX on Saturday, January 10, 2015 8:35 AM

Very impressive and gorgeous Hellcats Freddie. I love 'em. Your use of black primer definitely produces an excellent effect. Although I do the same thing but, with white or gray primers, I'm going to keep that idea in mind on future builds. Thanks for sharing you builds and your process. Also, your start on the Corsair office is looking mighty fine.

"Not only do I not know what's going on, I wouldn't know what to do about it if I did". George Carlin

  • Member since
    August 2005
  • From: Long Island, New York, USA
Posted by fjs3 on Saturday, January 10, 2015 11:26 AM

Using black as a base , I have found gives the color some depth.  I don't put on the black heavy either, just for effect.  Even when applying the base color, I don't go heavy with the way I streak the paint across the model's surface, allowing the black to bleed through.  With each layer of paint, I lighten the shade of the base color, and apply it in the same fashion, only using a wider separation between the band's of paint.  With each application, I lighten the color further, separating the band's still more.  I'm sure you get the idea, LOL!!

"I'm gonna build all these models one kit at a time!

  • Member since
    April 2013
Posted by SchattenSpartan on Saturday, January 10, 2015 5:45 PM

Rob: Sorry for the long delay. I've been having issues with my router again the last couple of days. Finally decided to replace the damn thing. and now everything works fine again. That Devastator of yours looks really good. I'll get her added to the front page ASAP.

Joe: Holy damn, just when you think you got it all behind you, things go south again... I do know you'll get her looking as if nothing ever happened though!

Freddie: Those Hellcats look really nice! The weathering on the horizontal surfaces in particular turned out great! Nice start on the Corsair as well!

  • Member since
    August 2009
  • From: MOAB, UTAH
Posted by JOE RIX on Saturday, January 10, 2015 9:29 PM

Hey There Clemens! Good to see you're back up and operating. I missed you. Thanks for the positive vibes.

The second round of recovery has been a bit slow. Last week was filled with other obligations and I've been under the weather the past couple of days. But, the real delay came when I became a victim of my impatience and applied the white a little to heavy on areas where I had sanded down to the primer. Thus, some panel lines get filled in and such I'm resanding those areas. I'll get it in some form or another.

"Not only do I not know what's going on, I wouldn't know what to do about it if I did". George Carlin

  • Member since
    July 2014
  • From: Franklin Wi
Posted by Bakster on Monday, January 12, 2015 9:12 PM

Greetings folks.  Well, I have the bomb bay closed up.  I am pretty happy with how it looks.   I am glad that its done.  I managed to pull that off without a major mess up. The plastic that Academy uses for this kit is really soft and It is very easy to mess up lines.  I had to be really careful not to overdo sanding or make a slip of where the grit was cutting.  This plastic is very unforgiving.  The soft plastic probably explains the vast number of sink-marks that this kit has as well.  There are very few parts that didn't show signs of them.

Oh... I should explain the threaded screw coming out from under the fuselage.  I  will also make a stand that will attach to that. The nice thing about it being threaded is that I will be able to remove the model from the stand, if I ever need to.  This was a "fun" challenge as well.  I had to reinforce the join in that location from within the fuselage.  I used epoxy.  That area will take some stress, and especially because of where it is located. It is not centered under the plane.  I couldn't trust the bay doors to hold the weight of the plane so I had to move the mount further back.  The plastic is thicker and stronger there.  I will also have to make sure that the plane is balanced while in its resting position. I will tackle that once I get to positioning it on the stand. 

The next step is to fix a few more sink-marks and do some final touch ups.  Then it's time to mask and for primer coat.


  • Member since
    August 2009
  • From: MOAB, UTAH
Posted by JOE RIX on Monday, January 12, 2015 9:33 PM

Right On Steve! You did an exceptional sanding job to make those bay doors fit so nicely. Excellently done. I like the screw idea for the stand. Hey, I'm curious. Are you scratch building a stand for your Avenger? Again, very well done.

"Not only do I not know what's going on, I wouldn't know what to do about it if I did". George Carlin

  • Member since
    July 2014
  • From: Franklin Wi
Posted by Bakster on Monday, January 12, 2015 11:40 PM

Hey thanks, Joe.  

Yes and no with regard to the stand.  I ordered a wooden base yesterday.  The stem is yet to be determined. So the answer is yes I am making the stand but no not entirely from scratch. Wink

  • Member since
    August 2005
  • From: Long Island, New York, USA
Posted by fjs3 on Tuesday, January 13, 2015 12:44 AM

I made good progress, on the F4U-1, completing, and mounting the cockpit and sealing up the fuselage.  right now, that assembly is in the drying rack, but I do have a few pictures of the cockpit before she was closed up...

This is the rear bulkhead, and side consoles...

Next, the front bulkhead, instrument panel, stick and rudder pedals...

Here's a couple shots, with the cockpit assembly being test fitted inside the port and starboard fuselage halves...

Here is the seat, with a belt harness made from paper strips...

And lastly, the seat mounted to the rear bulkhead...

Tomorrow, I'll post the pictures of the fuselage, and depending how far I get, some pictures of the engine. 

Thanks for looking, and have a nice day tomorrow!!

Regards

Freddie from LI

"I'm gonna build all these models one kit at a time!

  • Member since
    August 2005
  • From: Long Island, New York, USA
Posted by fjs3 on Tuesday, January 13, 2015 12:53 AM

Here's a few of the F6F-5 that I am building also.  Just test fitting a few parts, removed all the masking, touched up a few places, and getting her ready for the weathering process.  She won't be too dirty however, because she was the CAG's aircraft, and they tended to keep personal aircraft, pretty cleaned up.

Thanks again for looking and have a great day Ya'll!!

Regards

Freddie from LI

"I'm gonna build all these models one kit at a time!

  • Member since
    March 2012
  • From: Corpus Christi, Tx
Posted by mustang1989 on Tuesday, January 13, 2015 3:56 AM

That's a nice looking Hellcat Freddie. That cockpit tub you're working on looks to be Tamiya all the way......is it?

Bakster it looks like you're Avenger is really starting to take shape. Lookin' good pal!

Joe Rix: I think it's time everybody "wished" that black cloud from over you. Hope you're able to recover soon. I'd like to think there's a finished Hellcat in the near future. Will be watching Joe.....


 Forum | Modelers Social Club Forum (proboards.com) 

  • Member since
    August 2005
  • From: Long Island, New York, USA
Posted by fjs3 on Tuesday, January 13, 2015 7:52 AM

Mustang--Correct Sir, that's Tamiya's 1:48 scale F4U-1.  I figured I could contribute a complete build before the March deadline!  The F6F, is Eduard's 1:48 kit, and the second of two I've built.  I still have to weather her a little bit and add the fiddly parts and she's fini!!

"I'm gonna build all these models one kit at a time!

  • Member since
    December 2012
Posted by flyerduke on Tuesday, January 13, 2015 7:56 AM

Nice progress Steve.  Lookin' forward to the finished plane.

Freddie - That -5 is a real beaut!  The Corsair cockpit is really coming along nicely.  I wish I could move along quicker like you.

JR - Don't give up the ship.

Craig

  • Member since
    August 2005
  • From: Long Island, New York, USA
Posted by fjs3 on Tuesday, January 13, 2015 7:59 AM

Looking good so far Bakster!  Looking forward to the finished piece.  Looks like the Accurate Miniatures kit?  I didn't realize Academy released those too.

"I'm gonna build all these models one kit at a time!

  • Member since
    July 2014
  • From: Franklin Wi
Posted by Bakster on Tuesday, January 13, 2015 9:35 AM

Say Freddie--you are doing some really nice work. Great detail work on that cockpit.  You are a prolific builder!  Thanks as well for the encouragement...

Thanks, Craig.  I agree.  I can't wait to see it done!  It's like being pregnant for many months.  I want to pop this sucker out!  Lets give birth already. Indifferent

Thanks, Mustang.  I appreciate your encouragement buddy.  BTW.  I agree with what you said to Joe.  I want that dark cloud to go away.  Like they say, "if it doesn't kill you, it makes you stronger."  Joe is going to come out of this stronger than ever! He will look like the Hulk!  Smile  Keep at Joe!


  • Member since
    April 2013
Posted by SchattenSpartan on Tuesday, January 13, 2015 1:18 PM

Freddie: That Hellcat of yours is an absolute beauty! Some very nice work on the Corsair office as well!

Steve: Looks like you nailed the installation of the bomb bay doors!

  • Member since
    January 2011
  • From: Commonwealth of Virginia
Posted by Tal Afar Dave on Tuesday, January 13, 2015 7:03 PM

Great looking detail painting going on there, Freddie

fjs3

I made good progress, on the F4U-1, completing, and mounting the cockpit and sealing up the fuselage.  right now, that assembly is in the drying rack, but I do have a few pictures of the cockpit before she was closed up...

This is the rear bulkhead, and side consoles...

Next, the front bulkhead, instrument panel, stick and rudder pedals...

Here's a couple shots, with the cockpit assembly being test fitted inside the port and starboard fuselage halves...

Here is the seat, with a belt harness made from paper strips...

And lastly, the seat mounted to the rear bulkhead...

Tomorrow, I'll post the pictures of the fuselage, and depending how far I get, some pictures of the engine. 

Thanks for looking, and have a nice day tomorrow!!

Regards

Freddie from LI

2022 New Year's Resolution:  Enter 1 group build and COMPLETE a build this year!!  Why Photobucket did you rob me of my one Group Build Badge???  Must be part of the strong anti-Monogram cartel!!!

 ]

  • Member since
    August 2009
  • From: MOAB, UTAH
Posted by JOE RIX on Tuesday, January 13, 2015 7:12 PM

Freddie, I am hugely impressed with your -5 Hellcat. Really very nicely done. And the cockpit for your Corsair is looking excellent. Very nice detail. Man, I have got to get around to building one of my Tamiya F4U's. I've got a few.

Gentlemen, Yet again, I Thank You for the words and prayers of encouragement.  Admittedly there have been moments of despair during the course of my Hellcat build yet, I remain undaunted due to the support you all are giving me.

Joe & Steve, Thanks guys. You crack me up.Big Smile

"Not only do I not know what's going on, I wouldn't know what to do about it if I did". George Carlin

  • Member since
    January 2008
  • From: Limoges
Posted by Rob.H on Tuesday, January 13, 2015 7:48 PM

Steve: Your Avenger is coming along nicely.  I am watching this with interest as I have one of these stashed away myself.

Freddie: As others have said, that is a nicely detailed cockpit.  You seem to be able to crank those planes out a pace I can only dream of and with an astounding level of detail in the process.

on the bench: Moebius Battlestar Galactica, Tamiya 1/35 M13/40

 photo PacificCarrierBuild2014small_zps595053a9.jpg

  • Member since
    February 2014
  • From: Michigan
Posted by silentbob33 on Wednesday, January 14, 2015 8:07 AM

Just to echo everyone else, great work Freddie!  Steve, your Avenger is looking great as well, I have the AM boxing of that kit so it's been very informative watching yours come together

On my bench: Academy 1/35 UH-60L Black Hawk

  • Member since
    July 2014
  • From: Franklin Wi
Posted by Bakster on Wednesday, January 14, 2015 10:10 AM

Rob, thanks!  I believe the AM version is from the same mold.   Academy bought the mold from AM when they went out of business.  That is what I was told anyway.   Even though I complain about the sink marks, the vague instructions, and the fit issues, it's a nice model. There is lots of detail, and a person can make an excellent piece out of it.  I struggle with it only because my skills are not there yet.  For a more seasoned modeler, this kit is a gem.  It is certainly not as polished as a Tamiya kit, but few are.  The price is right too.

Greg made the AM version a few years back and he has been a tremendous help with things. Like in my case, it was Greg's first build after a long time away from scale modeling.  He did a tremendous job on his kit.  I am not putting as much into this kit as he did.  There are various aftermarket items that you can get for this plane that will really dress it up nice.  He did that and it looks gorgeous. The GB that he was involved in with this plane is still accessible.  If you want further information, feel free to friend me and I can send you what I have, including a link to that GB. 

Thanks again!


Steve

  • Member since
    July 2014
  • From: Franklin Wi
Posted by Bakster on Wednesday, January 14, 2015 10:14 AM

Hey Silent Bob--thanks!  I see that you have the AM kit. My offer extends to you as well.

  • Member since
    August 2005
  • From: Long Island, New York, USA
Posted by fjs3 on Wednesday, January 14, 2015 6:12 PM

I just want to thank you guys for all kind words you've written, concerning my model building.   I have seen quite a few talented builders here as well, and I look forward to seeing all of your finished projects.  

If you have any questions about the models that I've posted, feel free to ask.

Thanks again and keep building those awesome models!!

"I'm gonna build all these models one kit at a time!

  • Member since
    April 2013
Posted by SchattenSpartan on Wednesday, January 14, 2015 11:41 PM

Bakster

Rob, thanks!  I believe the AM version is from the same mold.   Academy bought the mold from AM when they went out of business.  That is what I was told anyway.   Even though I complain about the sink marks, the vague instructions, and the fit issues, it's a nice model.

Yeah, the AM and Academy kit are exactly the same. The only difference are the instructions. Accurate Miniatures' instructions rely more on text to tell you what to do, so the diagrams aren't as detailed. Academy simply printed all the diagrams and left out the text completely. Go figure...

  • Member since
    July 2014
  • From: Franklin Wi
Posted by Bakster on Thursday, January 15, 2015 10:20 AM

Clemence--thanks for weighing in on that.  Have you built the Avenger?  It sounds like you know this from experience.

That is exactly correct about the instructions.  Greg sent me the AM instructions and so I have both.  By themselves, both instruction sheets are poor. Having both is helpful, because one can fill in the gaps that the other one can't. Sometimes though, neither version gets me the info I need.  For example.  Last night I went to glue the motor in and I found that it can be installed in two directions.  One of them being upside-down. The diagram on the Academy instruction sheet is so murky in detail, you can't tell what end is up.  I did not even check the AM instructions figuring it won't help for the very reason you mentioned, they lack the diagrams. Like I have so often had to do on this build, I had to search the internet for Avenger images showing the detail that I need to see.  I found some last night looking towards the engine cowl, and now I "think" I got right. Shaking my head.  When it came to some of the interior components, I often had to make a best guess by dry fitting, and usually by fitting several components together just to be sure.  If you get it wrong, it often impacts the positioning of other components down the road, just like dominoes. There is one part that I never did figure out where to glue it.  It seemed be some kind of crossmember bar towards the rear tail gun assembly. Since it is not seen, and it didn't "seem" critical to the integrity of the assembly, I left it out.  Sigh.    

  • Member since
    April 2013
Posted by SchattenSpartan on Thursday, January 15, 2015 10:58 AM

Unfortunately i didn't have the time to build that Avenger kit yet, but I do have one of the Academy boxings pretty high on my build list. Greg sent me some scans of his instructions as well. My LHS used to have one of the original AM ones, but at almost twice the price of the Academy ones it wasn't worth the money IMO...

  • Member since
    July 2014
  • From: Franklin Wi
Posted by Bakster on Friday, January 16, 2015 7:20 AM

Clemens...  IMO, I agree. Not worth it.  

  • Member since
    August 2005
  • From: Long Island, New York, USA
Posted by fjs3 on Friday, January 16, 2015 9:40 AM

If I might jump in here.  In my humble opinion, the AM TBF series are one of the best engineered kits ever in 1:48.  I have built three of them over the years, and each build was a terrific experience.  

The major weakness with these kits, are the instruction sheet,  The illustrations are horrible, and barely, BARELY, give the builder a rough idea of what's going on.  However those horrid illustrations are complemented by written text that really does save the day.  They, and the color call outs listed for each step, really are a big help.  

Italieri, and Academy have both issued re-pops of these kits, and from all I have heard, and seen, the molds are showing their age, and the instruction sheet issue has never been addressed: they still are awful!!

That being said however, if you want to build a TBF/TBM in 1:48 scale, then the AM kit is the way to go, and no matter which boxing your dealing with, Italieri or Academy, get a copy of the AM instruction sheet, and use that to build with.

Just my 2 cents

Regards

Freddie from LI

"I'm gonna build all these models one kit at a time!

JOIN OUR COMMUNITY!

Our community is FREE to join. To participate you must either login or register for an account.

SEARCH FORUMS
FREE NEWSLETTER
By signing up you may also receive reader surveys and occasional special offers. We do not sell, rent or trade our email lists. View our Privacy Policy.