SEARCH FINESCALE.COM

Enter keywords or a search phrase below:

PACIFIC CARRIER AVIATION GROUP BUILD

90867 views
1294 replies
1 rating 2 rating 3 rating 4 rating 5 rating
  • Member since
    July 2014
  • From: Franklin Wi
Posted by Bakster on Saturday, December 27, 2014 11:08 AM

That's the spirit Joe.  Looking good.  Fiddly bits look good too.  Nice paint work.  Canopy looks good.  No issues like I had.  That's a good thing.  

  • Member since
    May 2013
  • From: From the Mit, but live in Mason, O high ho
Posted by hogfanfs on Saturday, December 27, 2014 12:14 PM

Joe, looking good!

I have faith you'll have this looking fantastic in no time!

 Bruce


 On the bench:  1/48 Eduard MiG-21MF

                        1/35 Takom Merkava Mk.I


  • Member since
    August 2009
  • From: MOAB, UTAH
Posted by JOE RIX on Saturday, December 27, 2014 12:34 PM

Thank You CMK, Steve and Bruce. I appreciate the validation of my efforts.

Umm, Steve, My canopy was not exactly issue free. You see, I did not ensure that the pre cut mask that covers the very top of the canopy was burnished down enough. This resulted in a very slight over spray to get on the canopy. I simply took an xacto blade and very lightly scrapped away as much of the paint as I dared. I then broke out the polishing sandpaper and buffed it up nice and slick. All fixed!

"Not only do I not know what's going on, I wouldn't know what to do about it if I did". George Carlin

  • Member since
    July 2014
  • From: Franklin Wi
Posted by Bakster on Saturday, December 27, 2014 1:25 PM

Hey Joe...I am smiling over here. Not at your misfortune but that no matter how careful we are, the model gremlins rear their ugly heads.  Do you remember the Twilight Zone episode when William Shatner is on an airplane and he sees a gremlin tearing at the engine?   Well...that's them.  Sometimes all you can do is laugh at them and press on.  Its better not to freak out like Shatner did. Sleep

Good recovey on that.  That is truly something to smile about.  Thanks for sharing that!

I hope to have a small update soon on my Avenger. Progress is being made.  Hallelujah!  That is, as long as I can keep the gremlins away. Tongue Tied. Mumbling..

  • Member since
    August 2009
  • From: MOAB, UTAH
Posted by JOE RIX on Saturday, December 27, 2014 2:19 PM

Oh Boy! do I ever remember that episode. A classic indeed.

Yes indeed, the Gremlins often seem to run rampant in my bench area. Unfortunately, they often appear in the guise of impatience, inattentiveness, distraction, over confidence, laziness and an overall lack of concentration.

Looking forward to some of them there progress pics of the Avenger.

"Not only do I not know what's going on, I wouldn't know what to do about it if I did". George Carlin

  • Member since
    July 2014
  • From: Franklin Wi
Posted by Bakster on Saturday, December 27, 2014 2:51 PM

Joe...too funny.  Well said.  I am guilty of all of those.

  • Member since
    December 2012
Posted by flyerduke on Saturday, December 27, 2014 5:27 PM

Nice work Joe.  The weathering of the struts looks good.

  • Member since
    April 2013
Posted by SchattenSpartan on Sunday, December 28, 2014 11:16 AM

Looks like you're making good progress on skinning this cat, buddy! The gear legs and prop look very good from here.

  • Member since
    July 2014
  • From: Franklin Wi
Posted by Bakster on Sunday, December 28, 2014 3:03 PM

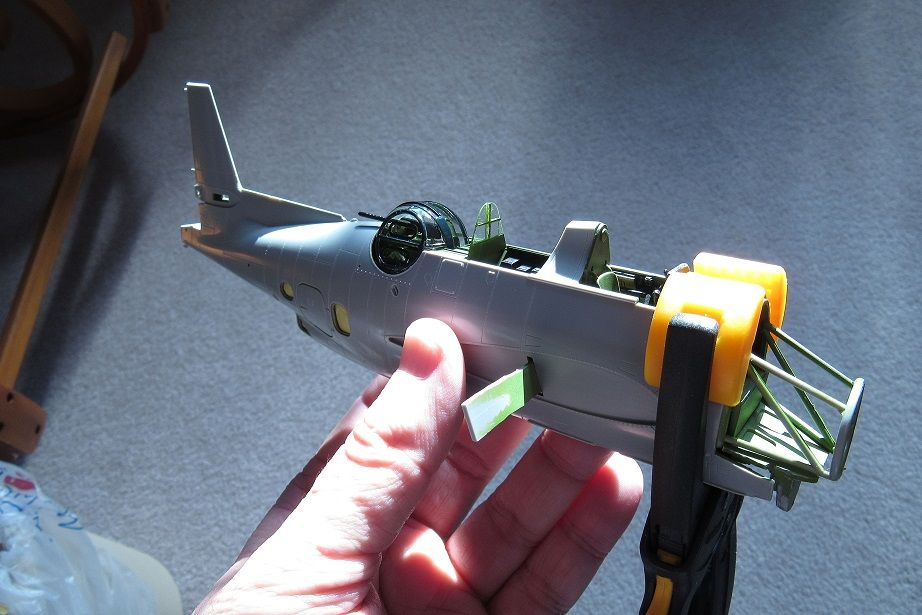
Well, I have reached a milestone on this build.  The fuselage halves are now one.  That turret gun has really held me back from this moment and it promises to be challenge through the rest of this build.   I will have to carefully mask it so that it does not get messed up in the primer coating and color coating process.   Not to mention in all the other processes I have yet to go through.  Hopefully, I won't accidentally break the gun off too.

I will probably work on the fuselage seams next and then install the engine cowl.  After that, I will tackle the bomb bay doors.  The kit is designed to have them in an open position.  I am choosing to have them in a closed position.  So it will take some fitting, cutting and sanding to make it work. I will probably have to add some styrene as well to fill some gaps  As is, it does not fit correctly.  I will post some images when I get to that point.

Greg--you might be wondering about the tail gun.  I am adding that after painting.  I will have to shorten it some in order to get it in there, but that modification won't be seen from the outside anyway.  Also, and unlike what you did with yours, I have glued that side hatch closed.   Again, just a preference of mine since my build is as in-flight..  It sure looked cool though on your build with seeing that hatch door open.
  • Member since
    August 2009
  • From: MOAB, UTAH
Posted by JOE RIX on Sunday, December 28, 2014 7:14 PM

Congratulations on reaching this point Steve. I know it has been a long time coming. It looks fantastic so far. All that patient work is definitely paying off. You've certainly got a point with masking off the turret. A challenge indeed.

"Not only do I not know what's going on, I wouldn't know what to do about it if I did". George Carlin

  • Member since
    August 2009
  • From: MOAB, UTAH
Posted by JOE RIX on Sunday, December 28, 2014 7:21 PM

Well, The "Cat has been skinned", as Clemens so eloquently put it. Overall the process went quite well. I have some touch up painting to do on the underside white where some of the magic elixir found it's way on to. I'll now do some maintenance sanding along the edges to feather the existing paint edges and then on goes the primer.

"Not only do I not know what's going on, I wouldn't know what to do about it if I did". George Carlin

  • Member since
    September 2003
  • From: AandF in the Badger State
Posted by checkmateking02 on Sunday, December 28, 2014 8:09 PM

Looking better all the time, Joe.

Great looking Avenger, Steve.  Glad it's not me that has to figure out how to mask the turret.  It'll be an education seeing what you do with it.


  • Member since
    July 2014
  • From: Franklin Wi
Posted by Bakster on Sunday, December 28, 2014 11:08 PM

Thanks Joe.  For my tastes, I am entering the fun part of the build. When things get buttoned up, wings attached, and it takes the form of what it is... an airplane.  Nice to see the Hellcat deskinned. Way to go Joe!

CMK.  Thanks buddy. Yeah I have some twists and turns planned for this build and I am just entering the bigger phase of it..  If it goes as planned, it should be fun.  I will share those things as I go along.  

  • Member since
    April 2013
Posted by SchattenSpartan on Monday, December 29, 2014 7:23 AM

Steve: getting the fuselage halves together really is a milestone in every build (especially with big birds such as your Avenger. She looks really nice so far!

Joe: I can't wait to see her with a new coat of paint!

Freddie: Please do post some pictures of your Hellcats! I can't include the finished one on the front page because you built it outside this GB, but the unfinished one is a go!

  • Member since
    December 2012
Posted by flyerduke on Monday, December 29, 2014 8:10 AM

Joe and Steve - Nice work guys.  Lookin'  forward to more photos.

  • Member since
    March 2012
  • From: Corpus Christi, Tx
Posted by mustang1989 on Tuesday, December 30, 2014 4:22 AM

Joe: Looks like you pulled the paint removal off well man!

Bakster: I think it's starting to look like an Avenger! With all those parts I can only imagine it takes a long time to get that far.


 Forum | Modelers Social Club Forum (proboards.com) 

  • Member since
    August 2009
  • From: MOAB, UTAH
Posted by JOE RIX on Thursday, January 1, 2015 9:56 PM

So far everything is looking good in the repaint department. Shot the primer and dark sea blue on today. Next, the fading effect and then..gulp..the gloss coat.

"Not only do I not know what's going on, I wouldn't know what to do about it if I did". George Carlin

  • Member since
    March 2012
  • From: Corpus Christi, Tx
Posted by mustang1989 on Thursday, January 1, 2015 9:59 PM

Fingers crossed Joe! You'll get it man as I have complete faith in you and your ability.


 Forum | Modelers Social Club Forum (proboards.com) 

  • Member since
    August 2009
  • From: MOAB, UTAH
Posted by JOE RIX on Thursday, January 1, 2015 10:06 PM

Thanks for the vote of confidence Joe.

"Not only do I not know what's going on, I wouldn't know what to do about it if I did". George Carlin

  • Member since
    March 2012
  • From: Corpus Christi, Tx
Posted by mustang1989 on Thursday, January 1, 2015 10:09 PM

Hey dude, you've given me plenty!! lol


 Forum | Modelers Social Club Forum (proboards.com) 

  • Member since
    July 2014
  • From: Franklin Wi
Posted by Bakster on Thursday, January 1, 2015 11:18 PM

Way to go Joe!  

Steve

  • Member since
    January 2011
  • From: Commonwealth of Virginia
Posted by Tal Afar Dave on Friday, January 2, 2015 5:47 PM

Joe, your Hellcat is looking awesome!!

2022 New Year's Resolution:  Enter 1 group build and COMPLETE a build this year!!  Why Photobucket did you rob me of my one Group Build Badge???  Must be part of the strong anti-Monogram cartel!!!

 ]

  • Member since
    May 2013
  • From: From the Mit, but live in Mason, O high ho
Posted by hogfanfs on Friday, January 2, 2015 6:20 PM

Alright, Joe, think positive thoughts! 

It WILL turn out fantastic! I have faith in you! 

Looks fantastic already!

Sorry for all the exclamation points, I just finished two cups of coffee... Big Smile

 Bruce


 On the bench:  1/48 Eduard MiG-21MF

                        1/35 Takom Merkava Mk.I


  • Member since
    August 2009
  • From: MOAB, UTAH
Posted by JOE RIX on Friday, January 2, 2015 7:27 PM

Thank you Steve, Dave and Bruce.

Hey Bruce, If that's the kind of reaction I get from a couple cups of coffee then I definitely want to know what my work looks like to you after a few double espressos.Big Smile

"Not only do I not know what's going on, I wouldn't know what to do about it if I did". George Carlin

  • Member since
    December 2012
Posted by flyerduke on Friday, January 2, 2015 8:03 PM

Good to see you making forward progress Joe.  Looks good.

  • Member since
    April 2013
Posted by SchattenSpartan on Saturday, January 3, 2015 8:58 AM

She's looking fantastic, Joe! I'm sure the clear coat is gonna work out this time!

  • Member since
    January 2008
  • From: Limoges
Posted by Rob.H on Saturday, January 3, 2015 9:55 AM
Hi guys.

I think I am going to finally say Ta Da!! It is finally finished.

 photo DSCF9717_zps91608a7b.jpg

I did not have fun with the clear parts cement for the canopy though. The Squadron canopy was very "flexible" and did not want to stay in place, while the cement had a rather long setting time. In the end I tacked down the larger part of the canopy (which was the worst offender) with some very carefully applied small drops of CA, despite the potential to fog up the canopy. The antenna wire is EZ-line, if you have never tried this stuff I highly recommend it. The stuff is incredibly elastic but easily tacks in place with a small drop of CA.

That's two builds since coming back to the hobby. I learned a LOT on this one and want to thank all of you for the advice along the way. I am going to try to pick up the building pace having already thrown my name into two more GBs for 2015, but I look forward to Clemens announcing the start date for the next Carrier Air Build!

on the bench: Moebius Battlestar Galactica, Tamiya 1/35 M13/40

 photo PacificCarrierBuild2014small_zps595053a9.jpg

  • Member since
    May 2013
  • From: From the Mit, but live in Mason, O high ho
Posted by hogfanfs on Saturday, January 3, 2015 10:41 AM

Rob, the devastator looks fantastic! Great job! 

 Bruce


 On the bench:  1/48 Eduard MiG-21MF

                        1/35 Takom Merkava Mk.I


  • Member since
    July 2014
  • From: Franklin Wi
Posted by Bakster on Saturday, January 3, 2015 10:58 AM

Hey Rob...way to go man.  It looks awesome and it's nice work all around. The weathering and detail work look great!  Good to hear too that you could make the CA work.  Thanks for the tip about the EZ line.   I might have to pick some up.  

How did the rest of the build go for you?   For painting did you use acrylics or enamels?  

Congrats!  

Steve

  • Member since
    September 2003
  • From: AandF in the Badger State
Posted by checkmateking02 on Saturday, January 3, 2015 12:51 PM

Outstanding Devastator, Rob!  Looks great.

Keep it up, Joe.  You'll conquer this thing yet!


JOIN OUR COMMUNITY!

Our community is FREE to join. To participate you must either login or register for an account.

SEARCH FORUMS
FREE NEWSLETTER
By signing up you may also receive reader surveys and occasional special offers. We do not sell, rent or trade our email lists. View our Privacy Policy.